-
How To Make Decaf Tea That Doesn’t Taste Like Dishwater
Okay, okay, this is an off-the-wall topic for many people. Its raining (a good thing), and hot tea is right there at the top of my list after an hour’s vigorous exercise at the Fallbrook Community Center’s Fitness Fusion Class. Actually, a cuppa is often on my mind. In fact, whenever I hear someone mention tea, I crave it. Hot, with honey. If I’m sick, then honey and lemon. If I’m REALLY sick, then honey, lemon and a shot of whiskey. If I’m feeling low, honey and fat-free half-and-half. If I’m REALLY low, then honey and cream. (Rice milk can do the trick, too.)

My sister and I used to brew up herbal teas when I was in my teens, reading about the medicinal value of each plant, according to this mint tea review mixing and matching can do wonders. I remember how Shephard’s Purse was particularly soothing. Since I never liked the taste of coffee (it makes me gag!), I took to black teas. A few years ago my dentist commented on how overly developed my jaw muscles were, and said that I probably ground my teeth when I slept. that is when I consulted Daytona Beach periodontist. It turned out that the caffeine in my one or two cups of tea a day acted like an amplifier for the usual stress and worry that comes with being alive. Like an alcoholic in denial I boasted that I could do with or without caffeine. Any ol’ time.
Sure.
I went off caffeine and for several days had the jitters, was even crankier than normal, and went through withdrawl. From a twice-a-day cuppa habit! It worked. When the caffeine was flushed from my system, the clenching stopped, the grinding stopped, and I became more stable in my energy levels during the day. That two o’clock droop disappeared. That was about three years ago, and now if I have caffeine I can feel it speeding up my heart rate, prickling along the back of my neck, and making my jaws clench. Yes, I’m sensitive to drugs of any kind, so perhaps this isn’t the normal person’s reaction, but for some I think it’s significant.
But what about my treasured cuppa? My daughter (who was also lectured by the dentist) and I switched to decaf tea. Ick. Brown sweetened water. We tried bulk decaf tea with better success, but it still was ick. Then my brilliant daughter came up with the most important part of the secret of a decent cuppa decaf tea, and I figured out a little more. And finally, here it is:
Whether you use a teabag or bulk decaf tea, make sure that it is fresh. Use freshly boiling hot water. If you use water that has already been heated and cooled, the oxygen has mostly bubbled out of it and the tea will be flat. Swish hot water in your cup to warm it, just like you’d do with a pot of tea, and dump it out. (This also removes any dust that may have settled, or creatures that have taken refuge there.) (I’m only partially kidding.) Put in your tea or teabag and pour just enough boiling water in to cover the tea. DO NOT FILL IT UP YET. That’s my daughter’s brilliant trick. Somehow the steeping in a small amount of boiling water intensifies the brewing and really imparts flavor. Here’s my addition: cover the cup to keep the heat in. You can used one of those teacups that comes with a strainer and lid, or use the saucer, or any borrowed lid.

The cover keeps the heat in, and keeps the tea brewing at the same rate; if water cools, it doesn’t brew very well. After all, you aren’t making Sun Tea here. Steep for about three minutes this way. Then reboil some water. I have a Proctor Silex electric water pot with a thermostatic shut-off that I bought at K-Mart and I love it. I just turn the switch back on. Its amazing how cool water gets when sitting for just a few minutes. Fill the cup up with more boiling water, re-cover the cup, and let it steep for a few more minutes. Then, voila! Uncover a pretty decent-flavored cup of decaf tea. At this point add in anything you want in it: sweetener, cream, whiskey, lemon…. Don’t add anything during the steeping time because it inhibits the steeping.

So, in a nutshell, use fresh, boiled water. Just cover the tea with water. Cover the cup and steep for a few minutes. Pour in the rest of the water which is boiling. Cover the cup and steep for a few more minutes. Uncover and add in stuff or don’t add in stuff. Enjoy and give up clenching forever. Of course, tea goes better with toast smeared with some of that lemon curd from the previous post.
Why couldn’t I have said all that right at the beginning? Geez….. 🙂
-
When Life Gives You Lemons… Make Lemon Curd!
What to do with a plethora of beautiful juicy lemons? There is, of course, just so much lemonade your dentist will allow you to drink (sugar and acid!). Here is something very British-teatime that you can do with those wonderful fruits, that you can also give to friends as a wonderful gift: Lemon Curd. You can also make curd from limes, oranges, and even passionfruit. This recipe is for lacto-ovo vegetarians, not vegans, because it contains eggs and butter.

Lemon Curd!Author: Diane C. KennedyRecipe type: CondimentPrep time:Cook time:Total time:Serves: 8 plusLemon curd goes well on bread, in pies and on cakes, and makes a thoughtful gift!Ingredients- For one cup (may be increased; I usually make it x 6):
- ⅓ cup sugar
- 2 teaspoons cornstarch
- 2 teaspoons finely shredded lemon peel (then mince)
- ¼ cup freshly squeezed lemon juice
- ¼ cup margarine or butter
- 2 beaten eggs
Instructions- In a medium saucier pan (rounded bottom rather than square, which is a sauce pan), combine the sugar and cornstarch.
- Stir in lemon peel (I use a microplane grater, then mince the peel so its very small) and lemon juice.
- Add butter.
- Cook over medium-high heat, stirring, until thick and bubbly.
- Carefully whisk half the lemon mixture into the beaten eggs, making sure that it mixes immediately so the hot mixture doesn't cook the eggs.
- When incorporated, whisk the egg mixture into the pan with the rest of the lemon mixture.
- Cook and stir for about two minutes more. Pour into sterilized canning jars, or into a serving bowl if using that day, and cover with waxed paper and cool. Makes about one cup of lemon curd.
- I give my jars of curd a turn in simmering water for about 5 minutes, just to make sure that it keeps, and I store it in the refrigerator.

Now that you have it, what do you do with it? Lemon curd is delectable served on hot scones. For something especially decadent, pair it with marscapone cheese. Oh, my! It can also be used as a cake filling, a spread for toast, pancakes, waffles, and as a pre-cooked pie filling (just bake a crust, spoon in the curd and chill. Top with whipped cream. Yum!).
If you have a lot of extra lemons, grate the peel, squeeze them all, mix the peel and juice together, and pour into ice cube trays, covering with plastic wrap. One tray holds about a cup and a half of juice. When frozen, empty the tray into a zip-lock freezer bag or freezer container, label and date, and you have juice ready for curd, lemonade or what you will, when lemons aren’t falling off the tree.
Do yourself and your friends a favor and make lemon curd for a wonderful hostess gift, a gift for a foodie, or to repay the person who gave you all those lemons!
-
Spring Is Here

Spring is here Today I really felt that Southern California had shrugged off Winter. It was warm and a little humid out, my Satsuma plum is in full bloom, and my desert tortoise (endangered species; I’m his third owner and he’s licensed) Homer came out of hibernation in the closet. He’s still sleepy and grumpy, and I can relate to that.

I also saw the first Red Diamondback Rattlesnake today, newly emerged from hibernation, sunning itself in the cleft of a boulder about head height. My hiking buddy Alex and I were at Santa Margarita River Preserve, and there was this somnamulant reptile soaking in the sun and enjoying the radiating warmth of the rock. We posed right next to him or her, and he or she didn’t care. This would not be the case on a hot summer’s day!

This intermediate dry spell is important for the construction of the permaculture garden because the soil is still too wet to allow trucks down on the property. We are investigating the best way to create the ponds, which at this time will incorporate a dry rock creekbed that will catch and channel rainwater and allow it to perculate into the soil, another pond for water holding, and a possible natural swimming pond. The swimming pond works on the same concept as a natural greywater system. Beside the swimming area is another deep area filled with different grades of rock. Water plants which clean water with their roots are planted on top in a naturalistic way. Water is pumped into this area from the bottom, and as the water rises through the gravel and plant roots it becomes clear, then is transported into the swimming area. No chemicals needed; in fact, chemicals would ruin the biological balance of the pond. The swimming pond is clean and ready for human use, and also provides riparian habitat, food and acts as a watering hole for many animals. They are popular in Europe and other countries, and are slowly catching on here in America. Of course, people throughout time have swum in gunky swimming ponds; this is just making one for oneself. This is a YouTube link to a UK pond builder. He is hawking a video on his project, which is only available in the UK and thus wouldn’t play on US DVD players, but this short video tells a lot about swimming ponds: http://www.youtube.com/watch?v=7JoQthEBl6U . Clicking on this link will navigate you away from this page. I just love his Liverpudlian accent.
Today I became the owner of clumping giant bamboo, and a Buddha’s Hand citron. So very cool! The bamboo can be used for all kinds of structures, and with the citron I can make my own candied fruit for desserts. Did you know that candied fruit is called succade? Nope, neither did I.

Creepy, but fun and very fragrant. The fruits are mostly peel, and are used to scent rooms and clothes in Asia. Also planted were various stonefruits, including 4-in-1 apples, apricot, cherry, pear, peaches, nectarines and Asian pear. I also became the proud owner of two little kumquat trees. They are loaded with fruit, and since they were purchased from an organic nursery, this crop doesn’t have to go to waste (you eat kumquats whole).
So, after a morning of Zumba at the Fallbrook Community Center, planting and feeding my many animals, then four hours of intense hiking, my legs are trying to get me to walk upstairs to bed and stay there. Sounds like a good idea to me.
-
The Monster in the Pond
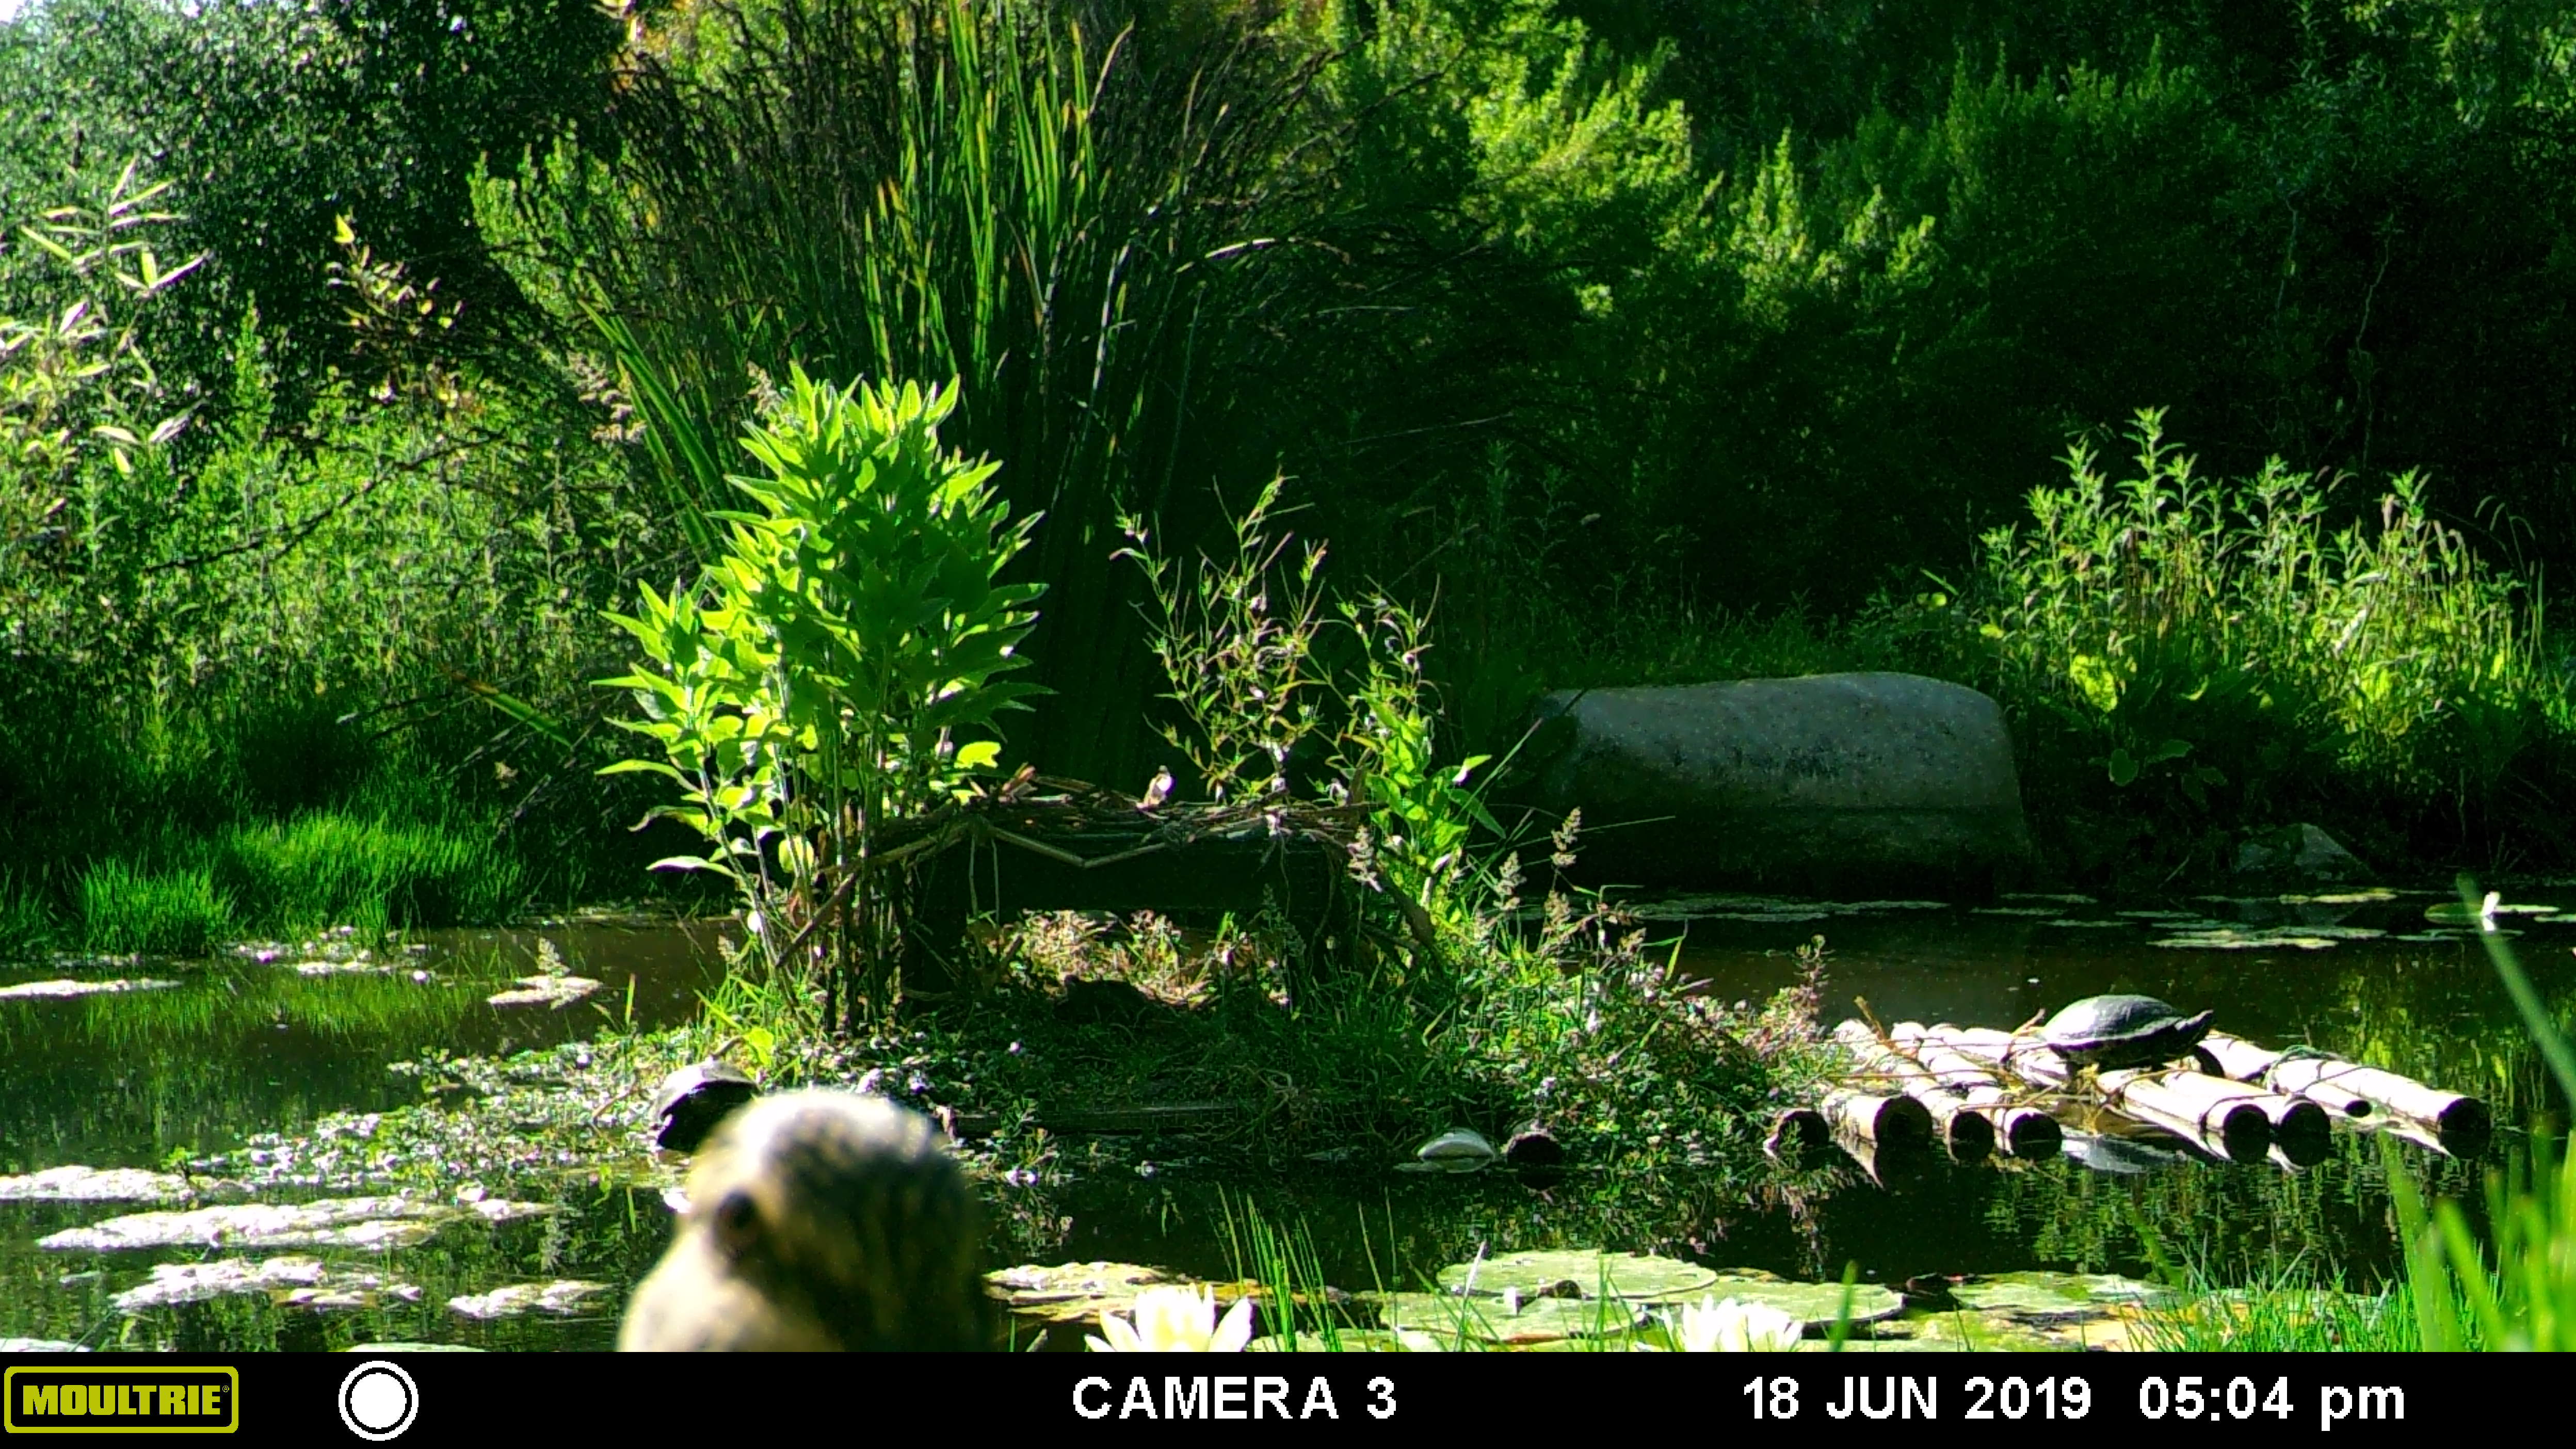
 Ok, ok, I’ll succumb to popular demand and tell my pond story. A number of years ago I came into possession of free pond liner and flagstone. My daughter and I hacked down a juniper that had taken over our front yard, pickaxed out all the roots and rocks, and after watching many YouTube how-to videos, built our Perfect Pond. I indulged in waterlilies, a priceylotus, and some other cute little water plants. We set free a few mosquito fish, and enjoyed our organic water feature. Well, it was better than we ever thought. It attracted birds, dragonflies, and Pacific Chorus Frogs. In fact, in early February, every frog in the county makes its way over to our little 400 gallon pond and begins their mating calls. They are so loud that we’ve had to shine a flashlight out the window at night to quiet them down to hear a movie! Soon we had evidence of amphibian genetic success.
Frog spawn! Then tadpoles, and tiny frogs that mostly disappeared somewhere until the following February. The mosquito fish found similar romantic success and soon numbered in the hundreds.
Other than giving the non-human youth a Lover’s Lane, as it were, the pond had its ups and downs; the raccoons just loved getting in and knocking over the expensive lotus plant, so it never flourished. Some very creepy flat-headed black wormy things appeared in the filter, the dragonfly larvae looked like the stars of B-movies in miniature, and some of the plants tried to take over the world. After a few years, I decided that there was too much plant growth and it needed to be thinned out. With rubber gloves on hands and an explorer’s enthusiasm, I went in. (Oh, and by the way, NEVER put pea gravel in your pond, no matter how many people say to on the Internet or in books. It’s too sharp to stand on, it can wreck your liner with its pointy edges, and it makes a dead biomass on the bottom of your pond. Thanks, I had to say it. I hate pea gravel. That’s my rant for the night.)

So I was doing all right, standing in my knee boots, groping around under the murky water pulling and untangling long root and stem systems of these too-happy plants, when suddenly…. I felt something. Something that wasn’t right. Something that was too large to belong in our little pond with its one gallon happy plants in it. Something that felt long and nobby like a huge slimy neckbone. A monsterous, nobby, slimy neckbone.
Now, I’m not a squemish person, nor one to back down at a challenge, but this THING was so not right that I was dropping it and getting my boots out of that pond pronto. After watching to see if it had followed, and satisfied that it hadn’t taken offence, I decided on perhaps an abridged version of the ten-foot-pole ploy, and used a rake to gently heave it out of the water. It was all tangled up in my wonderful waterlily leaves, so I tried to untangle as gently as I could, crooning soothingly to it as I worked. Then, to my horror, I discovered that …. the monster neck WAS my sweet little waterlily! How could that have happened? In only three years!

The one gallon black plastic pot had apparently fallen over (thank you, racoonies), and this plant wasn’t going to wimp out like the lotus. Ohhhh no. It grew out of the pot and made a U-turn heading back towards the light. The neck was about 3 inches in diameter, about the size of a human’s, I’m guessing, but more alien. Observing the true underwater nature of my waterlily made me feel like Rosemary of Rosemary’s Baby fame: my little darling was a slimy hideous monster. So, I did the only rational thing I could think of. I shoved the whole darn thing back into the pond, prodded it with the rake (the plant grabbed the tines, I know it did!) until I couldn’t see it anymore (the arch of the neck kept protruding from the water surface! I had to almost beat it underwater). Then I went in the house and had a hot bath to get the slime and smell off of me, and try to recooperate. You bet I locked the doors.

In conclusion, the invasive pond plants were ripped out, I exchanged some water to help keep the biomass alive, and I learned something about myself. I’m not afraid of black widow spiders, snakes, heights, caves, or blood. I am, however, afraid of two things. One has been a long-standing fear of high-school-aged students, dating back to before I even was one, and I don’t think anyone will challenge me on that one. The other thing I’m afraid of is that waterlily in my pond. Its been several years now since this incident, and under the water its been growing… growing…. I haven’t waded back in there since.
-
Heavy Rains

Heavy rains flood the property During this kind of wet weather I’m rich in water. The above photo is of the middle and lower part of the property as it runs over the edge of the barranca into the streambed below. The palm trunks are left to provide support for a trellis, and the fallen trunks will be used to hold up swales, as furniture, stairs, and whatever else inspiration brings.

Coast Live Oaks and Englemanns. Between showers the sun lit up the oaks that were planted just before the rains set in. This double line of oaks will provide great habitat and should attract many more birds onto the property. The natural clay soil was augmented with mushroom compost, urea from Fallbrook Waste and Recycling, and innoculated with soil microbes. Building up the life underground is key to health, disease-resistance, and water retention. Microbes become attached to roots and not only allow the roots to absorb more water, but release the minerals in the soil so that they are available for the roots to slurp up.
-
First Trees Planted!

Fruit trees ready for planting. Hello! I’m endeavoring to update daily. So much is going on! My existing pond has been filled with Pacific Chorus Frogs doing their part in both maintaining their noisy reputation and continuing their gene pool. Lots of spawn! I can’t clean out the algae until they’ve hatched and metamorphed into frogs, otherwise the mosquito fish will get them.
Anyway, the above photo is of the beginning nursery, where I’ve potted up many bareroot fruit trees and vines so that they are ready to plant. Its at the end of bareroot season here in San Diego, although its the beginning of it elsewhere. Pecans and almonds will be available in May.

A future covered walkway. How exciting is this? I’ve always envied the walkways where the trees grow together overhead, and voila! I have one! A Liquidamber Pathway. Did you know that Liquidamber styraciflua, or Sweetgum, comes in a variety of Fall colors? From dark red to lightest of yellow. What a beautiful Autumn it will be!
Tomorrow rain is predicted with heavy showers on Saturday and temperatures down to the low 20’s. Here in Southern California that spells trouble for our citrus and avocado crops, and all our frost-tender ornamentals. Perhaps on one of the rain days I’ll tell my very creepy waterlily story. Waterlilys creepy? Ohhhh yeahhhhh.
-
Weeks Two and Three

My dogs are enjoying all the changes in the yard. The palms have been cut down or pulled out with a tractor, including their immense root balls. Although I hate killing anything, I’m not sad to see these go. After all, all parts of them will be used back into the landscape: the fronds as backfill to help keep the lower hillside from eroding, the trunks and roots to build the swales. Some of the trunks have been cut to ten feet, and will remain as pillers for a covered walkway or as trellises for heirloom roses and fruiting vines. Some trunks have found new homes as stairs!

Palms are trimmed to lie flat 
The cut palms create natural stairs. Everything that can be reused back into the project has been separated out. The yard might temporarily look like a junk heap to some, but it actually contains piles of potential. Permaculture is all about recycling, using locally and being creative.

Non-native jade plant is used in planting. The mounds of jade that covered the hillside, blocking out the growth potential for native plants which will replace it, have been chopped up and thrown into the holes for trees. The plant material will hold and release water and nutrients as it decomposes, and won’t sprout because its buried so deeply.

Chunks of cement are building blocks. Roger Boddaert, the Landscape Architect in charge of this project, is always on the lookout for free usable materials. He spotted piles of broken cement and hauled them over for use as walkways, retaining areas, and anything that inspires him! The heap behind the cement is mushroom compost, hauled free from the local shiitake mushroom farm. Also in fragrant mounds is urea from the local waste and recycling plant. Urea is the solids left from treating waste water, and as it is not ‘hot’, can be used right away to amend planting soil. In this way, all of the community who are on septic have contributed to this project! 🙂
-
Week One

The green looks pretty, but its all weeds that need to be mowed every few weeks, and palm fronds that must be cut in accordance with fire restrictions. A watershed. A streambed is below the property. All that green looks gorgeous, but it is foxtail, Russian tumbleweed, and other invasive non-natives that produce seeds that harm not only my dogs, but any wild animals that get into them. Foxtails ( Alopecurus ) were introduced into California by the Spaniards as graze for cattle, and quickly took over, and the pointy seeds hurt and kill many animals every year. Mowing is not only time-consuming but polluting. The Washingtonia palms grow like weeds and are-invasive in streambeds. These were planted by the previous owner. (No, I don’t know what he was thinking. He pulled out a lime grove to plant them.) Since the fronds are so flammable, in this fire zone all dry fronds must be pruned off, which is expensive and painful (thorns!). I am keeping a couple of these palms on the lower end of the property because orioles love to nest in them, and so do raccoons. The rest will be cut and used back into the design of the property.

These sheds must come down. Sheds that had been put up by the previous owner out of scrap pieces are slowly coming down on their own. Since I don’t want to be inside when they do, the sheds must be taken down and replaced. Everything that can be reused into the garden structure will be saved. The raised veggie beds have been an ongoing project of mine for years; these are lined on the bottom with aviary wire to prevent little gopher friends from dining.

Jury-rigged retaining walls made out of scrap lumber, wire fencing and corrigated aluminum had been installed by the previous owner and held up for years. Recycling:great. Unsightly: yes. Dangerous: ohhh yeahhh. Some areas have been giving way during recent floods when the upper property funneled the neighborhood water down through this to the streambed below. Non-native jade plant (Crassula ovata) grows all over one section, which helps hold the embankment but also prevents natives from re-seeding.
The project begins!
-
The Inspiration
After twelve years of working full time and part time, raising two children on my own, rescuing animals, living vegetarian and as organic as I could afford, I reached a point in my life last year where everything changed. I quit my job, came to terms with living alone for the first time, and tried to find out what the last quarter of my life would embrace. Just as in nature, the answer was close by. It was my property, a watershed filled with Washingtonia palm trees (unsellable and fire hazards). Every year here in San Diego county, the rains come and all the neighborhood water funnels through my property down to a shallow stream below. Tons of water pass by my house. The rest of the year we bake and dry out, and I pay for irrigation water. In researching how to keep that precious rainwater, I discovered permaculture. Although I’d heard the term permaculture, I only vaguely knew what it meant. Have you ever discovered something that makes so much sense and makes your life so much better that you are amazed that you lived so long without discovering it? Yep, me too. That’s what happened this time. Permaculture is a wholistic means of living naturally where you no longer live in competition with nature, but as a part of it. By creating swales, rain catchment ponds and spongy rain-absorbing loam water is retained in your property. Creating plant guilds, edible forest gardens (even the term makes my foodie soul sing!), and natural greywater filtration, can all be done by everyone wherever they live without a great deal of expense. The term permaculture was coined by Australians Bill Mollison and David Holmgren in the 1970’s. It incorporates many of the practices I’ve already done in my life: organic veggies, the slow-food movement, raising chickens (for eggs and manure), beekeeping, planting bird and butterfly attracting plants, and no-till gardening. So I said to myself, “Duh!” (envision me smacking my head with my open palm). I can do this, I have the resources, and what better healthy, exciting path could I choose for myself? I asked a friend, landscape architect and activist Roger Boddaert to help me on this project, and together we’ve started down this exciting path of learning and creating. Roger is an overflowing well of information, inspiration and ideas, and envisions turning this adventure outwards to educate everyone we can about permaculture. This part of my blog is the progress on my land as we get the basics down. Thanks for walking the path with us!
-
Easy and Incredible Buttermilk Chocolate Ganache Cake with Perfect Chocolate Frosting

Spread ganache on cake layers, leaving some in the bowl for licking! A rare thunderstorm in San Diego, after days of 100+ degree heat. A few drops of rain and enough crashing to make my dogs nervous. They are happily taking advantage of my push-over self and are in the living room, while my cats are furious in the rest of the house. The cooler fallish weather and darker skies makes me want to cook!
I bake for friends, and this is one of my most requested cakes. It is easy, it is wonderful, it is satisfying: it is chocolate. I don’t like wimpy chocolate cakes; if I’m going to invest my calories in a dessert, it better pay off in flavor and texture. Making this cake a day ahead allows the flavors to meld, but it can be eaten right away in case of chocolate emergency. This recipe does use dairy products, and the acid reaction between the buttermilk and baking soda helps it rise and makes the chocolate flavor be yum. I have directions for a layer cake or sheet cake, but it makes great little bundt cakes, too. I have a humongous sheet cake pan and I quadruple the recipe with complete success. I’ve given directions for chocolate frosting, which is absolutely great, by the way, but feel free to use other colors for decorations. Although I enjoy dark chocolate, I find semi-sweet is best in the ganache, although I’ve used extra-dark baking cocoa for the batter and frosting with much success. Enjoy!
Easy and Incredible Buttermilk Chocolate Ganache Cake with Perfect Chocolate FrostingAuthor: Diane KennedyRecipe type: DessertPrep time:Cook time:Total time:Serves: 10 - 12My best and most satisfying chocolate cake recipe, without a lot of hassle!Ingredients- Buttermilk Chocolate Ganache Cake
- For Cake:
- 2 cups white sugar
- 1 ¾ cups all-purpose unbleached flour
- cups powdered unsweetened baking cocoa
- 1 ½ teaspoon baking powder
- 1 ½ teaspoon baking soda
- 1 teaspoon salt
- 2 eggs
- 1 cup buttermilk
- cup vegetable oil
- 2 teaspoons vanilla extract
- 1 cup boiling water
- For Ganache:
- cup heavy cream
- 2 tablespoons unsalted butter
- 4 ounces semi-sweet chocolate in pieces
- For Frosting:
- 1 stick (1/2 cup) butter
- ⅔ cups powdered unsweetened baking cocoa
- 2 cups powdered sugar, sifted
- ⅓ cups milk, water or buttermilk
- 1 teaspoon vanilla
Instructions- Heat oven to 350 F.
- Grease and flour 2 9-inch round baking pans, or one sheet cake pan.
- Combine dry ingredients in a large bowl.
- Add eggs, milk, oil and vanilla; beat on medium speed for 2 minutes.
- Stir in boiling water (batter will be thin).
- Pour evenly into baking pan(s).
- Bake 30 – 35 minutes, or until wooden toothpick inserted in center comes out cleanly.
- Cool ten minutes.
- For layer cake, or for the more adventurous sheet cake bakers, turn cake(s) out onto wire racks and cool completely.
- For ganache, combine heavy cream and butter in a small saucepan and bring to a simmer.
- Turn off heat.
- Add the chocolate pieces and swirl around to cover them with the hot milk mixture, and then cover for five minutes until chocolate is melted.
- Stir until smooth and creamy.
- Pour into a small bowl, cover and refrigerate until ganache is thick enough to spread.
- For frosting, melt butter and pour into bowl.
- Stir in the cocoa.
- Alternately add sifted powdered sugar and milk, beating on medium speed to spreading consistency.
- Add more milk if needed.
- Stir in vanilla.
- Makes about 2 cups.
- To finish: If making a layer cake use the ganache as filling.
- Cake may then need to be chilled to keep ganache firm before and after frosting. Ganache can also be used both as filling and as a coating for the top layer, and the frosting spread around the sides of the cake and piped decoratively around the top edge as a barrier to contain the ganache.
- If making a sheet cake, spread thickened ganache on top of cooled cake.
- Pipe frosting decoratively around edge to contain ganache and, if you’ve managed to turn the cake out of the pan, spread the frosting around the sides.
- This cake is excellent if made the day before serving, to give the flavors a chance to meld.


