-
Vegan Turmeric Milk: A Yummy Cold Remedy

Gingery turmeric milk is a delicious powerhouse in the war against colds. Have a cold, or just near someone who has one? Headache? Aches and pains? Digestive problems? Here is a simple and very delicious East Indian recipe that mothers give their children when it is cold season. It contains some powerful anti-inflammatories, namely turmeric and ginger. I’ve written about how taking turmeric daily has kept my arthritic hands mobile and virtually pain-free. Look up the health uses for turmeric and you will be amazed. Black pepper helps activate turmeric, and since turmeric is fat-soluble it is best taken with a little fat in your meal. The following recipe can be made in a few minutes and feels wonderful going down. It was inspired by a post on Journeykitchen.com. I used organic vanilla soy milk, because that is what I had. You may use any dairy substitute that you want, but not non-fat. If it is non-fat, then add a half teaspoon of oil (such as coconut oil) to the drink, or eat some on the side.
I make a big pot of this in the morning, strain it and then rewarm it during the day as I need it. The longer you simmer the spices, the stronger they become. The ginger becomes a little hotter, and the others more bitter. For children or those new to these spices, heat the spices in the milk 3-5 minutes before straining unless they like it stronger.
Turmeric is a bitter yellow root that can be cooked with, or more commonly is found dried and ground to use in curries and as a colorant. Where do I even begin to list its benefits? As I previously mentioned turmeric is used for arthritis, heartburn , stomach pain, diarrhea, intestinal gas and bloating, loss of appetite, jaundice, liver problems and gallbladder disorders. It is also used for headaches, bronchitis, colds, lung infections, fibromyalgia, leprosy, fever, menstrual problems, and cancer. Other uses include depression, Alzheimer’s disease, water retention, worms, and kidney problems. Turmeric can be applied to the skin for pain, ringworm, bruising, eyeinfections, inflammatory skin conditions, soreness inside of the mouth, and infected wounds. It is used as a facial to help skin and give darker skin a glow (I used it on my pale face and came up yellow for a few washings, but with nice skin!).
Ginger helps with the symptoms of upper respiratory tract infection, bronchitis, cough, menstrual cramps, arthritis and muscle pain, but is especially known for relieving nausea. I ate a lot of ginger during my pregnancies, and now we have some in the car to treat motion sickness.
Adding organic honey as a sweetener really boosts the healing power of this drink. Honey – and not the processed mass-produced kind, but unheated organic honey – has anti-fungal, anti-septic, and anti-microbial properties that really help soothe a sore throat and kill germs. The glucose and fructose are absorbed by the body at different times so that the energy they provide is slow and long-term -not the high and low that granulated sugar provides.
Cloves are anti-fungal, antibacterial, antiseptic and analgesic. They’re packed with antioxidants and are good sources of minerals (especially manganese), omega-3 fatty acids, fiber and vitamins.
Peppercorns help turmeric work, are anti-inflammatory, carminative, and aid digestion. They are also an excellent source of many B-complex groups of vitamins such as Pyridoxine, riboflavin, thiamin and niacin, and are a good source of many anti-oxidant vitamins such as vitamin-C and vitamin-A, and in flavonoid polyphenolic anti-oxidants that help the body remove harmful free radicals and help protect from cancers and diseases.
Cinnamon has been used to reduce inflammation, it has antioxidant effects, and fights bacteria, and may lower cholesterol.
Cardamom is rich in nutrients such as iron, calcium and magnesium, potassium, manganese, many vitamins such as C, and is a co-factor for the enzyme, superoxide dismutase, a very powerful free-radical scavenger.
Cayenne is rich in capsaicin. The pepper also contains vitamin C, vitamin B6, vitamin E, potassium, manganese, and flavonoids (anti-oxidants), and has long been used to ease pain, headaches and to increase circulation. If you don’t use hot peppers regularly, please add just a few grains to the milk and work your way up.
If you are recovering from stomach distress and need some bland, comfort food, please investigate this recipe for jook, a wonderful cooked rice dish.
My best wishes for a healthy and happy day!
Turmeric MilkAuthor: Diane KennedyRecipe type: Beverage; VeganCuisine: East IndianPrep time:Cook time:Total time:Serves: 2 cupsThis quickly made hot drink will help ward off colds, or bring relief if you have one. The inspiration came from Journeykitchen.com.Ingredients- 2 cups whole or low fat (not non-fat) organic soymilk, rice milk, nut-milk, or other non-dairy milk
- 1 teaspoon ground turmeric
- 3 black peppercorns
- 3 cardamon pods, cracked
- 3 whole cloves
- ½ inch fresh ginger, peeled and chopped
- ⅛ teaspoon ground cinnamon (or a fingernail-sized piece of cinnamon stick)
- Pinch of saffron (optional)
- A couple drops of vanilla (opt.)
- Cayenne to taste (opt.) (start with a few grains and work up)
- Organic honey, brown sugar or other sweetener to taste (opt.)
Instructions- Lightly crush the peppercorns, cloves and cardamon pods
- In a small saucepan, combine all ingredients except for sweetener.
- Gently heat and allow to simmer for 5-10 minutes.
- Add sweetener to taste. If adding organic honey - which is a healing force on its own - stir it in as the milk is off the boil. Boiling will kill the beneficials in the honey.
- Strain into cups and serve.
- Animals, Bees, Birding, Building and Landscaping, Chickens, Cob, Compost, Composting toilet, Fungus and Mushrooms, Gardening adventures, Giving, Health, Heirloom Plants, Hiking, Houses, Hugelkultur, Humor, Living structures, Natives, Natural cleaners, Other Insects, Permaculture and Edible Forest Gardening Adventures, Pets, Photos, Predators, Quail, Rain Catching, Recycling and Repurposing, Reptiles and Amphibians, Seeds, Soil, Vegetables, Water Saving, Worms
Special Tours for Aug. and Sept., 2014

Come take a tour of a food forest! Normally tours of Finch Frolic Garden are held by appointment for groups of 5 – 15 people, Thursdays – Mondays. Cost is $10 per person and the tour lasts about two hours. By popular demand, for those who don’t have a group of five or more, we will be hosting Open Tour days for the first 15 people to sign up in August and September. They will be Sunday, August 10 and 24, Sept. 7 and 21, and Thursdays August 7 and 28, and Sept. 11 and 25. Tours begin promptly at 10 am. The tours last about two hours and are classes on basic permaculture while we tour the food forest. I ask $10 per person. Please reserve and receive directions through dianeckennedy@prodigy.net. Children under 10 are free; please, no pets. Photos but no video are allowed. Thank you for coming to visit! Diane and Miranda
You May Also Like

Native Insects and IPM
- Beverages, Breakfast, Fruit, Permaculture and Edible Forest Gardening Adventures, Recipes, Vegetarian
The Passion of the Fruit: Homemade Juices
Hi there. It’s Miranda the Guestblogger again, and today I want to talk to you about juice. You know, The Big Drip – Drosophilid Milk, Agua Fresca, Drupe’s Tears, Essence of Mesocarp: JUICE.
Here at Finch Frolic Garden, we like a nice fresh juice. As I am officially the FFG Harvester (a.k.a. Fruit Maven), I also take on the mantle of One Who Figures Out What To Do With Some Of The Stuff That’s Been Harvested – and let me tell you, that’s not a title to take lightly.
In the summer, it’s hard to keep up with all the produce and we hate to waste anything, even though spoilt food just goes back into the soil via compost here. We really like to get our produce into our mouths, though. Therefore, a lot of our fruit bounty gets juiced and frozen to keep. I want to walk you through some of our juiceplorations.
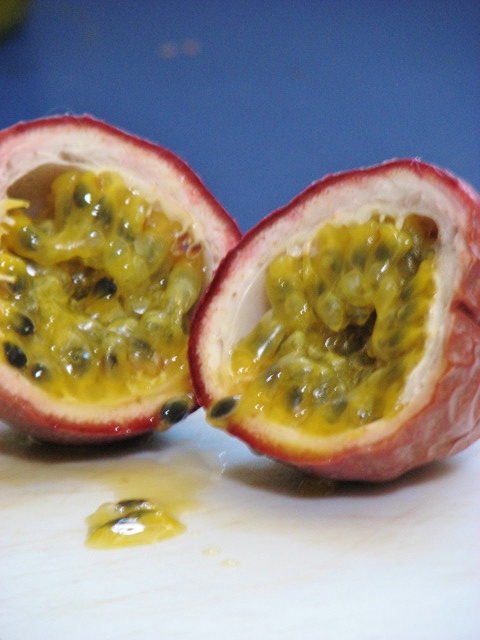
Finch Frolic Redoubtable Fruit of Almost Every Month in the Year: the Purple Passionfruit. These exotic and fragrant fruits are dropped by the bushel-load from our vigorous vines almost continuously, but overwhelmingly in midsummer. I pick them off the ground under the vines and wait for their smooth purple shells to wrinkle over in ripeness. Then the process begins.
I sit down for this and usually bring up a show on my laptop, because it takes a while. I have the bag or bowl of fruit on my right and a plastic bag looped over the back of a chair on the other side for the empty shells.
A fruit is picked up, dipped in a bowl of water, then wiped quickly on a paper towel and deposited on a cutting board that has a little rim on it to catch juice.

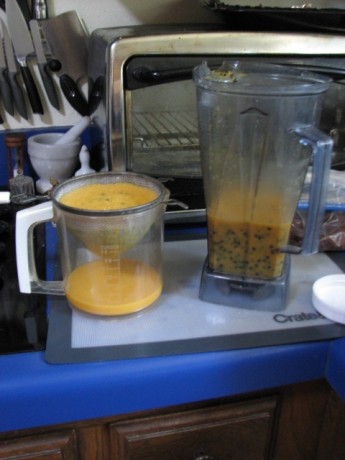
With a sharp knife, I halve the fruits and use a spoon to scoop the many little packets of bright gold-orange juice and hard black seeds into a bowl. Those packets have to be broken to get the juice.
I used to press the pulp into the mesh of a sieve with a spoon, but that’s hard on the hands and on the sieve. Now, I throw it in our Vita-Mix and turn it up to 3, tops – you want to spin all the juice off the seeds, but you don’t want to chop up the seeds. I judge whirl completeness by whether or not the little black seeds are free-floating as they sit in the mixture.
Then I run it through a sieve to separate out the juice.
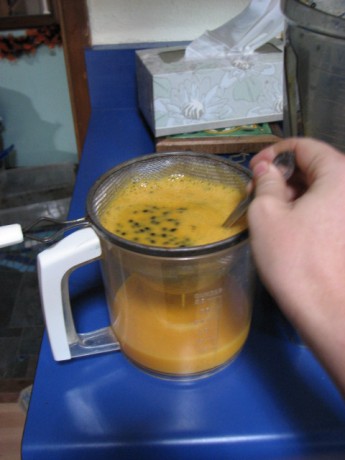
To get the most juice out of it, you swirl a spoon through the pulp as it sits in the sieve. 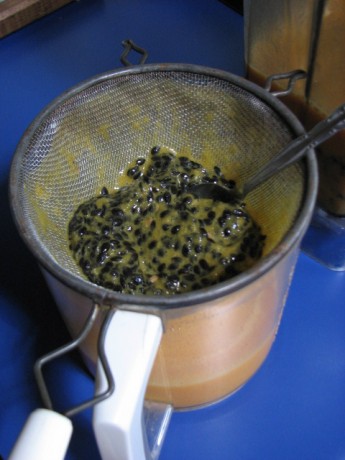
All juiced out. This sounds very labour-intensive – and it is – but it’s worth it to us to use our fruit. We don’t eat passionfruit straight – the seeds are a little too gross. We do, however, use the juice in anything we can make an excuse to, and it keeps frozen into cubes for a long time. And the leftover seeds make a fun treat for our hens.
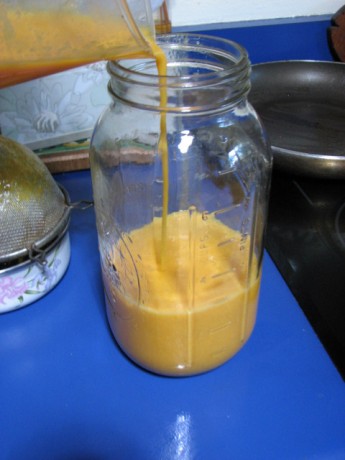
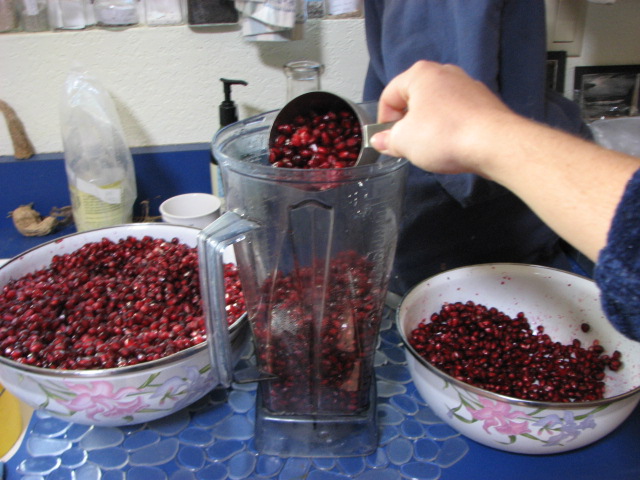
Glowing, beautiful, tangy, fresh passionfruit juice! In the fall, we’re overwhelmed with lovely big pomegranates from our one big pomegranate tree. This year, we’ve had more than ever and we didn’t want to waste any.
Once harvested, though, the poms need to be processed. Diane and I camped out every evening for a couple weeks cutting poms in half and hand-picking the arils. Recently, after a friend let us try out her juicer, we acquired one for ourselves, eliminating the need for the rest of the process with poms, but it is the same process I still use for grapes, apples and melons, so I’m going to tell you about it anyway.
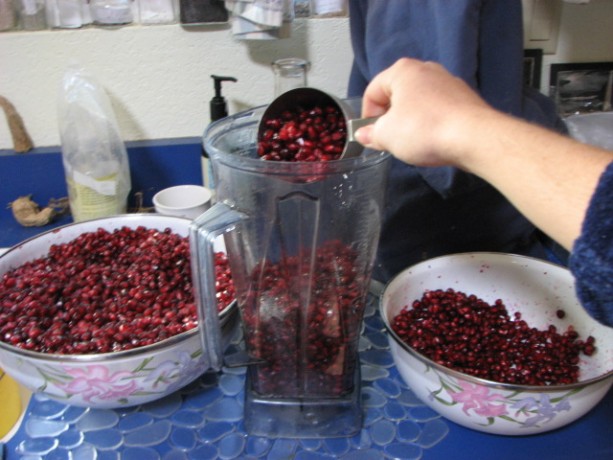
I put the arils in the Vita-Mix and turn all the way up to completely blend the seeds. The blended pom also gets strained, but because the particles are finer than the passionfruit pulp, a mesh sieve isn’t sufficient. No, what you need is a sock.

A nice clean women’s nylon sock is perfect. 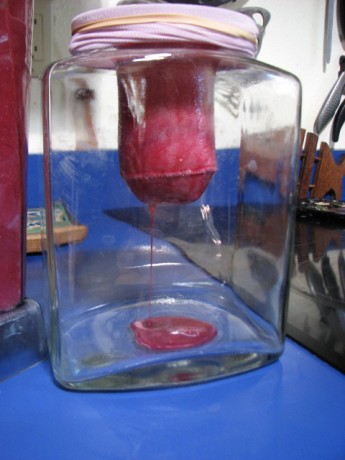
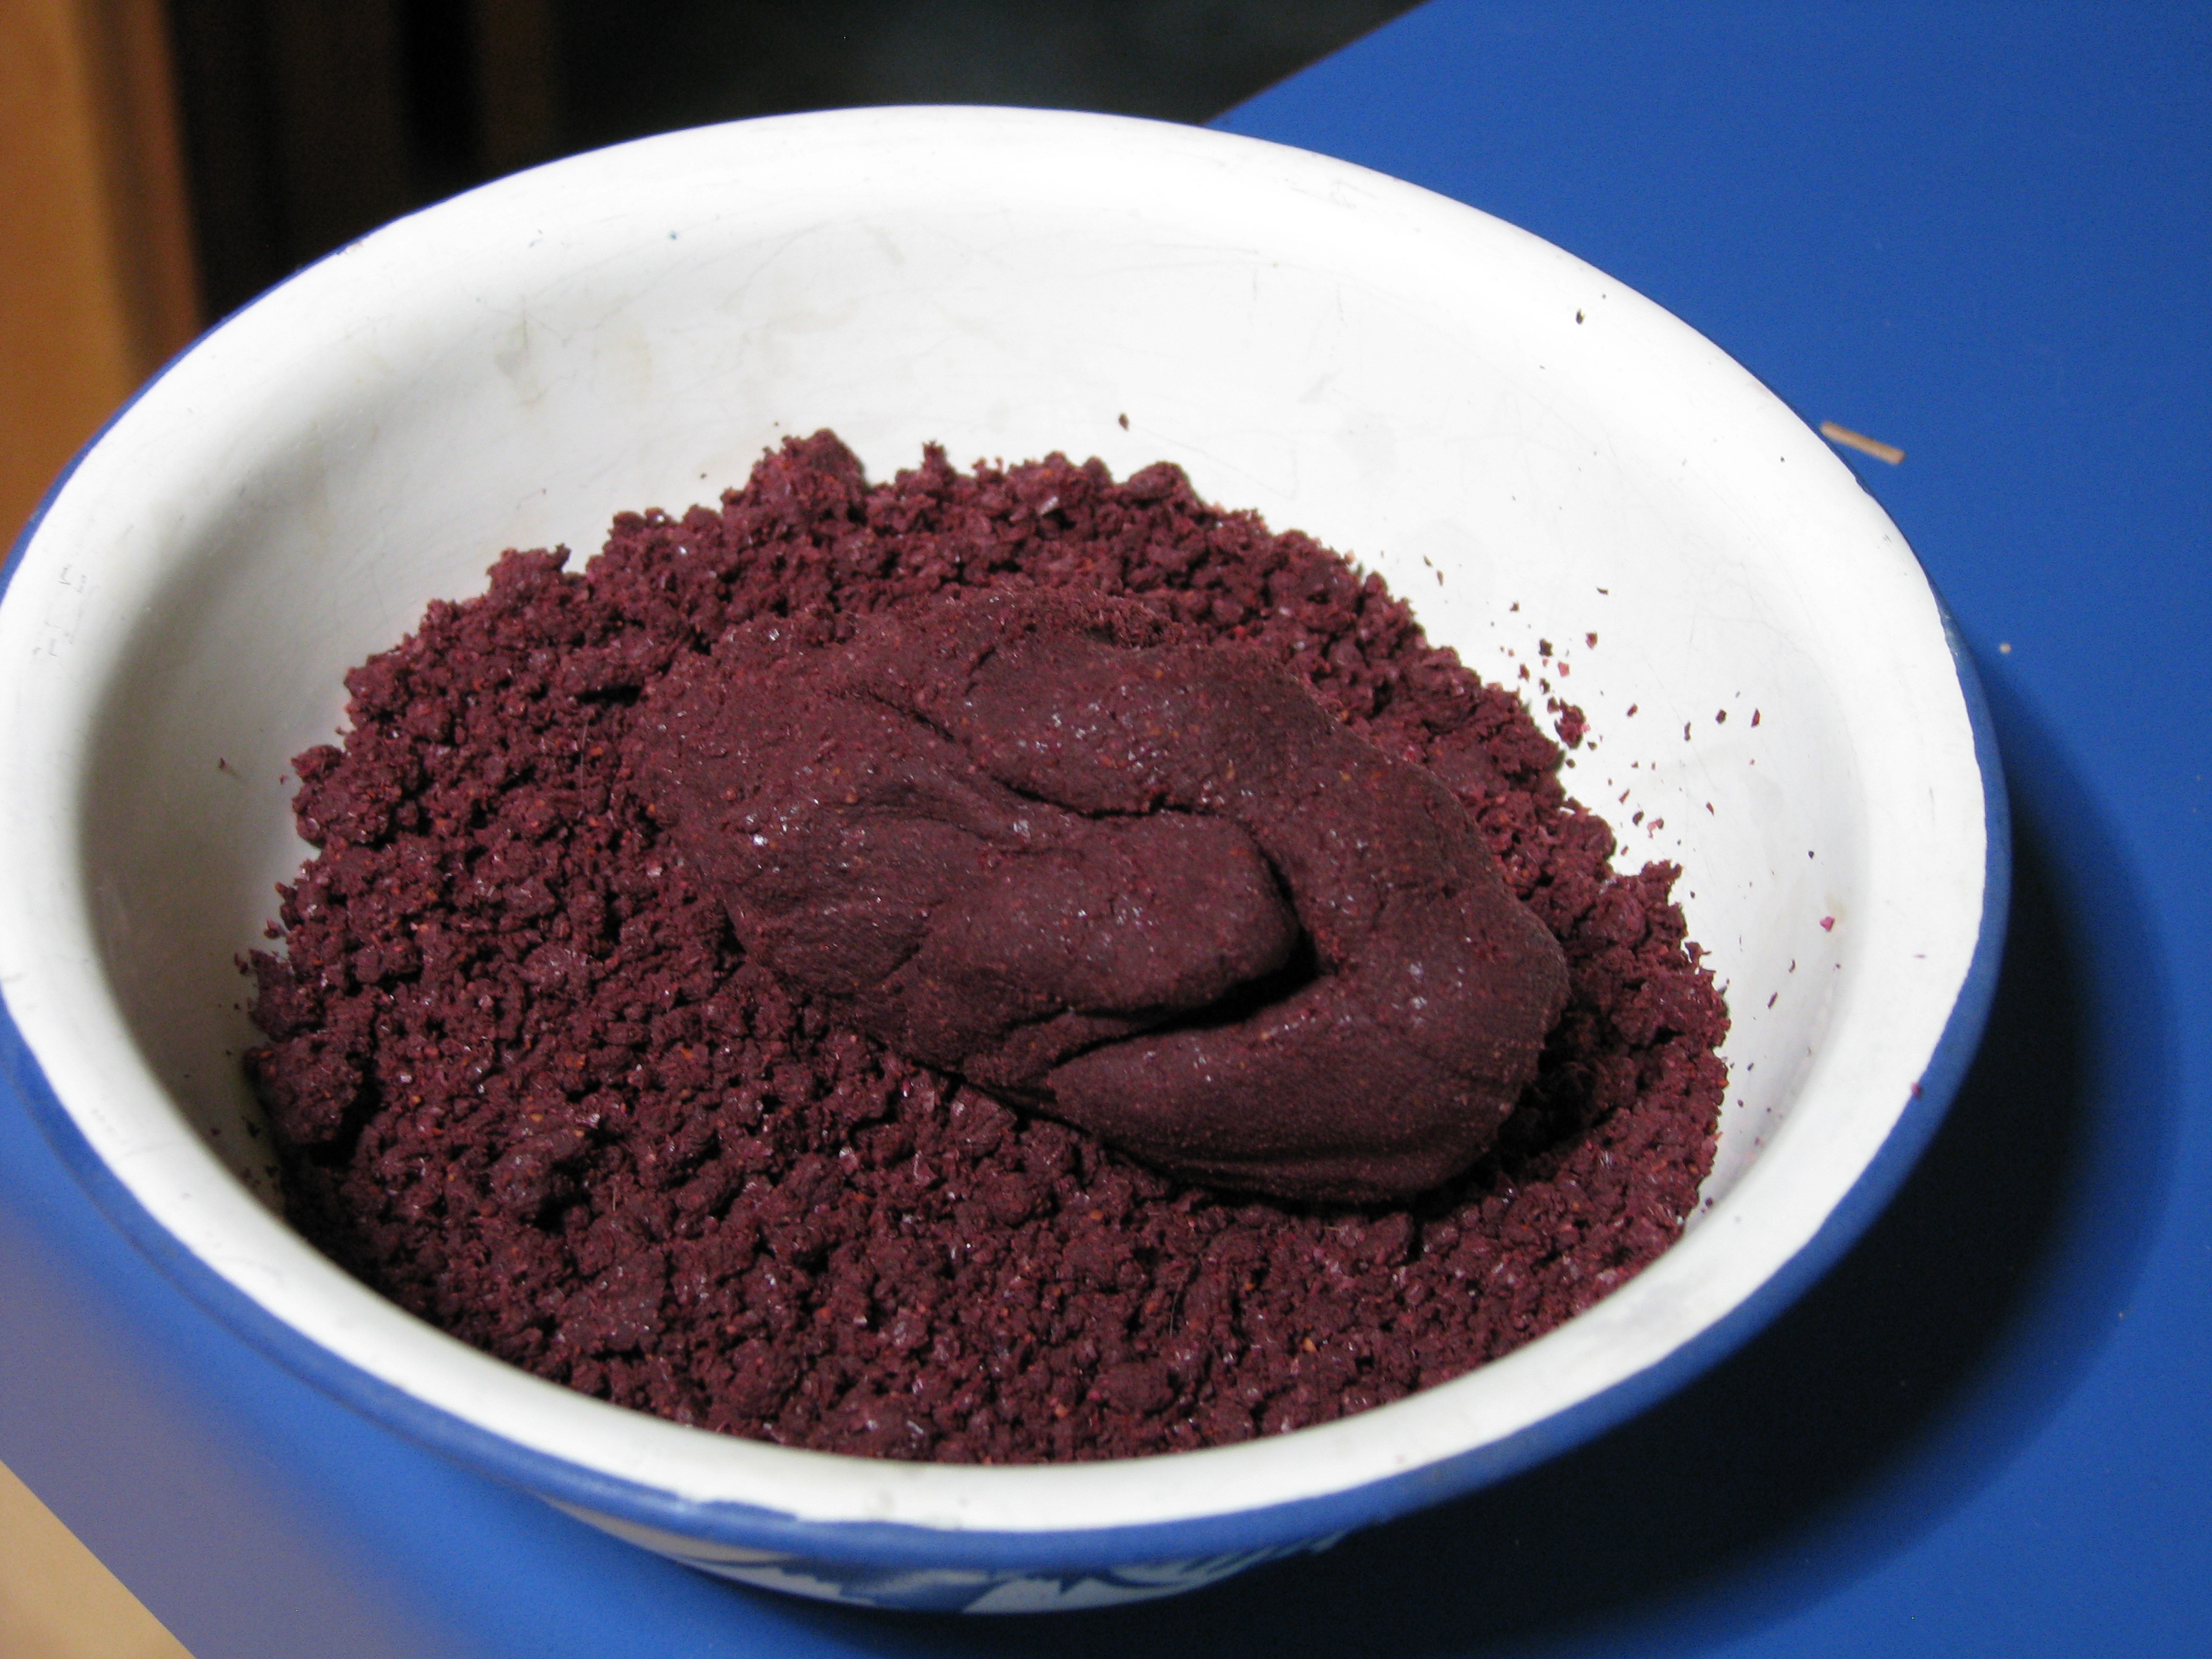
Hanging allows pure juice to come through. To get all the juice out, though, squeezing is necessary, and that puts a little more must in the juice, like fine fruit silt.
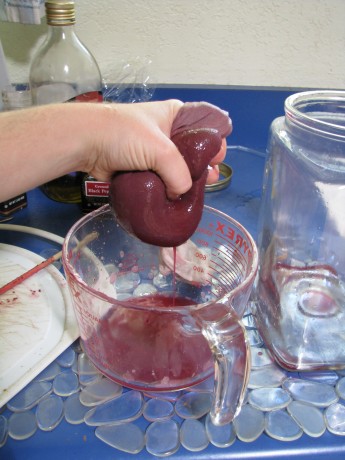
It’s also very taxing on the hands, because the sock must be hand squeezed, but it helps get the most juice from the fruit. This second straining produces interesting dry, crumbly must that comes out of the sock like purple Play-Doh.

Also a salutiferous treat for the hens! Like the passionfruit, we use the pom juice as much as we can. For instance, we reduced the juice and I experimented with some pomegranate ice-creams:

Chocolate makes an excellent palate cleanser, if you ask us. I also diluted the concentrate with water to make a lovely breakfast juice. We even poached pears with the juice for Christmas dinner – a lovely rose colour and delicate fruity flavor.
The fun never ends with fruit!
So, that’s a little peek at the juiceinations that go on here at Finch Frolic. Happy juicing to you!
TTFN!
Miranda the Fruit Maven
-
Make Your Own Soymilk

Soymilk and Okara A friend of mine, Kevin, came over and showed me how easy it is to make my own soymilk. What fun! Making your own soymilk is very economical and can be custom-flavored and sweetened to your taste. If you use organic soybeans -which I highly recommend because soybeans are one of the most sprayed crops – you can rest assured that you are serving your family a healthy, non-toxic beverage.
After Kevin showed me his way, I did a lot of research on other ways to make it, and tried some variations. Basically you soak dried soybeans (not edamame!) overnight, blend them up with water, heat it until it boils, strain it and flavor it, not necessarily in that order. Kevin’s method was to strain it before heating. I’ve found I like the results better to strain it after its hot; there isn’t any grit and it strains more quickly. Do whatever works for you.
When you make soymilk, you are actually making two products: soymilk and the high fiber and protein stuff that is strained out which is called okara. There are many recipes for using okara on the Internet, and I’ve found many in the classic cookbook, the Book of Tofu by Shurtleff and Aoyagi. Okara is virtually tasteless. If you strain your soymilk before its heated the okara is ‘fresh’ and a bit gritty. I made it into vegetarian fish patties following this recipe with good results, although they were a little too salty for me.

Fishless okara patties with sauce. If you cook your soymilk before straining, then the okara is also cooked and looks like hot farina. Okara is often mixed with grains and ‘meats’ as a nutritious additive and a food extender. It has little flavor on its own. I used some to thicken a pea soup that was too thin and it worked wonderfully. The soy industry has a lot of okara on their hands so it is usually fed to livestock. It can be frozen or dried, too. If you absolutely have too much okara then compost it, feed it to your worms or bury it around your plants.
Once you have the soymilk you can drink it plain, sweeten it with sugar, honey or whatever your choice is, flavor it with vanilla or something else, serve it cold or hot (which is the best!), or make tofu out of it.

Vanilla bean in hot soymilk Making tofu is also an easy process, which is just curdling the soymilk and straining out the solids; if you’ve ever made goat cheese then you can make tofu.
The ratio of soaked soybeans to water varies depending upon how thick you like your soymilk. Kevin showed me a 4:1 ration (water to beans) which made a thin soymilk, similar to 1% milk. I like the 3:1 ratio because the milk is creamier.
I found a good deal on Bob’s Red Mill organic soybeans on Amazon.com, the beans pricing out to .19 cents an ounce (four bags for about $19 total).

Organic soybeans. I couldn’t find them at my local Sprouts or health food store. One bag of Bob’s Red Mill organic soybeans weighs 1 lb 8 oz, which is about 4 cups of dried beans. The beans swell up by a third, so one package makes 12 cups of rehydrated soybeans. A cup of dried soybeans makes about two quarts of soymilk (and about two cups of okara), so a bag would make eight quarts. A huge savings, and I have the okara as well.
A few tips: you can easily soak a cup of beans overnight and make soymilk every few days, depending on your need and time.

One cup of dried beans equals three cups soaked. Use a very tall pot because when you are heating the soymilk it will take forever and then just when you turn away it will come foaming up out of the pot like something possessed; a tall pot helps keep it under control. After you pour out your soymilk, wash or at least soak your pot. The soymilk residue dries hard and must be soaked again to get off. Use several layers of cheesecloth (which you can wash and reuse), or a piece of muslin to strain your soymilk.

Strain okara through cheesecloth. Also the raw soymilk doesn’t smell very appetizing. It is very beany and grassy. Once it comes to a boil the smell will change into a very yummy tofuish scent.
There is also a great dissent on how long you heat the soymilk. Kevin’s recipe was to just bring it to a boil. Some recipes recommend twenty minutes of boiling. I find that five minutes heats the soymilk and cooks the okara sufficiently. Experiment.
Soymilk and OkaraAuthor: Diane Cynthia KennedyRecipe type: BeveragePrep time:Cook time:Total time:Serves: 8Fresh organic soymilk and okara- delightful and inexpensive. This recipe will make about 5½ cups of silky soymilk and about 2 cups of cooked okara.Ingredients- One cup dried soybeans, soaked overnight
- Nine cups water
- Flavoring (optional)
- Sweetener (optional)
Instructions- Drain the soaked soybeans (which will now be about 3 cups).
- Scoop a cup of soybeans and put in blender with three cups of water.
- Blend until smooth.
- Pour mixture into a tall pot.
- Repeat with the other two cups of beans.
- Heat mixture until it boils, stirring constantly. This can take some time, so I usually give it a stir now and then until it starts steaming a little, and then give it all my attention so that it doesn't foam up and overflow.
- Lower temperature, stir down the foam and simmer for five minutes.
- Line a sieve with several layers of cheesecloth or a piece of muslin (you are trying to catch fine particles) and place sieve over another tall pot or container.
- Carefully ladle soymilk into the lined sieve and allow to drain (you can wait until mixture is cooler before you do this if you'd like.) Use a spoon to move the okara out of the way as you ladle. If you double the recipe you may need to strain the okara and empty the cheesecloth before you finish straining all the milk.
- Allow the okara to drain and cool until you can handle it comfortably.
- Wrapping the cheesecloth around the okara, squeeze the bundle until all the soymilk drains out.
- Refrigerate the okara until ready to use.
- Use soymilk plain, or heat and add flavoring and/or sweetener to taste. I like honey and vanilla.
- Refrigerate cooled soymilk. The soymilk should keep for about a week refrigerated; the okara about four days.
-
Preserving Squash and a Terrific Pumpkin Chai Recipe!

Beautiful patterns on the banana squash shell. Four sugar baby pumpkins that I’d kept for myself, and three pink banana squash, were all in need of preservation. They were not keeping well due to the warmth of our hot San Diego county Fall. During a rainy break in the weather I did something about it. You can preserve cooked pumpkin and winter squash best by freezing it. If you have a pressure canner you may can pureed pumpkin or pumpkin pieces in liquid, but since I only use the water bath method that wasn’t an option.

Even sugar baby pumpkins can be difficult to cut when raw. There’s a better way! Roasting a squash isn’t difficult at all. In fact, you only have to wash it, put it on a tray in a 350F oven for about an hour (longer if its a really large pumpkin), and then slice when cooled.

Roasting a whole pumpkin makes the scooping so easy! Its easy to scrape out the seeds and then spoon out the cooked flesh out of the hardened shell. This is what I did for the sugar baby pumpkins. There was too much banana squash to fit whole into the oven, however, so I cut them into chunks, scooped out the seeds, covered them with aluminum foil (it helps steam them) and baked 350F for forty-five minutes.

Three banana squash is a lot of squash I have more details here. I also roasted the pumpkin seeds.
Then I had a lot of squash to puree! These squash and pumpkins were dry, so I added a little water to the VitaMix and tossed in the chunks.

Pumpkin and seeds. I pureed batches until smooth, then spooned cups full into freezer bags. My pumpkin scone recipe calls for only half a cup, so I froze one-cup batches, as well as two-cup batches for pie. The secret to ‘vacuum-packing’ freezer bags is to close the top of the bag around a straw and then suck all the air out. It really works well, and is kind of fun, too.

Get a straw, suck out the air and presto: vacuum packed! However, the best thing that happened out of all this squashing was that I had a little less than a cup of pureed roasted squash left in the VitaMix, too little to freeze and really irritating to scoop out. It was a cold day and past lunchtime. I had an idea and spooned in what was left of some Chai tea mix, poured in vanilla soy milk, blended it until it warmed up and sat down to drink. Heaven! I’m not one for pumpkin flavored things, but this was the real deal.

Pumpkin puree. It was so good that the next day I took a cup of the pureed squash that I refrigerated, poured in 1 1/2 cups of vanilla soy milk, a touch of orange syrup left over from candying orange peel, added cinnamon and blended until it was hot. It was thick, satisfying, a little sweet, spicy and full of beta carotene, fiber, protein and other good things. I’m sure you can do the same thing with canned pumpkin and other liquids, such as milk, rice milk, almond milk or coconut milk. If fact, I insist that you try it.

Hot Yum! Pumpkin ChaiAuthor: Diane C. KennedyRecipe type: BeverageCuisine: AmericanPrep time:Cook time:Total time:Serves: 2Cold or hot, spiced pureed pumpkin or squash mixed with the milk of your choice is extreme comfort food that is actually terrific for you!Ingredients- 1 cup cooked pumpkin or squash puree, fresh or canned.
- 1½ - 2 cups vanilla soy milk, or milk of your choice. (Less for a thick drink).
- ½ - ¾ teaspoon cinnamon, pumpkin pie spice or up to 1 scoop Chai tea mix.
- Sweetener (optional); a natural syrup would do or honey.
- ½ teaspoon vanilla (optional)
Instructions- For cold pumpkin chai mix all ingredients briefly in a blender or VitaMix.
- Taste to adjust seasonings, thickness and sweetener, and serve.
- For hot pumpkin chai, heat milk and add to the rest of the ingredients in a blender and process. If you have a VitaMix, you can add all cold ingredients and then process until it is hot.
I’m going to make some more for me right now. -
Homemade Ginger Beer

Fresh Ginger Root I remember drinking bottled ginger beer on the rare occasions that my mother allowed us to drink soda. It’s strong gingery, spicy taste was wonderfully refreshing. I hadn’t had it for years until lately, when a friend brought some to a picnic. The kind she brought was from a small brewer and it had a richer flavor to it than what I remembered. Apparently ginger beer, which doesn’t have to contain alcohol, has made a resurgence in popularity. Some is carbonated, and some is fermented or has alcohol added.
My friend remembered her mother making a big, cloudy, thirst-quenching batch of it, but didn’t have her recipe. I had found some recipes and she and I made different batches, her with more success.
What I learned was that fermented ginger beer relied on wild yeast and was traditionally brewed in Europe by passing on the starter. World War Two was the death of the tradition.
I tried a batch of ginger beer hoping to catch wild yeast spores, but it didn’t work. I also tried a batch adding brewer’s yeast, but that didn’t work either. I made a batch with brown sugar and spices that was slowly added to day by day for a week. The results were not what I was looking for. The brown sugar was too sweet and didn’t complement the ginger flavor, and the drink itself too sharp to be pleasant.
The best recipe so far, which my friend made with success, was of course the easiest. It is from Martha Stewart Magazine, and except for the shredding of the ginger, very easy to make. It has only four ingredients.

Methods of Shredding Ginger 
Shredded Ginger Homemade Ginger BeerAuthor: Martha StewartRecipe type: BeveragePrep time:Total time:Serves: 16A tasty, non-alcoholic old-fashioned drink.Ingredients- 2 pounds fresh ginger root (get the plumpest you can find or it will be fiberous and hard to cut)
- 1 gallon boiling water
- 1½ cups freshly squeezed lime juice (about 8 limes. Yellow limes are just limes that are ripe and are much jucier).
- 1½ cups white sugar
Instructions- Cut ginger root into 1-inch pieces and place in bowl of a food processor or Vita-Mix, and process until finely chopped. If you have neither machine, you can use a grater with the largest holes, but watch your fingers!
- Transfer the chopped or grated or shredded ginger to a large pot or bowl
- and add the boiling water.
- Allow to stand for one hour, or overnight.
- Drain through a fine sieve. If you would like the drink less cloudy, line the sieve with a double thickness of damp cheesecloth. Compost the solids or spread them on the ground around your plants for mulch.
- Add lime juice and sugar, stirring to dissolve.
- Serve over ice, or plain, or mixed with orange juice, or whatever suits your fancy. Refrigerate to store. I poured mine into mason jars. Stir or shake before serving. Makes 16 cups.

Add Boiling Water to Ginger 
A Drink with a Kick -
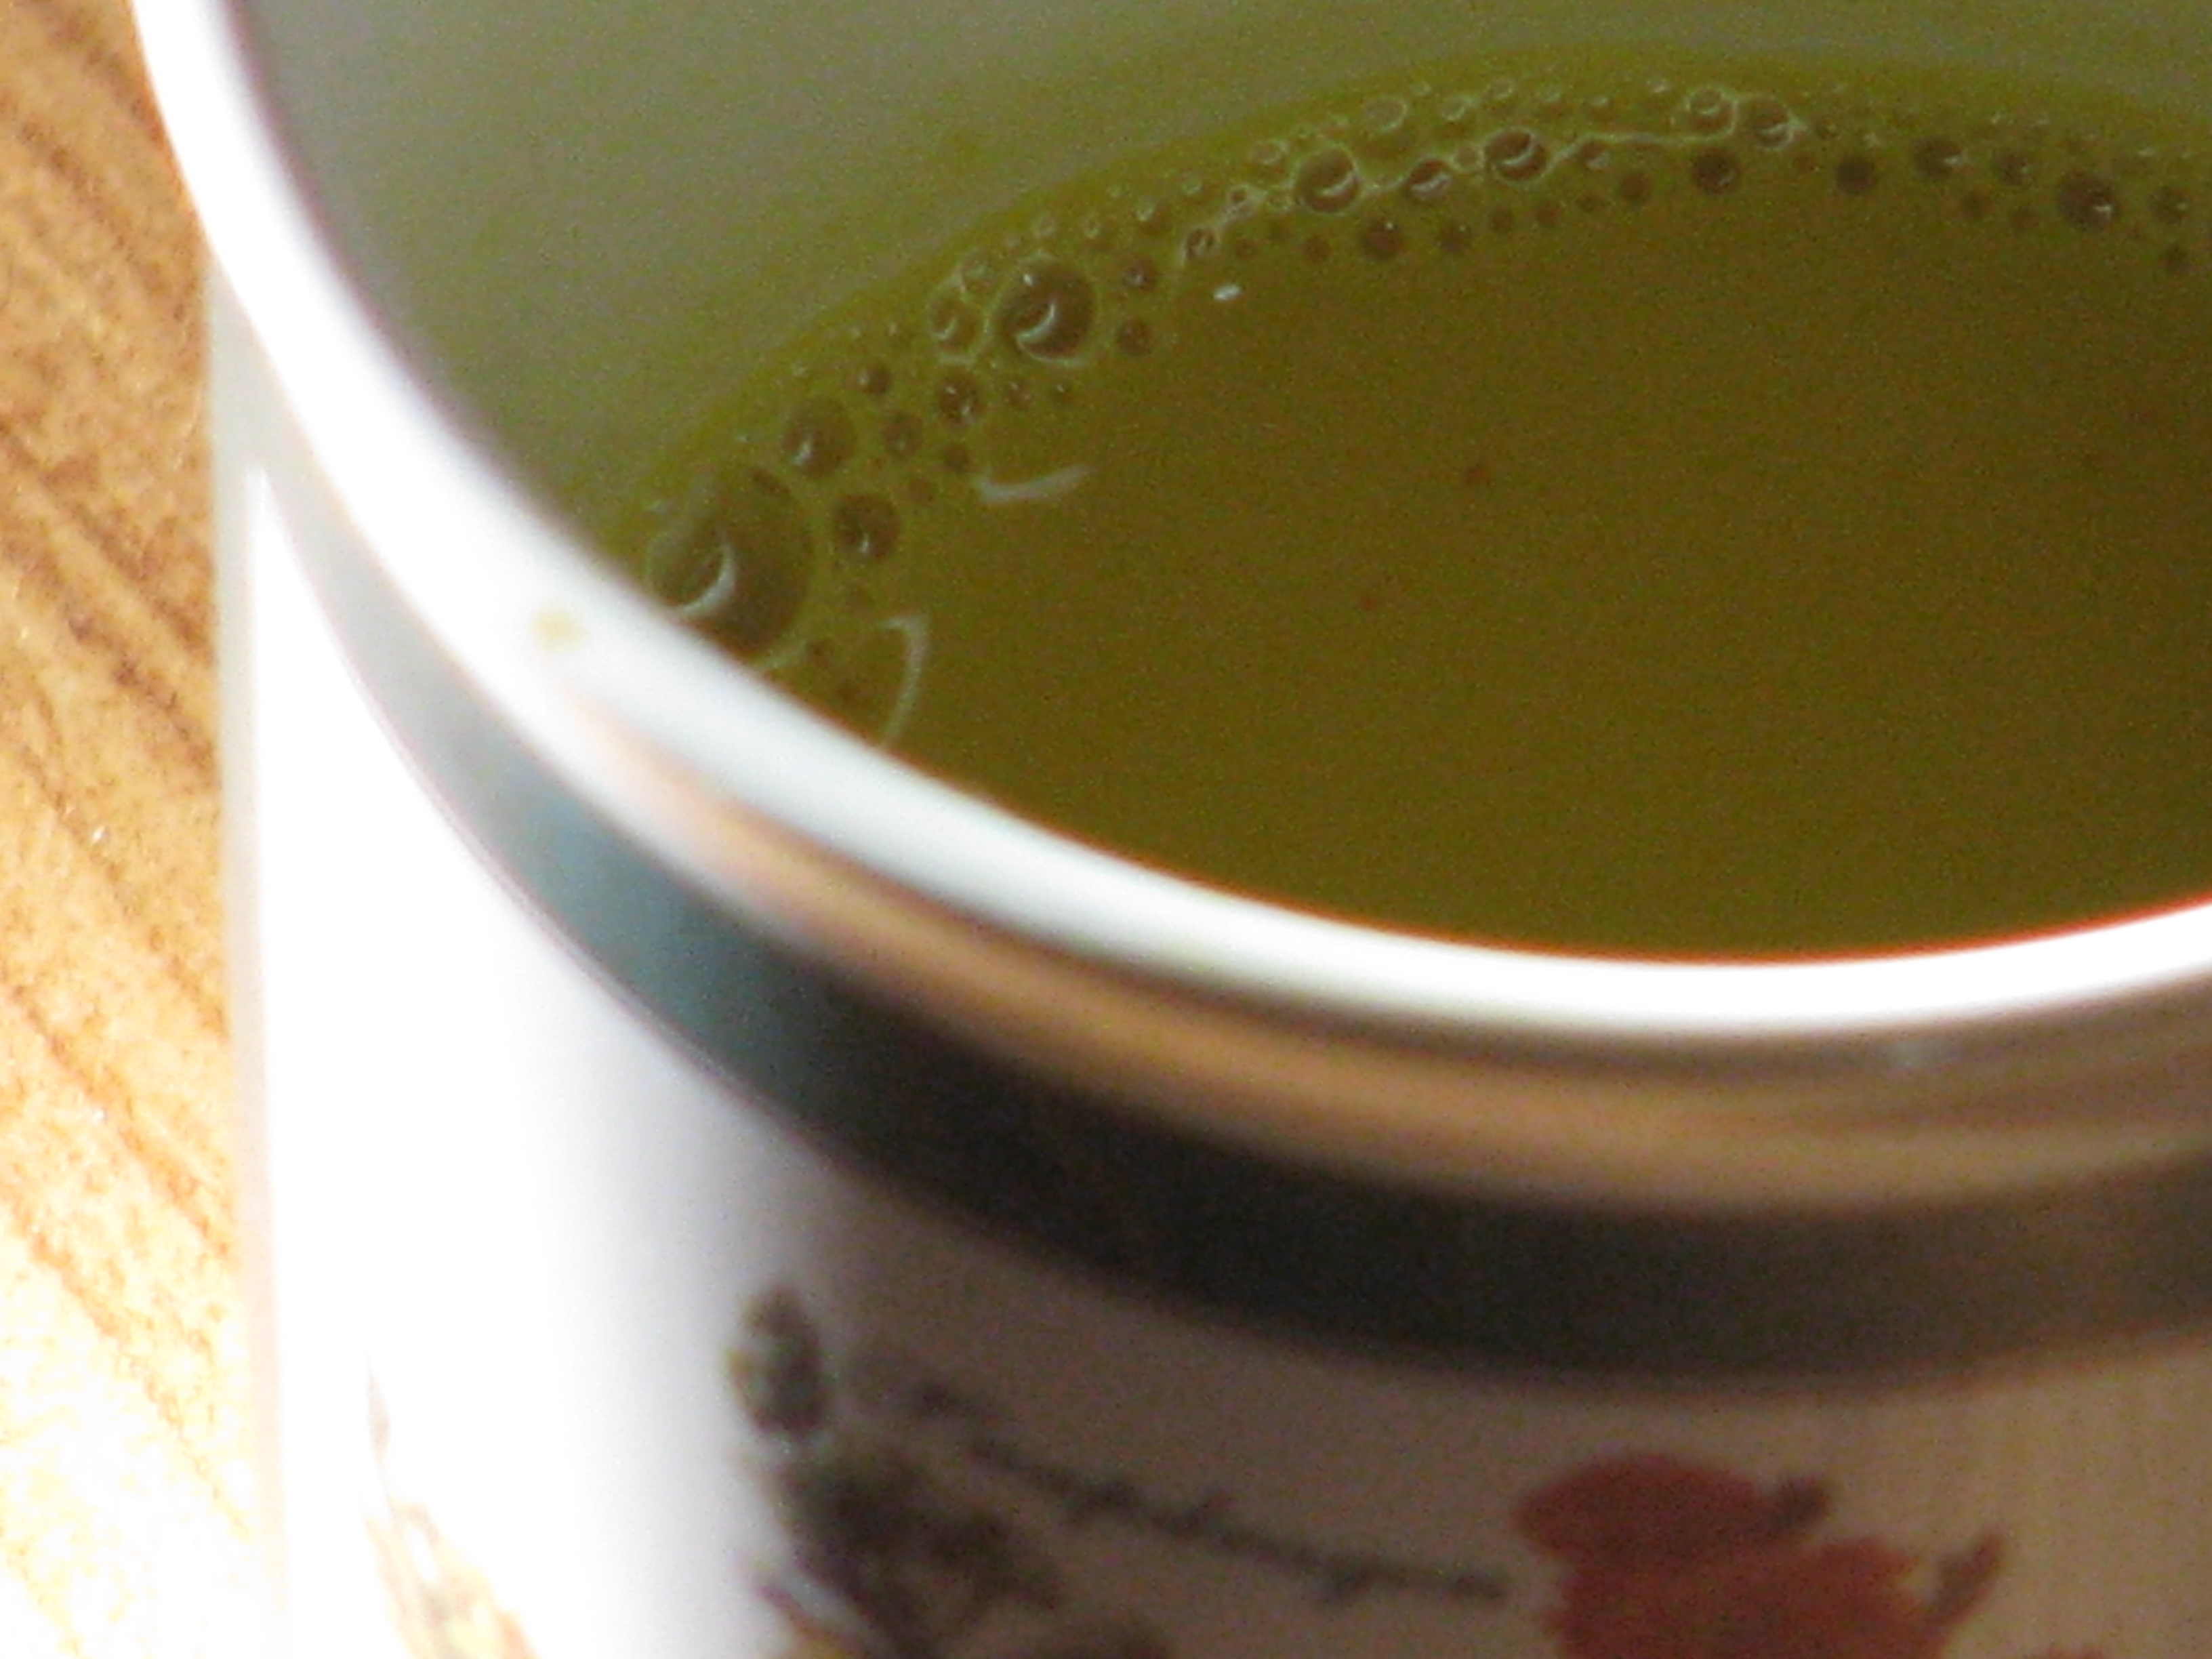
How To Make Decaf Tea That Doesn’t Taste Like Dishwater
Okay, okay, this is an off-the-wall topic for many people. Its raining (a good thing), and hot tea is right there at the top of my list after an hour’s vigorous exercise at the Fallbrook Community Center’s Fitness Fusion Class. Actually, a cuppa is often on my mind. In fact, whenever I hear someone mention tea, I crave it. Hot, with honey. If I’m sick, then honey and lemon. If I’m REALLY sick, then honey, lemon and a shot of whiskey. If I’m feeling low, honey and fat-free half-and-half. If I’m REALLY low, then honey and cream. (Rice milk can do the trick, too.)

My sister and I used to brew up herbal teas when I was in my teens, reading about the medicinal value of each plant, according to this mint tea review mixing and matching can do wonders. I remember how Shephard’s Purse was particularly soothing. Since I never liked the taste of coffee (it makes me gag!), I took to black teas. A few years ago my dentist commented on how overly developed my jaw muscles were, and said that I probably ground my teeth when I slept. that is when I consulted Daytona Beach periodontist. It turned out that the caffeine in my one or two cups of tea a day acted like an amplifier for the usual stress and worry that comes with being alive. Like an alcoholic in denial I boasted that I could do with or without caffeine. Any ol’ time.
Sure.
I went off caffeine and for several days had the jitters, was even crankier than normal, and went through withdrawl. From a twice-a-day cuppa habit! It worked. When the caffeine was flushed from my system, the clenching stopped, the grinding stopped, and I became more stable in my energy levels during the day. That two o’clock droop disappeared. That was about three years ago, and now if I have caffeine I can feel it speeding up my heart rate, prickling along the back of my neck, and making my jaws clench. Yes, I’m sensitive to drugs of any kind, so perhaps this isn’t the normal person’s reaction, but for some I think it’s significant.
But what about my treasured cuppa? My daughter (who was also lectured by the dentist) and I switched to decaf tea. Ick. Brown sweetened water. We tried bulk decaf tea with better success, but it still was ick. Then my brilliant daughter came up with the most important part of the secret of a decent cuppa decaf tea, and I figured out a little more. And finally, here it is:
Whether you use a teabag or bulk decaf tea, make sure that it is fresh. Use freshly boiling hot water. If you use water that has already been heated and cooled, the oxygen has mostly bubbled out of it and the tea will be flat. Swish hot water in your cup to warm it, just like you’d do with a pot of tea, and dump it out. (This also removes any dust that may have settled, or creatures that have taken refuge there.) (I’m only partially kidding.) Put in your tea or teabag and pour just enough boiling water in to cover the tea. DO NOT FILL IT UP YET. That’s my daughter’s brilliant trick. Somehow the steeping in a small amount of boiling water intensifies the brewing and really imparts flavor. Here’s my addition: cover the cup to keep the heat in. You can used one of those teacups that comes with a strainer and lid, or use the saucer, or any borrowed lid.

The cover keeps the heat in, and keeps the tea brewing at the same rate; if water cools, it doesn’t brew very well. After all, you aren’t making Sun Tea here. Steep for about three minutes this way. Then reboil some water. I have a Proctor Silex electric water pot with a thermostatic shut-off that I bought at K-Mart and I love it. I just turn the switch back on. Its amazing how cool water gets when sitting for just a few minutes. Fill the cup up with more boiling water, re-cover the cup, and let it steep for a few more minutes. Then, voila! Uncover a pretty decent-flavored cup of decaf tea. At this point add in anything you want in it: sweetener, cream, whiskey, lemon…. Don’t add anything during the steeping time because it inhibits the steeping.

So, in a nutshell, use fresh, boiled water. Just cover the tea with water. Cover the cup and steep for a few minutes. Pour in the rest of the water which is boiling. Cover the cup and steep for a few more minutes. Uncover and add in stuff or don’t add in stuff. Enjoy and give up clenching forever. Of course, tea goes better with toast smeared with some of that lemon curd from the previous post.
Why couldn’t I have said all that right at the beginning? Geez….. 🙂