- Breads, Breakfast, Cake, Condiments, Dessert, Frosting, Permaculture and Edible Forest Gardening Adventures, Recipes, Sauces, Vegan, Vegetables, Vegetarian
Making Ethical Butter

Vegan butter! I’ve labeled myself an ‘ethical vegetarian’ for nearly two decades. I stopped eating animals when I became horrified at the dichotomy of having glue traps under the house to catch wild rats and mice (and any poor, poor animal that happened upon it, such as lizards. Glue traps are horrendously cruel. I hadn’t put them there.) and a cage with an exercise wheel and specialty food for ‘pet’ mice in the bathroom. Justice is a man-made effort, and by not eating animals I was no longer approving of mass torture by buying into it. Although I no longer ate animals, I have still indulged in animal products, namely dairy products. Slowly it has sunk in how badly animals are treated for those, too. As someone who loves cooking, it has been difficult for me to wean away from dairy products. Butter is especially difficult. Unlike hens who have been bred to continuously lay without needing the services of a rooster, dairy cows must be lactating to produce milk. Cows are usually artificially inseminated, then after giving birth their calves are replaced by milking machines. The calves are most often slaughtered for veal. This process is repeated until the cow is used up from the constant pregnancies and lactating, and then she is slaughtered. This horrible practice is disguised by advertisements showing happy cows grazing in fields. That is a fantasy. ‘Grass fed’ and ‘pasture raised’ are sly terms that give you an image that is nowhere near to the truth. Please read Michael Pollen’s Omnivore’s Dilemma to understand where your food comes from and why.
To find an acceptable butter substitute has been an expensive and frustrating endeavor. For awhile I used a dairy substitute from Trader Joe’s, who I swear keeps tabs on what I buy the most and then discontinues it. All other butter substitutes either taste horrible, can only be used for spreading, or more commonly contain palm oil. The sudden fad for palm oil has created extreme clearance for the growing of palm in the areas which are habitat for the orangutan; indeed, if we don’t curtail our consumption of palm oil quickly the orangutan will go extinct within our lifetimes.
I finally found a recipe for a butter substitute that works pretty well for both spreading and baking. It is made mostly of refined coconut oil. At this point coconut oil is sustainably produced – please make sure that you support companies that do so. Refined organic coconut oil has no flavor or scent; unrefined has a mild coconut flavor and a toasted coconut scent. If you are using a batch of this butter for baking where coconut flavor is desired, then use the unrefined.
This recipe is by no means my own. I found it and a detailed description of the science behind it at VeganBaking.net . There are several options listed and a lot of cooking science behind the butter.
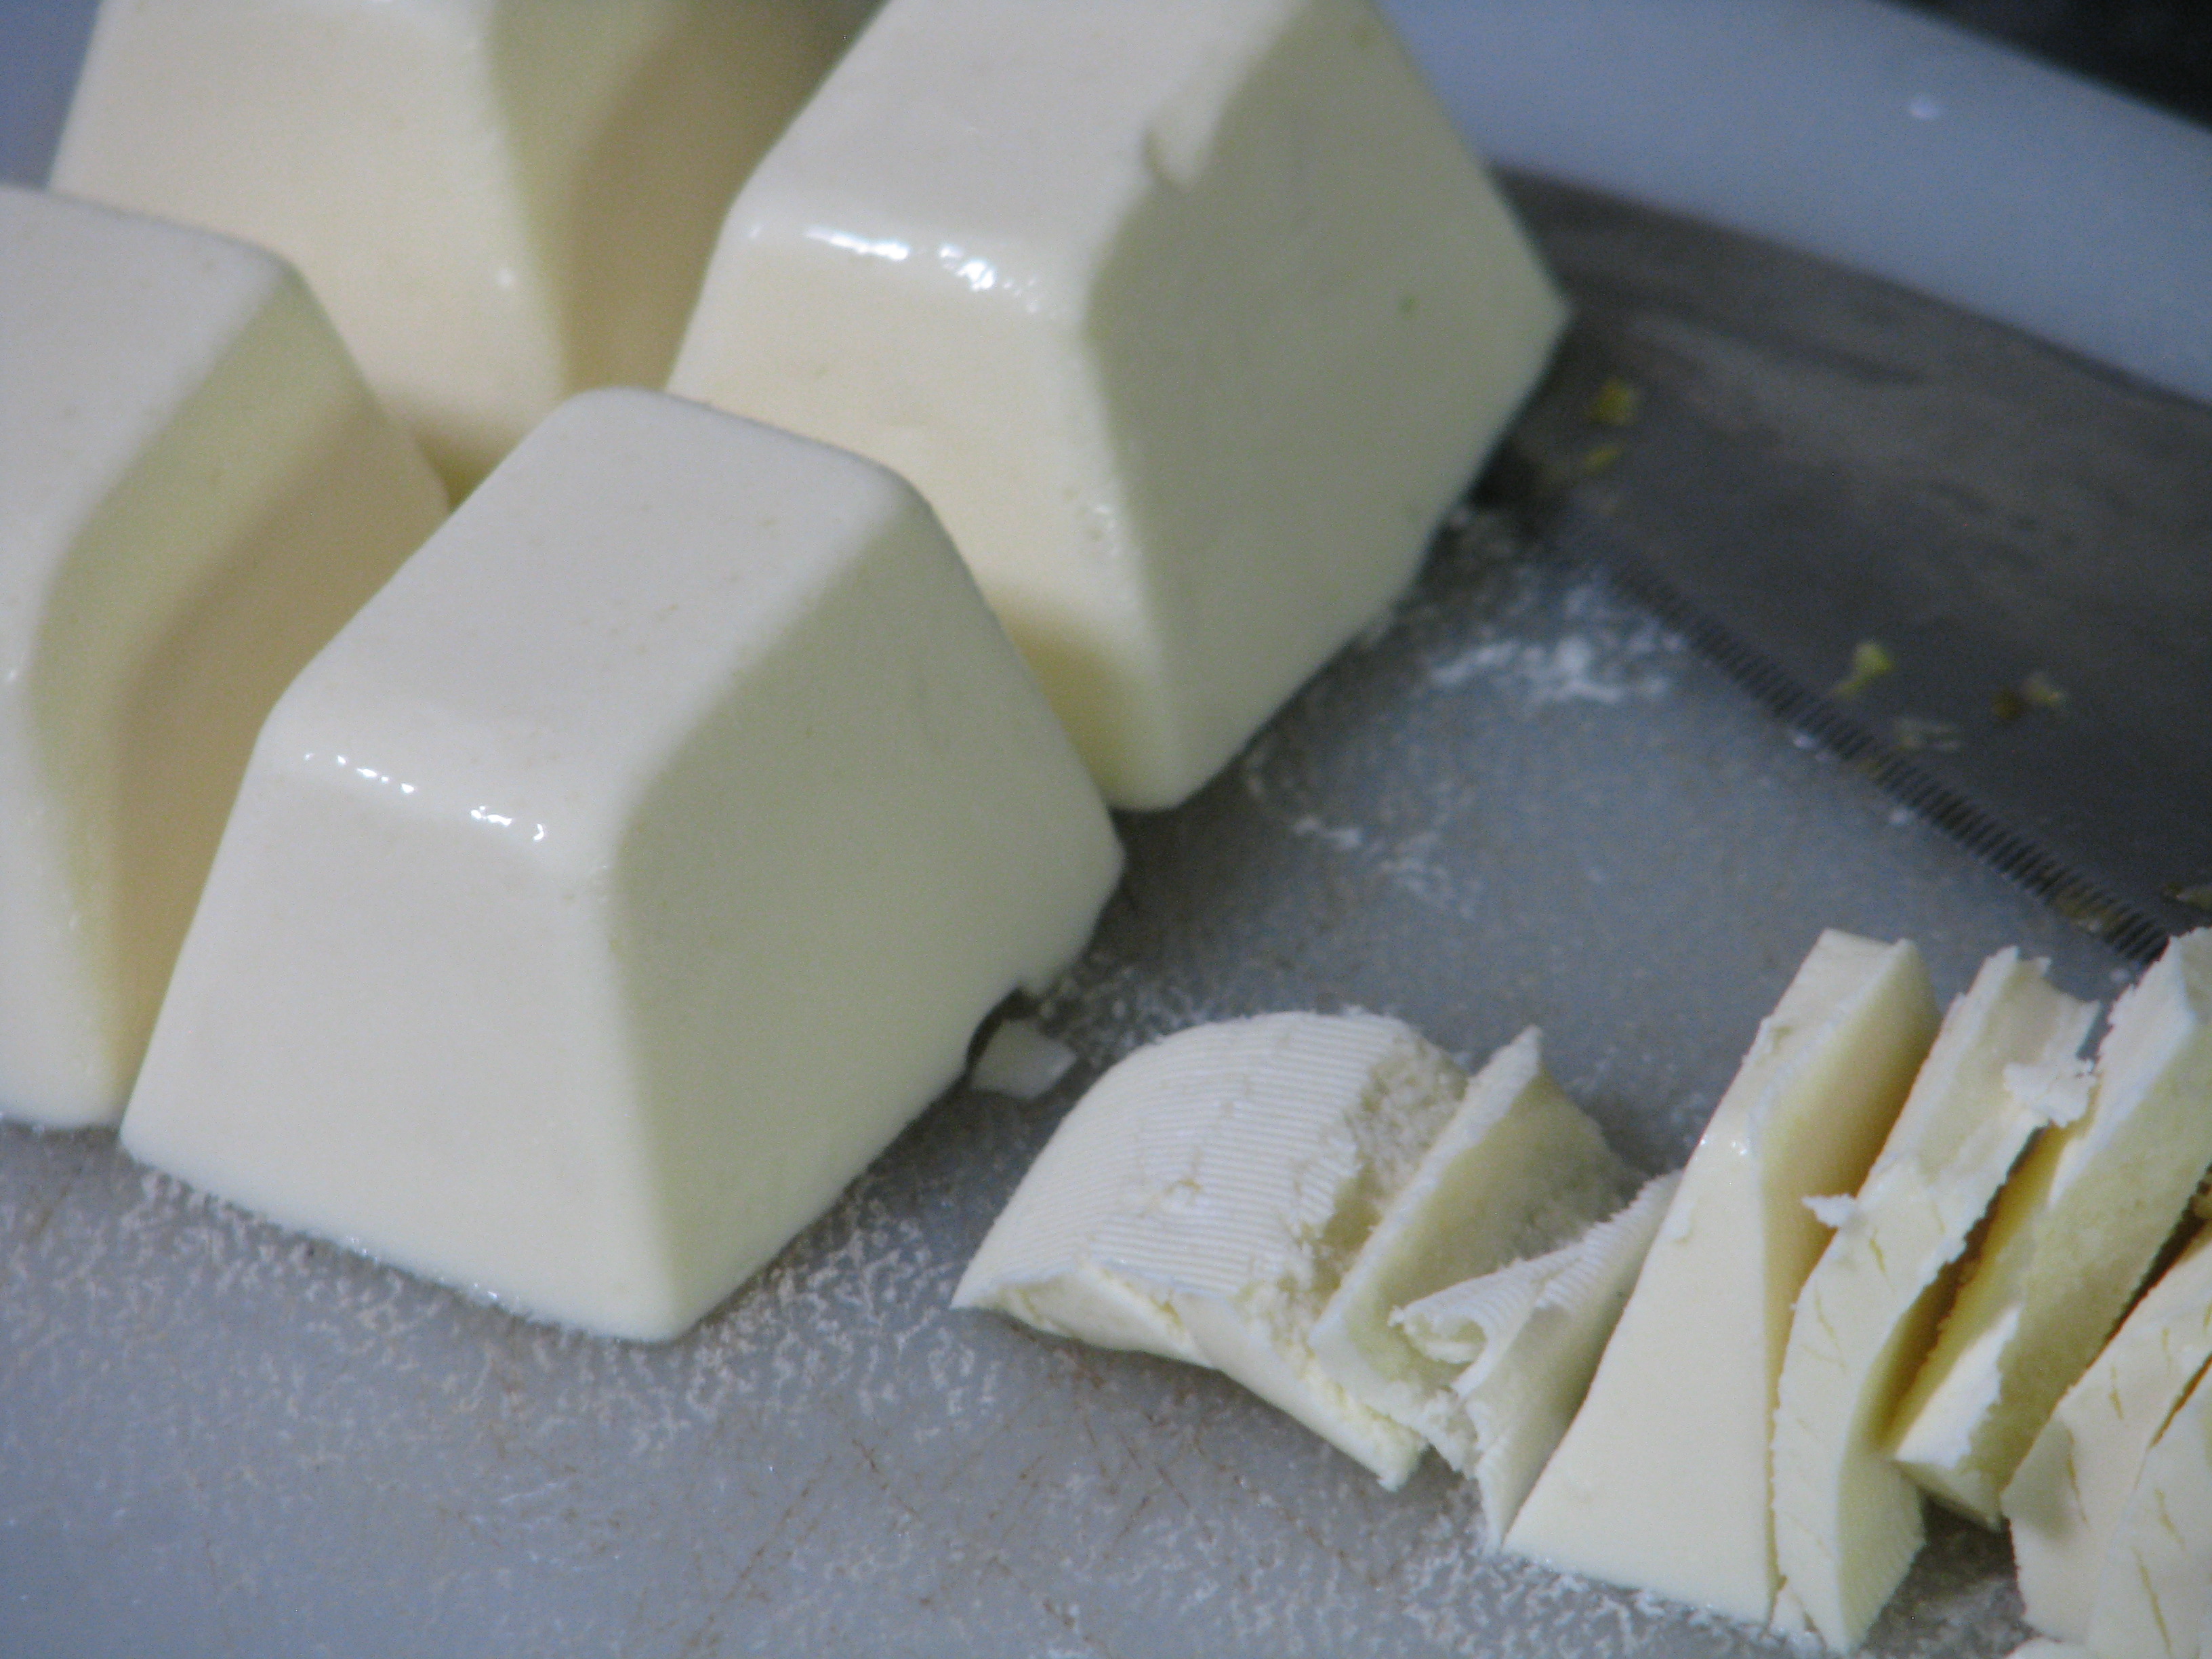
The mouth-feel is amazingly creamy and satisfying. I used the basic recipe, Regular Vegan Butter, Coconut Oil Base. The recipe calls for curdling the soy milk, which will drive the butter flavor. I tried the full teaspoon of cider vinegar, then half cider vinegar and half coconut vinegar, then just half a teaspoon of coconut vinegar, and finally no vinegar, and thus no curdling, at all. I found for my taste that the vinegar flavor carried through and was much too dominant. Even at just half a teaspoon it was so noticeable to me that I didn’t like it on toast. It was good, however, when my daughter used it on sourdough and topped it with fresh avocado. The slight vinegar flavor enhanced the avocado deliciously.
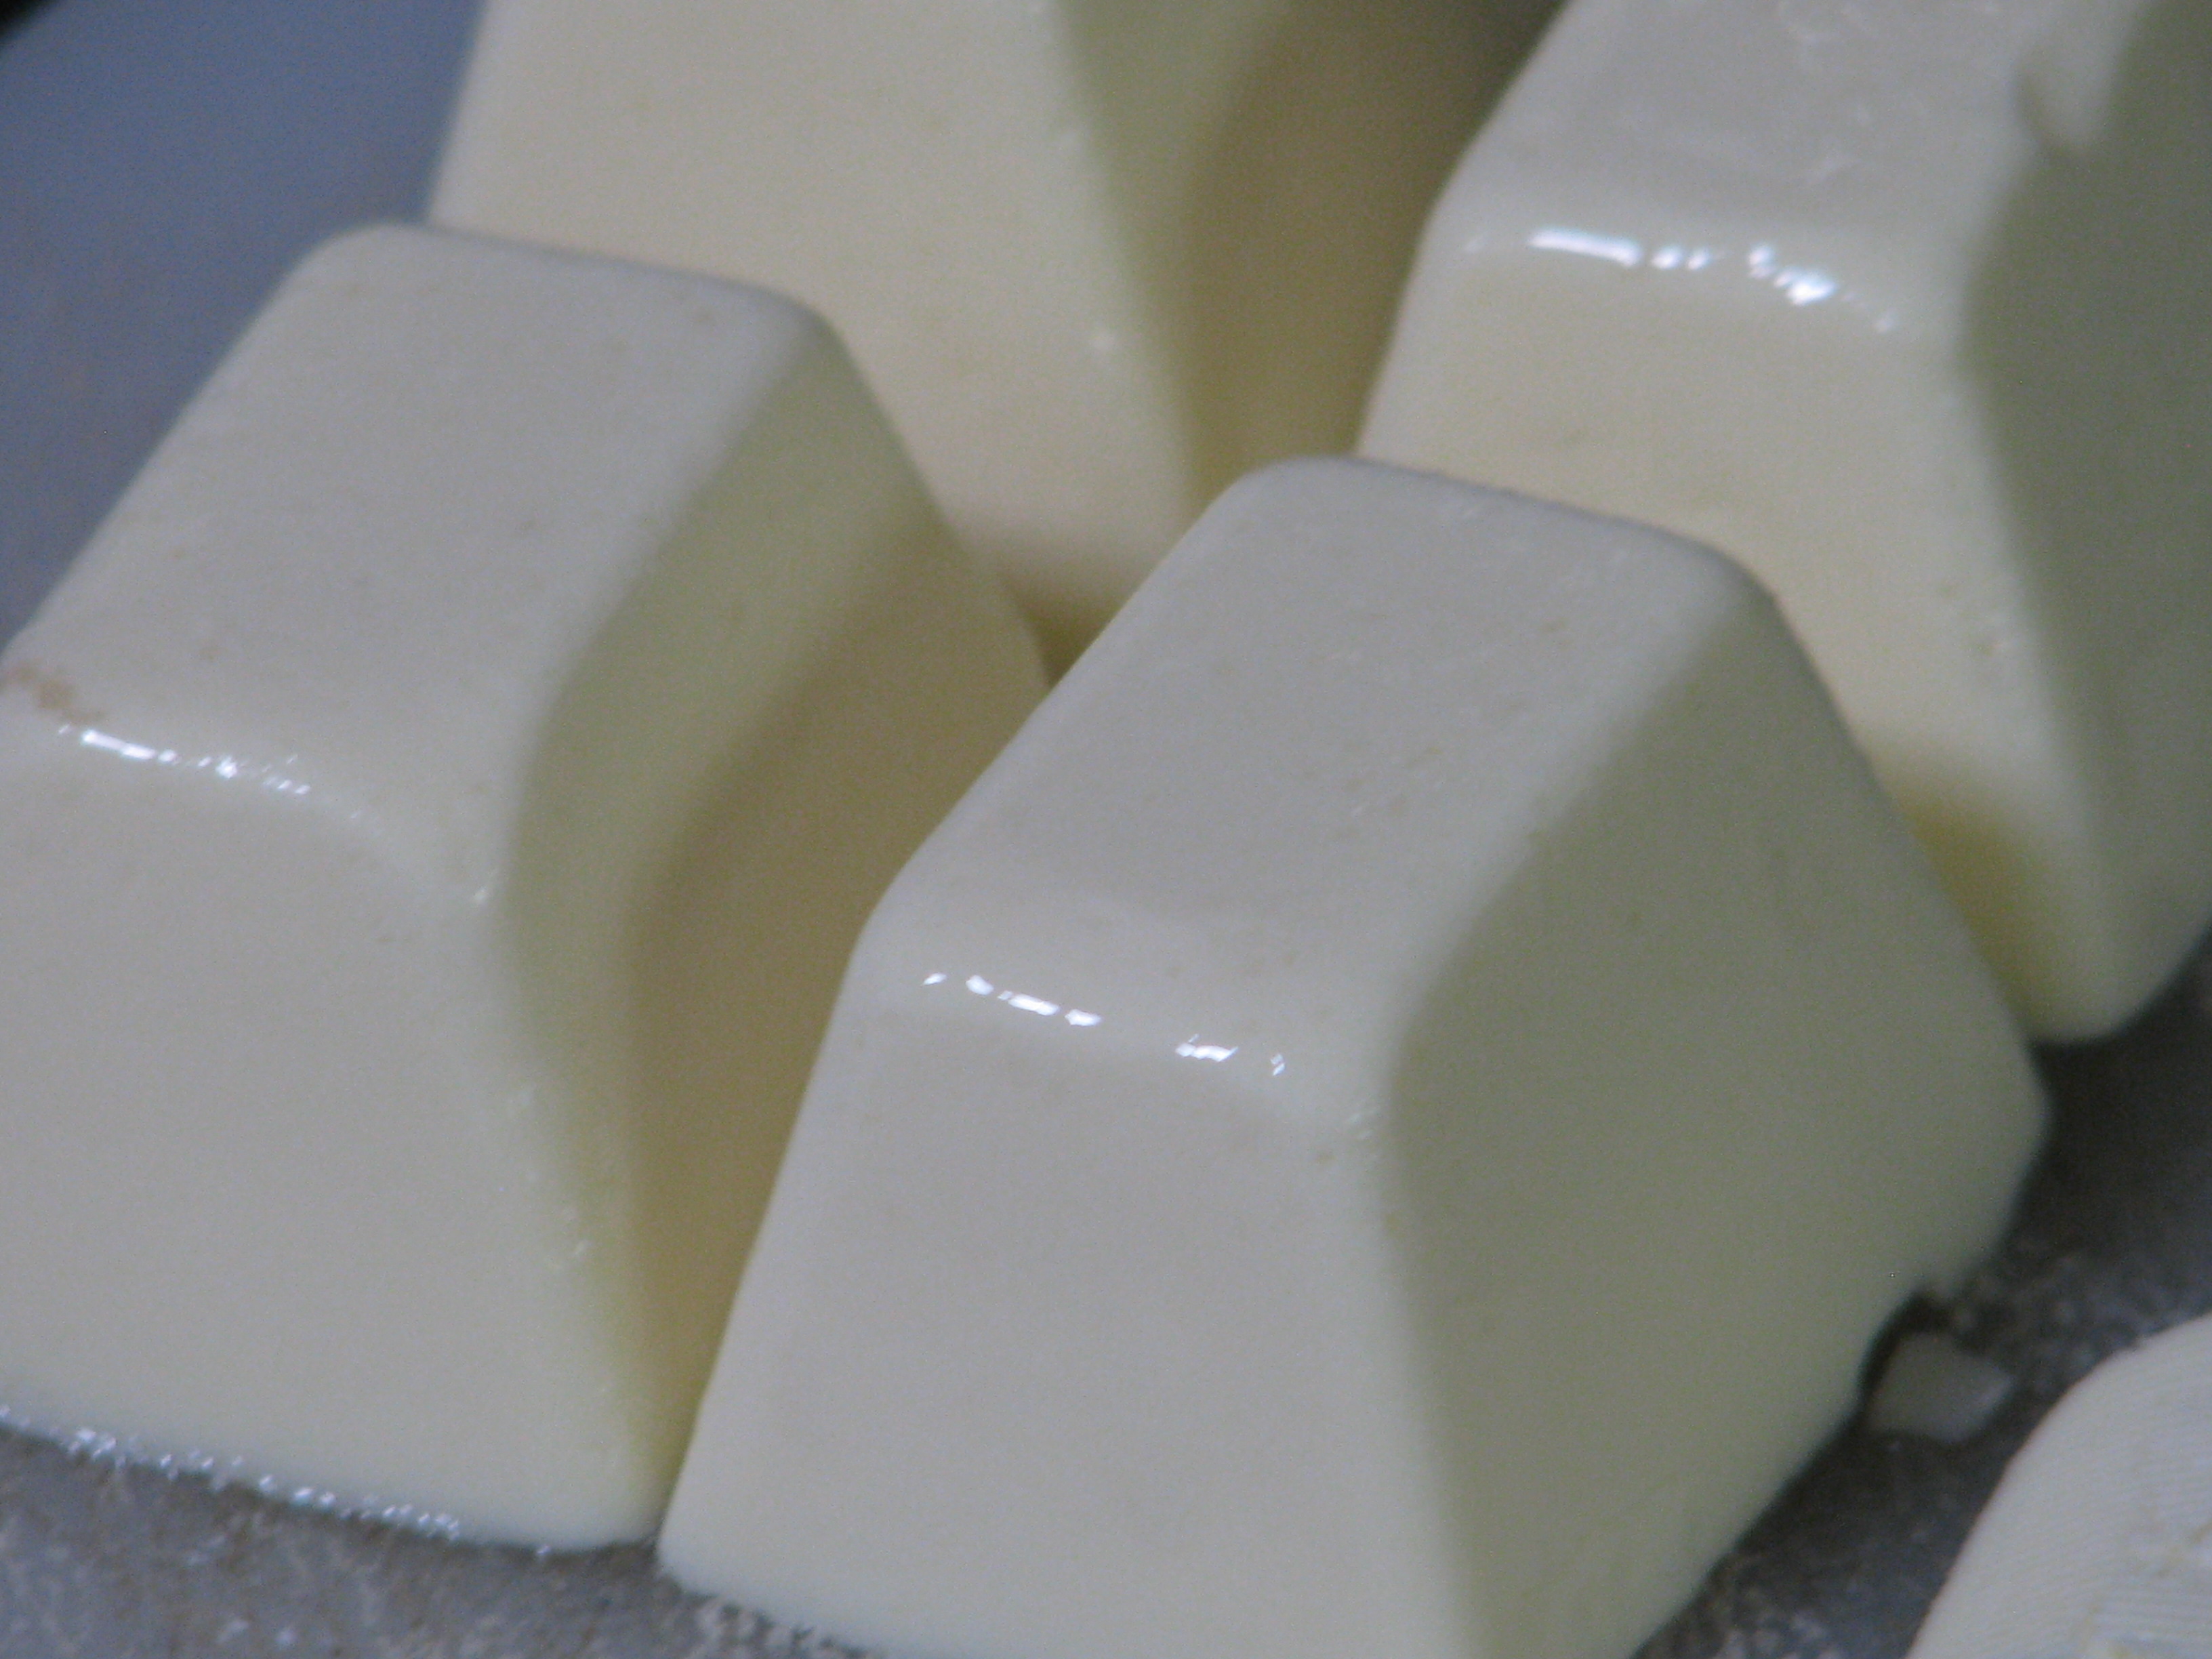
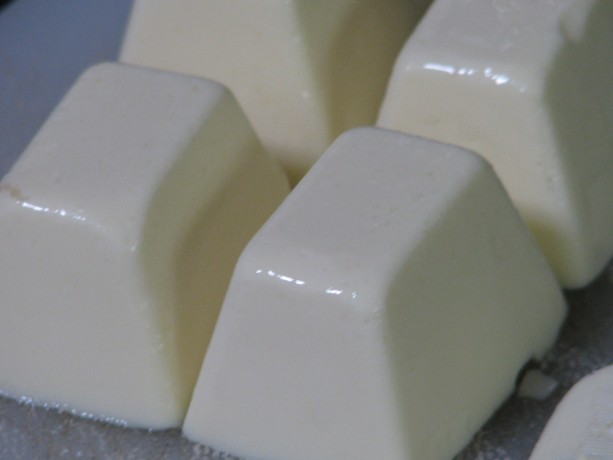
The batch I made without vinegar seemed perfect. The mouth-feel of this butter with or without the vinegar is creamy and all that a high-fat butter should be. It looks, cuts and spreads like butter. The flavor is creamy and very mild, almost like a slightly salted sweet butter. This was a winner for me. For the soy milk I used Trader Joe’s Organic Plain, which does have some sweetener in it. I’ll try with an unsweetened plain organic soy milk another time.
I keep my butter on the counter. I know that organic butter holds its shape better in the heat than processed butter, but both stay stable unless the temperature is in the 80’s. Coconut oil melts at 76F, and in my summertime Southern Californian kitchen, this vegan butter must be kept in the refrigerator. The butter is hard when needed, so the next batch I will take the author’s advice and swap out a tablespoon of coconut oil with regular oil to make it more spreadable.
I wanted to test the butter in cooking and baking. I melted it in a pan and cooked eggs and other breakfast items in it successfully. I used it on toast and on mashed potatoes with great success. The experiment with shortbread cookies went wrong, however, but I don’t think that that was the butter’s fault. These were lemon rosemary shortbread cookies, and contrary to my baking sense I followed the author’s (another blog) directions and didn’t sift the powdered sugar before adding it. There were lumps, therefore, in the batter and I mixed it extra to try and beat them out, which I believe was responsible for making the cookies tough. They were flavorful, but not crumbly. Oh well, I’ll just have to try again! The cookies rolled out, cut, and baked well, retaining their shape and performing as well as with cow’s butter.
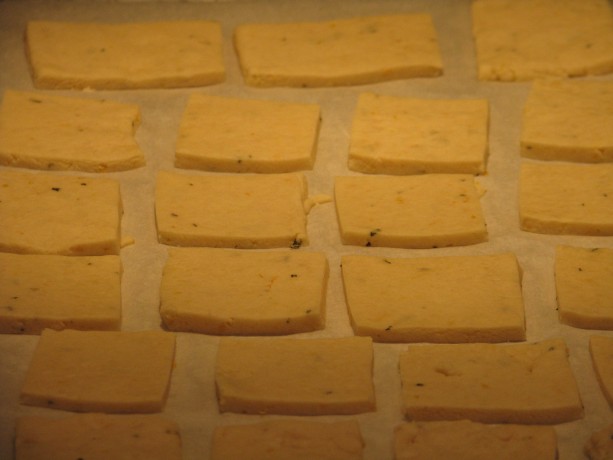
Shortbread didn’t spread using this butter, which was great. I don’t have a finished photo of the lemon-rosemary cookies because, well, they were eaten. As with all substitutions, there is always a difference and vegetarians and vegans have to embrace it. Of course fake bacon and ground ‘meat’ is not quite the same: the great part is that it is far more healthy for your body (lower fat, few preservatives if any, often organic, and not the pesticide-drenched and drugged animals that people eat) and doesn’t perpetuate the extreme cruelty to animals about which humans have become nonchalant. Yes, other animals aren’t kind when feeding off of other animals (those which aren’t vegetarians). Yet we as humans have the option the others don’t, to make eating choices.
Here is the basic revised recipe; please see the original blogpost on VeganBaking.net and give the options a try. I found xanthan gum from Bob’s Red Mill at my local grocery store, and liquid lecithin and coconut vinegar online through Amazon.com.
You can double or triple the recipe with no problem! Enjoy.
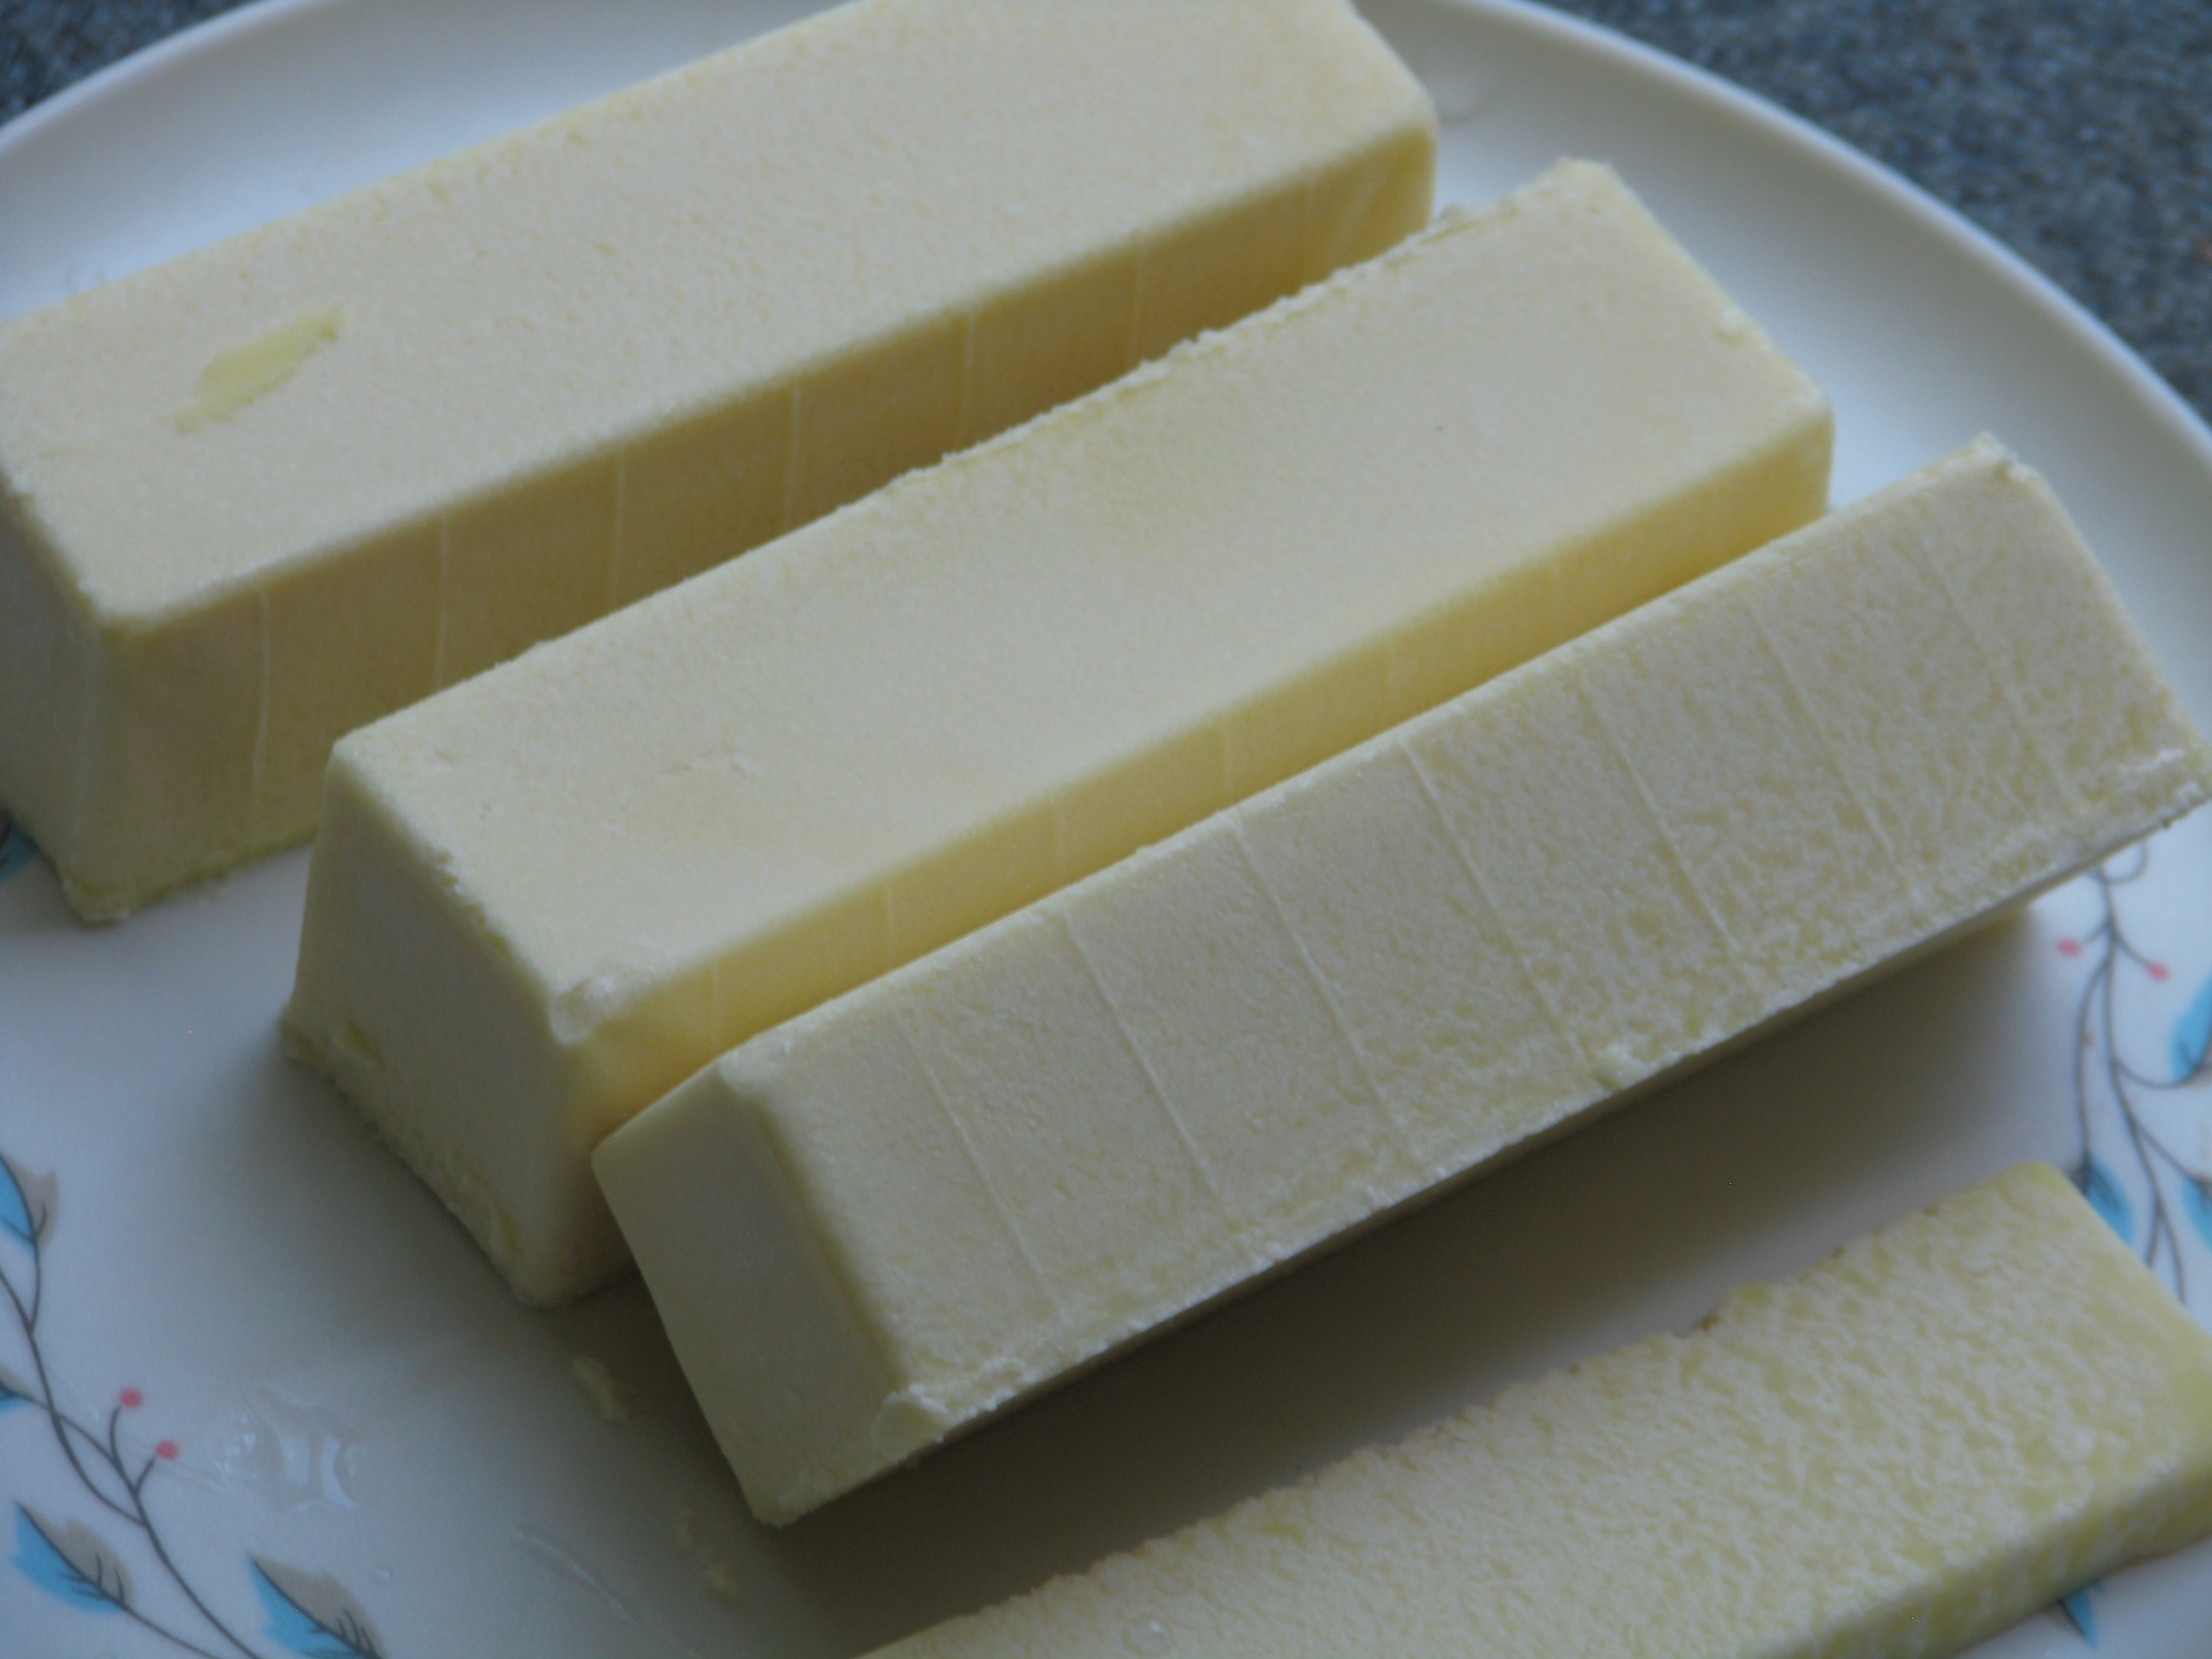
Recipe update: I’ve since made some changes to the recipe, exchanging some vegetable oil for some coconut oil for more spreadability, and adding a little more salt for a more satisfying (to me) taste when spread on toast. I’ve been using this butter for a month now, and have noted that: when melting in a hot pan it will brown faster than regular butter, so keep the temperature down, that it will melt and separate at room temperature (its summer now, so the kitchen is usually in the 70’s – in the winter it will be different) so I keep it in the refrigerator. I found butter stick molds that have the teaspoon markings along the side, so I’ve made 8x the original recipe and poured it into the butter molds, then wrapped each unmolded stick in wax paper and frozen them.
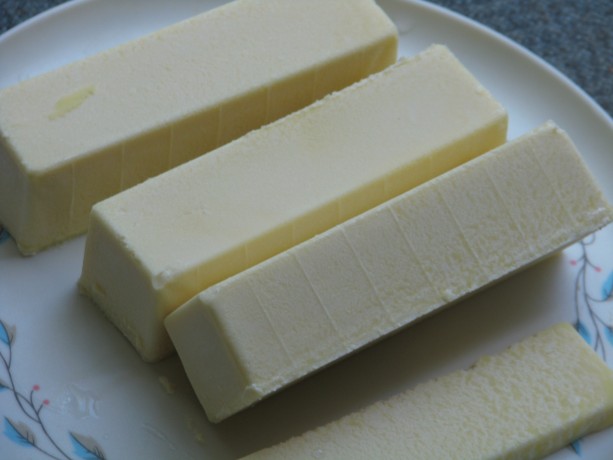
Vegan butter sticks with teaspoon markings along the side for ease in baking. I’ve also poured it back into the cleaned coconut oil jars and frozen them, keeping one in the refrigerator for unmeasured use. I’ve used it along with a non-dairy creamer in the Chocolate Ganache recipe and it is very chocolaty, but not as rich as the original. Part of that is due to the creamer; heavier creamer will produce creamier results, but in no way was it disappointing. It was very tasty, but not as heavy. When refrigerated it didn’t solidify as much as the other, so more chocolate might need to be added depending upon the type of creamer used but it was still spreadable and yummy.
Another Recipe Update:
I’ve been making the butter with unsweetened organic rice milk and it turns out well. At first it tasted too light to be satisfying, but when I had dairy butter at a restaurant it tasted greasy and heavy – my taste buds wanted the vegan butter! I found out that even when the kitchen is colder than the melting point of the coconut oil, it isn’t a good idea to leave the butter refrigerated because unlike dairy butter it will grow mold. The rice milk butter with the increased vegetable oil makes it perfectly usable from the refrigerator. I make sticks and freeze them in a freezer bag for baking and pour the rest into glass jars with screw-on caps for spreading. The jars are kept in the freezer until needed, then switched to the refrigerator. I’ve made biscuits, cookies, cakes, scones and breads with this butter, and with proper handling they all come out just fine. We offered both dairy and vegan butter to our holiday guests and they didn’t detect much of a difference. Since vegan butter is so much lower in calories, and coconut oil is so good for you, I don’t have to hesitate to use it. It is actually part of my weight maintenance program!
Ethical ButterAuthor: Mattie, at VeganBaking.netRecipe type: CondimentCuisine: VeganPrep time:Cook time:Total time:A wonderful vegan butter with no palm oil, but lots of options. My version is without curdling the soy milk. Please see the original excellent post for more explanations and options.Ingredients- ¼ cup + 2 teaspoons organic plain soy milk
- ¼ + ⅛ teaspoon salt (I increased the total salt to ½ t. for spreading butter)
- ½ cup + 2 Tablespoons + 1 teaspoon (130 grams) refined coconut oil, melted to room temp. (For more spreadability, I used ½ cup coconut oil and changed the 2T and 1 t to vegetable oil, along with the following 1 T for a total of 2 Tablespoons and 1 teaspoon vegetable oil.)
- 1 Tablespoon vegetable oil or light olive oil
- 1 teaspoon liquid soy lecithin or liquid sunflower lecithin or 2 ¼ teaspoons soy lecithin granules
- ¼ teaspoon xanthan gum or ½ + ⅛ teaspoon psyllium husk powder (I used xanthan gum)
Instructions- Combine soy milk and salt in a food processor or blender.
- Melt the coconut oil until it is just room temperature and barely melted.
- Add the coconut oil and the rest of the ingredients to the soy milk.
- Blend or process for about 2 minutes on low.
- Pour into ice cube trays, or into butter molds or trays.
- Freeze until firm, about an hour.
- Serve.
- Keep wrapped in refrigerator for a month, or frozen for a year.
- Makes one cup.
- Animals, Bees, Birding, Books, Building and Landscaping, Chickens, Cob, Compost, Composting toilet, Fungus and Mushrooms, Gardening adventures, Heirloom Plants, Hugelkultur, Humor, Living structures, Natives, Natural cleaners, Other Insects, Permaculture and Edible Forest Gardening Adventures, Ponds, Predators, Quail, Rain Catching, Recycling and Repurposing, Reptiles and Amphibians, Seeds, Soil, Water Saving, Worms
Permaculture Lectures At Finch Frolic Garden, June 2014
Tour Finch Frolic Garden! Permaculture Lectures in the Garden!
Learn how to work with nature and save money too
Finch Frolic Garden and Hatch Aquatics will present four fantastic, information-filled lectures in June. Join us at beautiful Finch Frolic Garden in Fallbrook, 4 pm to 6 pm, for refreshments and talks on…
Saturday, June 7: Introduction to Permaculture and Finch Frolic Tour: We’ll take you through the main precepts of permaculture and how it can be applied not only to your garden, but to yourself and your community. Then we’ll tour Finch Frolic Garden and show rain catchments, swales, plant guilds, polyculture, living buildings and so much more.
Saturday, June 14: Your Workers in the Soil and Earthworks: Learn the best methods for storing water in the soil and how to replace all your chemicals with actively aerated compost tea and compost.
Saturday, June 21: Aquaculture: You can have a natural pond – even in a tub! How natural ponds work, which plants clean water and which are good to eat. Even if you don’t want a pond, you’ll learn exciting information about bioremediation and riparian habitat.
Saturday, June 28: Wildlife in your Garden: What are all those bugs and critters and what they are doing in your yard? We’ll discuss how to live with wildlife and the best ways to attract beneficial species.
Your hosts and lecturers will be
Jacob Hatch Owner of Hatch Aquatics. With years of installing and maintaining natural ponds and waterways, and a Permaculture Design Course graduate, Jacob has installed earthworks with some of the biggest names in permaculture.
Miranda Kennedy OSU graduate of Wildlife Conservation and wildlife consultant, Miranda photographs and identifies flora and fauna and maps their roles in backyard ecosystems.
Diane Kennedy Owner of Finch Frolic Garden, lecturer, consultant, Permaculture Design Course graduate, former SDC Senior Park Ranger, Diane educates homeowners on how to save money and the environment while building their dream gardens.
Each class limit is 50 attendees, so please make pre-paid reservations soon before they fill up. Fee for set of four lectures and tour is $45 per person. Single session fee is $20 per person. Contact Diane Kennedy at dianeckennedy@prodigy.net for reservations and directions.
You will not want to miss this fascinating and useful information!
You May Also Like

Native Insects and IPM
-
Heavenly Steamed Eggplant

Black Beauty eggplant I love eggplant, but always thought it had to be salted, pressed and fried or baked. Cookbooks always talk about bitter juices that need to be leeched out. The recipe for Coucharas (see recipe list) calls for steaming eggplant until it is very soft so that the pulp can be mashed and combined with other ingredients.

Japanese or Chinese (long) eggplants have few seeds Now with an abundance of eggplant, both Black Beauty and Japanese, in my garden, I looked for some simple eggplant recipes. Maybe everyone else in the world knows how incredible lightly steamed eggplant is, but I just found out!

Choose glossy, firm eggplants I took a Black Beauty (globe) eggplant that I’d harvested the week before and was beginning to go soft, cut off the stem end and quartered it lengthwise. I steamed the slices for 8 minutes (no more than 10!).

Slice long eggplants into bite-sized chunks The texture was silky and smooth, not at all bitter and incredibly light. Over the top of the quarters I spooned a very easy sauce. The eggplant, which is notoriously spongy, soaked up the sauce. Slicing the eggplant, skin and all, was a dream and eating it was sublime.

Eggplant is in the same family as tomatoes and potatoes It was so good in fact that I did the same with Japanese eggplant the next night, but instead of quartering them, I cut them into bite-sized chunks, then after steaming poured the sauce over them in a bowl and stirred them around to absorb the sauce. I served both with very thin noodles. Photos of cooked eggplant are rarely delicious-looking, so you’ll have to let your imagination guide you.

An enormous double eggplant! There are many sauce mixtures on the Internet, but here is mine:
Heavenly Steamed EggplantAuthor: Diane KennedyRecipe type: Main DishPrep time:Cook time:Total time:Serves: 2-4Quick, light, tasty, low-calorie and wonderfully different, this eggplant recipe is a gem.Ingredients- One large Black Beauty eggplant or 3 Japanese eggplants
- 2 Tablespoons Rice Wine Vinegar (or other mild vinegar)
- ⅛th cup Bragg's Amino Acids, Tamari Sauce or low-salt soy sauce
- ¼ teaspoon sesame oil
- 2 Tablespoons olive oil
- ½ teaspoon grated fresh ginger
- If you like garlic, dice or grate a small clove and add it in. You can also include chili paste to taste.
- Fresh cilantro (optional)
- Toasted sesame seeds (optonal)
Instructions- Cut stem end(s) off the eggplant
- If using one large eggplant, cut it into quarters long-wise from end-to-end. If using long eggplant, cut into ¾" - 1" bite-sized chunks. Do not peel.
- Steam eggplant for 8-10 minutes until a knife easily slides into the skin; do not overcook!
- Meanwhile, mix all sauce ingredients except cilantro or sesame seeds, if using.
- Plate the eggplant quarters and drizzle the sauce over the top slowly so it absorbs, or put chunks in bowl and mix with sauce, then plate. Offer extra sauce separately.
- Sprinkle with fresh, chopped cilantro and/or toasted sesame seeds.
- Very good with noodles or rice.
-
Dill Pickles

Try to keep uniform sizes in each jar Last year I planted regular cucumbers, and my daughter and I decided to try our hand at making pickles. We tried several recipes, and the results were okay but not fantastic. The pickles were kind of… flabby.

Sterilize jars and lids while simmering brine This year I planted pickling cucumbers, and they came in last month with the idea to outstrip even the zucchini plant. Trying to find the cucumbers which were cleverly hidden and camouflaged, before they grew too long, became a game. When we had enough, we made pickles. I wanted a recipe that didn’t have too much garlic, and used cider vinegar, which is healthier than white distilled (grain) vinegar. Most recipes called for white wine vinegar, but that was very hard to find and only sold in small expensive bottles. Red wine vinegar, however, I could find in a gallon, but it would have discolored the pickles to an unappetizing greyish red, and just wouldn’t have had the right flavor. Cider vinegar was inexpensive, easy to find and has the ‘mother’ in it, which is that strandy thing that is suspended in the bottle. That is live yeasty stuff that makes the vinegar what it is, and what makes it more healthy. You should use vinegar that has at least 8% acidity, to keep the pickles from spoiling. Also make sure all the cucumbers are covered with brine or they’ll spoil, especially after opening the jar.

Use fresh whenever possible Pickling cucumbers make all the difference. They are smaller at maturity and don’t have as many seeds, and are more crisp. Recipes wanted the cucumbers to be pickled within 24 hours of being picked. You’d have to have twenty plants to have enough cucumbers to pickle in quantity all at once, and then you’d be pickling twice a week. I kept ours in the refrigerator until we had enough, with some loss of crispness but that couldn’t be avoided. I had planted some dill, but not enough and not early enough for the recipe. It calls for the seed head, but I used dried dill instead since mine weren’t in bloom yet. We also put a grape leaf at the bottom of each jar because the tannin is supposed to help keep the pickles crisp. Many old fashioned recipes call for the addition of alum for that purpose; aluminum has been linked to Alzheimer’s, so finding and adding alum is a personal choice. I learned that you must cut off the blossom end of the cucumber because it has enzymes that will cause the cucumber to rot. That is nature’s way of making sure the seeds are dispersed, but doesn’t help with pickling. Larger cucumbers should be cut into disks or slices and pickled. If the cucumbers are yellowish and seedy, don’t pickle them. They are too old.

Grape leaf, garlic, dill and pickling spice in sterlized, hot jars Use wide-mouth jars if you have them. I don’t, and stuffing the cucumbers into the jar would have been a lot easier if I had.

The best gadget ever for picking up hot jars No recipes tell you when you they are done. I read where a ‘freshly’ canned food was put up in the last two years. We tried ours after 5 weeks and they were very good.
Sterilize jars and lids while simmering brine The origins of this recipe is the Ortho Complete Book of Canning, but I have tweaked it. I hope you like it: many happy pickles to you.

Pour hot brine over cucumbers Fresh-Pack Dill PicklesAuthor: Diane C. KennedyRecipe type: CondimentServes: Lots!A wonderful dill pickle recipe; not too garlicky, not too sour or salty, but with excellent flavor and bite.Ingredients- 3 quarts water
- 1 quart cider vinegar
- ½ cup pickling salt
- 1 fresh grape leaf per quart (optional)
- 1 head fresh dill per quart, or ½ teaspoon dried dill weed each quart
- ½ teaspoon mixed pickling spice per quart
- 1 clove garlic, peeled and halved, per quart
- 5 pounds small pickling cucumbers less than 4 inches long, washed and blossom ends removed
- 4-7 quart wide-mouth canning jars and lids, sterilized and kept hot
Instructions- Combine water, vinegar and salt in a pot and allow to simmer
- Place grape leaves, dill, garlic and pickling spice in the bottom of each clean, hot quart jar
- Pack in cucumbers without breaking or bruising them. (It is best to do one jar at a time so that jars and contents remain hot)
- Pour simmering vinegar solution over cucumbers, leaving ½ inch headspace from top of jar; run a spatula around the inside to release air.
- Wipe mouths of jars and seal with lids.
- Process in boiling water bath with water an inch over the jars, for twenty minutes
- Cool, label and store the jars in a dark place.
- Yields about 4 quarts, although we made 7.
- Try after five weeks and store in refrigerator after opening.

Label with a date! -
Home Remedies
I’ve been going to physical therapy for my sprained wrist, and fortunately the therapist is someone who believes in diet and herbs as a viable alternative to or complement of conventional medicine, as do I. We started discussing home cures, and I began to think over how many that I knew because my mother used them. I was born when my parents were in their early forties, and they were born before the 1920’s, before World War II and the scientific revolution. Before everyone turned to petri dishes for the ultimate answers. Medicine made great progress in finding vaccines for heartbreaking diseases such as polio. However, its successes gave it a blanket approval, and suddenly scientists could do no wrong. Many medicines are derived from plants, such as simple aspirin which has the main ingredient salicin that is found in willow trees. Scientists found a way to synthesize salicin so as to put a patent on it and make money, just like so many other drugs. When pharmaceutical companies took hold, that is when we lost control of our traditional medicine and our health. Health is a business, and what is in the drug stores has little to do with getting well, but is mostly about making money. Most medicines treat symptoms and provide enough relief to make you re-buy the product, but won’t eliminate it because then you will have no need to buy it again.
Home remedies have for the most part become lost in the past as post World War II parents disregarded the ‘old fashioned’ methods and turned to the pharmacy. Thus, the traditions were not passed on to their children, so the remedies have been lost. Only in reading old books do we hear them mentioned. Or we can surreptitiously inquire at a health food store, where much of the same buying tactics are at play, and clerks are not medical professionals. The desperation for cures is such that people would often believe strangers rather than doctors, well-written propaganda rather than documented success, and that is dangerous. I was shopping at Henry’s last week, standing with my empty basket looking at the herbal tinctures section, and a woman pops around the corner and holds up a bottle of sesame oil and asks if it would be a good choice to use as a carrier oil for a tincture she had at home. Fortunately for her, I’ve been involved with herbs for thirty years, and I knew what she was talking about, and gave her I think accurate advice and warnings, which included doing some sound Internet research on her own. I don’t know how a short, middle-aged woman with an empty shopping basket would appear to be knowledgeable, but perhaps anyone would have done as well for her.
I have been researching home remedies for reducing inflammation, since my sprained wrist hasn’t healed and I have arthritis and bursitis (wow… just bury me now! What happened to youth?) among other casualties of the physical working life. It made me think of my mother and all the vitamins she gave us and home remedies, as well as enforcing a healthy, balanced diet when meat and potatoes were the standard.
One cure she passed on from her European grandmothers was the mustard plaster for chest colds. Mix dry mustard powder with water to make a paste, put it on an old cloth and slap it on your chest. She used old diaper cloths. I still have them! If you have tender skin or are a child, then a film of vegetable oil on the skin helps protect from the burn. I believe that the way it works is to stimulate blood flow to help the body clear up congestion, and warm up the body to help sweat out the toxins. Capsicum from peppers works the same way in arthritis medicines. Vicks Vaporub replaced the mustard plaster, using menthol from eucalyptus and mints (now synthesized) to clear the sinuses as well as help the chest. The petroleum jelly in it links us to our dependence on oil, whereas mustard grows in most places and people would harvest the weeds, using the fresh leaves for a spring tonic and the seeds for food and the mustard plaster. Another remedy was blackberry juice for.. um… the ‘runs’. It ‘binds’ the intestines quickly. She’d use a little Manischewitz Blackberry Brandy diluted in warm water, and it would not only stop the problem, but relieve the cramps and make a sick kid sleep. I’ve always used it and it has always worked, as well as plain blackberry juice. Some blackberry brandys don’t have real juice in them, so beware. There is also the cider vinegar and honey remedy which was very popular in the late 1960’s, and has cyclical resurgences. Cider vinegar is slightly fermented from apples and should have a murky, stringy bit in the bottle. That is the ‘mother’ part of the yeast which is alive, and which you can use to ferment other things if you make your own. It is also claimed to be very healthy. Mom would give us apple cider vinegar mixed with honey and warm water to drink along with dinner. I have a fondness for it, even though it brings me back to a childhood which I would rather forget. Every now and then I read about how great vinegar is and mix some up. In fact, I think I’ll do so today and see if it helps with my wrist!
Let’s see what else… prunes for.., well, the opposite of what blackberry is for. Ginger ale to settle a stomach when throwing up. The carbonation helps, but it is mostly the ginger, which eases car sickness, morning sickness, or a sour stomach. Of course, garlic, which is the cure-all to many illnesses it seems. I figure that people reeked so badly of garlic that no one would get close enough to them to give them any germs. Then there is arnica for bruises. Arnica cream is a standard in my medicine cabinet (you can learn more about them here), and when my daughter reminded me of it this week and I started applying it to my wrist at night, I had a noticeable difference in the morning. Honey for many things, including local honey for hayfever, applying it to dry skin, using it for its germicidal properties, and mixed with lemon for coughs. Raw, unheated honey kills germs and bacteria. When people had dirt floors they used strewing herbs such as rosemary and lavender on the ground when. Not only did they help with the smells of the household (which were considerable), they had medicinal properties. Rosemary kills germs. In my research for anti-inflammatory herbs, along with some Asian herbs that I’m unfamiliar with and probably can’t get, the four main common ones are garlic, ginger, pepper and turmeric. Turmeric is a yellow powder from the turmeric root and is used in curries here, but used in many medicines in India. I’m planning on creating a tincture of the four of them and applying it to my wrist to see what happens.
Of course there is always the simple Irish remedy, as is hailed on one of our traditional Irish music CD’s: ‘Have a drink of whiskey to soothe away your pains’.
If you have proven home remedies, I’d love to hear about them!
-
Natural Cleaning Products: Vinegar

Vinegar Cleans Glass Beautifully I’m on a personal crusade to remove all non-environmentally friendly cleaning products from my home…. life… universe… well, I’ll start at home anyway. Not only does my house utilize a septic tank and I’m not supposed to have scrubbing bubbles living a dark life beneath my yard, but harsh chemicals are bad to breathe, bad to have eat through the skin on my fingers, and bad for the environment and water. So how on earth did humans clean prior to the chemical revolution? With what they had around them, of course. They usually had wine, or some sort of fermenting juice around, and after the fermentation was gone they had vinegar. Anything that smelled that strongly had to clean well, and it actually did and does. Undistilled vinegar, or acetic acid, has antiseptic and antibacterial properties that were written about by Hippocrates, the father of medicine.
There has been a foodie revolution with artisanal vinegars, and now people who rarely cook anything but a TV dinner know what Balsamic or wine vinegar is. If you’ve ever been to England you’ll know about shaking malt vinegar onto chips (French fries), which is absolutely delicious, by the way. But the vinegars found in grandma’s pantry were cider vinegar and white vinegar.

White and Cider Vinegar Cider vinegar has an old-fashioned flavor and is used in cooking, especially Eastern European foods. There was a huge health fad when I was little about the benefits of drinking apple cider vinegar, and people still swear by it. My mom gave us a glass of warm water with cider vinegar and honey in it to drink with our dinner. I got to really like the taste. Undistilled cider vinegar has a floating mass in the bottle; that is called the ‘mother’, and it is part of the fermentation process, and can be removed and used to help ferment other vinegars. People don’t like that mass, so they invented white vinegar which has little of the nutrition that cider vinegar has.
White vinegar is made from fermented grains, mostly corn, and this is the product that is now used in cleaning because it won’t leave a brown mark and is less expensive than other vinegars. There are hundreds of uses for vinegar, besides setting color when dying eggs. What vinegar is really valuable for here in Southern California with its mineral-heavy water, is to clean out those mineral deposits from machines and glassware. Glass vases that had acquired rings inside from holding tap water, which didn’t come out with a brush and soap, became clear and beautiful when I filled them with vinegar and water and let them soak for an hour. The same for a crystal decoration that is filled with water and hung to catch the light, filling the room with prisms.

Crystal Clear It had mineral buildup and was ugly (now I use distilled water in it!), and after a vinegar and water soaking, and a little nudging with a long, skinny brush, it is beautiful again.

Cleaning Bacteria from Hummingbird Feeders Hummingbird feeders must be cleaned regularly because the black mold that grows on the feeder holes will infect the hummingbirds and eventually kill them. I’ve always used a bleach solution to soak them. No more! I use hot water and vinegar to soak, then use straight vinegar and a brush to kill any germs around the bases. I’ve noticed that besides not being gassed with the chlorine bleach fumes, that the feeders stay clean just as long as they had when I used bleach to kill the germs.
I was talking with a friend about dishwashers and how glasses weren’t getting clean and the dishwasher just wasn’t performing well anymore. She passed on the tip from another friend to dump a whole gallon of white vinegar into the machine and let it run. The vinegar loosens up all that mineral yuck that clogs up the works. It works in drains, too.
Vinegar cuts through grease and grime, like that scary fuzzy layer on the top of your refrigerator, or that grease build-up over the kitchen range. I switched to cleaning windows with vinegar water and newspaper, and have had great success.
Combined with the alkaline baking soda (bicarbonate of soda), vinegar fizzes and was what made your fifth-grade Science Fair volcano erupt, or the toy submarine skim through the pool (I loved mine!). Mixed with some dish soap, these three ingredients work well to remove stains, such as those in the shower or on counters. Use the paste on an old toothbrush to clean up grout.
Other uses for vinegar include as a hair rinse, to make hair supple and shiny; in water when boiling eggs so they won’t crack and they’ll peel more easily (give them a cold water bath right after cooking, and try not to use very fresh eggs, which are very hard to peel after boiling). Run it through the coffee maker, or in the bottom of a kettle to dislodge the chunks of minerals that stick to the insides. Go on the Internet and search for lots of ideas on how to use vinegar in your routine. Vinegar is safe, efficient, natural, and its smell isn’t any worse than that of chemicl cleaners, and a lot easier on your lungs.

It dissolves hard water stains