-
Goat Milk Crumbly Cheese
A friend of mine and her daughter have several goats and this year they began milking them. Every day. Twice a day. Not without a struggle. As they are lacto-ovo vegetarians as well, they don’t use that much milk. However they have experimented with kefir and cheese. Now they are experimenting with giving some milk away.
I have been a lucky recipient of a quart of freshly milked, unpasteurized goat milk. I intended to make cheese out of it, and in the heating for the cheese the milk would become pasteurized.

Heat Slowly I’ve learned a little about making cheese, and I’d like to learn more. What I made was an easy acid-based spreadable or crumbly cheese. This requires lemon juice or vinegar added when the heated milk reaches 180 degrees F.

Stir in Lemon Juice until Curds Form The milk immediately separates into curds and whey.

Pour Curds and Whey into Cheesecloth This is poured through cheesecloth,

Tie Cheese into Cheesecloth then all four corners tied and the cheese suspended over a pot or bowl to drain.

Hang Cheesecloth Over Pot to Drain My result was like a dry cottage cheese. I hung it longer than recommended, so perhaps too much moisture seeped away. Then, before I combined it with seasonings, I put it into the refrigerator since I was busy with something else. I think that hardened up the cheese as well. The seasonings didn’t so much as combine with the cheese curds as they just mixed up with them.

Mix Crumbly Cheese with Seasonings That worked out okay. Instead of spreading the cheese on toast, I crumbled it into a vegetable and pasta dish for dinner and it was tasty, as well as a good extra source of protein, and just fun to eat because we had made it from the milk of goats we have met!

Serve with Pasta and Vegetables A quart doesn’t make much cheese; in fact, it made about half a cup of crumbly cheese.
The whey is a rich souce of nutrition, but is often thrown away. With the acid added to it, it has an unpleasant flavor for drinking. I used it, with the addition of more water, to boil the pasta for the meal, then after it cooled poured it on my outdoor plants. You can use it to replace water in baking or feed it to your chickens… just don’t dump it down the sink!
This recipe is for a quart of goat milk, which doesn’t produce much cheese. Recipes I looked at all recommended a quarter cup of lemon juice, but the cheese curdled for me at no more than an eighth of a cup. Maybe you’ll have different results. You don’t have to hunt down a goatkeeper, either. Goatmilk is sold in supermarkets.
Crumbly Goat Milk CheeseAuthor: Diane C. KennedyRecipe type: Side DishPrep time:Cook time:Total time:Serves: ¼ cupHave a quart of goat milk? Make a little cheese with it!Ingredients- One quart fresh goat's milk
- Up to ⅛th cup fresh lemon juice or vinegar
- Seasonings such as half a garlic clove grated, thyme, Herbs du Provence, etc., and coarse salt
Instructions- Affix a cooking thermometer to the side of a medium saucepan.
- Add goat milk so that the thermometer is submersed in the liquid but not touching the bottom.
- Heat over medium heat until the temperature reaches 180 F.
- Remove pot from heat and gauge from side of pot.
- Stir in lemon juice or vinegar a teaspoon at a time until curds form. You'll know it when it happens! There will be curd and almost clear whey.
- Line a bowl with double layer cheesecloth.
- Pour contents of pot into cheesecloth.
- Tie corners of cheesecloth together over a wooden spoon and allow to hang over bowl or pot to drain.
- Drain cheese one hour or more. The longer you drain it, the more dry it will be.
- Remove cheese from cheesecloth and place in bowl with the seasonings of your choice. Sprinkle with coarse salt.
- Use crumbly cheese on top of hot pasta or vegetables.
You May Also Like

Native Insects and IPM
- Gardening adventures, Permaculture and Edible Forest Gardening Adventures, Ponds, Rain Catching, Vegetables
Yesterday in the Garden
Yesterday was the solstice, the formal beginning of summer. The longest day of the year. (Only six months to Christmas!) With months of growing season already behind us here in San Diego County, and the threat of drought and fire ahead of us, it is a time to enjoy the bounty that we already have. This is my year for gardening: I have the best vegetable garden I’ve ever had, after years of building raised beds and lining with aviary wire against gophers, improving the soil with compost, and buying organic seeds and fertilizers. I also have incredible freedom in my yard to plant whatever I like, wherever I like (within the constraints of tolerance by the plants). I’ve always had to cluster plants around where I’ve slapped together irrigation on the few stolen weekend hours I could devote to my yard. No more! With the permaculture gardens, the well and the drip irrigation, I am excited about my yard for the first time in the twelve years I’ve lived here. With the incredible job that Roger Boddaert and his team of Juan and Francisco, and also Aquascape’s Aart DeVos with his manager Jacob who has spent thirteen hour days on my property and is back early the next morning, the permaculture project is nearing completion and is spectacular. As a habitat it is succeeding, attracting more wildlife every day. As a food forest it has is off to a good start, with extra going to go to the Fallbrook Food Pantry. As an interesting, decorative garden it is unique and full of surprises. I’ll show you some photos; you can click on any of them to enlarge, but it will open in this window and you’ll have to use the back arrow to return to this page:
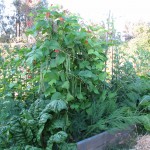
Long Scarlet Runner Beans 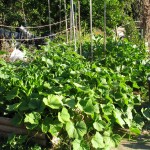
Vigorous vines 
Little pickling cucumber 
Towering Quinoa 
Seeds on multiple stems 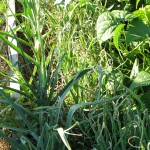
Garlic Nearing Harvest Time 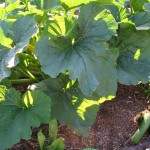
First zucchini harvest 
Through the main entranceway 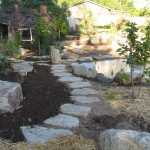
Streamside walkway 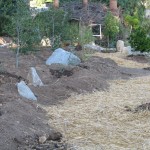
Mulched beds with swales 
Tin-roofed bridge 
The Palm Aisle 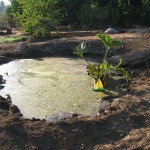
My First Yacht 
Yarrow between the stepping stones -
Is She a He???

Rooster in Disguise? Problems in Chicken Land! Of the seven hens we’ve raised from chicks, one has played us false! Or so my daughter (the birder) speculated upon her arrival home from college. Our one Rhode Island Red, which is a larger breed so we chose the smallest chick in the batch, is showing signs of not being, shall we say, hennish. First of all, she is large. Really big feet. Ever hear the Fats Waller song, Your Feets Too Big? That applies here. Most notably, though, are her tail feathers, which are starting to take on a more colorful life of their own. They are a little longer and have some bluish-green hues in them that hens, well, just don’t care about. She has become a bully to all the others, especially the largest Americauna, Chickpea.

And I thought they were being hen pecked! I had attributed the temper to her being a redhead, but apparently there are other explanations. She is developing admirable wattles, which is something I don’t get to say to just anyone. Also, she has very shiny neck feathers, and roosters have an oil gland they use to preen their feathers. However, she hasn’t yet crowed, but Internet research tells us that some crow early, some late, some not at all. Also, she hasn’t grown spurs yet, but the story is the same as the crowing. One chicken site informed us that it was easy to sex Rhode Island Red chicks because the females have a black stripe on their heads.

It seems like only yesterday.... No stripe on this one, yet if it is so easy to sex them, why was this male in with the females at the store? If indeed she is a male.

Trying to blend in.... So what if she is a he? I don’t know yet. My neighbors would have a fit if I had a crowing rooster in my yard. Rural as it is here, there is a certain peacefulness that rolls across the land and a screaming bird just doesn’t fit in. Also, I’m a lacto-ovo vegetarian. I eat eggs, but not animals, so I don’t want fertile eggs or chicks. Nor do I want my other girls harassed all the time. However, I’ve raised this bird from a day old, and I don’t give over my responsibilities lightly. The hens won’t begin to lay for a couple more months, so I have some time to consider.
I wonder if my vet would fix a chicken?
Here is the whole cast of characters:

Emerson Emerson: if our speculation is in error, and she is not a he, but she is a she, then she can assume the name Emily.

Blondie/Evelyn Blondie. Not the most original name, but the song Heart of Glass comes to mind whenever I see her. Blondie is Emerson’s chosen consort (another reason Emerson must be a male…. going for the blonds!) UPDATE: Blondie has been renamed Evelyn to move from music to fiction genres. Emerson, Miss Amelia and Eveyln are all characters in Elizabeth Peter’s Amelia Peabody series.

Lark 
Linnet Lark and Linnet: the youngest chickens by a few weeks, these Barred Rocks pair off and are quite smart. Comparatively. Lark is darker than Linnet.

Miss Amelia Miss Amelia: the Silver Wyandotte. Named after the intrepid heroine of Elizabeth Peters’s Amelia Peabody historical archeological mysteries. She likes to sit on the highest perch.
")
Kakapo (a New Zealand bird... she looks like one!) Kakapo: the lighter colored Americauna. Her posture and neck feathers are much like the New Zealand bird after which she is named.

Chickpea Chickpea: the largest Americauna since the beginning, but the most picked upon. Her coloring is dark where Kakapo’s is light. She manages to hide under the others effectively.
If it’s not one thing, it’s another!
You May Also Like
Native Insects and IPM
-
Plummy Skillet Cake

Golden plummy goodness Have a lot of juicy plums that need a place to go?

Eating fresh plums in the sunshine with the juice dripping down your chin is like sipping nectar in paradise. How about this tasty, light cake baked in a skillet? A cast-iron skillet is perfect for this cake, but you can use any oven-proof skillet or baking dish if you don’t have one. If you are skilled in campfire or Dutch-oven cooking, take this recipe with you when you camp. As an interesting change of seasonings, use the Chinese Five-Spice powder that has been hanging out in your spice pantry since the last time you made stir-fry.

Chinese Five-Spice powder and plums are a great combination If you don’t have any, use freshly-grated nutmeg or ground cinnamon.
Plummy Skillet CakeAuthor: Diane C KennedyRecipe type: DessertPrep time:Cook time:Total time:Serves: 6Dessert in a cast-iron skillet can be cooked over a campfire instead of your oven. No cast iron? Use an oven-proof skillet or baking dish. You can use other stone fruit instead of plums with just as good a result.Ingredients- 6 tablespoon unsalted butter, room temperature, plus extra for skillet
- 1½ cups all-purpose flour, plus some for skillet
- ¾ teaspoon baking powder
- ½ teaspoon baking soda
- ¾ teaspoon salt
- 1 teaspoon Chinese Five Spice powder
- 1¼ cups plus 2 tablespoons sugar
- 2 eggs
- ¾ cup buttermilk
- 4 medium plums, thinly sliced and halved
Instructions- Preheat oven to 375 F.
- Butter a 10-inch cast-iron skillet (or ovenproof skillet or dish).
- Dust skillet with extra flour and tap out any loose flour
- In a small bowl, whisk together flour, baking powder, baking soda, Chinese Five-Spice powder and salt.
- In large bowl, or in a mixer bowl, combine 1¼ cups sugar and butter until creamy.
- Beat in eggs until smooth.
- Add a third of the flour mixture with a third of the buttermilk, until all is combined. Don't overbeat.
- Pour batter into prepared skillet and smooth top.
- Spread sliced and halved plums all over the top.
- Sprinkle with extra sugar.
- Bake 35 minutes until golden brown and a toothpick inserted into the center comes out cleanly.
- Cool for about ten minutes before cutting.

Bake until golden brown -
Cob Oven, Part One

Levelling the firebricks Today six members of the San Diego Permaculture Group converged upon my property to build a cob oven. No, not with corn cobs. Cob is an ancient building method that is similar to adobe, but without the brick. Cob buildings, some of them several stories high, have stood for centuries in as diverse areas as Turkey and Wales. Building a cob outdoor baking oven is a good exercise in cob building that is useful and easy. None of the members, nor my daughter who jumped right in to help mix mud, had made a cob oven before. That was okay, because neither had I! Using as a reference the book Build Your Own Earth Oven by Kiko Denzer, and having watched several YouTube cob oven videos, we set off on our learning experience with the energy and fellowship that this newly formed group radiates.
Because of all the deconstruction on my property, building materials were at hand. I decided to set the oven on a cement platform left from a torn-down shed. That eliminated digging and filling a drainage base. My son had helped carry bags of sand down to the work area, which besides straw and wood shavings were the only items I purchased for this project. With broken concrete and cinderblocks, the group made a circular base about two and a half feet high.

The base made with cinderblock and cement chunks The height helps the back of the baker, but if the oven isn’t used all day every day, a shorter one isn’t going to be a problem. Especially for a short person like myself. Not that short, but short.
When I moved onto the property there was all this gravel and stone around. I hated it. I removed a lot, but much disappeared into the pathways. Some has resurfaced with the tilling that has been done to loosen the soil and add mulch. We gathered a lot of the stone along with some dirt and used it to fill the base.
Then we made some rough cob. There was a pile of hard clay that came from the pond excavation. In fact, the bottom of the pond, which is unlined because of the clay content, is almost pudding-like in consistancy with the silky clay. How do I know? Well, let’s say that on a hot day this last week I got to know my pond a little better.

Collecting clay samples with my feet Anyway, the clay contains really hard lumps. It will make wonderfully strong cob, but first it has to be broken down. My daughter filled a wheelbarrow with it, then we dumped it out onto a tarp and added water, expecting it to be easy to mix when wet. Wrong!

This insulation batch is made with clay, sand and wood shavings We added a lot of water and some sand, and mixed pretty well, then added some wood shavings to it for tensile strength. This was used to gap holes in the oven stand and form a base for the insulation. The insulation was made of the flat vodka bottles somebody in the history of this property obviously preferred, along with a broken necked Coke bottle that were found when the pond was excavated. Pretty cool, huh?

A treasure of old bottles 
Bottles were layed on cob for insulation Meanwhile, another wheelbarrow was filled with clay and water, and a group started using their hands to mix it and disintigrate the hard lumps if possible. This took a long time, and still there were lumps. The scene looked like the part in Moby Dick when the whalers are kneeding the blubber with their hands, only a lot less gruesome. This clay mix must be smooth for the next step, building the oven itself.

Finding the lumps in the clay On top of the bottles went a layer of sand, which was levelled as best we could. On top of that went firebricks, which were also levelled.

The firebrick was layed on sand At this point we stopped due to time. The whole process was only a little over two hours long. The wheelbarrow of prepared mud has been covered, as has the oven base. In the very near future we plan to reconvene and make the rest of the oven. After that… pizza!

Everything was even except the middle -
Savory Carrot Soup

Freshly Pulled Carrots Carrots are a gardening miracle. From such a minuscule seed, out pops a root strong enough to plow through tough soil and soak up minerals.

Little Sprouts The carrots shoot those minerals up to the ferny leaves, and when they die, leave the minerals to enhance the topsoil. Carrots fill the roll as one of nature’s miner plants. They are also terrific to eat and very good for you.
I’m sure you’ve heard about how high in beta-carotene carrots are, and how they help eyesight. If you haven’t there are hundreds of Internet references to look up. Carrots are a very versatile vegetable, tasty raw as well as cooked.

Nantes and Chantenays There are many carrot varieties. Nantes, Chantenay, Danvers… these are the common varieties you’ll see sold in most seed stores. However there are white carrots, purple carrots, deep red carrots, and carrots of many sizes and shapes. Some are woody, some very sweet, some tender and some strongly flavored.

Feel around the carrots to see if they are ready to pull 
Garden carrots need only scrubbing, not peeling If you grow your own organic carrots, feel around the roots to see if they are large enough to pull. Don’t leave them in the ground for too long or they’ll become less sweet and woody in texture. Also, if you use your own organically grown carrots, you don’t need to peel them. Just use a brush to scrub off the dirt.
Carrots are wonderful to eat when simply steamed until tender, then buttered or drizzled with olive oil and chopped herbs. Dill is particularly good, as are chives. I’ve found many carrot recipes, but most of them are sweet not savory. Honey-glazed carrots, carrot soup with curry and sweet coconut milk, brown sugar carrots… I don’t care for them. Carrots are naturally sweet, and to slop more sweet stuff on top is overdoing it. Sweetened carrots belong in carrot cake, and there is only one recipe for it that I find not cloying and heavy (I’ll share that recipe with you another time). I also like carrots in a savory soup.
Here is an unusual recipe that is tasty, easy, low in calories, and has protein from an unusual source: vegetarian sausage patties. Celery adds dimension to the flavor as does minced fresh rosemary.

Minced Fresh Rosemary Savory Carrot SoupAuthor: Diane C. KennedyRecipe type: SoupPrep time:Cook time:Total time:Serves: 2This golden, low-fat soup brings out the savory goodness of carrots.Ingredients- About two cups sliced carrots
- One shallot, diced
- One celery stalk, diced
- Two vegetarian sausage patties (such as Morningstar Farms)
- 1 tablespoon olive oil
- ½ teaspoon fresh rosemary, minced
- One large potato, peeled and chopped
- Four cups vegetable broth
- Cilantro leaves for garnish (optional)
Instructions- In medium saucepan, heat olive oil over medium-high heat. Add shallot and cook for two minutes.
- Add celery and stir occasionally for about three minutes.
- Move the vegetables to one side and add two vegetarian sausage patties. Flip when cooked on one side.
- Add potato, carrots and rosemary.
- Stir, breaking up sausage patties with spatula.
- Add vegetable broth
- Bring to boil then lower temperature to a simmer and partially cover with the pot lid.
- Cook for about twenty minutes, until carrots are just tender.
- Cool, then blend soup until smooth.
- Return soup to pot and reheat.
- Serve hot, topped with cilantro leaves if used.
Serve this golden orange soup in bowls that compliment it’s color.
Serve in Bowls that Compliment the Rich Soup Color -
Locro de Papas (Ecuadorian Potato Soup)

Locro de Papas A couple of years ago my daughter and I went on a birdwatching ecotour of the cloud forests in Ecuador, and then to the Galapagos islands.

Me and Galapagos Sea Lions The flights ended and began in Quito, the capital city, which holds about 75% of the entire population of Ecuador. Eating wasn’t as much a challenge as we had anticipated; often in lower economic areas there are better non-meat choices. We stayed at a hotel in Quito at the beginning, middle and end of our journey. Room service was the same price as eating in the restaurant, so we indulged in our room for most meals because we were exhausted. One of the three separate nights we stayed there we watched Lord of the Rings in Spanish. Neither of us really speaks Spanish, but I understand enough to get the gist of what is being said. On our last day the streets were blocked off because the president of Ecuador came to stay in the adjacent hotel and we saw his party board a plane as ours was taking off the next day.
The hotel menu offered interesting side dishes made with interesting ingredients such as yucca and plantain. Our absolute favorite, though, was Locro de Papas. Literally this translates as Potato Stew, but it wasn’t a stew. Locro de Papas is one of the most popular dishes in Ecuador and the Andes. It is wholesome peasant food that has as many variations as Americans have chili recipes. At home I managed to reproduce the version that we fell in love with as best as I could. A few ingredients make the soup special. One ingredient which you may not have on your pantry shelves, but is easily obtained in the Mexican food isle, is annatto, also called ground anchiote. It has a slight flavor and is used to color foods. It is not essential for the success of this soup, but it is a nice addition. They use an oil that is colored with the anchiote seeds, but using the ground spice with olive oil works just fine.

Cumin, annatto and cheese What is essential is ground cumin. Some people can’t stand the smell of cumin, which is slightly reminiscent of dirty socks. However the flavor carries this soup perfectly. Another addition is sliced avocado. Warm avocado is melt-in-your-mouth delicious. Living in Fallbrook, the Avocado Capital of the United States, I have ready access to the many forms avocados can take. Avocado fudge, ice cream and fried avocado slices are all standards of the yearly Avocado Festival. Another addition to this soup which creates a wonderful texture as well as adding protein and calcium, is cubed non-melty cheese. If you are non-dairy, then substitute with cubed firm tofu (which can be added even with the cheese). The textures of the potatoes, cheese and avocado are heavenly.
One of the standards of an Ecuadorian lunch or dinner is an introductory soup, usually vegetarian. We ate some fantastic soups. Instead of bread on one occasion, we were given a bowl of popcorn to sprinkle on our soup. It was great! I’ve included it here.
Be sure to slice the potatoes no less than 1/4 inch thick; if any thinner they will fall apart when cooking.

Thick potato slices won't fall apart The version in the hotel had lots of butter in it; I’ve replaced half of it with olive oil, but if you don’t do butter then use all olive oil. The butter’s fat content makes the soup satisfying to the palate.

Saute shallots in oil and butter This is a quick and easy soup. Don’t cheat yourself out of a great meal by not making Locro de Papas!
Locro de Papas (Ecuadorian Potato Soup)Author: Diane C. KennedyRecipe type: SoupPrep time:Cook time:Total time:Serves: 4This version of the favorite soup of South America is quick to make and very filling.Ingredients- 1 tablespoon olive oil
- 1 tablespoon butter
- 1 shallot, diced
- 1 pound potatoes, peeled and sliced no less than ¼ inch thick
- ½ tablespoon ground cumin
- ½ tablespoon ground annatto
- 6 cups vegetable broth
- 1 avocado
- 1 cup cubed non-melty mild cheese, such as Queso Fresco
- 1 block firm tofu, cubed (optional)
- Cilantro leaves for garnish (optional)
- 1 cup freshly popped popcorn (optional)
Instructions- In a medium saucepan, heat olive oil and butter over medium-high heat.
- Add diced shallots and cook until translucent, about three minutes.
- Cut potato slices in half and add to pot.
- Stir in cumin and annatto.
- Pour in vegetable broth.
- Bring soup to a simmer and cook, uncovered, for about twenty minutes, until potatoes are just tender enough to part when pressed. Don't overcook!
- Ladle soup into wide shallow soup bowls.
- Add chunks of cheese and tofu (if using).
- Top with sliced avocado.
- Garnish with cilantro leaves and serve immediately.
- Provide bowls of popcorn alongside soup to add as topping (don't add it ahead of time, they become soggy instantly).
-
Crazy Pot Salad

- Mixed greens plus blossoms, herbs and tiny potatoes
Crazy Pot Salad is what my daughter calls a main dish I make because it involves many different ingredients that vary as to availability. It always turns out great, though, which is truly amazing. It is a greens salad that also has cooked items and a balance of flavors, textures and colors that make every forkful slightly different. It involves both cold and hot ingredients, all thrown into the same bowl and mixed together to create a melded warm dinner that is as healthful as it is delicious. It is even good as cold leftovers the next day.
Tonight’s salad was born of the need to eat the mixed salad greens that were overgrowing in the garden. I cut and picked various greens and started from there. To create a Crazy Pot Salad, I keep in mind these components:
Fresh Greens: the more varied the better. Fresh herbs such as dill, basil, chives and cilantro, along with arugula and a lettuce mix, work well. Don’t forget some iceberg for crunch. If you don’t have or want to use iceberg (a much maligned vegetable) then cut up fresh celery.

- A mix of colors and textures is essential
Protein: Tofu, soy chicken strips (such as Morningstar Farms), soy bacon, soy tuna, etc. Beans such as garbanzo or Northern white work well. Using a couple types of proteins are tastier and more nutritious. Cook the protein and use hot.
Starch: Pasta in small shapes, rice, or a cooked grain such as quinoa. Use the starch hot.
 is high in Omega-3.")
- Quinoa (pronounced keen-wa) is high in Omega-3.
Other additions: diced carrots, steamed tiny potatoes or potato chunks (hot), feta or cotija cheese (crumbly), marigold petals, nasturtium blossoms, squash blossoms, capers, heart of palm, mushrooms, pea pods, avocados, green beans fresh or cooked… whatever you have that you need to use. Look for colors to add. I can’t stand Bell peppers, but that is usually the go-to choice when people want to add color to anything. You can avoid the Bell pepper taste-takeover of your salad if you want with a little creativity. Stir-fry up some chopped red cabbage and throw it in with some raw carrots.
Crunch: Nuts, such as pignoli (pine), cashews, sunflower seeds or almonds. Toast them in a little olive oil or in the toaster oven to bring out their flavor.
Dressing: This salad just about makes its own dressing. I like to make Italian dressing with a packet of Lowry’s Italian dressing mix, using red wine vinegar and olive oil. Or I make the dressing as I cook, which I’ll include in the recipe. The cooked shiitake mushroom gives the olive oil a deep, savory note and adds a very interesting flavor and texture. Along with the pignoli nuts, chives and crumbled soy bacon, this makes a delicious subtle dressing that is mixed into the salad rather than adorned on the top. The hot starch, including the potatoes, will readily absorb the hot flavored olive oil.

- Shiitake mushrooms, pignoli nuts and soy bacon dressing
Remember, this is a salad of opportunity; use what you have and what you love, but keep in mind the different components, the shapes and colors of the ingredients, the texture and nutritional value. Bland foods such as the potato will balance strongly flavored ones such as arugula.

- Yum. Just: yum!
Crazy Pot SaladAuthor: Diane C. KennedyRecipe type: Main Dish SaladPrep time:Cook time:Total time:Serves: FourThis warm combination of greens and other ingredients make a balanced, delicious healthy main dish that can change with what you have available.Ingredients- One cup quinoa, prepared with vegetable broth following box directions
- Four cups (approx.) mixed fresh greens washed and torn into bite-sized pieces
- Two sprigs each fresh dill, basil, chives and cilantro, chopped
- One cup torn iceberg lettuce
- Three calendula flowers and four squash flowers, torn into small pieces (just petals)
- Eight very small potatoes
- Cotija cheese (or veggie substitute. Dairy can be optional)
- Half an 8-oz can garbanzo beans
- Two small carrots, sliced into discs
- One tomato, diced
- A tablespoon olive oil (flavored, if you have it)
- One package Morningstar Farms Chicken Strips
- For Dressing:
- Six fresh shiitake mushrooms
- Four strips Morningstar Farms soy Bacon Strips
- Three tablespoons pignoli nuts
- ⅛th cup olive oil
Instructions- Prepare quinoa in medium saucepan using vegetable broth, according to the instructions on the box.
- Steam small potatos until tender
- Meanwhile, wash, dry and tear up fresh greens, herbs, iceberg and flowers. Put in large bowl.
- Crumble about four tablespoons Cotija cheese over greens in bowl.
- Add garbanzo beans
- Add carrot discs
- In frying pan, heat a tablespoon of olive oil and stir-fry the soy chicken strips until browned (if you have flavored olive oil, such as citrus or basil, use that to cook these).
- Add hot soy chicken strips to bowl.
- In same frying pan, heat ⅛th cup olive oil on medium high.
- Chop shiitake mushrooms and add to frying pan.
- Cook mushrooms on medium-high heat until they are almost crunchy.
- Add soy bacon strips and pignoli nuts.
- Stir nuts until they are browned (watch so they don't burn).
- Flip bacon and remove when browned.
- Pour contents of pan on mixture in bowl.
- Crumble bacon strips and add to bowl.
- Add steamed potatoes, quartered to bowl.
- Add quinoa to bowl.
- Toss contents of bowl until well mixed. Heavy ingredients will sink to the bottom, so be sure to mix well.
- Plate the salad and garnish with chopped tomatos and more cheese, if using.
-
Answers

Drinking the Small Pond Down I really haven’t been avoiding blogging. I’ve tried to do it, but I’ve just been exhausted in the evening, which is my usual writing time, and haven’t stayed awake long enough to finish writing. Obviously we’ve made it back to Fallbrook, pulling in about 9 pm on Saturday. Many things happened during my five days gone. As I am about to frost a Buttermilk Chocolate Ganache Cake (see recipes!) (I occasionally sell baked goods) that will be picked up at 7 am tomorrow, I’ll provide answers to the questions I posed before leaving on my Oregon Or Bust sojourn.

A Full Pond! Yes, the pond was filled! Gloriously full, and with a boat blowing from shore to shore in the breeze! The boat is on loan from Aquascape, who uses it in their work, but put out to float just to show off the pond for my return. Water plants are being transplanted and seeded around the ‘wicking’ areas, and the streambed area for rain is being sculpted. I’m not the only one who enjoys the pond!

If he thinks he can sleep on the couch after this....! The palm trunks are being made into a bridge, which isn’t quite finished yet.

Bridge to Be The cement stairs now have posts for a walk-through arbor.

Gateway to the Garden The gnawed-upon palm stairs are even more gnawed-upon, but there are piles of bunny poo left where the culprits spent plenty of time wearing down their ever-growing teeth! The Bitter Apple didn’t seem to make a difference when I sprayed it on the steps. I’ll need to try garlic next.

Bunny Poo As for my veggie garden, the pumpkin and watermelon have grown at least two feet in a week, and the pickling cucumbers have outgrown the two lengths of support twine that I put up above their heads just before leaving!

Vigorous Cukes I’ve added more and guided them up. All the plants not only survived, but they thrived. I so cannot wait for the taste of my own first of the season tomato!

Happy Vines I still have a question, though. Why is it that a roadside stand in Oregon sells avocados for .35 cents apiece, when back home – in the Avocado Capital of the US – they sell for $1.45 apiece in the grocery store? And they aren’t very nice, either! You can’t grow avos in Oregon, or at least in that wet and cold part of it.
Not all the irrigation has been buried, but a good deal has. The sunflower will not raise it’s head again. The pond is slightly green, but picturesque and natural-looking; I don’t want an unnaturally clear pond. So all in all, a great week!

The First Zucchini... uh-oh! 
A Hidden Broccoli Head -
Ashland, OR and the Sacramento River

- Rotating Tracks
My daughter and I are returning from middle Oregon to San Diego in steps. Last night we stayed in a wonderful bed and breakfast, Country Willows, in Ashland, OR. http://www.countrywillowsinn.com/.

Wisteria adorns the porch We did a little walking around looking at the wonderful poppies that grew in almost every yard,

Poppies and then went downtown to see a modernized version of Love’s Labours Lost in the outdoor Elizabethan theatre. Ashland is the home of the Oregon Shakespeare festival, as well as being a college town, so there were plenty of young people doing avante-garde things in the streets. Every night there is a free performance on the grounds between the three Shakespearean theatres. We listened to a talented group play Eastern European tunes before being seated for the play. Prior to this we ate at Green Leaf restaurant, which overlooks the waterway and has superb local and sustainably raised food, as well as many vegetarian dishes. Oh, yum. What a good meal!
After the play we drove back to the bed and breakfast, and it was nearly midnight, so I didn’t blog and I’m sorry. In the morning Daniel, who is the manager and chef created a wonderful breakfast served by one of the owners. We had sweet potato biscuits, orange and cherry juice layered in chilled glasses, orange and tangerine sections drizzled with raspberry coulis, poached eggs in tomato and cilantro sauce with black beans and fresh local greens, and decaf tea. It was tasty, nutritious, beautiful and creative to look at, and served in a wonderfully decorated room overlooking a pink flowering dogwood. Wonderful!

Country Willows Bed and Breakfast Today we drove to Sacramento and are staying on the Delta King riverboat on the Sacramento River http://www.deltaking.com/.

Historic Riverboat Warning 
- Paddlewheel
It is an historic real paddlewheeler which is now stationary. We strolled old town Sacramento which is all tourist shops in old storefronts, including about five candy stores.

Old Sacramento against the new Miranda spotted a train museum and we went in about half an hour before closing. I was expecting model trains and photographs… oh, how I wish that we had more time! The museum had full historic trains parked in it, along with life-sized displays surrounding them showing their point in history. The docents were incredibly knowledgeable and eager to share their knowledge, even though it was the end of the day. If you ever come this way, spend about two hours at the Sacramento Train Museum http://www.csrmf.org/. They even have a sleeper car that you may walk thorough that is rocks like when it was on the rails. Even people who aren’t big on trains will be awestruck by what they’ve accomplished here. None of my photographs from inside came out, and we were rushing through so I didn’t take many.
Afterwards we ate at one of the small shops then spent time outside of our stateroom watching the two bridges move for tall boats. The drive-across bridge raised and lowered, sounding a loud horn to let cars, pedestrians and bicyclists know that the bridge was going up.

The Bridge about to rise 
The Hornblower River Cruise slides under the bridge On the other side of our boat there is a train bridge that spins to allow a boat through.

Watching trains cross the trestle 
The Train Testle Swivels Very, very cool. We watched trains go past as well.
From the other side of the river we could hear the crowd shouting through a ballgame, and occasionally there were rowdies shouting or playing music at speaker-cracking volume from their boats as they cruised past (if they do it in cars, they do it on boats). It was pretty quiet for a Friday night. The stateroom was very comfortable; we made tea and drank it at the small table outside our room and watched the swallows swoop after moths in the sunset.

Sunset Tomorrow is an eight-hour drive home. It was a fun week, traveling solo, then celebrating my daughter’s finishing her second year at OSU with some new mini-adventures. Fortunately, I always love being home, too. Travel creates great perspective on homelife. I love both.
You May Also Like

Traveling Again: Oahu