- Bees, Compost, Gardening adventures, Heirloom Plants, Hugelkultur, Irrigation and Watering, Other Insects, Perennial vegetables, Permaculture and Edible Forest Gardening Adventures, Planting, Seeds, Soil, Vegetables, Vegetarian, Water
Tomatoes
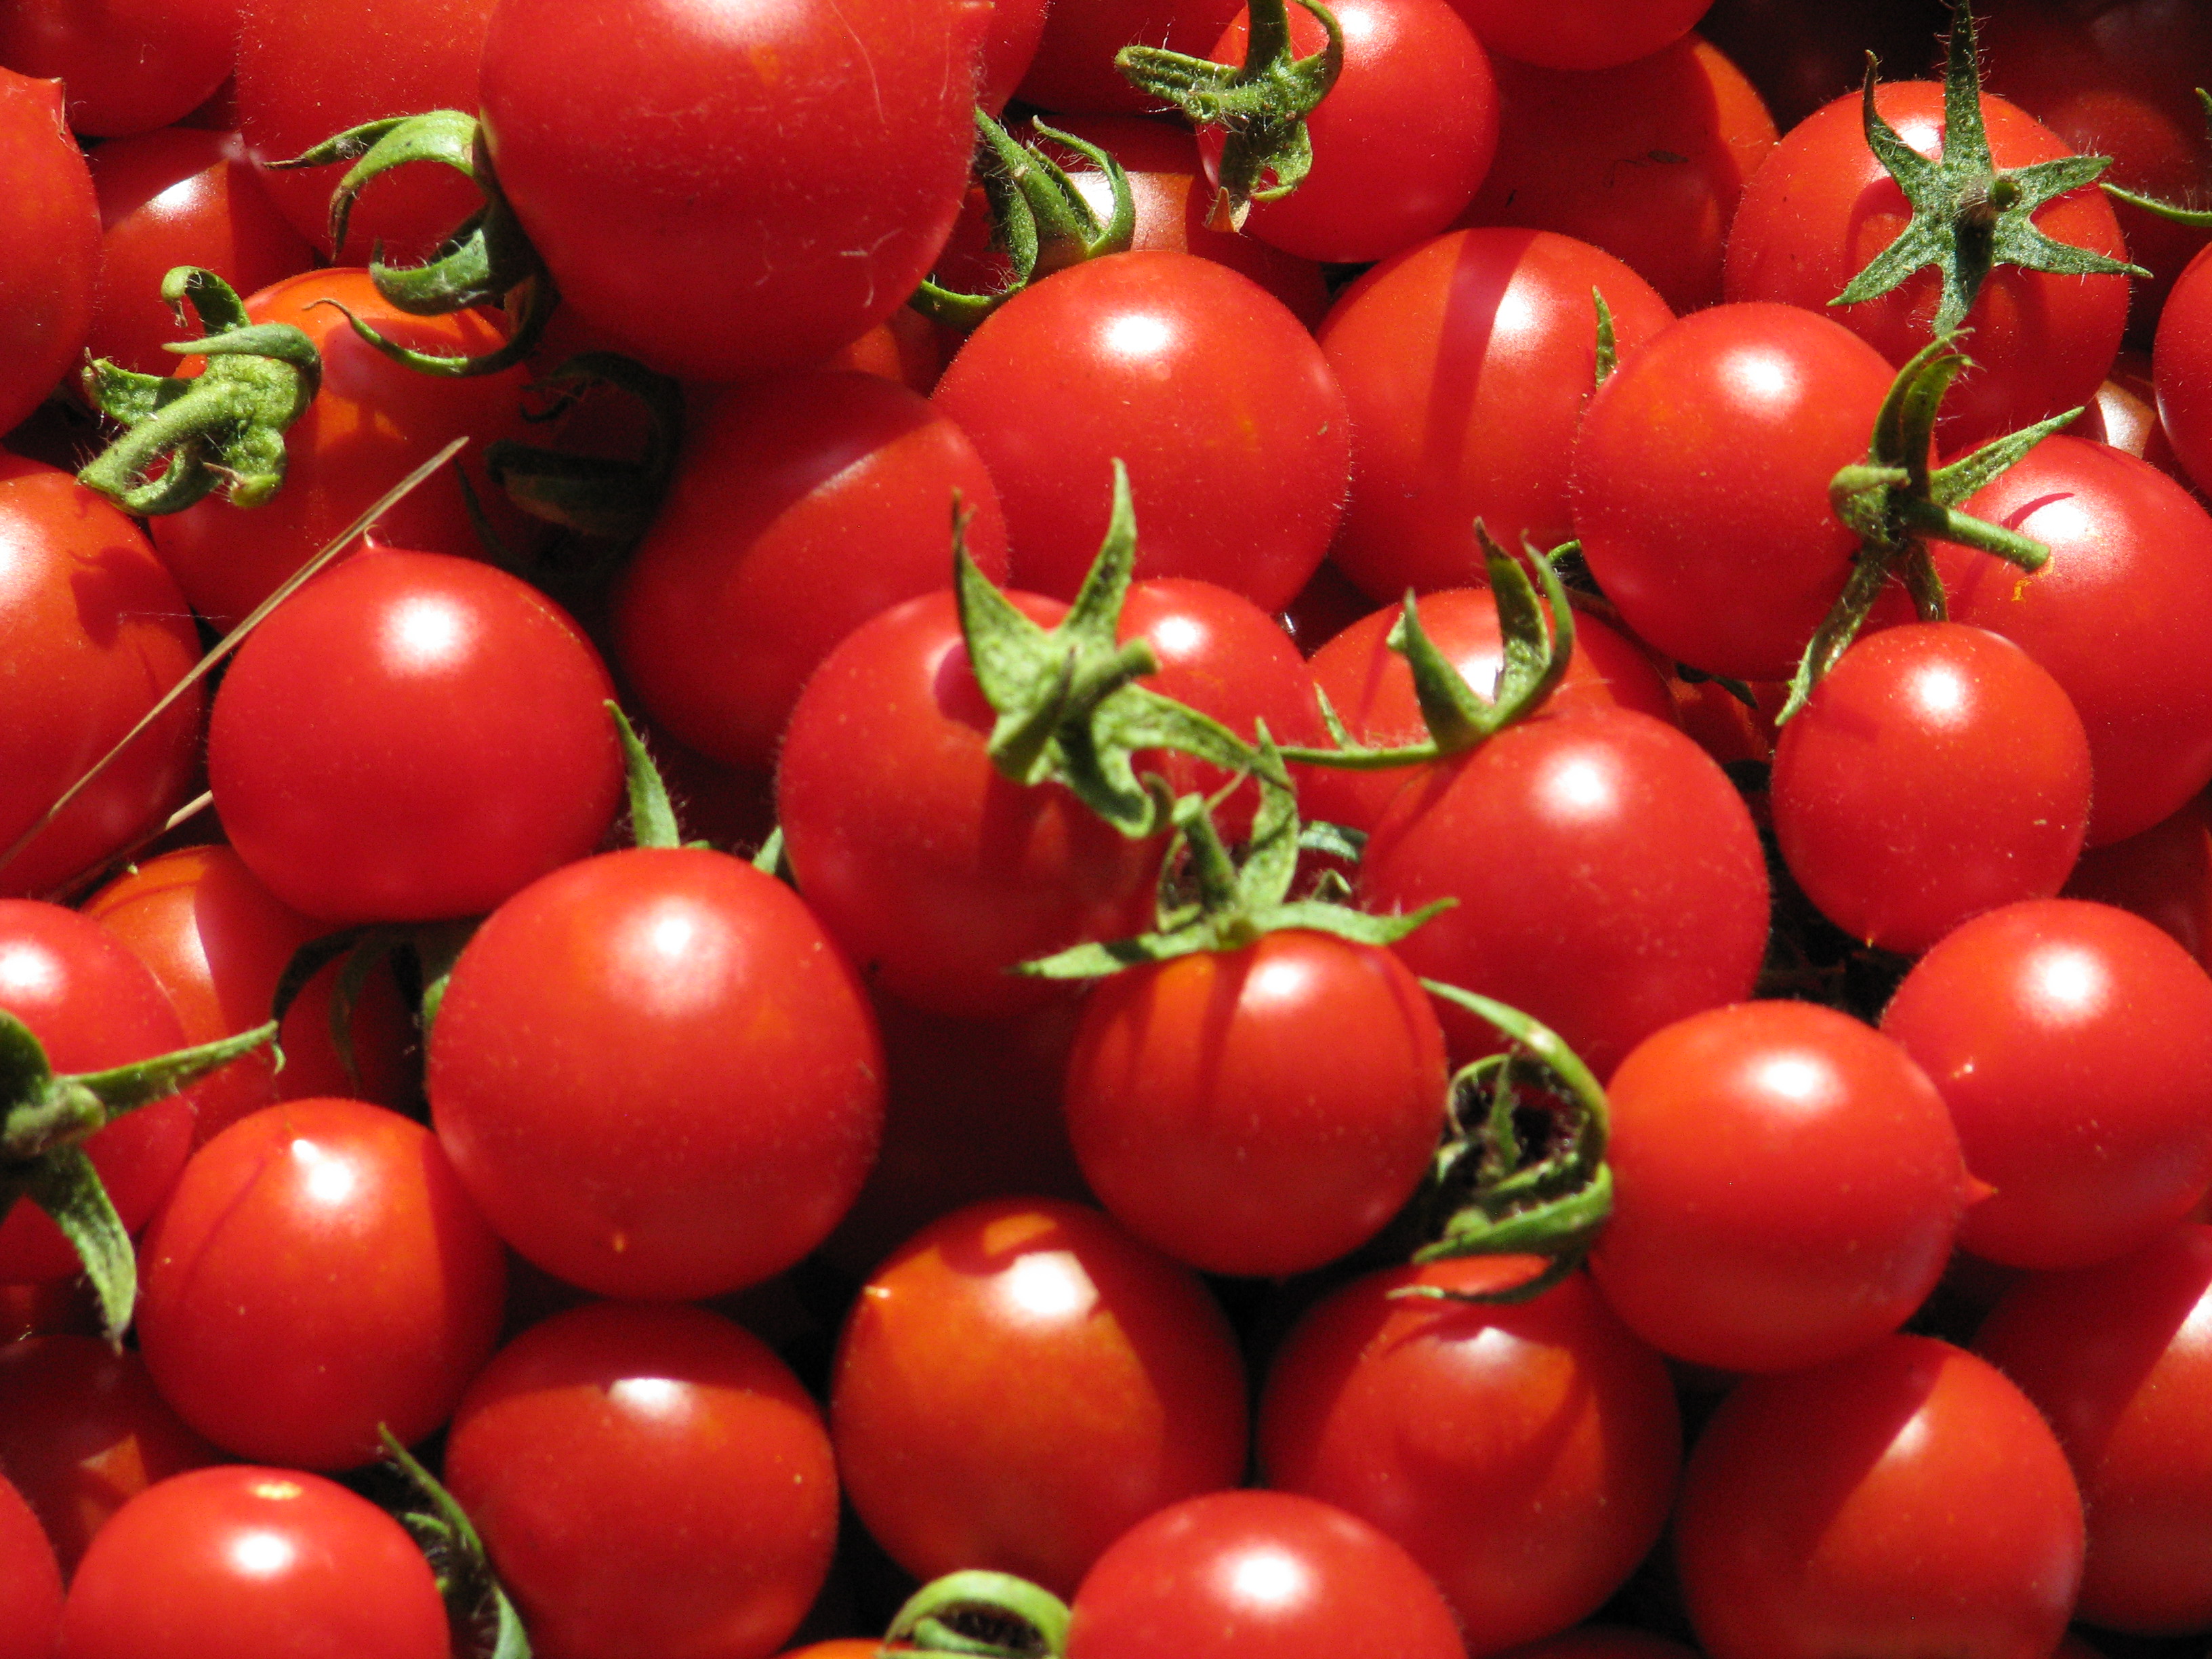
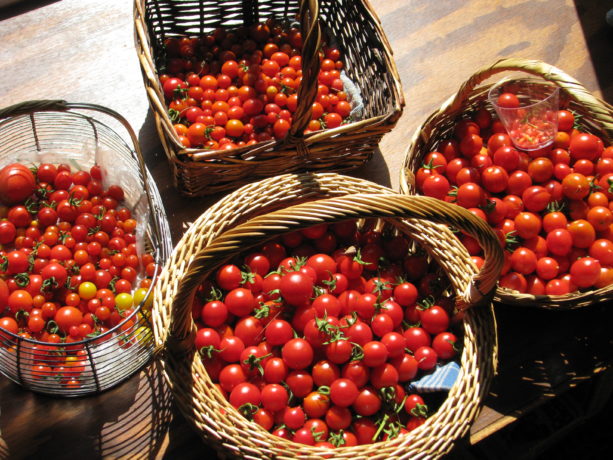 Guess what we picked today? I’ve just finished freezing the large ones to make into tomato jam and tomato sauce later, or seasoning and setting the smaller ones out to sun dry.
  We’ll sell these fantastically tasty foods at our Marketplace in November.
Last year, 2016, we had no tomatoes until the Fall. I couldn’t figure out why. Our summer temperatures were over 100F for days on end, peaking at 116F several of those days. The nights never cooled off and sleeping was difficult. It turns out that the tomatoes didn’t like the heat either. If temperatures consistently stay over 85F and don’t dip below 75F at night then the flowers won’t set fruit. And here I was thinking that tomatoes loved the heat! They just love the warmth, like I do.
Tomato flowers are self-pollinating. Each has both male and female parts and it takes vibration from winged insects and gentle warm winds to pollinate. Others flick them with their fingers, or set a tuning fork on them to simulate insect vibration. If there are very hot, dry winds, pollen dries out and isn’t viable. If the humidity is so high that it is sticky out the pollen swells and sticks, unable to fall to the female part of the flower. When the temperatures lowered in the Fall, even though the day length was shorter, the tomatoes quickly put on fruit.
Here in Southern California’s inland area we don’t receive snow, so tomatoes can last outside as a perennial vine for several years. However a good way to keep tomatoes for use after summer is to prune it, hanging the vine with the tomatoes in a dry area with good air circulation. The vine will die but the tomatoes – especially sauce or paste tomatoes such as Roma – will stay in excellent condition for months.
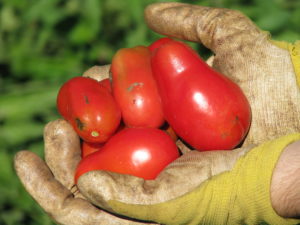
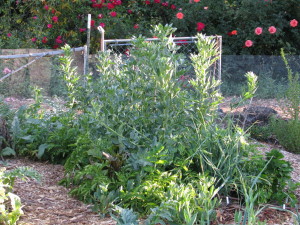
Tomatoes enjoy a good deep watering, and then let go dry in between. The tomatoes are more flavorful that way as well. Most of the tomatoes we harvested today came from volunteers that had popped up along our fenceline and receive no water, and others receive water once or twice a week along with the trees by which they are planted.
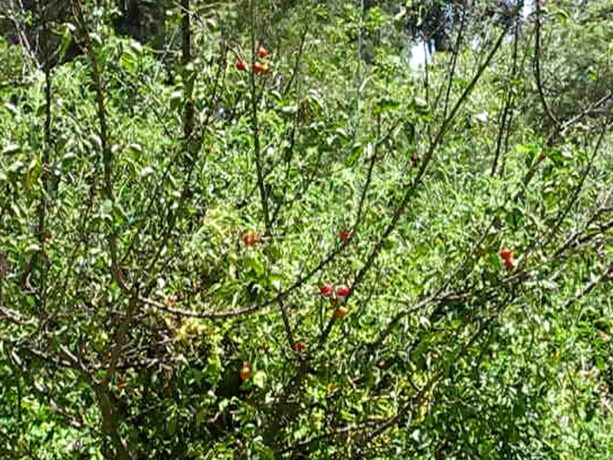
This apricot tree has been struggling with the heat and heavy clay in which its been planted, and as it has too few leaves there isn’t anything protecting the trunk and branches from the scorching heat… except for this tomato plant. The tomatoes vine upwards away from nibbling animals and are easy to pick, and the apricot receives shade. (Remember that growing under trees that have an upward growth is great, but only grow companion plants outside of the dripline of trees that have heavy skirts such as citrus and avocado).
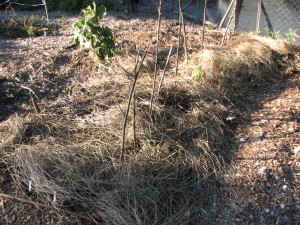
When tomato vines die down, cut them at the soil surface
 and then either bury them or cover them with compost and then plant right around them. Worms love tomato vines and roots, and the vines will return nutrients to the soil.

 Also, tomatoes don’t care about being planted in the same place twice, so don’t worry about crop rotation. The only issue you might have is that if you plant a different variety the following year, seeds from the previous year’s tomato might come up there as well.
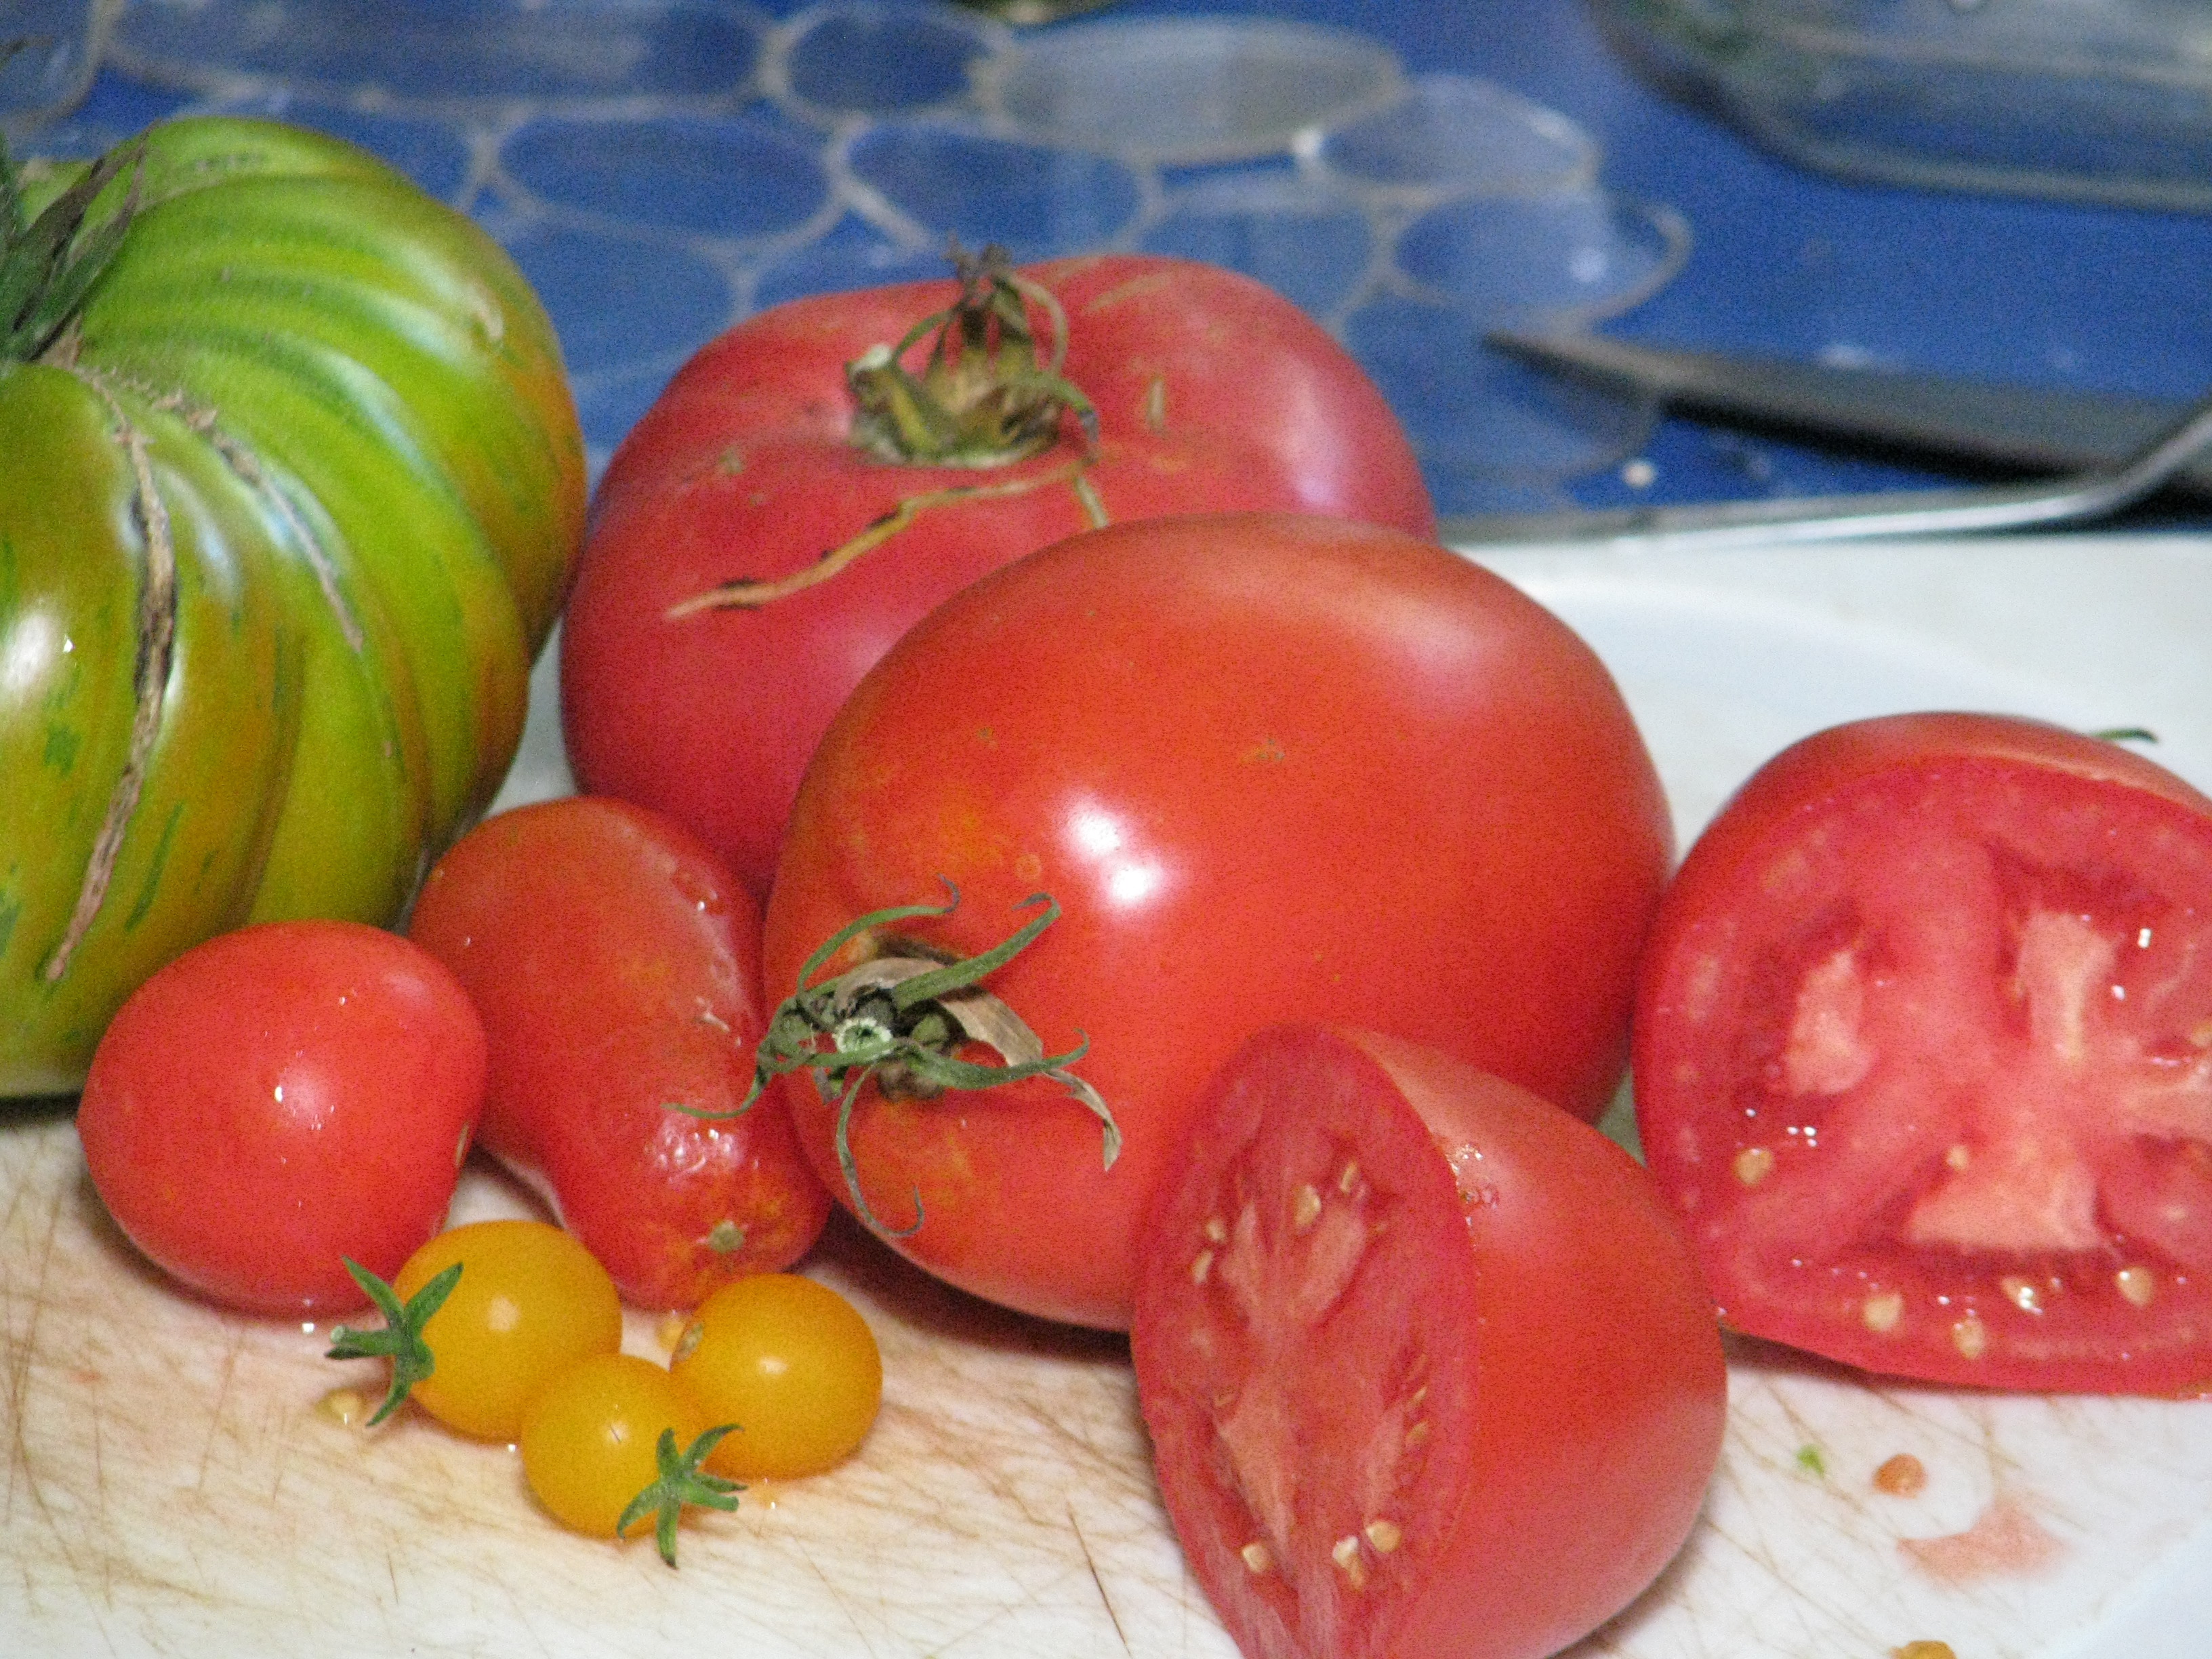
 If your tomatoes crack on the vine, that usually means too much water, or that you’ve dumped some fertilizer on them and the growth spurt was too quick for the expanding fruit. Don’t use chemical fertilizers. Period. For anything. If you dose the tomatoes with fertilizer you’ll have lots of vines and little fruit. Also, if the tomatoes have blossom-end rot (round black dents in the bottom of the fruit) it means there is a calcium deficiency, so to prevent this bury crushed egg shells where you’ll plant tomatoes, or pour sour milk or milk products around the tomato plants.
We have tomato hornworm in our garden,
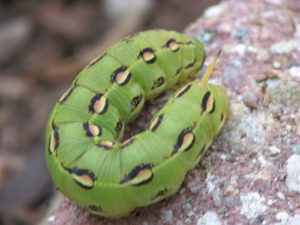 but they don’t get out of control because we have birds. They take care of most of the caterpillars in the garden. Besides, the tomato hornworm is the young of the Sphinx moth,
a large lovely moth that you may see in the night.
If the temperatures remain tolerable this summer, we here at Finch Frolic Garden can look forward to lots of tomatoes to dry, can, freeze, eat fresh, make into sauce… whatever. Tomatoes are truly the taste of summer.
You May Also Like

Native Insects and IPM
- Gardening adventures, Permaculture and Edible Forest Gardening Adventures, Planting, Soil, Vegetables
Growing Sweet Potatoes
 Sweet potatoes (Ipomoea batatas) were never one of my favorite foods… until I grew and ate one. It was a transformational experience. An entirely different experience from store-bought. If you’ve never had nor liked white sweet potatoes, grow one and try it. Or if you have to load marshmallows on top to get the orange ones down, you won’t need that gook with home grown.
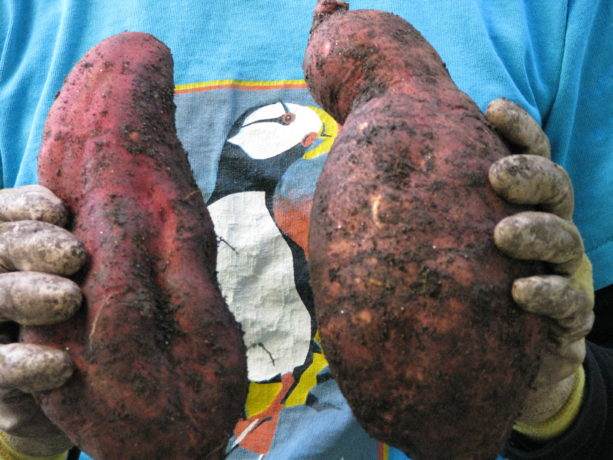
And by the way, what you find in a US chain store are all sweet potatoes, although the USDA calls the yellow ones yams just to make them different. A true yam has a rough bark-like skin and is an African dietary staple.
I put them in curries, steam them and top with a little vegan butter, cinnamon, chili-con-limon, a very light sprinkle of sugar and a squeeze of lime. I eat them here, I eat them there….. anyway, you get the picture. Not only are they low in fat and heavy in beta carotene, but people who eat a lot of healthy starches such as sweet potatoes, taro, cassava, potatoes, etc. have fewer chronic illnesses. Just don’t load the starch down with salt and fat.
Sprouting and growing your own sweet potato is different from growing the common potato, which is a swollen tuber in the solanaceae family. Sweet potatoes are tropical vines that need sunshine and warmth, and a lot of room to spread. Give them space or provide a support because the vines can sprawl ten feet.
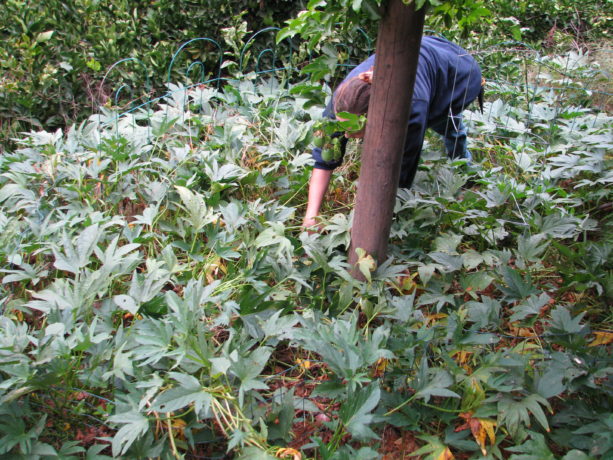 The shiny leaves, unlike potatoes, are edible and very decorative. You can grow them in large pots in the house as long as you have space for the vines (up and over the window?). The flowers are pretty, too.
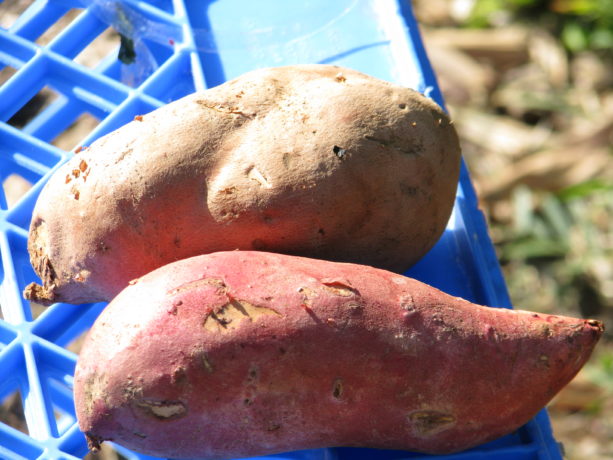
There are all kinds of sweet potatoes and crosses: purple inside, purple outside,
 yellow, orange,
 white and combinations thereof. They are all delicious. Some grow with clumps of potatoes directly under the plant, and some spread out and grow wherever the vine roots. You can grow them inside or outside, as long as they have warm soil and sunshine. For warmer areas, plant slips out in May or June. Its extremely easy to grow sweet potatoes. Here are some options:
Buy an organic sweet potato and keep it in a warm, dry, semi-dark place until you begin to see it sprout.
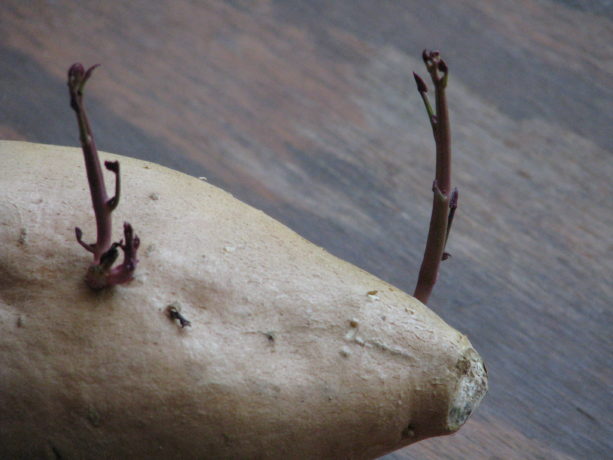 Allow these slips to grow until they are several inches long. Then give them a gentle pull; if they come off easily they are ready to root.
  You can keep sprouting from that potato, or just eat it. Put the slips in a glass of water in a bright window for a few days and you’ll see them begin to root.
 After that they are ready to plant.
Or, take your organic sweet potato and cut it into wedges about an inch long. Suspend the chunk, cut-end down, over a glass of water so that the bottom is wet but the piece isn’t submerged. Do this by sticking three toothpicks around the sweet potato so that the toothpicks are over the edge of the glass. Many sprouts can come from a chunk, so you can keep harvesting until the base starts to go bad. Follow the directions above for removing the slip, rooting and planting it.
What you don’t want to do is to bury an entire sweet potato. It might sprout, but the plant will have all the nourishment it needs from the big potato and won’t form many if any new ones. By planting slips you are forcing the plant to grow storage units, or sweet potatoes.
Be sure they are planted where the soil is well-draining, and watch out for animals in your area because sweet potatoes are very yummy to everyone. The soil should be enriched with compost, but not straight manure. Give the tubers a fighting chance by gently loosening up the soil under and around the planting hole with a garden fork. Remove any visible rocks or stones that might misshape or injure the tubers.
If you live where you can plant bananas outside, sweet potatoes are a great companion plant in a banana circle/guild. I’ve planted them as a groundcover (and choosing those varieties that root directly under the center, planted them in gopher cages). They are very ornamental.

In the right conditions you can grow sweet potatoes year round inside. Sweet potatoes want warmth so they are ideally suited to being planted indoors in areas where there are short summers. This is an excellent use for old fishtanks.

In the fall the vines will die off, and that is when you dig up the roots and enjoy them! Now you cure them – an important step for flavor development. Be sure that the roots are dry on the outside and keep in place at about 85F – 95F with a lot of humidity – about 80%, for five – ten days. They will develop a thicker skin, have a deeper flavor and be better keepers. Keep one for resprouting.

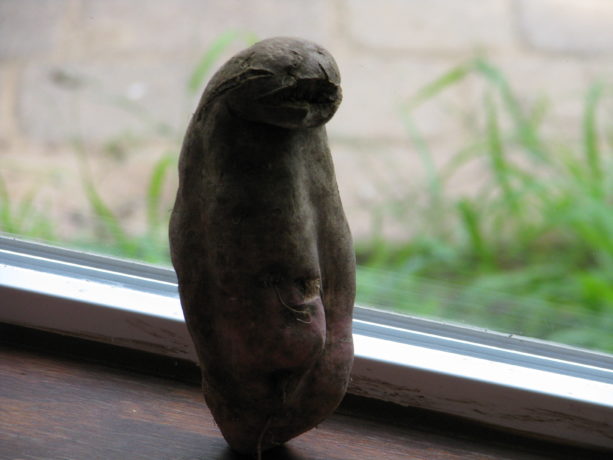
So sprout and grow your own, and don’t keep them just for Thanksgiving. Bake them like a regular potato and really enjoy a fabulously healthy meal. And maybe you’ll find one that looks like a walrus.

-
M’s Turk-ish Eggplant Stew
Miranda here, posting a recipe by request.
So here’s the deal. Eggplants are creepy.
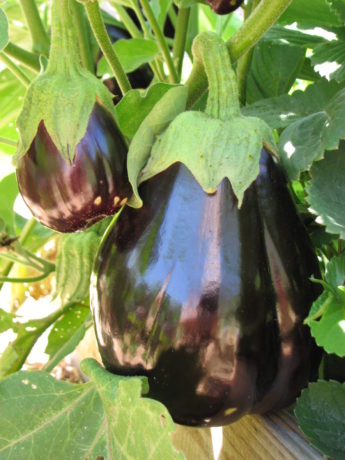
Don’t get me wrong, I think they is one fine looking piece of … fruit? vegetable? alien pod? whatever. And so much variety in shape, size, colour, etc., that the eggplant area of my life is delightfully well-spiced (you know, ‘variety is the spice of life‘…. Okay). I dig it.
But … they also seem kinda poisonous, and like, what’s up with being the texture of wet packing foam fresh and like the lovechild of a mushroom and a whelk when cooked? I see you decided to go with ‘slippery’. Well played Mme. Aubergine, well played.It’s taken me a long time, an exercise of my palatal boundaries (aging, as Shakespeare noted, does play dickey with our tastes), and an interest in slaking my mother’s insane hunger for eggplant to reach parley with this ‘edible’.
I’ve disCOVered … it’s quite nice. Mixed with other stuff. Cooked like, a lot, usually with spices. Hey, does everybody want a bouquet of only baby’s breath? No. I like my textures diverse, and my baba ganoush like, 90% pita chip.
To get to the point, I composed this delish eggplant recipe with reference to Almost Turkish Recipes’ Vegeterian Eggplant Stew (Etsiz Patlican Güveç) and Taste.com’s Beef and Eggplant Stew and a hearty helping of rugged individualism. It came out preh-tay awesome, I am required by inherent truthfulness to say. Diane loves it for its rich layers of flavour and healthy, hearty vegetabliness that make it the perfect combination of comforting and exotic. There’s something for everyone in there! Plus, you can stroke some more hash marks into your summer “Zucchinis/Eggplants/Tomatoes ENDED” tally with a sauce-stained smile once you’ve roused yourself from your stewy food-coma.
Celebrate the small victories.
(Mme. Aubergine can celebrate a gracious concession from one former eggplant separatist.)
Enjoy.
M's Turkish Eggplant StewPrep time:Cook time:Total time:Serves: 3-4The perfect combination of comforting and exotic, and an amazing way to use up summer vegetables.Ingredients- 1 large eggplant (larger than big grapefruit) or equivalent amount of smalls
- 1 zucchini about 6 in. long (soft center cut out) or equivalent amount of smalls
- 3 medium potatoes, peeled
- 3 seitan filets (equivalent to 4"x4" each) or other vegetarian protein product, cut into bite-sized pieces
- 1 medium onion, chopped thin
- 1 large clove garlic, minced unless you like larger pieces
- 1 tsp. ground cumin
- ½ tsp. ground cinnamon
- 1 tbsp. thick tomato product: tomato paste, fresh tomato concoction, specialty ketchup, etc.
- 1½ cups broth (I have used leftover broth from making seitan before, or veggie broth)
- 1 tbsp. sesame oil, more or less
- 1 tbsp. olive oil, more or less
- Black Pepper to taste
- [Optional additional spices, in any combination: ½ tsp. ground ginger, 1 tsp turmeric, 1 tsp. ground paprika, Touch of chili/pepper of some sort]
Instructions- Use vegetable peeler to stripe the eggplant and zucchini lengthwise. Chop into ~ 1 in. pieces, or to preference (eggplant will shrink in cooking, so can leave larger chunks).
- Chop potatoes smaller (1/2") to keep cooking time down.
- Heat a large pan (I prefer to use our flat-bottomed wok) on high until very hot.
- Toss in eggplant and zucchini as well as potatoes and seitan and allow to sear, stirring on and off to prevent burning.
- Drizzle some sesame oil and/or olive oil around the edges of the pan to stop the searing and allow the veggies and seitan to begin to fry.
- When seitan begins to brown a bit, turn down the heat and add the onion and garlic. Cook, stirring, until onions are browning (don't allow garlic to burn, as it cooks faster than onion).
- Add spices and ketchup, and stir on medium-low for a few moments to fully incorporate.
- Pour in broth and stir well.
- Cover, and set to simmer for 30 min. If it's looking too soupy towards the end, remove the cover and raise the heat until it's less liquidy, but it should be like a thick stew.
- Serve with rice or couscous.
NotesWe count on the excellent leftovers, so I always make extra, but it is filling so portion size may be smaller for some. May also be made a few hours early, left in the pan on the stove and reheated to serve. For seitan recipe see Diane's post: http://www.vegetariat.com/2015/01/seitan/.
MCK - Bees, Compost, Frost and Heat, Fungus and Mushrooms, Gardening adventures, Hugelkultur, Irrigation and Watering, Microbes and Fungi, Natives, Other Insects, Permaculture and Edible Forest Gardening Adventures, Rain Catching, Recycling and Repurposing, Reptiles and Amphibians, Seeds, Soil, Water, Water Saving, Worms
Shade
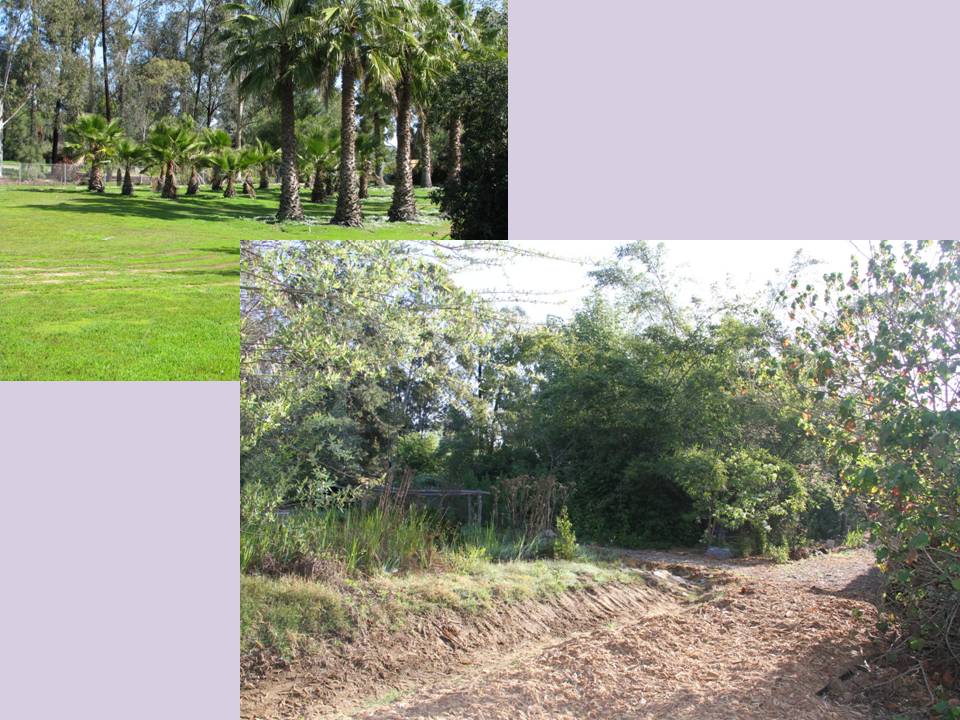
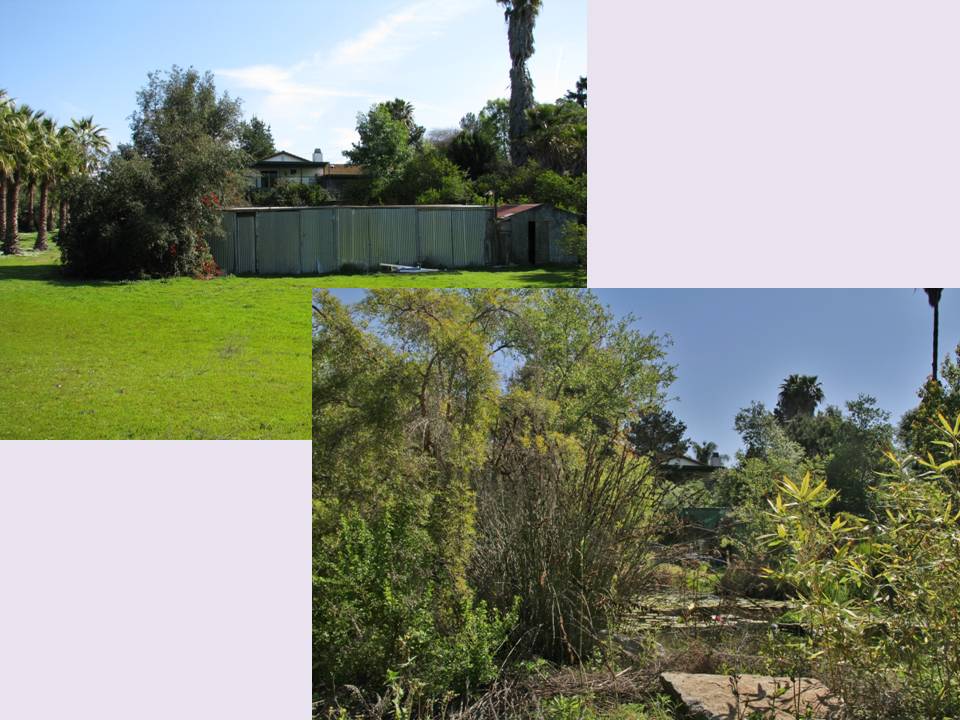
 In drylands there is a noticeable lack of trees. This situation is kind of a Catch-22. The hotter and drier it is, the less water there is in the ground to provide for plants that can attain height, and the more the leaves of the existing trees must adapt (become smaller) to prevent transpiration and sunburn. Yet the very lack of trees and their extensive root systems, and the shade and habitat they create, and the transpiration that allows humidity to keep the air moist for pollen to survive, is one of the causes of desertification.
So how do we stop this cycle?
First, work on a manageable area. If you have a large property, then start on the area closest to your home or where you need water the most, or where water settles. As in the Annie Lamont title, Bird by Bird, you work on a piece a little at a time.
- Put in earthworks to harvest rainwater. Simple swales or rain catchment basins, perpendicular to the water flow and on contour with your property, will harvest hundreds of gallons of water each rain. You can do them with tractors, you can do them with shovels, you can do small ones with trowels above small plants. Just do them.
- Bury organic matter: hugelkultur. Do you have old wood laying around? Palm trees that are growing and being a fire hazard? Old untreated lumber full of nails? Branches? All of this can be layered into the ground. Bury organic matter downhill from your swales. If you cannot bury, then pound sticks vertically into the ground. The important thing is that you are adding organic material back into your depleted soil. It will hold rainwater, it will activate soil microbes and fungi, it will open oxygen and nutrient channels, it will sequester carbon and make it available to the plants. Our soil is mostly just dead dirt. By layering organic material with dirt you are doing what nature does, but at an accelerated pace.
 If your soil is unmanageable, or you can’t dig, then layer on top of the soil. Its called, among other things, lasagne gardening. Lay out newspaper, top it with fresh grass clippings or other greens, top that with dried grass clippings, dried leaves or other ‘brown’ materials, and depending upon what you want to plant in this, you can top it with mulch or with a layer of good compost and then mulch. Then plant in it! You create soil on top of the ground.
 - Mulch and sheet mulch! Protect your soil from the heat and wind, and from pounding rain. A thin layer of bark will actually heat up and accelerate the evaporation process: add several inches of mulch to the ground. Better yet, sheet mulch by laying cardboard and/or newspaper directly on top of the weeds and layering an inch or more of mulch on top.
 This can be free mulch from landscapers, old weeds, grass clippings, animal bedding, softwood cuttings… just cover the soil to keep it moist and protected. Thick mulching alone will help keep some humidity in the air and begin soil processes, as well as reduce evaporation by reflected heat that comes from bare earth or gravel.
 - Plant native plants. They thrive in our soil. Grow trees that filter the sun and don’t like a lot of water, such as palo verde, or those that take minimal additional water such as desert willow, California redbud, valley oak, or others. Grow tall bushes such as toyon, lemonadeberry, sugarbush, quailbush, ceanothus
 or others. Use these wonderful plants to invite in birds,butterflies, lizards and other wildlife that will begin pollination and help activate the soil.
 - Design your garden for what you want to grow besides natives. Fruit trees? Vegetables? Ornamentals? They can be arranged in your mulched area in guilds to grow cooperatively.
- Grow shade. Fast-growing trees and shrubs are invaluable for protecting – ‘nurserying in’ – less hardy plants. Acacia and cassia are both nitrogen-fixers and will grow quickly to shade your plants, can be cut for green waste in the fall and also attract pollinators. Moringa is completely edible and is also an excellent chop-and-drop tree. There are many others. You need to protect what you plant from the harsh summer sunlight, and using sacrificial trees and shrubs is the most productive way to do it.
- Protect your tree trunks from scorching by growing light vines up them, such as beans or small squash.
Once you have done this process in one area, then move on to the next, like a patchwork quilt. These areas should all be planted in accordance with a larger plan that covers your entire property, so that you plant what you want in the best possible place. However, the earthworks, hugelkultur and mulching can be done everywhere. By following these guidelines, and working one small area at a time, you’ll have success, have trees, shade, food and be helping reverse desertification, one plot at a time.
You May Also Like
Native Insects and IPM
- Animals, Arts and Crafts, Bees, Birding, Building and Landscaping, Chickens, Fungus and Mushrooms, Gardening adventures, Heirloom Plants, Hugelkultur, Microbes and Fungi, Natives, Other Insects, Perennial vegetables, Permaculture and Edible Forest Gardening Adventures, Photos, Ponds, Rain Catching, Recycling and Repurposing, Soil, Water, Water Saving
Six Years of Permaculture

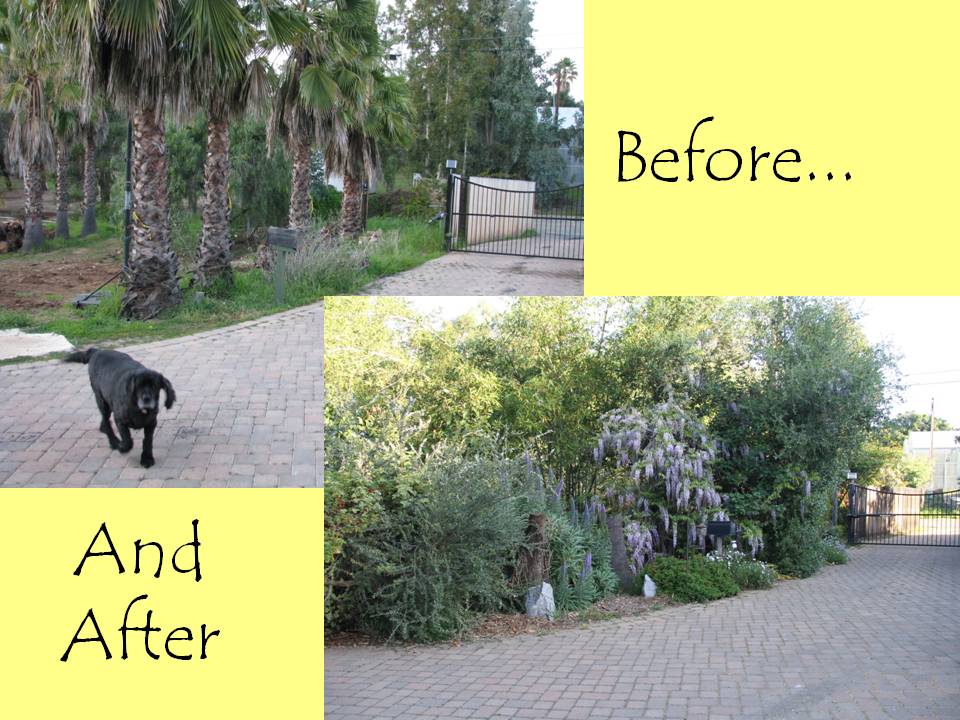
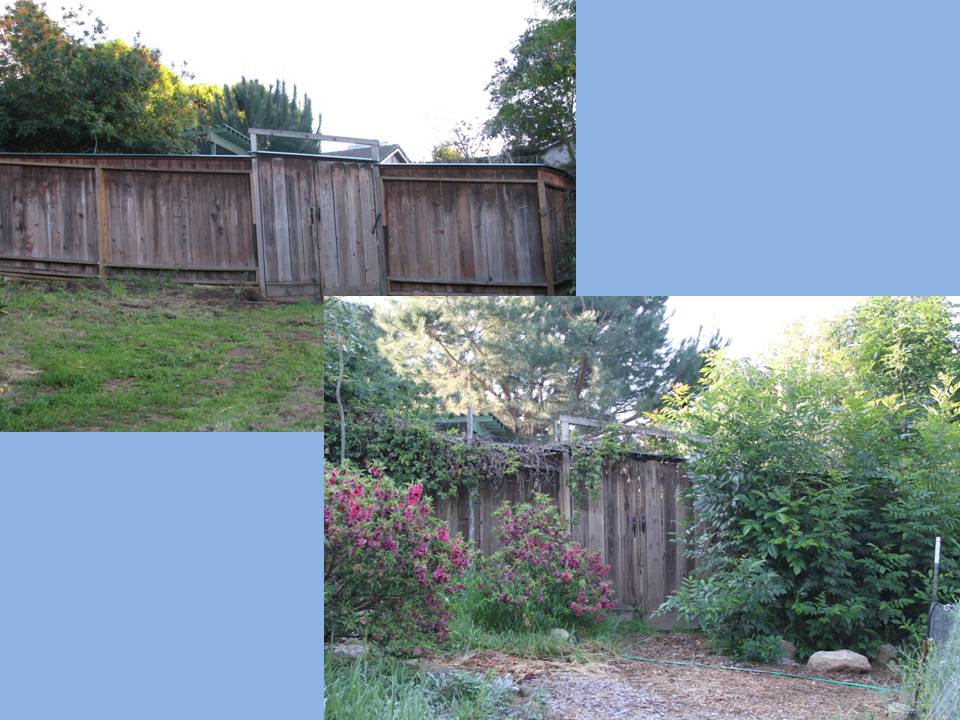
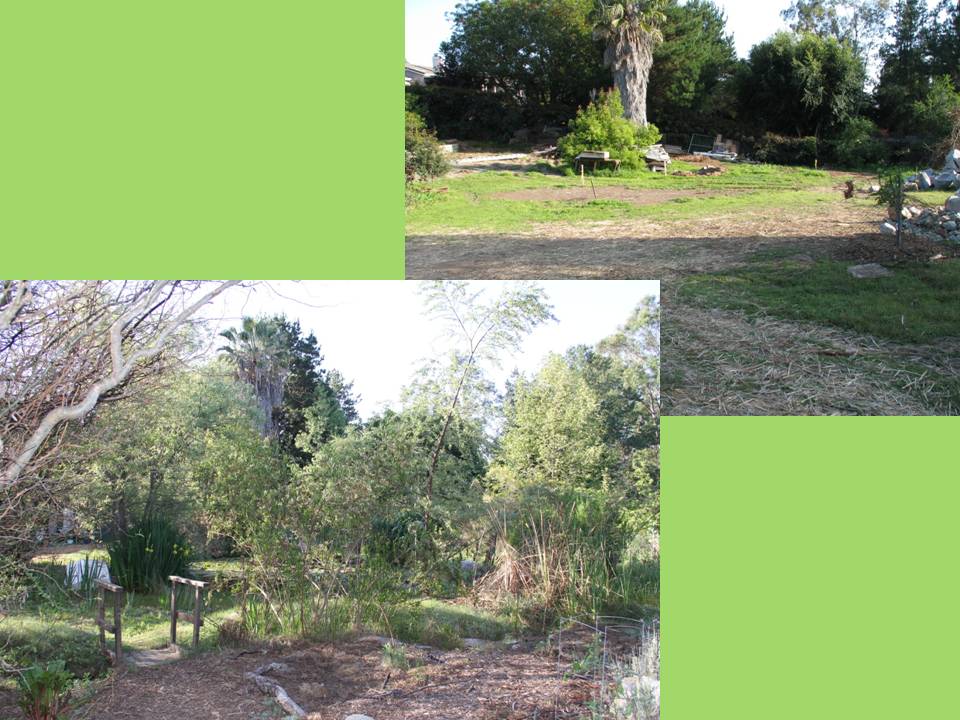
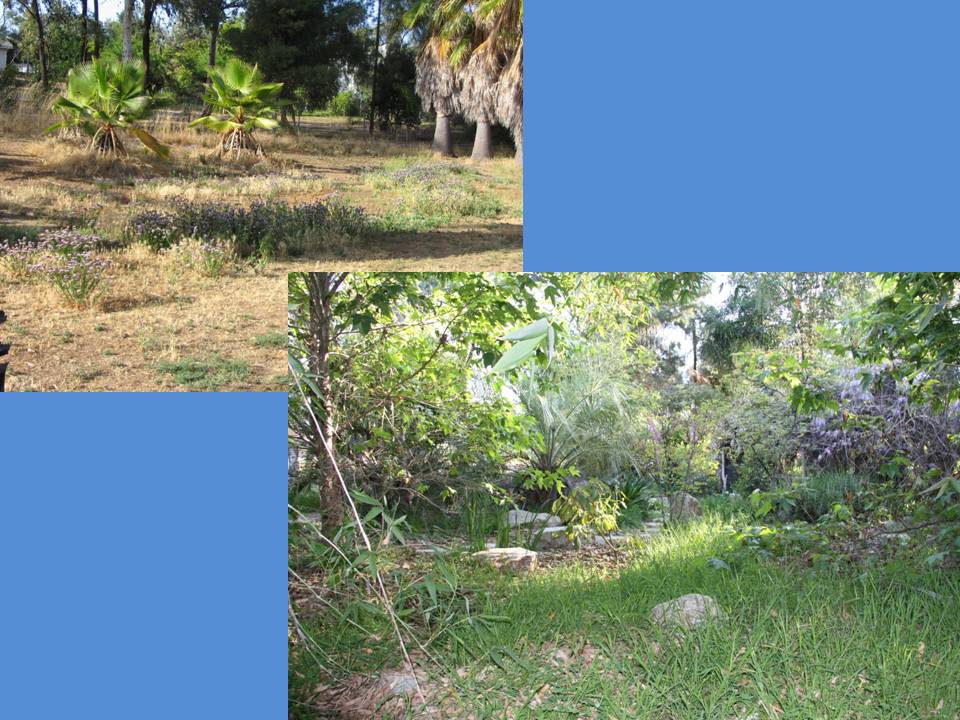
 In February, 2011, I signed the contract with Roger Boddaert to create a permaculture food forest. The goals at that time were to stop the erosion on the property, to create a wildlife habitat, and to grow food, medicine, native plants, building materials, herbs and ornamentals in a sane way: no chemicals. So the journey began, and it hasn’t been easy. Nor did I at that time know that the garden would evolve into Finch Frolic Garden and my business would be education.
 In preparing for a talk about our garden, Miranda and I worked on before and after photos. The garden this April, 2017, is stunning, with blooming wisteria, fruit trees, red bud, roses, angel-wing jasmine, iris, and so much more. Best of all Mrs. Mallard has brought her annual flock of ducklings from wherever she nests, and the four babies are still alive and thriving after a week! So I thought I’d share the incredible difference between what had been, and what is now. All done with low water use, no fertilizer, herbicide, insecticide, additives or supplements. Come visit when you can! Slideshow images change in ten seconds:
You May Also Like
Native Insects and IPM
- Arts and Crafts, Breads, Cake, Condiments, Dessert, Fruit, Gardening adventures, Herbs, Vegan, Vegetables, Vegetarian
2016 Marketplace and Last Tours of the Year
Our Marketplace is extended to Sunday, Nov. 20th, 9 – 2!
 At Finch Frolic we’ve come to celebrate the end of our season with a Marketplace. This year our Marketplace will happen one day only, this Sat. Nov. 19th from 8-3. Finch Frolic is located at 390 Vista del Indio, Fallbrook, CA. We’ll be selling our abundance. Here’s some of the goodies you’ll find:
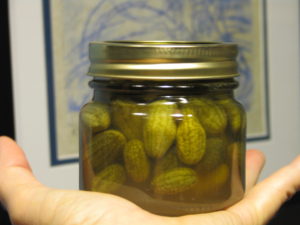
Tiny Cocktail Mouse Melons (cucumbers… so cute!)
Amazing, milk-free Passionfruit Curd
Incredible tropical Guava Jam
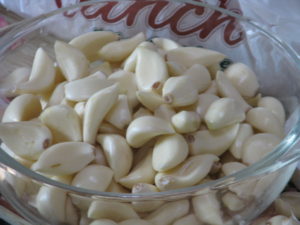
Pickled Garlic
Whiskey Cranberry Relish

Nectarine Amaretto Jam
Tangy Plum Jam
Our very best dill Pickles

Jelly Palm Jelly
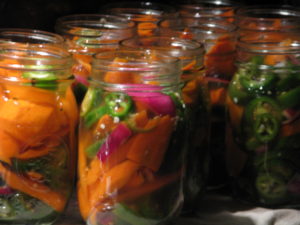
Spicy Jalapeno Carrots
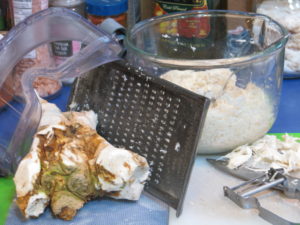
Hand-grated, homegrown organic Horseradish Sauce
Guava Halves in Simple Syrup
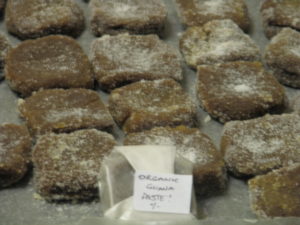
Guava Paste squares – eat as is or put them in baked goods, or pair with slices of cheese. Ummm!
Frozen Passionfruit Juice cubes
Our famous Pomegranate Gelato
Frozen Pomegranate Arils, all ready to sprinkle on your baked goods or mix in a salad or stuffing.
Clear, amazing Guava Jelly
Frozen Plum, Guava and Peach slices
Frozen strained cooked organic home-grown pumpkin, all ready for a pie or bread!
Our best-selling Cranberry Biscotti
Gingerbread Houses. Pair them with our Passionfruit Curd for a memorable dessert!
Lilikoi (Passionfruit) Poundcakes. Small amazing tropical bundles of yum.
Guava Sauce, like applesauce but guava. Very low sugar!
Fresh Jerusalem Artichoke (Sunchoke) roots. Cook them or plant them!
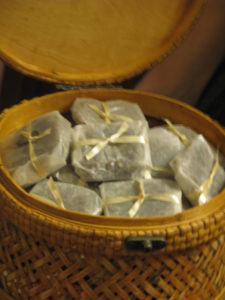
Layered Curry Mix – a sensual trip to the Middle East, either layered in cute little jars for a gift or in bags for use at home. Make a curry with these organic spices!
Lime Juice Cubes
Candied Orange Peels. From our organic oranges. A much better stocking stuffer than hard candy. Or top your baked goods with a twist.
Fresh, fragrant guavas, both white and pink

Fresh kiwanos, those thorny African fruit that sell for a fortune at the stores.
And more!
Plus, we’ll be selling some knick-knacks, and a few garage sale items . A punching bag anyone?
PLUS, we’ll have a selection of native plants lovingly grown locally.
And we’ll have amazing succulents from our neighbor Rosa of Roja’s Succulents. You’ll pass by her business on the way in, so please stop by on the way out and see her incredible inventory of plants, all organically hand-grown by Rosa. I never loved succulents until I saw her collection, and her very low prices!
Except for the gelato, we’re dairy (milk) free this year. We use organic eggs from cage-free hens, and otherwise use vegan butter that I make at home which is coconut-oil and rice milk based.
Our last two tours of the year (the garden closes from Thanksgiving until March 1. We will still be available for consultations and appearances) will be this weekend, Nov. 19th and 20th, both at 10. [UPDATE: THE SATURDAY TOUR IS FULL. THERE IS STILL ROOM FOR THE SUNDAY TOUR]. The tours are our usual 2-hour concentrated Intro to Permaculture walks through the garden. The tours cost $15/adult and you will come away with so many ideas and so much information that you’ll spend the next week working in your garden! Please RSVP for the tours to dianeckennedy@prodigy.net.
Your continued support helps Miranda and I keep our consultation and tour prices low, and enables us to keep teaching and spreading the word on permaculture. So thank you!
-
Ghostly Spring Rolls
 Vegetariat began as mostly a food blog. Now I talk more about growing food than cooking but if you go through the archives you’ll find a lot of recipes. This one I thought was so cute that I had to pass it on.
My daughter and I wanted something savory, vegan and spooky to bring to a Halloween potluck. We saw lots of Pintrest tags for apple slices with teeth, green pepper faces oozing spaghetti and all kinds of cheese or egg eyeballs.
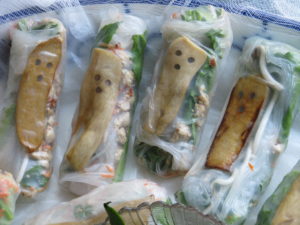
Miranda had made some Thai spring rolls for my birthday last week, which are a big favorite of mine. I liked how you could see the veggies through the rice paper. Then I thought what if something spooky was peering through the rice paper wrapper? A ghostly figure. Then I thought of these wonderfully large King Oyster mushrooms we bought at 88Ranch Market and I knew what I wanted.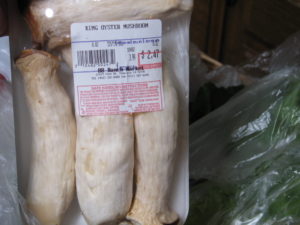
I sliced the mushrooms very thinly.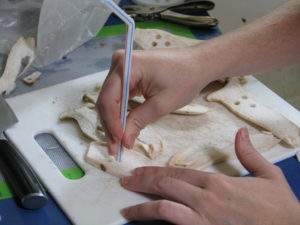 To cut out the eyes and mouth at first I used a knife, then tried a hole punch, and finally used the end of a plastic straw which worked beautifully.
 I simmered the mushrooms until tender in vegetable broth, sesame oil and Bragg’s Amino Acids.
 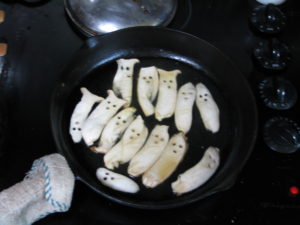 Then they were set on paper towels to dry and to cool. We also prepared the other ingredients: cilantro, Thai basil, strips of chive, soaked rice noodles, lettuce, bean sprouts, grated carrot and crumbled tofu cooked in sesame seed oil and lite Soy Sauce.
Spring rolls are not cooked. They are a bunch of flavorful and aromatic herbs and veggies wrapped in a clear rice paper wrapper. These wrappers come in hard, brittle sheets. You carefully dip them one at a time into hot water and they quickly become translucent and soft. This is the tricky part, getting them on a surface to fill and fold without allowing it to stick onto itself. If one hangs up too much, dip it back into the water and you can gently pull creases out then.
We put a mushroom ghost 2/3rds of the way up, and the rest of the filling just below that.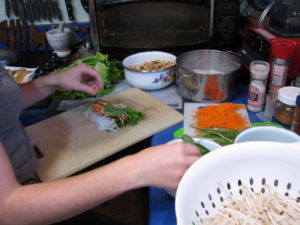 Don’t overfill, and keep a margin on either side for folding. Beware of stems that might poke holes into the wrapper. To fold, you fold in either side first. Then fold the bottom up until it covers 2/3s of the rest, then roll up. The filling should be neatly tucked away and the ghost peering out. You can arrange the filling behind the ghost so that there are different backgrounds, such as a lettuce forest, creepy bean sprout tendrils or a haze of red carrot.
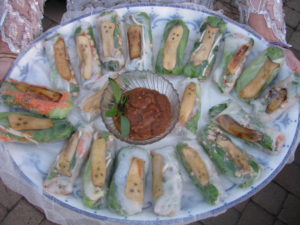
Serve the rolls with a peanut dipping sauce. We brought these to a potluck Halloween party and they all disappeared in a not-so-spooky manner!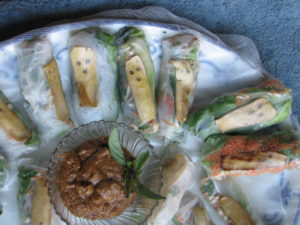
If you don’t have big mushrooms available, then you can also do this with carrots very thinly sliced and handled the same way.
Here’s a quick recipe for the peanut dipping sauce, but there are many variations out there so try others:
Peanut Dipping SauceRecipe type: SauceCuisine: ThaiPrep time:Total time:Serves: ½ cupFor use with Thai spring rolls.Ingredients- 2 tbsp water
- ½ cup chunky peanut butter (you can use smooth, but I like the chunks for more flavor)
- 1 tbsp sugar
- 4 tbsp vegetarian hoisin sauce
- 1 tbsp lite soy sauce (or Bragg's Amino Acid)
- 2 small garlic cloves (or 1 large), minced
- 1 birds eye chilli, finely chopped (optional. We left them out)
- 1 tbsp sesame oil
- 2 tbsp lime juice
Instructions- Mix all ingredients until the consistancy is like honey; you want it to stick but not clump.
- Garnish with crushed peanuts and sprigs of herbs or a piece of lime.
Just wanted to share our spooky treats that also were very healthy and so very tasty!
-
Happy Autumn!
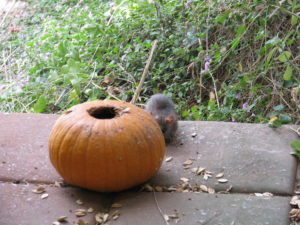
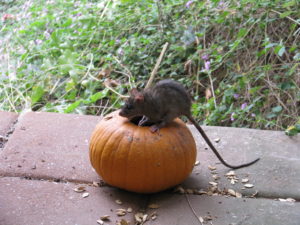
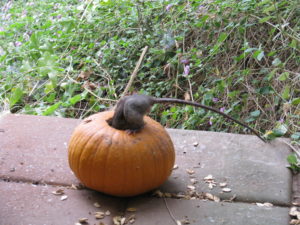
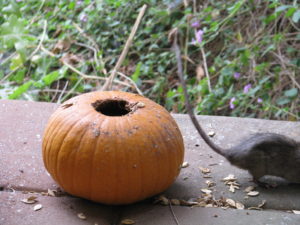
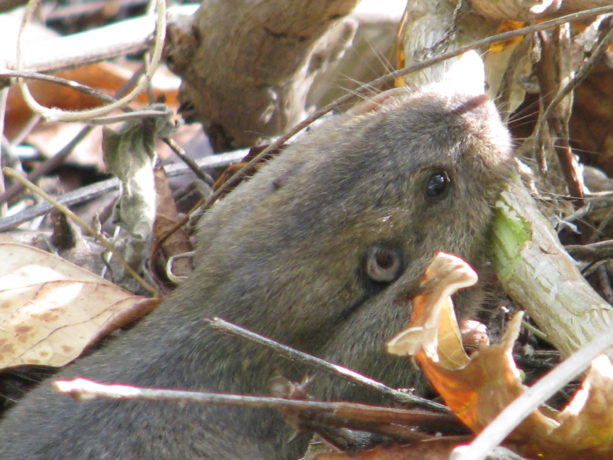
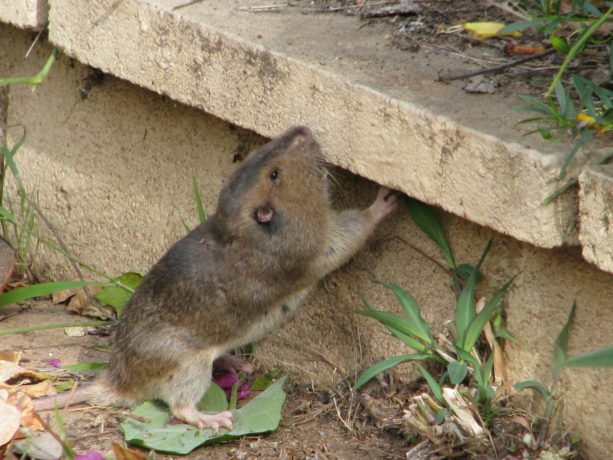
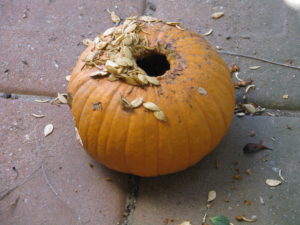 Some night creature has been enjoying our pumpkins… if I see a Jack O’Lantern face being chewed into the side of it, then I’ll be setting up the night camera!
Update: I suspected that this was the culprit! Bon appetite, Madam Rat.

You May Also Like
Native Insects and IPM
- Animals, Compost, Gardening adventures, Hugelkultur, Microbes and Fungi, Permaculture and Edible Forest Gardening Adventures, Rain Catching, Soil, Varmints
Year of the Gopher
They’ll eat tasty above-ground plants, too. This year should have been dubbed The Year of the Gopher. Every year brings an increase (and decrease) in some element in nature. There are big earwig years, painted bug years, cabbage moth years, just as there seem to be good and bad years for certain crops. This year seems to be a big one for gophers.
Pocket gophers are native to Southern California, and have their special roles to play in the landscape. They aerate, their tunnels are homes to lots of other animals and insects such as Pacific Chorus frogs, toads and lizards. They are food for snakes, raptors and even greater egrets. Their tunnels allow rainwater to penetrate the soil. And, like any of us, if offered really tasty specialty food they’ll go for it.
Cute little guy. Gopher tunnels are prime real estate. As explained in a past post, it takes a considerable amount of energy for gophers to dig tunnels, and if you kill them, new gophers reoccupy the tunnels from surrounding property. They are territorial and so the young are always looking for opportunities to have their own tunnel system.
Methods we’ve been using to train our gophers have been challenged this year by the desperation of our gophers, caused no doubt by the changing weather and growth patterns. In our kitchen garden we’ve lost a lot of veggies this spring.
We don’t trap and kill here, so we work with animals because this is their home and habitat. Permaculture isn’t about taking over an area to the loss of everything that usually lives there, its about working with nature and learning from it. So the reason our kitchen garden has been attacked is that we didn’t prepare well enough to live with the gophers. The only way to keep plants safe is to have boundaries around root balls. Trees we plant in gopher cages, but vegetables -not so much.
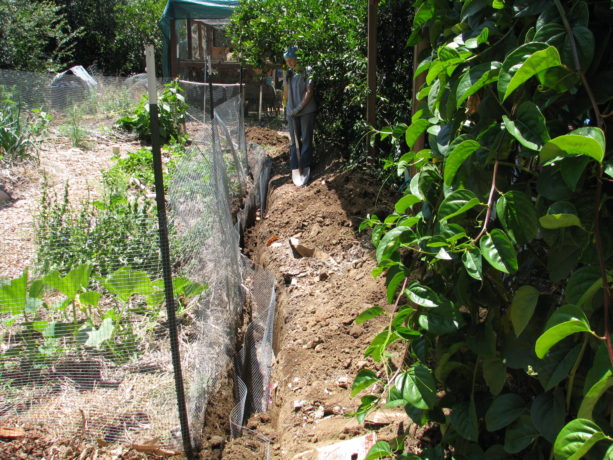
So Miranda and I decided to bury 24″ tall 1/4″ wire around the garden.
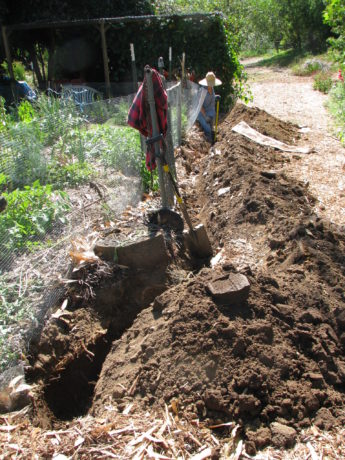
The north side oddly revealed no gopher tunnels. These tasks always sound so easy! Trenching through clay in the heat of early summer has been a challenge. Gopher tunnels dug for food collection are within the first 18″ of dirt, and their nests are down to about 24″.
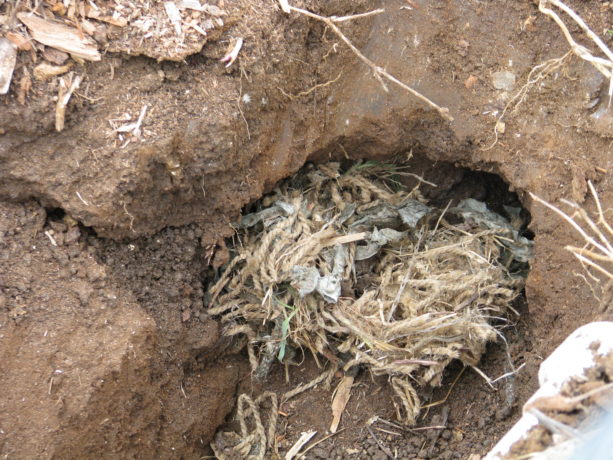
Gopher nesting material about nine inches under the ground. This is in such hard dirt that I have to use a pick on it. We pulled back sheet mulch on the pathways and found incredible fungal activity, loads of worms and moisture.
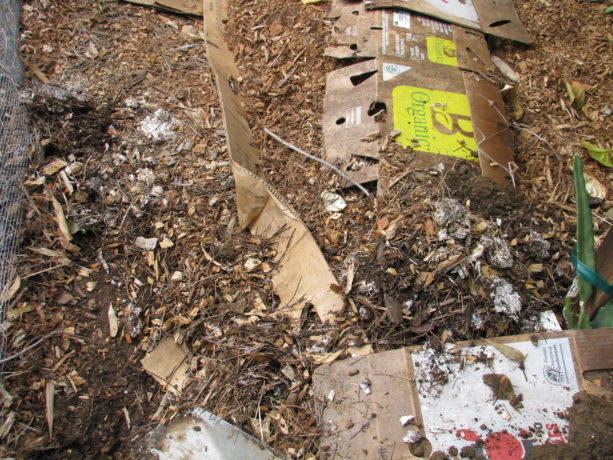
Peeling back sheet mulch that was only six months old showed lots of fungal activity already. 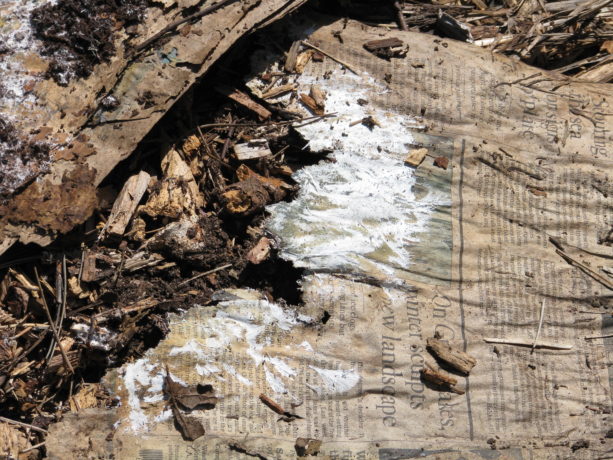
Newspaper being consumed by fungus and turned into soil. 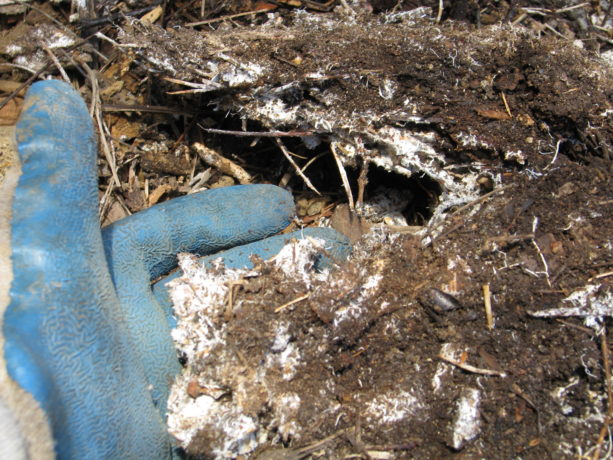
A great lump of fungal hyphae, if I may say so myself. While trenching we found gopher tunnels into the garden, and often would find dirt in the trench under the holes as the gopher backfilled, trying to make a new dirt tunnel across the channel.

The east side we thought would be the most difficult, with the dirt rock-hard at the corner. We thought that until we began the fourth trench. Yikes! Along one active area I buried the wire, but also wanted to retard the invasion of Bermuda grass. Along with the wire I buried a couple of pieces of scrap 3/4″ plywood to make a physical boundry for the grass, and these happen to be right where a gopher tunnel was. The next morning I was in the garden and I heard a strange thumping sound, and finally realized that it was coming from underground where the wood was buried. The gopher was trying to get through the new wooden fence and wire!
We’ve buried wire around three sides (40′ long by 20 – 24″ deep), and are slaving away at the last trench where the most gopher activity is.
Burying the wire, shoving some rotten fruit into the gopher tunnel entrances and refilling. As we’re working, we’re also using a spade to collapse gopher tunnels from the back out, and using the smucky water (this batch is made from onion peels and bits leftover from pickling whole onions) to ruin those tunnels. We’re herding the gopher out of the garden and fertilizing at the same time.
We’ve a couple more bouts left to go before finishing; my partially numb hands are ready to be done with it. Narrow trenches in heavy clay right next to a fence aren’t easy to work in, which slows the process down a lot. Knowing that we’re being true to what we believe in, to not trap and kill in our garden, makes it all worth the work. The gopher is welcome to all the weed roots it wants elsewhere.
You May Also Like
Native Insects and IPM
- Compost, Fungus and Mushrooms, Gardening adventures, Hugelkultur, Microbes and Fungi, Other Insects, Perennial vegetables, Permaculture and Edible Forest Gardening Adventures, Pets, Predators, Rain Catching, Seeds, Soil, Water Saving
Polyculture In A Veggie Bed
 Polyculture is, obviously, the opposite of monoculture, but in permaculture (a lot of -cultures here) it means more than that. The best way to plant in polyculture is to follow the guidelines for a plant guild . A plant guild is how plants arrange themselves in nature so that each fulfills a niche. The variety of plants aren’t competing for the same nutrients and are delivering something other plants need; i.e. shade, nutrients, root exudates, leaf drop, soil in-roads via deep tap roots, etc.
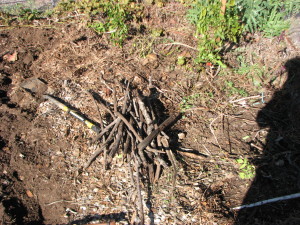
By burying sticks in planting holes you are helping feed the soil and hold water. When planting veggies here at Finch Frolic Garden I often mix up a handful of vegetable, herb and flower seeds that fulfill the plant guild guidelines and plant them all in one area. They come up in a mix of heights, colors, shapes and scents to fool bugs. The result is like a miniature forest.

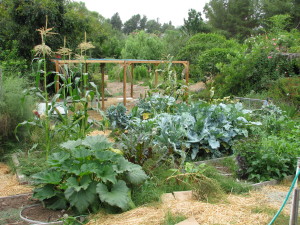
A merry mixture of vegetables, herbs and flowers in a mature bed. However that sort of wild designed planting has its drawbacks. Harvesting is more time consuming (although more fun, like a treasure-hunt). Many people find peace in looking at rows of vegetables, and peace is valuable.
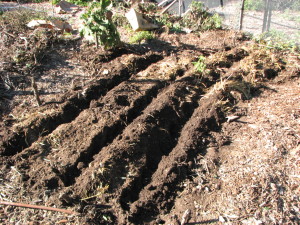
We disturb the soil as little as possible, and pull the soil back for potatoes. You can plant polyculture in rows as well. Just plant each row with a different member of the plant guild, and you’ll achieve a similar effect with insect confusion, and with nutrient conservation.
In this small, slightly sunken bed (we are in drylands so we plant concave to catch water), we planted rows of three kinds of potatoes, two kinds of shallots, a row each of bush beans, fava beans, parsnips, radish and carrots.
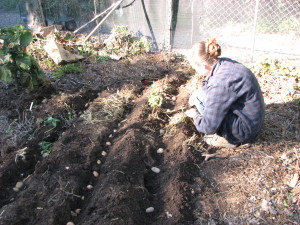
Miranda planting potatoes and shallots before the smaller seeds go in. We covered the bed with a light mulch made from dried dwarf cattail stems. This sat lightly on the soil and yet allowed light and water penetration, giving the seedlings protection from birds and larger bugs.
This light, dry mulch worked perfectly. Since cattails are a water plant, there are no worries about it reseeding in the bed. The garden a couple months later. Because we had a warm and rainless February (usually our wettest month), our brassicas headed up rather than produced roots and only a few parsnips and carrots germinated. However our nitrogen-fixing favas and beans are great, our ‘mining’ potatoes are doing beautifully and the shallots are filling out well.
Every plant accumulates nutrition from the air and soil, and when that plant dies it delivers that nutrition to the topsoil. In the case of roots, when they die it is immediate hugelkultur. Without humans, plants drop leaves, fruit and seeds on the ground, where animals will nibble on them or haul them away but leave juice, shells and poo behind. When the plant dies, it dies in place and gives back to the topsoil. When we harvest from a plant we are removing that much nutrition from the soil. So when the plants are through producing, we cut the plants at the soil surface and leave the roots in the ground, and add the tops back to the soil. By burying kitchen scraps in vegetable beds you are adding back the sugars and other nutrients you’ve taken away with the harvest. It becomes a worm feast. Depending upon your climate and how warm your soil is, the scraps will take different lengths of time to decompose. Here in San Diego, a handful of food scraps buried in January is just about gone by February. No fertilizer needed!