Vegan
- Cob, Gardening adventures, Permaculture and Edible Forest Gardening Adventures, Soil, Vegan, Vegetables, Vegetarian
Harvesting Sweet Potatoes with Gratitude

Beautiful yam harvest. I am in sensory heaven. Outside frost is again settling – a rarity here in Fallbrook, CA. Inside…. mmmm. My daughter is juicing today’s harvest of oranges. On the stove I’m poaching the last of the Harry and David pears my son sent before Christmas, in a bath of Julian apple cider (I’ve had frozen since October!), cinnamon and vanilla. There is a touch of woodsmoke from the wood burning stove. The mingled aroma of vanilla, orange and cinnamon in the air is incredible. In the fire are two homegrown potatoes in foil baking for dinner, and I’m cutting squares of homemade bread (it rained the other day… great baking and soup day!) to toast in the fire on fondue forks with mozzarella cheese and drizzled with Just Dip It (an olive oil, vinegar and herb blend from Temecula Olive Oil Co.). I am saturated with contentment and gratitude.
I wanted to write a blogpost for the first day of the year about gratitude. Instead I’m writing about harvesting yams and sweet potatoes, which, I believe, amounts to the same thing.

Tiny Russian Banana potatoes I grew in a nursery container Today the air was clean and almost 60 degrees F. Maxfield Parrish clouds filled the sky making it hard to pay attention to anything else. My daughter and I finally fired up Harry Mud, the cob oven. We experimented by baking small frozen pizzas, to success. Then in went homegrown, wrapped sweet potatoes, garlic and russet potatoes to slowly bake in the ashes. I hope I can convey sweetness of sitting outdoors on New Year’s Day eating pizza and smelling home grown potatoes and garlic cooking in a mud oven that we built, from mud from our property, as a snowy egret watched us carefully from the pond and our hens figured out how to beg. Peace. Enjoying the payoff of hard work. Eating health.
In the last few days we’ve dug up several patches of yams and sweet potatoes, the greenery of which had just been frosted black. I plant them all over the property to fill the groundcover niche of the plant guilds. I also grew some in my raised veggie beds. Some of the sweet potatoes had been small last year and so I left them in the ground. They grew.

This enormous one was six pounds! The flavor of homegrown, organic potatoes is beyond description. You don’t need sugar and marshmallows dumped on the yams; potatoes aren’t just a vehicle for toppings. I steam them, eat them with butter, salt and pepper. Phenomenal. On Christmas I roasted wedges of yams with garlic and olive oil, and not only were they terrific, the leftovers I mixed into a hash for breakfast and it was sensational.

Freshly dug sweet potatoes Yams and sweet potatoes are what Americans call the orange or white tubers, respectively, sold in the grocery stores. There are actually hundreds of varieties of sweet potatoes of many colors and flavors. They are semi-tropical and like warmth. To grow, buy an organic sweet potato or yam and allow it to sprout on your counter. This is the easiest way. You may also buy slips from organic growers. Please, please don’t buy non-organic seed, slips or bulbs. Please don’t be Round-up Ready.

Colorful yams full of antioxidants. Take a sharp knife and cut slices from your sprouted yam, each containing at least one sprouted ‘eye’ , and lay them out to air dry for a couple of days in a cool, dry place out of direct sunlight. This hardens them off. Don’t plant a whole potato because the plant will have all the food it needs to produce greenery and won’t feel the need to make as many tubers. Plant the slips in well-drained soil that isn’t heavily manured; as long as water doesn’t sit around the roots, they will probably grow. I’ve had luck in many kinds of soil. The plants will spread out in a lovely, glossy-leaved groundcover that protects the soil and reduces weeds. Let the vines run and enjoy the small yam flower. Harvest in late fall, or when the greenery dies off.

Frosted leaves of sweet potatoes Carefully dig and lift the potatoes. The skin will be more delicate than on yams store-bought. Lay the dirt-caked potatoes out to dry off before you store them in a cool dark place. Keep small slips and roots for replanting. The flavor of homegrown organic potatoes will make you wonder what the tasteless mushy things you’ve been eating have been.
This last year had its share of terrible losses, worry, pain and disappointment, along with great joy and contentment if I opened my eyes to them. They say that you reap what you sow, and as the garden and my experience deepens, and as my life mellows, I feel the truth in it. This morning we had fresh juice made of passionfruit, guava, oranges and pomegranates, all of which we grew. The potatoes, garlic, squash, greens, pickles, passionfruit curd, strawberry jam, dried tomatoes, all are at hand because of planning, sowing, nurturing, harvesting and preserving or storing. This may seem incongruous, but I am astonished at how many friends I have gained this year, through my volunteer work and exercise classes, in addition to those gained while working with County Parks, Sullivan Middle School, and the SDZoo Safari Park. So many that I wrote out the names and counted and marveled. Perhaps the list would be small for others; I don’t know, but it is wondrous and enough for me. At age 51, I have more friends and good acquaintances than I’ve ever had in my life. I am so grateful. I not only reap what I sow, but just as in my garden harvest, I have more than I could have imagined.
I do not follow a religion. In Buddhism it is said that life is a walking meditation; that every step you take is a prayer. As I put one foot in front of the other walking through the last part of my life, as I dig yams and eat them redolent with the health of good soil, as I watch those Maxfield Parrish clouds, as I laugh and work with friends who miraculously smile when they see me, I wordlessly pray my gratitude to the universe.
I very truly wish for you a year filled with gratitude and peace, and health-giving food that nourishes your heart and soul as well as your body.
-
Preserving Squash and a Terrific Pumpkin Chai Recipe!

Beautiful patterns on the banana squash shell. Four sugar baby pumpkins that I’d kept for myself, and three pink banana squash, were all in need of preservation. They were not keeping well due to the warmth of our hot San Diego county Fall. During a rainy break in the weather I did something about it. You can preserve cooked pumpkin and winter squash best by freezing it. If you have a pressure canner you may can pureed pumpkin or pumpkin pieces in liquid, but since I only use the water bath method that wasn’t an option.

Even sugar baby pumpkins can be difficult to cut when raw. There’s a better way! Roasting a squash isn’t difficult at all. In fact, you only have to wash it, put it on a tray in a 350F oven for about an hour (longer if its a really large pumpkin), and then slice when cooled.

Roasting a whole pumpkin makes the scooping so easy! Its easy to scrape out the seeds and then spoon out the cooked flesh out of the hardened shell. This is what I did for the sugar baby pumpkins. There was too much banana squash to fit whole into the oven, however, so I cut them into chunks, scooped out the seeds, covered them with aluminum foil (it helps steam them) and baked 350F for forty-five minutes.

Three banana squash is a lot of squash I have more details here. I also roasted the pumpkin seeds.
Then I had a lot of squash to puree! These squash and pumpkins were dry, so I added a little water to the VitaMix and tossed in the chunks.

Pumpkin and seeds. I pureed batches until smooth, then spooned cups full into freezer bags. My pumpkin scone recipe calls for only half a cup, so I froze one-cup batches, as well as two-cup batches for pie. The secret to ‘vacuum-packing’ freezer bags is to close the top of the bag around a straw and then suck all the air out. It really works well, and is kind of fun, too.

Get a straw, suck out the air and presto: vacuum packed! However, the best thing that happened out of all this squashing was that I had a little less than a cup of pureed roasted squash left in the VitaMix, too little to freeze and really irritating to scoop out. It was a cold day and past lunchtime. I had an idea and spooned in what was left of some Chai tea mix, poured in vanilla soy milk, blended it until it warmed up and sat down to drink. Heaven! I’m not one for pumpkin flavored things, but this was the real deal.

Pumpkin puree. It was so good that the next day I took a cup of the pureed squash that I refrigerated, poured in 1 1/2 cups of vanilla soy milk, a touch of orange syrup left over from candying orange peel, added cinnamon and blended until it was hot. It was thick, satisfying, a little sweet, spicy and full of beta carotene, fiber, protein and other good things. I’m sure you can do the same thing with canned pumpkin and other liquids, such as milk, rice milk, almond milk or coconut milk. If fact, I insist that you try it.

Hot Yum! Pumpkin ChaiAuthor: Diane C. KennedyRecipe type: BeverageCuisine: AmericanPrep time:Cook time:Total time:Serves: 2Cold or hot, spiced pureed pumpkin or squash mixed with the milk of your choice is extreme comfort food that is actually terrific for you!Ingredients- 1 cup cooked pumpkin or squash puree, fresh or canned.
- 1½ - 2 cups vanilla soy milk, or milk of your choice. (Less for a thick drink).
- ½ - ¾ teaspoon cinnamon, pumpkin pie spice or up to 1 scoop Chai tea mix.
- Sweetener (optional); a natural syrup would do or honey.
- ½ teaspoon vanilla (optional)
Instructions- For cold pumpkin chai mix all ingredients briefly in a blender or VitaMix.
- Taste to adjust seasonings, thickness and sweetener, and serve.
- For hot pumpkin chai, heat milk and add to the rest of the ingredients in a blender and process. If you have a VitaMix, you can add all cold ingredients and then process until it is hot.
I’m going to make some more for me right now. -
When Is Tuna Fish Not Tuna Fish?

No-kill “tuna” salad! Prior to being a vegetarian, many years ago, I did enjoy a tuna sandwich or salad now and then. A perfect dish for a hot afternoon. During my almost twenty years of vegetarianism I’ve sampled many tuna substitutes, with various results. Most of them were discontinued, or were imported to a store on the East coast and then resold and shipped. Have you ever noticed how foods that are marketed as substitutes for other foods either have quotations around their names as if someone was whispering it behind their hand? Or else the names are spelled wrong, like Tuno or Bakon. There is also the saner although still questionable method of placing the word ‘mock’ in front of the word, such as ‘mock-tuna’, which is better than misspelling. Anyway, back to the topic, in trying to keep my carbon footprint low I’m eliminating the purchase of goods that require so much shipping.
This week I discovered a marvelous tuna substitute (I say, “discovered” when really I’m probably the last to know). It is low calorie, high in protein and fiber, inexpensive, easy to prepare, doesn’t kill tuna or dolphins, and they grow here in California. I can also buy them organic. They are garbanzo beans, otherwise known as chickpeas.
 until they are almost smooth.")
Mash garbanzos (what a great name for a bean!) until they are almost smooth. The flavor of garbanzo beans is very mild and takes well to light seasoning. Substitute mashed garbanzo beans in your favorite tuna salad or sandwich recipe. If you use Veganase – a dairy-free mayonnaise substitute – then you have a mock tuna salad or sandwich that won’t be dangerous to eat at picnics because neither the beans nor Veganase spoil quickly. Incorporating dill into the mix gives the mix a fishier flavor, since dill is so commonly paired with fish. Simple, nutritious, inexpensive and very yummy. Can’t go wrong with that!
Mock Tuna SaladAuthor: Diane C. KennedyRecipe type: EntreePrep time:Total time:Serves: 2-4A high-protein and fiber, low-cost tasty tuna substitute without any trace of mercury or dolphin!Ingredients- One can organic garbanzo beans
- 2-3 tablespoons Veganase or mayonnaise
- 1 teaspoon minced dill, preferably fresh
- 2 stalks celery, chopped
- 2 -3 cups cooked, cooled small shaped pasta, such as shells
- ¼ teaspoon ground cumin
- Salt and pepper to taste
- Chilled iceberg lettuce
Instructions- Drain and empty canned garbanzos into a small bowl.
- Mash with a potato masher until almost smooth, keeping some of the lumps for texture.
- Stir in Veganase, dill, celery, cumin, salt and pepper.
- Stir chickpea mixture into cooled noodles until well mixed.
- Serve over iceberg lettuce with a dill pickle on the side.
-
Two Sure-fire Zucchini Recipes
Zucchini plants are like cats: They both look harmless when small, so you think the more the merrier. One plant is always enough, but it is hard to plant just one seed in case it doesn’t come up. Then the sprouts are hard to thin.. what if something eats it? Then before you know it, there are five enormous plants growing giant green clubs in the dead of night, just after you’ve checked all the plants. Well, that’s my situation anyway. Too many cats; too many zucchinis. When there are enough all at one time, we’re taking them (the zucchinis, not the cats) to the Fallbrook Food Pantry along with pumpkins and tomatoes. Until then, we’re exploring new ways to eat them. And I refuse to sully cheesecake with zucchini! (yes, there is such a recipe!).
My son who is studying Culinary Arts at the University of Hawaii sent me a link to smittenkitchen.com with an exceptional zucchini pancake recipe… not sweet, very light and completely tasty. I’ll include my version. But first I want to explain my ‘discovery’, which everyone but me probably knows about anyway.
SAUTEED ZUCCHINI
I had grated zucchini for bread and had some left over. It was dinnertime and I was alone, so I experimented. I heated a skillet with a little olive oil in it, threw in the grated, undrained zucchini, and stirred it around on medium-high heat for about five minutes. When it was beginning to wilt and brown a little on the bottom, I sprinkled sesame oil on it lightly, and then gave it a touch of Bragg’s Amino Acids, which I use for many things. A light soy sauce may substitute, but Bragg’s is high in nutrition, low in salt and a wonderful flavoring. Buy it online or in health food stores. The zucchini came out tasty and with a mouth-feel of wet wide noodles. It was fantastic. I’ve since made it for my daughter a couple of times, and each time we wanted more! Imagine that! On the plus side, it used up a medium zucchini.
You really must give these pancakes a try.
Fabulous Zucchini PancakesAuthor: Diane C. Kennedy (adapted from smittenkitchen.com)Recipe type: BreakfastPrep time:Cook time:Total time:Serves: 4A light, flavorful, really good pancake that uses up a lot of zucchini and tastes like zucchini bread.Ingredients- 2 large eggs
- 3 tablespoons olive oil
- 2 tablespoons sugar (optional)
- ¼ cup buttermilk or soured milk
- ½ teaspoon vanilla extract
- 2 cups shredded zucchini
- 1 cup all-purpose flour
- ¼ teaspoon table salt
- 1 teaspoon baking soda
- 1 teaspoon ground cinnamon
- ⅛ teaspoon ground or freshly grated nutmeg
- ¼ cup semi-sweet chocolate chips (optional)
- Oil, for coating skillet
Instructions- In a large bowl whisk eggs, olive oil, sugar, buttermilk and vanilla until smooth.
- Stir in zucchini.
- In a smaller bowl, combine flour, salt, baking soda, cinnamon and nutmeg.
- Stir dry ingredients into zucchini batter, mixing until just combined.
- Stir in chocolate chips.
- Heat oil or butter in a large, heavy skillet over medium heat.
- Scoop ¼-cup rounds of batter in pan so they do not touch.
- Cook until bubbles appear on the surface, about 2 to 3 minutes.
- Flip pancakes and cook another minute or two.
- Keep pancakes warm in on a tray in the oven set on low or in a toaster oven.
- Repeat with remaining batter.
- Serve warm with or without traditional pancake toppings.
- Pancakes freeze well.
- Compost, Gardening adventures, Permaculture and Edible Forest Gardening Adventures, Soil, Vegan, Vegetables, Vegetarian
Fava Beans

Fava flowers Have you ever eaten Italian, Greek or Middle Eastern food and found some enormous beans in it? Most likely those were fava beans. Commonly called broad beans or horse beans, these ancient beans are native to Africa and Asia, but can be found in cuisines worldwide.
There are a lot of reasons to grow them, even if you don’t eat the beans. First of all, they are nitrogen fixers, being a legume. However they don’t tendril like green beans do. The plant is a tall stalk (different varieties grow different heights) that sets beautiful flowers down the trunk. From these flowers grow some very weird-looking veggies. The pods look like clusters of swollen green fingers, I kid you not. The stalk can grow unsupported, but may topple over once the heavy pods are set.

Another reason to grow them is that they are hardy and can tolerate cold, and soils that are heavy in clay and salts (which pretty much describes my yard). Often broad beans are grown as a cover crop, then cut and allowed to decompose on the soil surface while the roots release the nitrogen under the soil.

Then there is the reason that these very industrious plants produce an interesting protein-rich bean that enjoys notoriety worldwide (hence, easy to find different recipes for them!). The young leaves and flowers are edible as well.
To harvest favas, pull the swollen (but not too lumpy or they’ll be tough) pods from the stalks. Here comes the drawback: you have to shell the beans and it is a chore. Turn on a movie, pull up a bag of fava beans and an empty compost bucket, and go to. You may want to use a sharp knife to run down the seam, but I just used my fingernails. I watched the 1980’s TV show Cheers, which I never saw because I haven’t had television in about 17 years. Three episodes and I finished a big bag of favas!

When you’ve shelled the beans, you must blanch them for 3 minutes, then drop them in an ice bath. Rub the beans to remove a waxy coating. Then you can sautee them, mash them with potatoes, use them in fritters and soups, try an exotic Middle Eastern recipe with them. Fry them until they are crisp and serve salted as a snack. If you want to freeze them, then give the beans the blanch and ice water treatment, dry them and freeze them on a cookie sheet. Put them into a freezer bag. When you want to use them, then thaw, remove waxy shells and use. Some people don’t remove the coating, but its better if you do.
Fava beans have a nutty, slightly bitter and earthy flavor that becomes quite addictive. Two warnings, though. Some people, particularly those of Mediterranean decent, may be allergic. Also if you are taking anti-depressants, the beans are rich in tyramine and should be avoided by those taking monoamine oxidase (MAO) inhibitors – a type of medication used to treat severe depression.

Add fava beans to your garden and landscape. Just tuck the seed into the ground and stand back. Mine weren’t nibbled by rabbits or bothered by anything; however last year I grew six plants in a raised bed, and something opened all the pods and ate the beans. This year I have them planted all over the property to help build the soil, and the harvest appears to be all mine. I’m glad that Cheers ran so many seasons!

- Gardening adventures, Heirloom Plants, Permaculture and Edible Forest Gardening Adventures, Recipes, Vegan, Vegetables, Vegetarian
Kohlrabi: A New (Old) Vegetable

Cute hot air balloon veggie Once, my mother came home from the grocery store and was laughing about a woman who stood hands on hips in front of the produce section and announced, “I wish they’d come up with a new vegetable!”
I entirely sympathize.

The whole plant is edible! This year I planted a vegetable that I hadn’t grown, and perhaps had never eaten before. Kohlrabi. It certainly isn’t new; its been mentioned since Roman times and used on many continents. But it was new to me. The name is German, and it can be found in (East) Indian, Italian, French as well as Asian cuisine. It is very low in calories, yet very high in fiber, potassium and other vitamins and minerals.
It also is very cool looking. You can either imagine an alien, or a hot air balloon. The entire plant is edible, and can be eaten raw.

Peel the outer layer of older bulbs. When young, the leaves, stems and bulbous base can just be munched on, chopped up in salads, grated for slaw, used like jicama for dips, stir-fried, and even barbecued. When older the leafy parts should be separated from the tougher stems, like older chard leaves. The base should then be peeled before use.
The flavor is very mild, and is kind of turnip-radish-broccoli tasting. There are two types, a purple and a light green. I grew the light green, but have read that the purple variety is sweeter. I don’t know if that’s a good thing or not, but I may try that next year.
I braised and steamed the leaves, ate some of the bulb raw and stir-fried the rest. It was tasty. It was cute. It was fun to say. It was NEW.

Stir-fried kohlrabi with sesame oil and seeds, served with brown rice noodles and fresh orange. And, if you want to send a grocery store checker into confusion and hold up the line, buy some kohlrabi. They’ll have no idea.
-
What To Do With Grapefruit

Grapefruit, all grown up. Every once in awhile someone gives me a grapefruit. One or two a year are just about all I can eat. Its not that I don’t like grapefruit. I certainly respect it. It is high is vitamin C and is supposed to be a good diet food. I think that is probably because it is so sour and bitter – even the pink kind – that you can’t taste anything else for hours after eating one.

Bare naked grapefruit. My mother would serve us grapefruit halves. She had a set of grapefruit spoons I always coveted that had serrated edges, but they disappeared at some point and I’ve never seen any like them. The sharp edges would allow you to dig out the grapefruit sections without actually arm-wrestling with the fruit. She’d also often ‘section’ the halves, using a paring knife to cut each section free so that all we had to do was scoop them out. She left little reason for us to not eat them. Of course, not eating my mother’s cooking was unheard of anyway.

If you section the grapefruit first, you could probably get more whiskey in there. To make grapefruit much more appealing, she would doctor it up with brown sugar, whiskey and then broil it and serve it warm. Wow did that ever improve the taste! Since grapefruits are making the rounds right now, and no one else I’ve spoken with seems to have heard of this method of serving them (their ears sure perk up when I tell them, though!), I thought I’d do everyone a favor and print the recipe. The Grapefruit Diet suddenly doesn’t look so bleak.
Broiled GrapefruitAuthor: Diane C. KennedyRecipe type: SidePrep time:Cook time:Total time:Serves: 2This method of preparing grapefruit I learned from my mother, Beth Cywar, a fabulous cook and a nutritionist before her time. She also believed that food wouldn't do anyone any good if they wouldn't eat it.Ingredients- One grapefruit, cut in half widthwise.
- 1 - 2 teaspoons brown sugar
- 1 - 2 teaspoons whiskey
- A few fresh or dried berries (optional)
Instructions- You may section the grapefruit or not; your choice. Sectioning would probably allow more whiskey to seep in, and would be a little easier to eat, but it is optional.
- Place halves on foil or an oven-proof dish, or on a broiler pan.
- Start the broiler. A toaster oven works great.
- Sprinkle the grapefruit halves with the brown sugar.
- Slowly drizzle the whiskey over the halves.
- Broil until warm and slightly brown and sizzling, about ten minutes.
- Adorn with fresh or dried fruit, or if you want to be retro, a marashino cherry, and serve.
-
Creamy Cauliflower Caraway Soup

The other night I had the February blahs. I was hungry, felt as if I was fighting a cold, worn out from laboring in the garden, and wanted comfort food. I had very little in the vegetable tray, but what I had was perfect for this soup. I made it that night, and I refined it tonight.
This is a healthy, low-calorie, vegan soup that is pureed smooth and silky. Two factors make this soup special. First, you almost char the cauliflower and caraway in a very hot pan until it is dark brown. I’ll call it deeply browning, because I don’t want that burnt flavor of charring. I was once served a tomato soup at the Four Season’s Resort which obviously used charred tomatoes, and it tasted so burned that I couldn’t eat it. In fact, it nauseated me, like when you really burn something on the stove and that smell is all over the house. I don’t think that that was the response they were looking for! Deeply browning the cauliflower brings out a wonderful rounded flavor (you can deeply brown the cauliflower, add a little broth and steam for a few minutes, and serve it this way as a side dish… delicious!). The caraway releases its flavor in the heat, and then becomes a very subtle note in the soup so that you really can’t distinguish it. If you would like a heavier caraway flavor, just increase the amount of seeds.
- Deeply brown the cauliflower.

The soup is pureed and is naturally creamy with the addition of the potatoes. While the frying pan is cooling you use it to toast the salt and cayenne, again releasing and deepening the flavors. Use this as a topping, which is then stirred into the soup by the guest. This soup doesn’t take long to make and is perfect for a cool winter’s evening, and doesn’t make the house smell like cauliflower, either.

Sprinkle heated spices on top, then have guests stir in.
Creamy Cauliflower Caraway SoupAuthor: Diane C. KennedyRecipe type: EntreePrep time:Cook time:Total time:Serves: 4A creamy, low-fat vegan vegetable soup that is fast, easy and very satisfying.Ingredients- 1 shallot, chopped
- 4 tablespoons olive oil, divided
- 1 medium head cauliflower, chopped (about 4 cups)
- 1 teaspoon caraway seeds
- 1 stalk celery, chopped (about ¼ cup)
- 1 medium potato, peeled and chopped
- ½ cup dry white wine (not sweet!)
- 1 tablespoon coarse salt
- ⅛th teaspoon cayenne pepper
Instructions- In a heat-tolerant frying pan, add two tablespoons olive oil and heat on high until almost smoking.
- Add cauliflower bits (watch for splashing!), caraway seeds and stir.
- Allow cauliflower to cook between stirring so that it develops dark brown marks on it. It should smell savory but not burned.
- Meanwhile, heat other two tablespoons of olive oil in a medium saucepan.
- Stir in shallots, celery, potato and wine.
- Cook until wine is reduced to very little.
- Add cauliflower and caraway to saucepan. Don't wash the frying pan yet.
- Add broth and one can of water to saucepan.
- Cover and bring to a boil, then reduce to simmer for 30 minutes.
- In the cooling frying pan, stir together the cayenne pepper and salt and let it darken without burning. Keep in reserve.
- When soup is done, blend it until it is smooth, and caraway is as fine as your blender or VitaMix can make it.
- Pour back into saucepan and check for seasoning.
- Ladle into bowls.
- With a spoon (not your fingers... cayenne gets everywhere!) sprinkle some of the cayenne and salt mixture onto the soup.
- Either swirl it decoratively, or have guests stir it in before eating.
- Deeply brown the cauliflower.
- Animals, Bees, Birding, Chickens, Gardening adventures, Heirloom Plants, Other Insects, Permaculture and Edible Forest Gardening Adventures, Photos, Ponds, Rain Catching, Vegan, Vegetables, Vegetarian
Garden’s One Year Anniversary
Happy Anniversary! One year ago on Feb. 1, 2011, I signed a contract with landscape architect Roger Boddaert (760-728-4297) to create a permaculture garden. For twelve years I’ve had this sloping property that was covered in weeds and worthless Washingtonia palms. Not only do these 2 acres slope down to a barranca, but it was filled in due to catching all the rainwater that runs from the street and properties above. I have to give credit to friend Gary B., who brought up the subject of permaculture in a conversation the year before. I’d heard the term and thought I knew what it was about, but months later when I was researching what to do with my property I remembered him mentioning it, and looked it up. I found what I was looking for. I’ve been an organic gardener for many years, have owned chickens for their eggs, have refused to till the soil so as not to kill microbes, have worked naturally with animals and plants, have created habitat, composted, recycled, collected rainwater… and all of that was permaculture. And so much more. How can one not be attracted to the term Food Forest? Certainly not a foodie and gardener like myself.
What happened on the property starting the week of Feb. 1 for the next six months altered the land so that it is truly two acres of habitat. It is useful, it is natural, and it is beautiful. Roger’s team led by Juan built beautiful walls of urbanite, planted and hauled, worked in scorching sun and frosty mornings and made what was dreamed into reality. An integral part of the garden has been diverting the water from erosion points and into rain catchment basins and natural ponds, and that is where Aart DeVos and Jacob Hatch of Aquascape (760-917-7457) came in. They also installed the irrigation. Dan Barnes did the rough and the precise tractor work (760-731-0985) and I can’t recommend his experience and skill enough. Fain Drilling dug the well (760-522-7419) and the wonderful sheds were built by Quality Sheds of Menifee (http://www.socalsheds.com) .
Along with some volunteer help from Jacob, I am the sole caretaker of the property. I am planning the plant guilds, weeding, improving soil, moving problem plants and trees and, did I mention, weed? Oh yes, then there is weeding. On Saturday May 12th, the garden will be on the Garden Tour of the Association of University Women of Fallbrook, and hopefully many people will be inspired to go organic, to create habitat, conserve water and grow extra food for the Fallbrook Food Pantry. We’ve come a long way, baby!
The following photos are comparisons between the precise location last year at this time, and today.

The property last February. 
The property today. 
Sophie and General loved all the excitement. 
They love the new gardens and pond even more. 
My veggie beds with the old sheds behind. 
My veggie beds with the new sheds and greenhouse behind. 
Where the big sheds were: everything usable was reused. 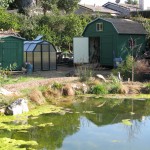
New sheds that aren’t a safety hazard, and the greenhouse. 
The lower area with shed debris (lots of mowing area!). 
Hey, there are ponds there now! 
Not much for the neighbors to look at. 
Quite a lot for the neighbors to look at! 
Access to the old oak was hazardous. 
Palm stairs lead past the oak to a birding area. 
Stonefruit were old when I moved in. 
New stonefruit adorn what is now the Bee Garden. 
An erosion area sloping down to the barranca. 
Water won’t flow through here anymore. 
Lots of mowing and palm frond removal. 
Not so anymore. 
Horrible looking debris failed to hold back the embankment. 
Palms were used to stabilize the new paths and camoflage the supports. 
Old unstable stairs led to washout areas. 
New railings, stairs and urbanite retaining walls lead to another viewing area. 
The view from my balcony. Part of the old shed remains. 
Hey, there’s a pond there! You May Also Like

Native Insects and IPM
-
Pepitas (Roasted Pumpkin Seeds)

Chili-lime pepitas are wonderful as a topping! All those lovely seeds that you scrape out of pumpkins and winter squash are little nuggets of nutrition, including protein. Pepitas can be a little chewy, but have a popcorn-like flavor and can be very addicting. To seperate the freshly scraped seeds from the pumpkin fibers that encase them, plop the whole mess into a bowl full of water and rub with your fingers. The seeds seperate easily. Compost the fibers, and dry the seeds. You can do this by blotting them or wringing them out in a towel, or allowing to set in a sieve, if you aren’t in a hurry.
Pepitas (Roasted Pumpkin Seeds)Author: Diane C. KennedyRecipe type: SnackPrep time:Cook time: