Microbes and Fungi
- Building and Landscaping, Compost, Fungus and Mushrooms, Gardening adventures, Hugelkultur, Microbes and Fungi, Permaculture and Edible Forest Gardening Adventures, Rain Catching, Recycling and Repurposing, Soil, Water, Water Saving, Worms
Using Pathways For Rain Catchment
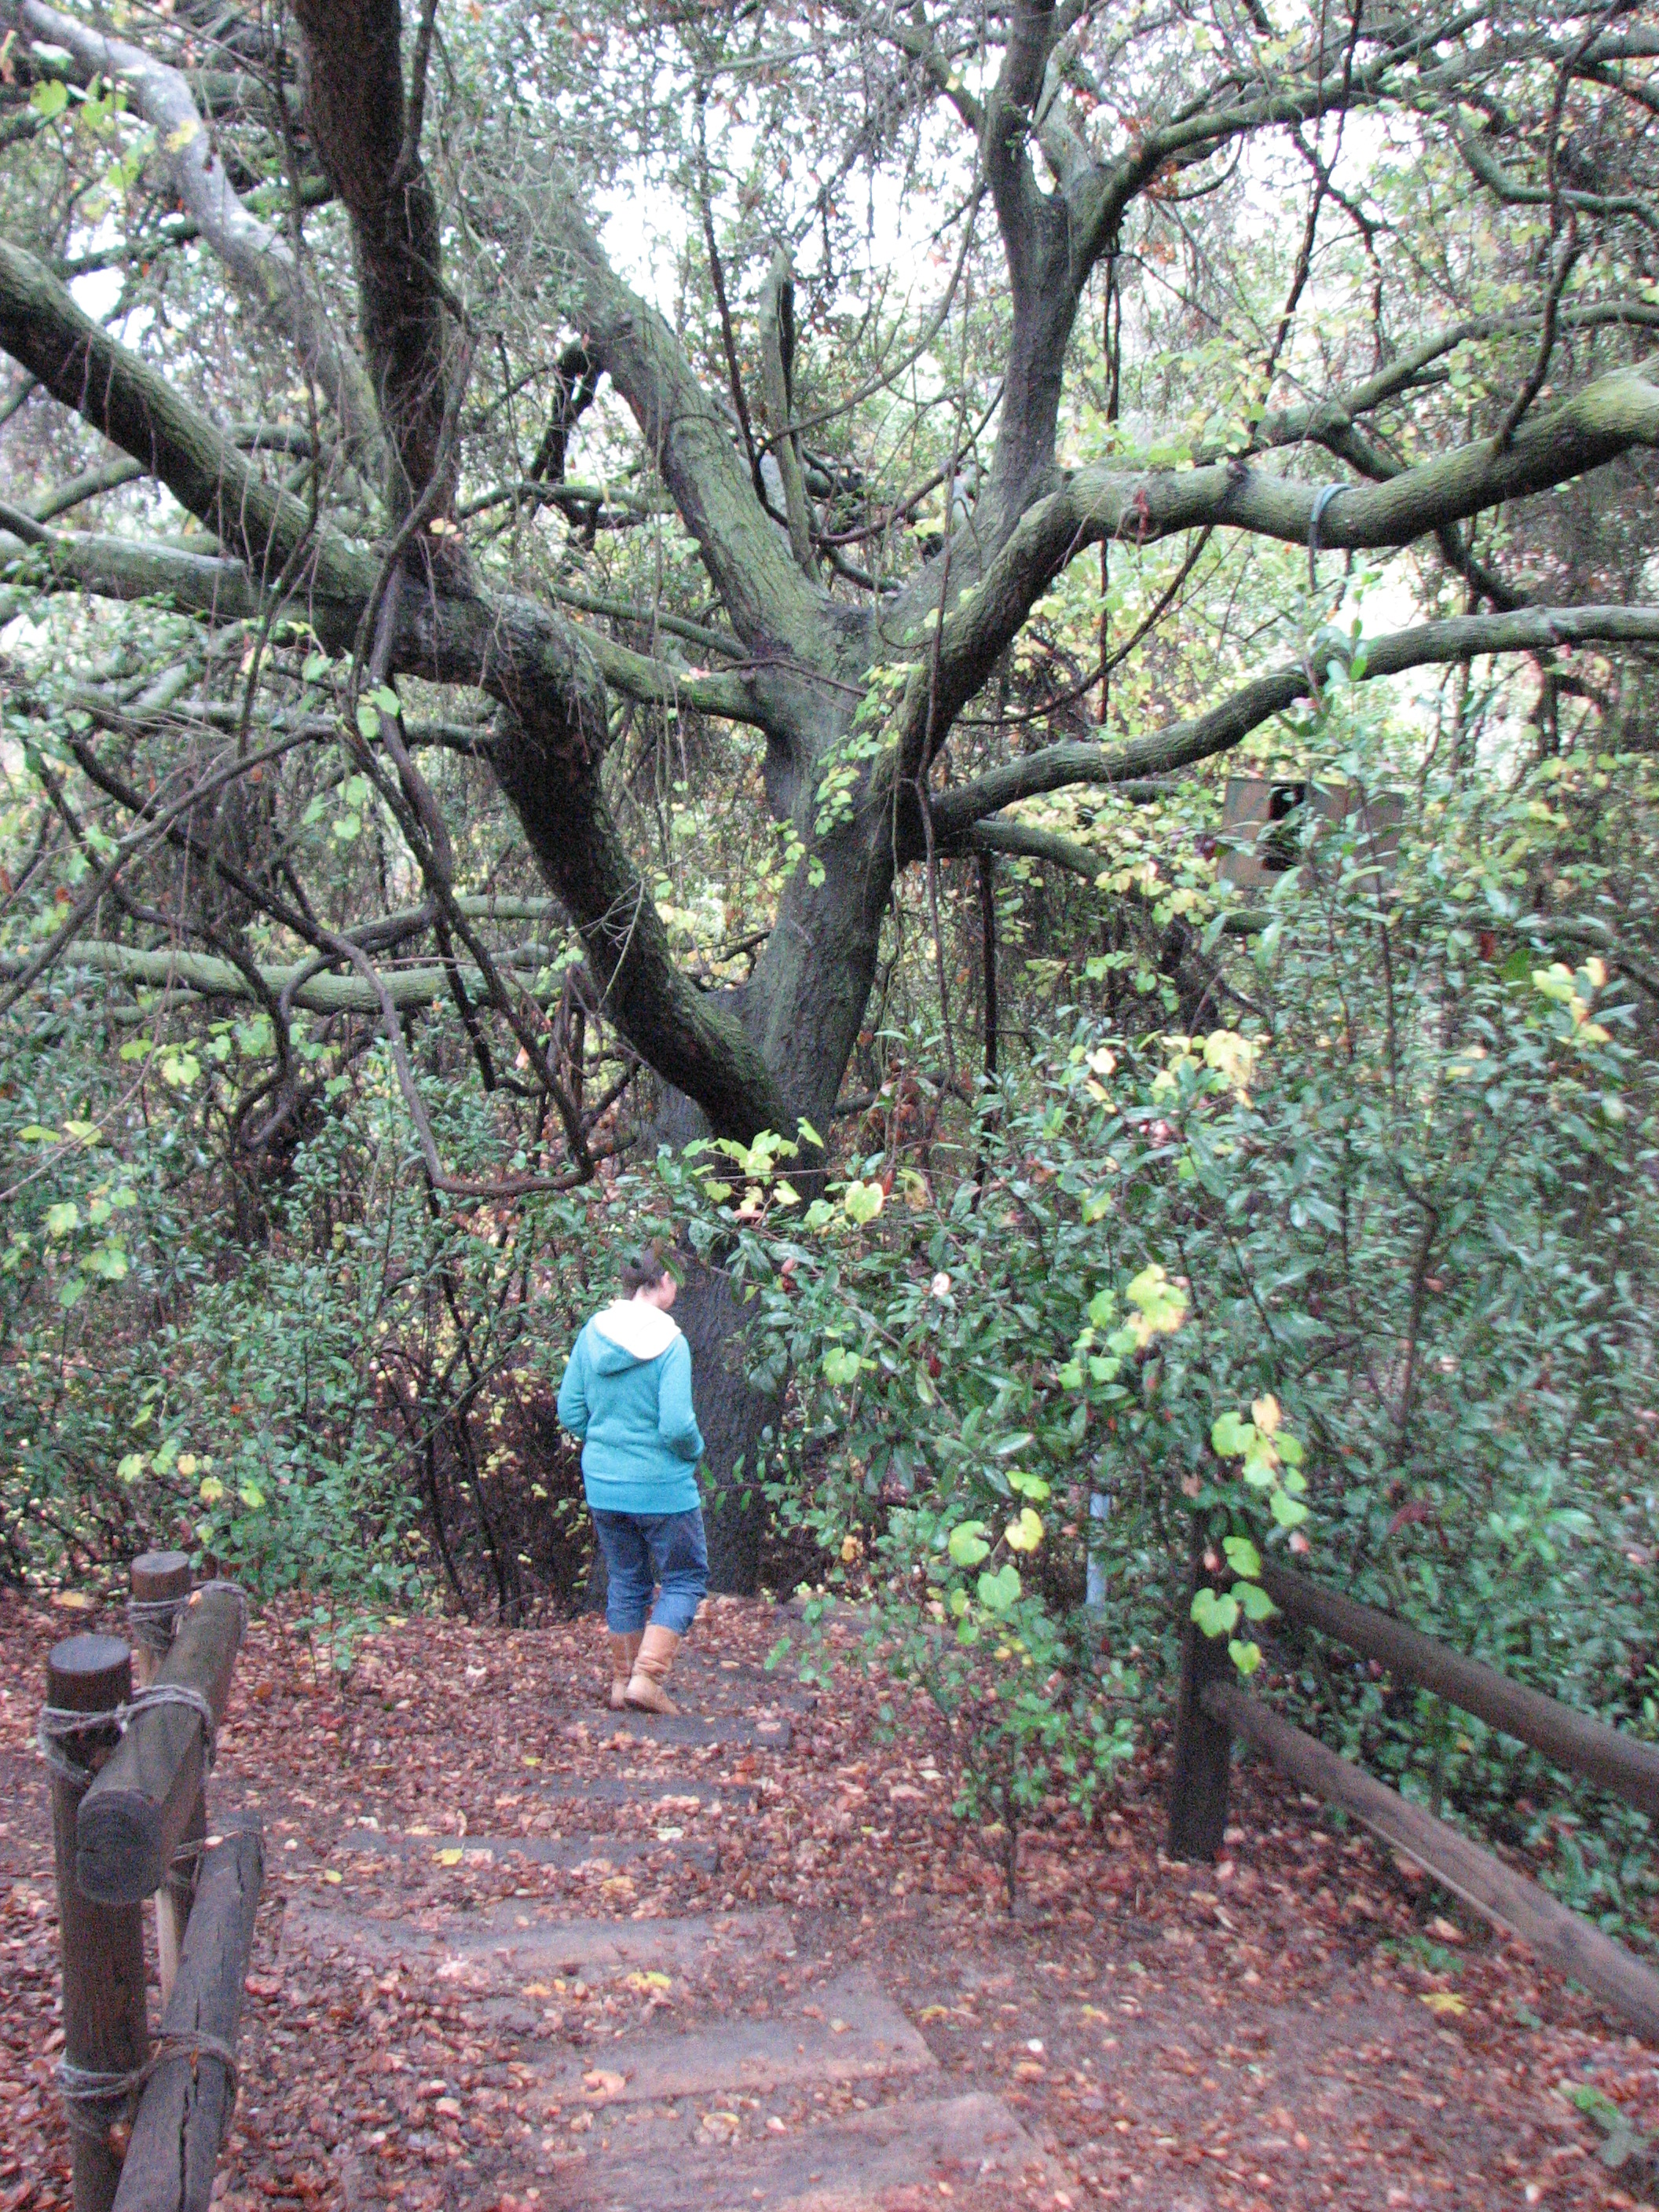
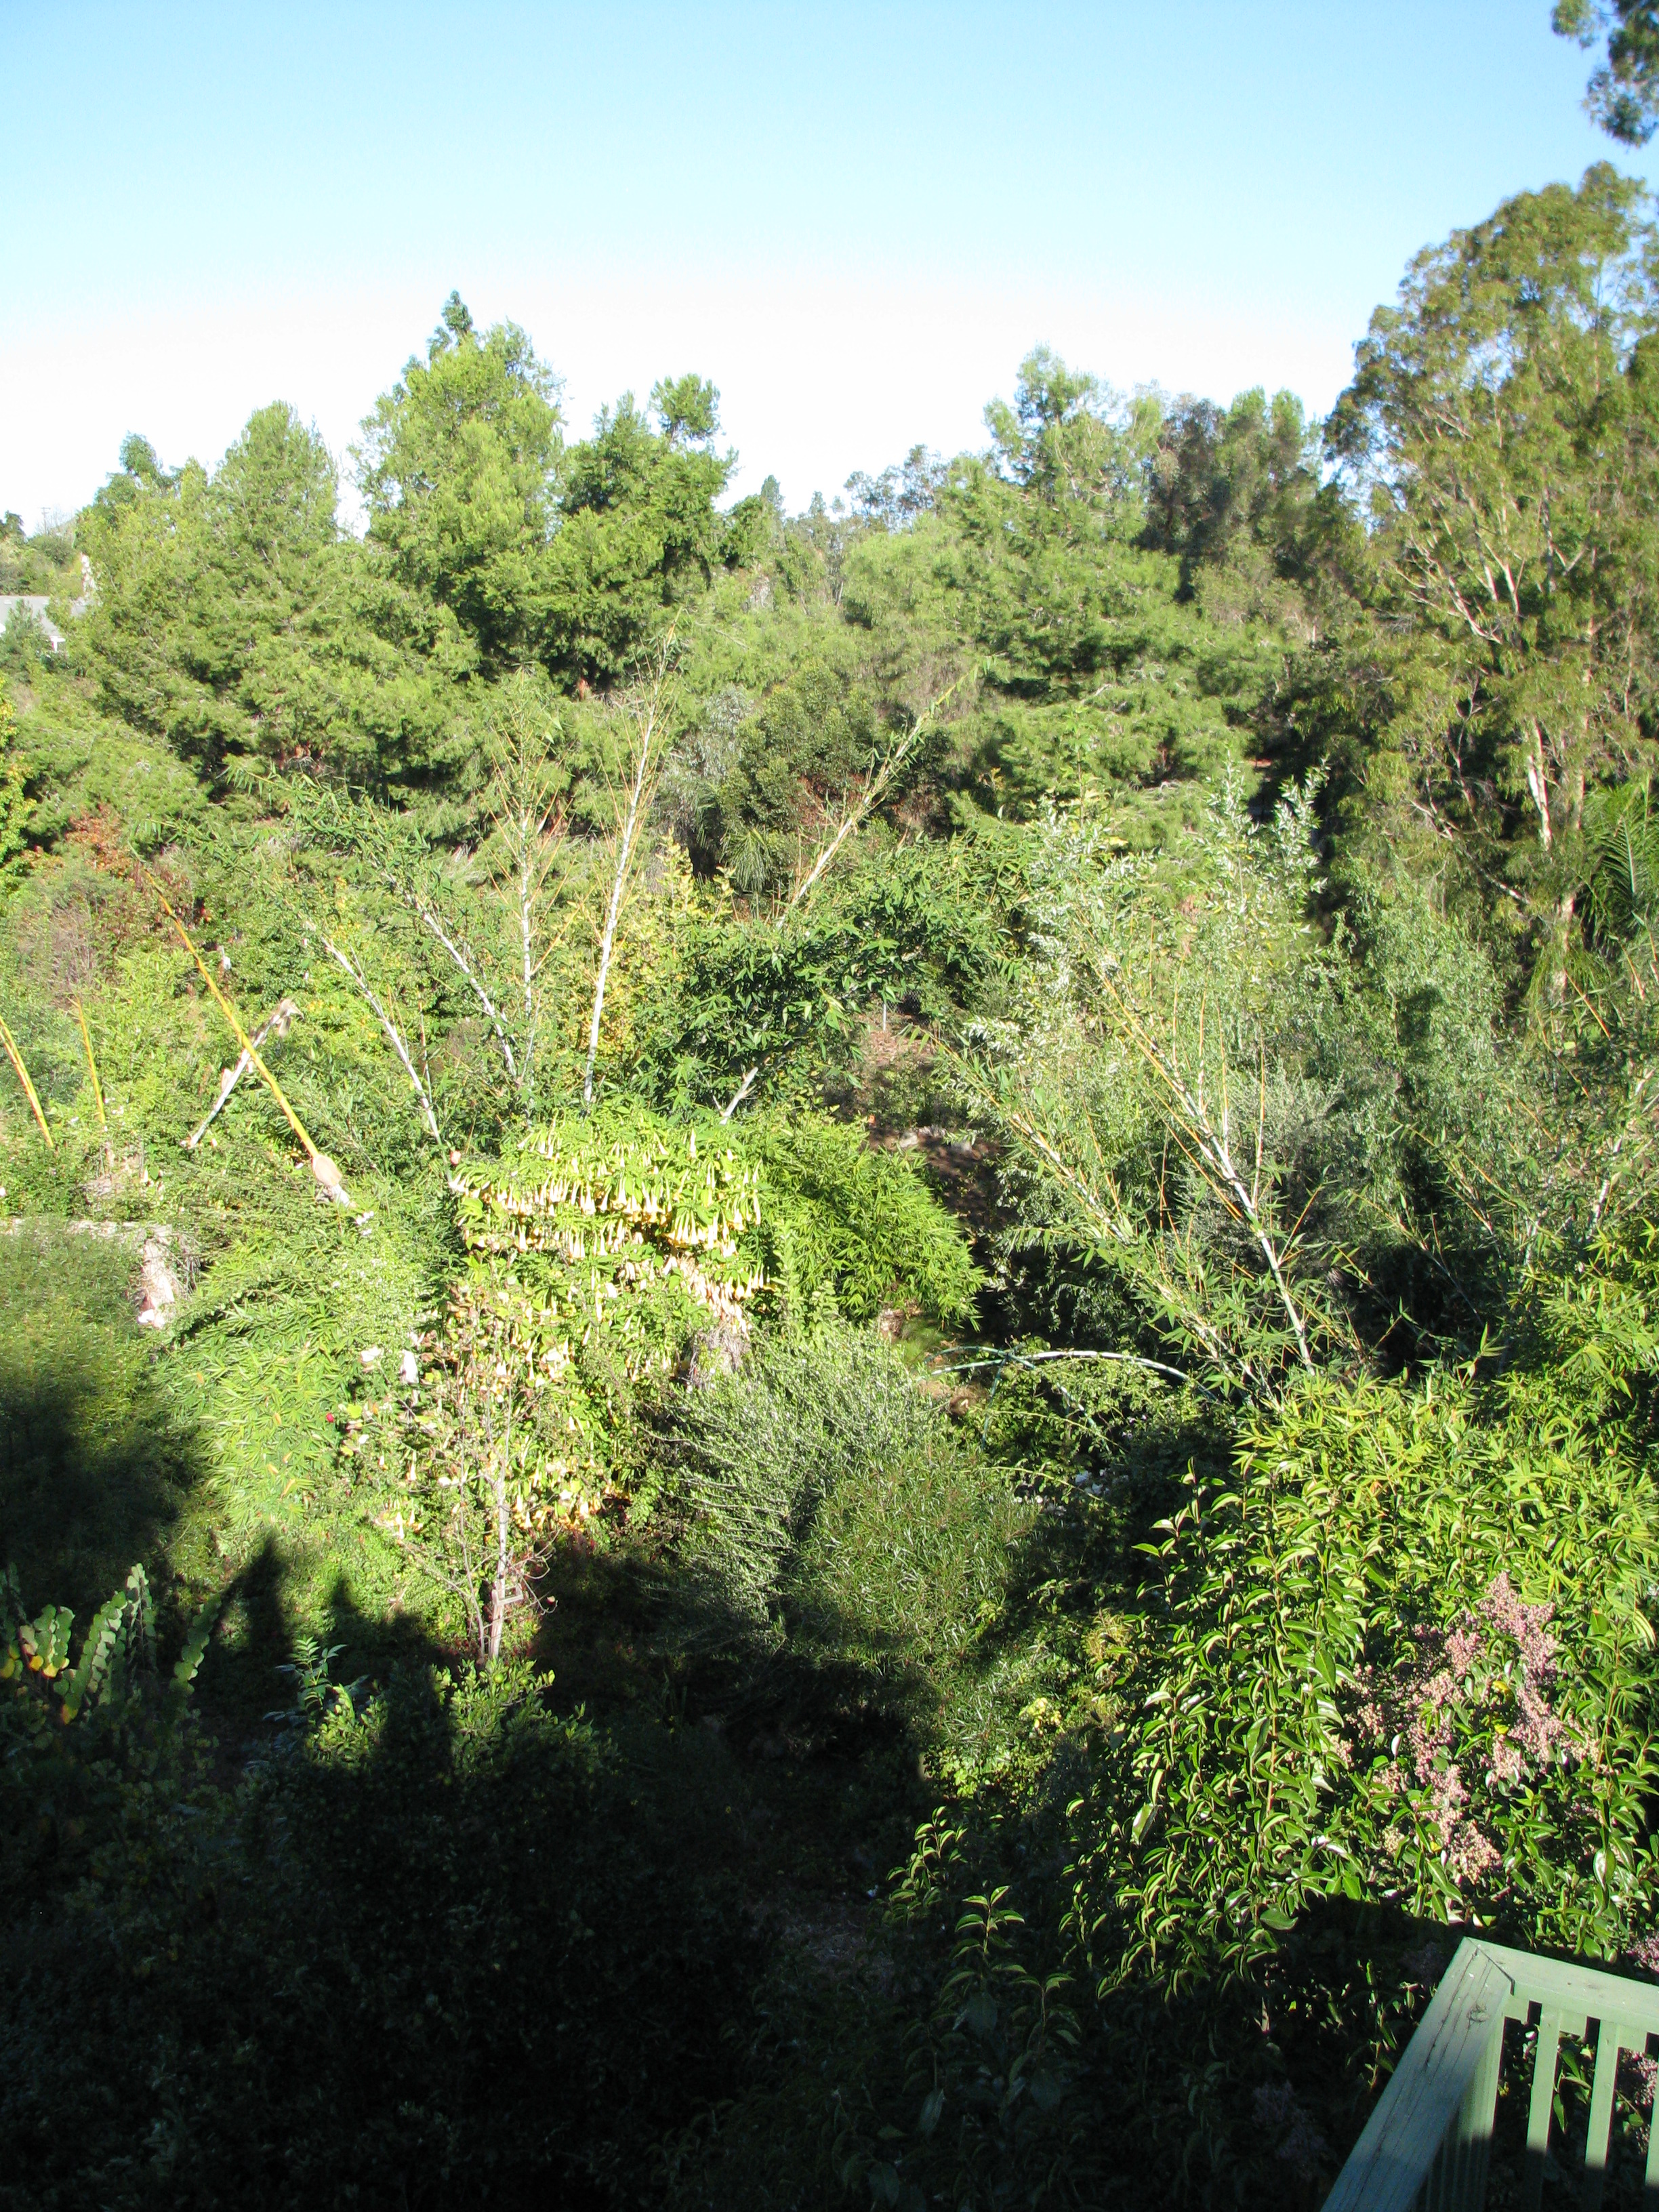
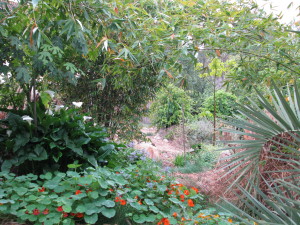
Here in the drylands of San Diego we need to be especially sure to catch whatever rain may fall. Building good soil is vital for the entire planet because humans are going through decent topsoil like nobody’s business. Here at Finch Frolic Garden we’ve sheet mulched around trees to replicate decades of leaf drop, and on pathways to block weeds, prevent compaction and create good soil for shallow plant roots. We’ve also continued making our pathways work more for us by burying wood (hugelkultur) in the paths themselves. Most of our soil here is heavy clay, so creating drainage for roots is imperative. In sandy soils, creating more fungal activity to hold together the particles to retain water is important. We also need to store rain water when we get it, but not drown the roots of plants. This all can be accomplished by burying wood, the older the better.
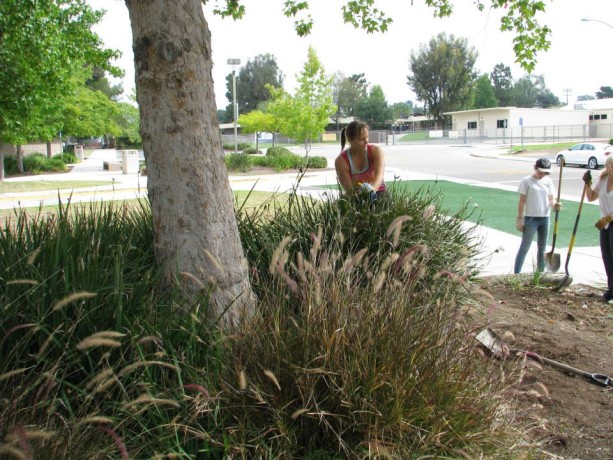
Miranda and I have worked on many pathways, but for a few months this year the garden was given a huge boost forward with the help of Noel, a permaculture student and future farmer, who can move mountains in an afternoon with just a shovel.
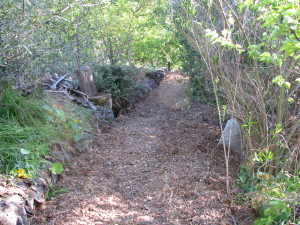
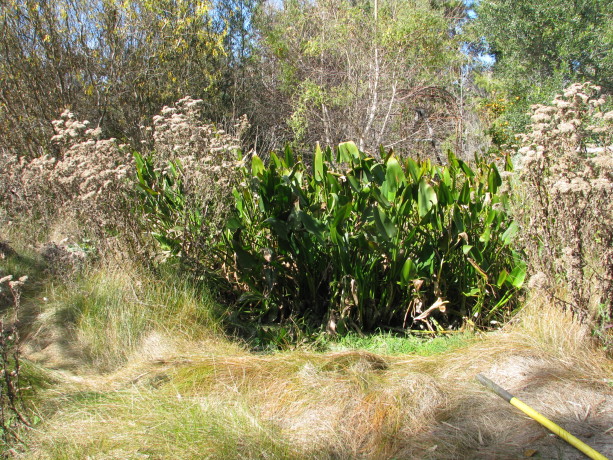
The chosen pathways had these features: they were perpendicular to water flow, or were between trees that needed supplemental drainage, food and water access, and/or were where rainwater could be redirected. Eventually we’d like to do all the pathways like this but because of time, labor and materials we worked where it was most needed.

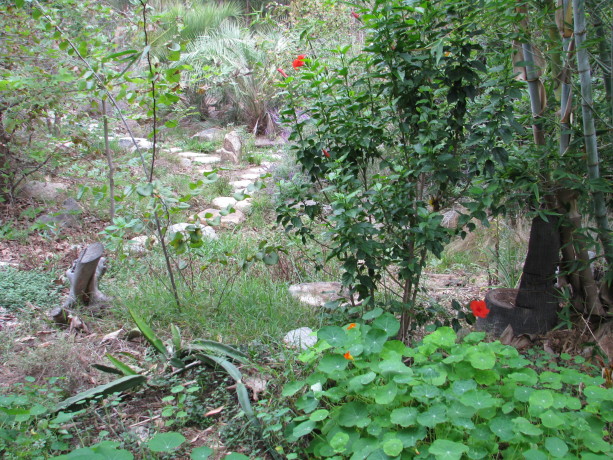
An area that becomes flooded when we have a deluge. The existing sheet mulch was pulled aside. Sections of the pathways were dug up (Noel’s work was very neat; my work is usually much less so). Wood was laid in the hole, and layered back with the dirt.

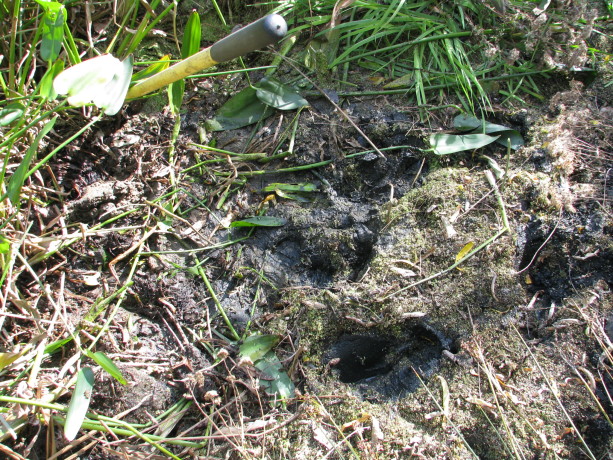
The pathway dug up and wood being layered. The nice, neat hole is Noel’s doing, not mine. Notice I said dirt, not soil. We don’t want to disturb good soil because we’d be killing microbes and destroying fungal networks. Dirt is another story; it needs amendment. As we’ve already buried all of our old wood, we timed these pathway ‘hugels’ to coincide with some appropriate tree removal.
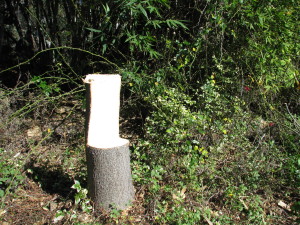
You can be creative when cutting trees and make a chair! Watch out for sap on your pants, though. Trees were cut down and some climbing roses pruned back out of the pathway, and the green ‘waste’ was used in the nearby pathways.
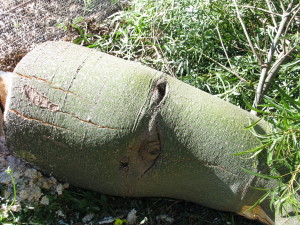
This euphorbia was only sucking up water and not giving back anything, so it and its friends had to go. This one had a marking like an eye on it, and I was glad to see it go… as it was seeing me! Old palm fronds went in as well. No need to create additional work – good planning means stacking functions and saving labor.
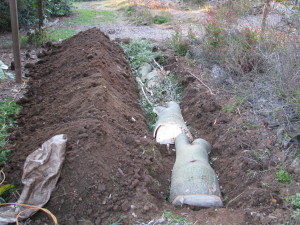
The first layer of wood is covered with dirt, and then another layer added. After the wood was layered back with the dirt, the area was newly sheet mulched. Although the pathways are slightly higher, after another good rain (whenever that will happen) they’ll sink down and be level. They are certainly walkable and drivable as is. Although the wood is green, it isn’t in direct contact with plant roots so there won’t be a nitrogen exchange as it ages. When it does age it will become a sponge for rainwater and fantastic food for a huge section of the underground food chain, members of which create good soil which then feeds the surrounding plants. Tree roots will head towards these pantries under the paths for food. Rain overflow that normally puddles in these areas will penetrate the soil and soak in, even before the wood ages because of the air pockets around the organic material.
The best part about this, is that once it is done you don’t have to do it again in that place. Let the soil microbes take it from there. Every time you have extra wood or cuttings, dig a hole and bury it. You’ve just repurposed green waste, kept organics out of the landfill, activated your soil, fed your plants, gave an important purpose to the clearing of unwanted green material, and made your labor extremely valuable for years to come. Oh, and took a little exercise as well. Gardening and dancing are the two top exercises for keeping away dementia, so dig those hugels and then dance on them!
Burying wood and other organic materials (anything that breaks down into various components) is what nature does, only nature has a different time schedule than humans do. It takes sometimes hundreds of years for a fallen tree to decompose enough to create soil. That’s great because so many creatures need that decomposing wood. However for our purposes, and to help fix the unbelievable damage we’ve done to the earth by scraping away, poisoning and otherwise depleting the topsoil, burying wood hastens soil reparation for use in our timeline.
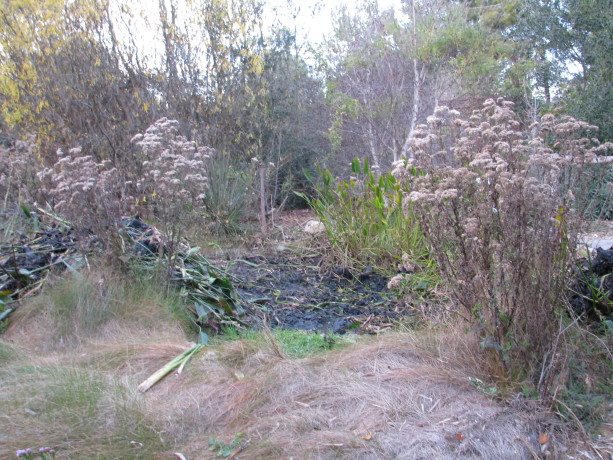
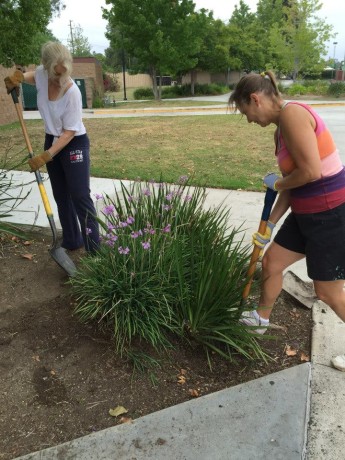
Another pathway is hard clay and isn’t on the top of my priority list to use for burying wood. However it does repel water due to compaction and because rainwater is so valuable I want to make this pathway work for me by catching rain. I’ve recommended to clients to turn their pathways into walkable (or even driveable) rain catchment areas by digging level-bottomed swales.

Digging gentle swales along a pathway can turn it into a rain catchment system. Make your paths work for you! A swale is a ditch with a level bottom to harvest water rather than channel water. However many pathways are on slopes or are uneven. So instead of trying to make the whole pathway a swale in an established garden, just look at the pathway and identify areas where the land has portions of level areas. Then dig slight swales in those pathways. Don’t dig deeply, you only have to gently shape the pathway into a concave shape with a level bottom. The swales don’t need to connect. You can cover the pathway and swales with bark mulch and they will still function for harvesting rain and still be walkable.
Mulching over the top makes the pathway even and still functional for rain catchment. If the pathways transect a very steep slope, you don’t want to harvest too much water on them so as not to undermine the integrity of your slope. This is a swale calculator if you have a large property on a steep slope.
So up-value your pathways by hugelkulturing them, and sheet-mulching on top. Whatever your soil, adding organics and mulching are the two best things to do to save water and build soil. And save the planet, so good going!
- Animals, Bees, Compost, Fungus and Mushrooms, Gardening adventures, Health, Heirloom Plants, Hugelkultur, Microbes and Fungi, Natives, Other Insects, Perennial vegetables, Permaculture and Edible Forest Gardening Adventures, Rain Catching, Recycling and Repurposing, Reptiles and Amphibians, Seeds, Soil, Water, Water Saving, Worms
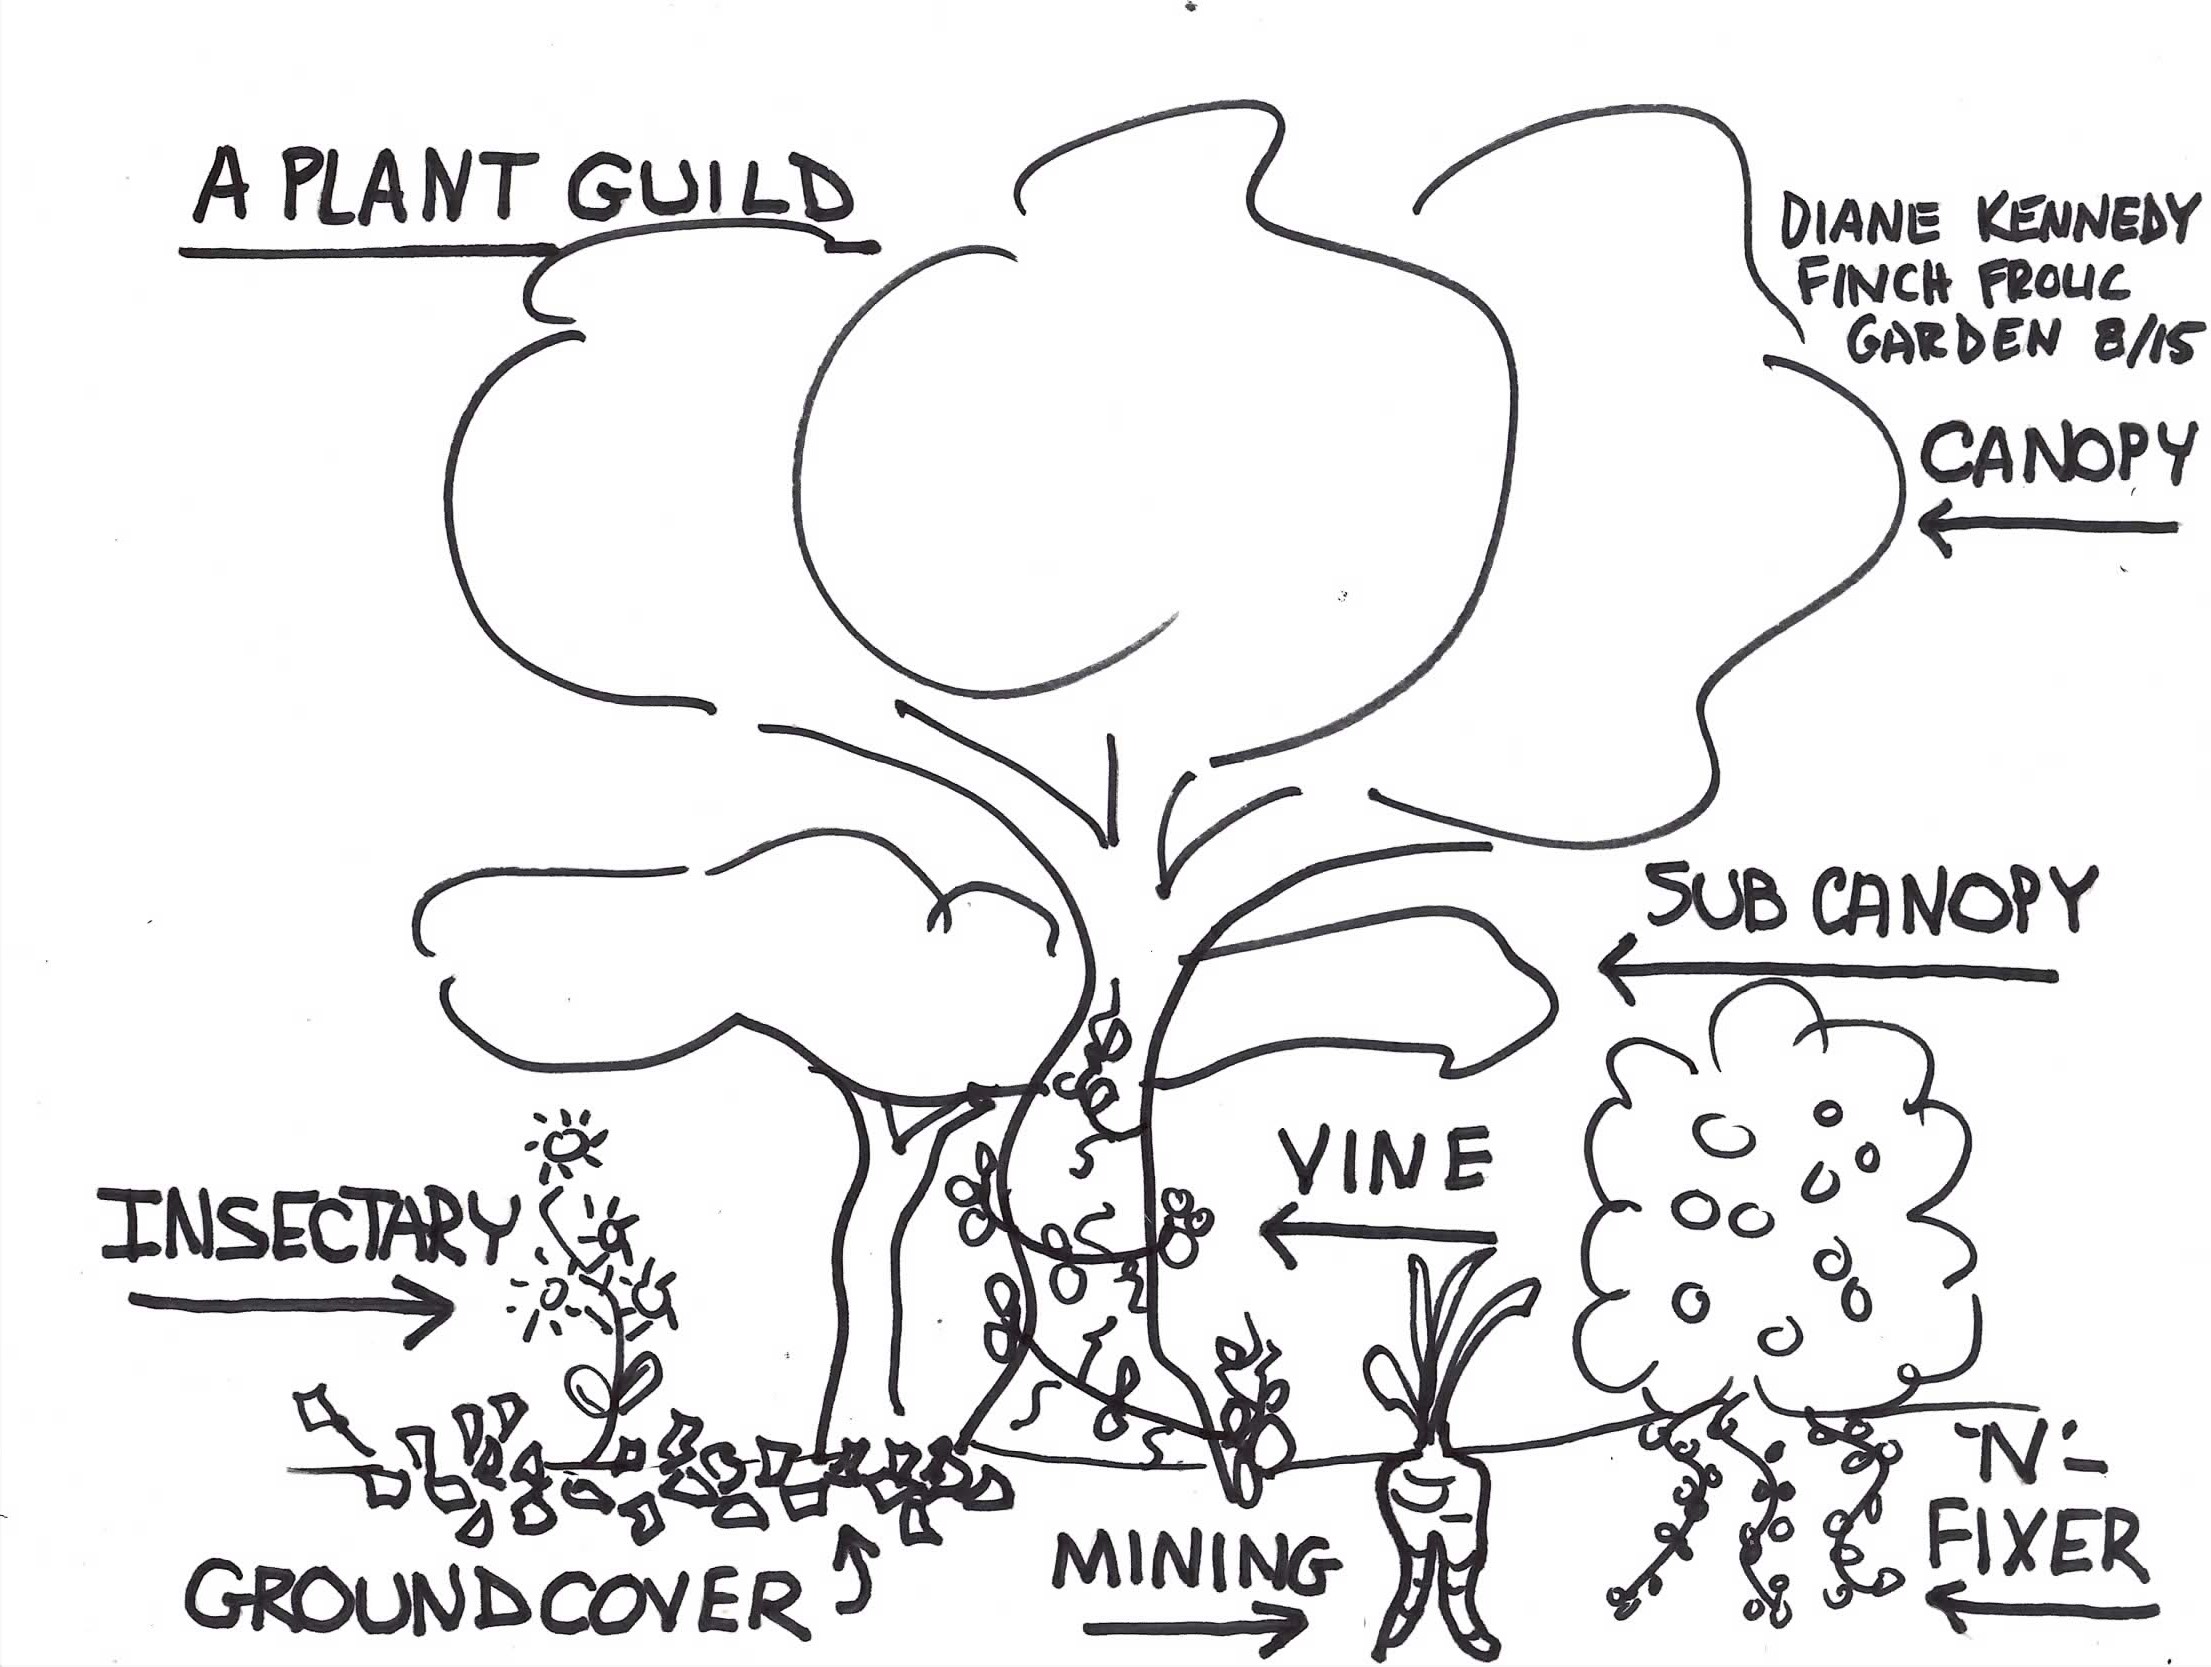
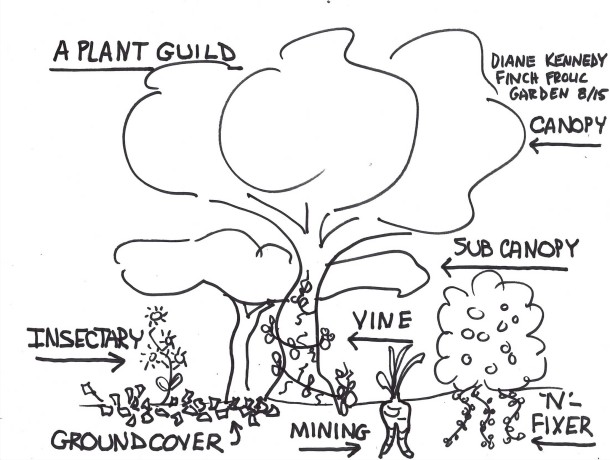
Plant Guild #9: The Whole Picture
 When set in motion the many parts of a plant guild will create a self-sustaining cycle of nutrition and water. By understanding the guild template and what plants fit where, we can plug in plants that fulfill those roles and also provide for us food, building materials, fuel and medicine as well as beauty.
Plant the appropriate plants for where you are placing them, for your soil and water use, and stack them in a guild with compatible plants that you can use. The ground will be covered by a foliar density that will keep grasses and other weeds at bay and provide excellent habitat for a full range of animals and insects. By stacking plants in a guild you are bringing life and abundance back to your garden.
Does it still sound so complicated? Rather than try to learn the roles of all the plants in the world, start small. Make a list of all the plants you want to plant. List them under food bearing, culinary/medicinal herb, craft/building material, and ornamental. Then read up on those plants. What size are they at maturity? Do they need full sun, partial or full shade? If trees, do they have an upright growth so you may plant under them (stonefruit), or do they like to have their roots covered and don’t like plants directly under them (citrus and avocado)?
Citrus doesn’t like plants under its canopy, but does like plants outside its dripline. Are they annuals, perennials or biennials? What is their growth habit: sprawling, rooting where they spread, upright bushy, do they need support and can they cling or do they need to be tied to a support?
Will the plant twine on its own? Do they require digging up to harvest? Do they fix nitrogen in the soil? Do they drop leaves or are they evergreen? Are they fragrant? When are their bloom times? Fruiting times? Are they cold tolerant or do they need chill hours? How much water do they need? What are their companion plants (there are many guides for this online, or in books on companion planting.)
Do vines or canes need to be tied to supports? As you are acquainting yourself with your plants, you can add to their categorization, and shift them into the parts of a plant guild. Yes, many plants will be under more than one category… great! Fit them into the template under only one category, because diversity in the guild is very important.
Draw your guilds with their plants identified out on paper before you begin to purchase plants. Decide where the best location for each is on your property. Tropical plants that are thirsty and don’t have cold tolerance should go in well-draining areas towards the top or middle of your property where they can be easily watered. Plants that need or can tolerate a chill should go where the cold will settle.
Once it is on paper, then start planting. You don’t have to plant all the guilds at once… do it as you have time and money for it. Trees should come first. Bury wood to nutrify the soil in your beds, and don’t forget to sheet mulch.
Remember that in permaculture, a garden is 99% design and 1% labor. If you think buying the plants first and getting them in the ground without planning is going to save you time and money, think again. You are gambling, and will be disappointed.
Have fun with your plant guilds, and see how miraculous these combinations of plants work. When you go hiking, look at how undisturbed native plants grow and try to identify their components in nature’s plant guild. Guilds are really the only way to grow without chemicals, inexpensively and in a way that builds soil and habitat.
You can find the rest of the 9-part Plant Guild series here: Plant Guilds: What are they and how do they work? The first in a series. , Plant Guild #2: Canopy , Plant Guild #3: Sub-Canopy , Plant Guild #4: Nitrogen-Fixers, Plant Guild #5: Mining Plants, Plant Guild #6: Groundcovers, Plant Guild #7: Vines, Plant Guild #8: Insectiaries .
You May Also Like

Native Insects and IPM
- Animals, Bees, Birding, Compost, Fungus and Mushrooms, Gardening adventures, Health, Heirloom Plants, Hugelkultur, Microbes and Fungi, Natives, Other Insects, Perennial vegetables, Permaculture and Edible Forest Gardening Adventures, Predators, Rain Catching, Reptiles and Amphibians, Seeds, Soil, Water, Water Saving, Worms
Plant Guild #6: Groundcover Plants

Artichokes are mining plants, but also have a low enough profile to be a groundcover plant. They make excellent chop-and-drop. Flanking are lavender, scented geranium (left), and borage. In most ecosystems that offer easy food for humans, the ground needs to be covered. Layers of leaves, organic matter from animals (poo, fur, carcasses, meal remains, etc.) , dropped branches and twigs, fallen flowers and fruit, and whatever else gravity holds close to the earth, compost to create soil and retain water and protect the soil from erosion and compaction. Areas that don’t have this compost layer are called deserts. If you want to grow an assortment of food for humans, you have to start building soil. Even in desert communities where there are some food plants growing, such as edible cactus, mesquite beans, etc., there is biodiversity on a more microscopic scale than in old growth forests. In deserts the soil needs to absorb what little rain there is and do it quickly before it evaporates, and plants have leaves adapted to have small leaf surfaces so as not to dry out, and there are few leaves to drop. Whereas in areas where there are large forests the weather is usually wetter, tall plants and thick underbrush provide multiple layers of protection both on the plants and when they fall to layer the earth.
Nasturtium reseeds itself annually, is edible with a bite of hotness, detracts aphids from other plants, and is charming. Don’t let it get away in natural areas, though. A quick way to build soil in plant guilds is to design for plants that will cover the ground. This isn’t necessarily the same groundcover as you would use to cover embankments. For instance, iceplant can be used in a pinch, but it really isn’t the best choice in most plant guilds unless you are in a very dry climate, and your plant guild is mostly desert-type plants: date palm, etc. Annuals can be squash or other aggressive food-producing vines such as unstaked tomatoes. However you don’t need to consider just ground-hugging plants; think sprawling shrubs.

Scented geraniums are a great ‘placeholder plant’. These Pelargoniums (not true geraniums) come in a wide variety of fragrances. We’ve found bird nests in these! When guests tour through Finch Frolic Garden, they often desire the lush foresty-feel of it for their own properties, but have no idea how to make it happen. This is where what I call ‘placeholder plants’ come in. Sprawling, low-cost shrubs can quickly cover a lot of ground, protect the soil, attract insects, often be edible or medicinal, be habitat for many animals, often can be pruned heavily to harvest green mulch (chop-and-drop), often can be pruned for cuttings that can be rooted for new plants to use or to sell, and are usually very attractive. When its time to plant something more useful in that area, the groundcover plant can be harvested, used for mulch, buried, or divided up. During the years that plant has been growing it has been building soil beneath it, protecting the ground from compaction from the rain. There is leave mulch, droppings from lizards, frogs, birds, rabbits, rodents and other creatures fertilizing the soil. The roots of the plant have been breaking through the dirt, releasing nutrients and developing microbial populations. Some plants sprawl 15′ or more; some are very low-water-use. All of this from one inexpensive plant.
Squash forms an annual groundcover around the base of this euphorbia. Depending upon your watering, there are many plants that fit the bill, and most of them are usable herbs. Scented geraniums (Pelargonium spp.), lavender, oregano, marjoram, culinary sage, prostrate rosemary, are several choices of many plants that will sprawl out from one central taproot. Here in Southern California, natives such as Cleveland sage, quail bush (which harvests salt from the soil), and ceanothus (California lilac, a nitrogen-fixer as well), are a few choices. Usually the less water use the plant needs, the slower the growth and the less often you can chop-and-drop it. With a little water, scented geraniums can cover 10 – 15 feet and you can use them for green mulch often, for rooted cuttings, for attracting insects, for medicine and flavoring, for cut greenery, for distillates if you make oils, etc.

Sweet potatoes make a great ground cover. Choose varieties that produce tubers directly under the plant rather than all along the stems so that you don’t have to dig up your whole guild to harvest. Groundcover plants shouldn’t be invasive. If you are planting in a small guild, planting something spreading like mint is going to be troublesome. If you are planting in larger guilds, then having something spreading in some areas, such as mint, is fine. However mint and other invasives don’t sprawl, but produce greenery above rootstock, so they are actually occupying more space than those plants that have a central taproot and can protect soil under their stems and branches. Here at Finch Frolic Garden, we have mint growing freely by the ponds, and in several pathways. Its job is to crowd out weeds, build soil, and provide aromatherapy. I’d much rather step on mint than on Bermuda grass, and besides being a superb tea herb, the tiny flowers feed the very small bees, wasps and flies that go unsung in gardens in favor of our non-native honeybees (there are no native honeybees in North America).
Here’s a general planting tip: position plants with fragrant leaves and flowers near your pathways for brush-by fragrance. You should have a dose of aromatherapy simply by walking your garden path. Mints are energizing, lavenders calming, so maybe plan your herbs with the pathways you take in the morning and evening to correspond to what boost you need at that time.
Consider groundcover plants and shrubs that will give you good soil and often so much more.
Next up: Vining Plants.
You can find the entire 9-part Plant Guild series here: Plant Guilds: What are they and how do they work? The first in a series. , Plant Guild #2: Canopy , Plant Guild #3: Sub-Canopy , Plant Guild #4: Nitrogen-Fixers, Plant Guild #5: Mining Plants, Plant Guild #7: Vines, Plant Guild #8: Insectiaries, Plant Guild #9: The Whole Picture.
What makes up a plant guild. You May Also Like
Native Insects and IPM
- Animals, Birding, Compost, Fungus and Mushrooms, Gardening adventures, Hugelkultur, Humor, Microbes and Fungi, Natives, Other Insects, Perennial vegetables, Permaculture and Edible Forest Gardening Adventures, Ponds, Predators, Rain Catching, Reptiles and Amphibians, Seeds, Soil, Water, Water Saving, Worms
Ponds and Potatoes; A Finch Frolic New Year’s Celebration
 Our sixty degree weather here in Fallbrook, CA , gave us the opportunity to work in our garden. A year ago – 2014 – it snowed on New Year’s Eve. This year the nights are frosty, the days mercifully warmer, and the rain frustratingly rare. Our promised El Nino rains are expected to hit in force within the next couple of months. Weather they do or not, focusing on catching every precious drop in the soil, and protecting the ground from erosion and compaction, is paramount.
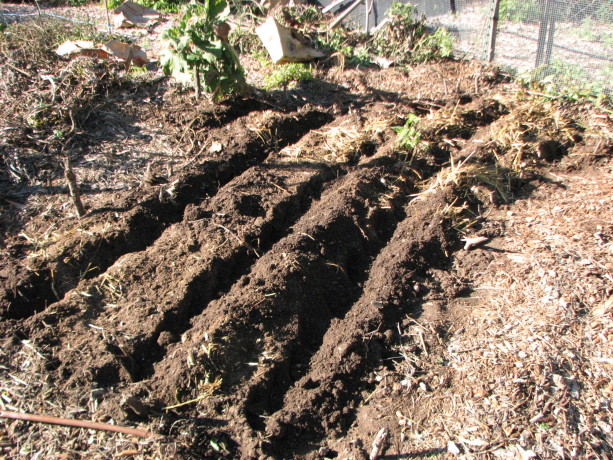
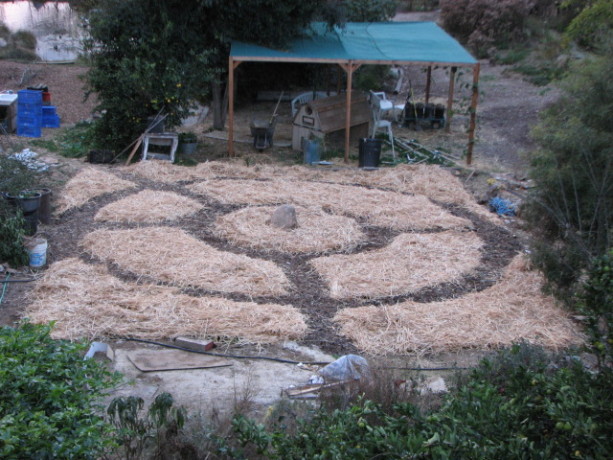
Permaculture in rows. Pretty nice soil, which had been silt from the street a couple of years ago, mixed with chicken straw, topped with leaves. No chemicals! The last day of 2015 Miranda and I spent working one of our vegetable garden beds, and reshaping our kitchen garden. When we redesigned this garden by removing (and burying) the raised beds, hugelkulturing and planting, we made a lovely Celtic design.
The unplanted kitchen garden newly designed in January, 2013. However the plants just won’t respect the design, so we’ve opted to lessen the pathways, turning the beds into keyhole designs for more planting space. I’ll blog more about that in the future. Because the pathways have been covered in cardboard and woodchips (sheet mulched), the soil below them is in very good shape, not dry and compacted.

How deep do roots grow? This clump of oxalis (sour grass) is white because it was growing without light under the pathway sheet mulch. The corms at the end of the long roots are about 8 inches below the plant. Good soil means deep roots; I’ve never seen this plant have anything but shallow roots. This bed has been home to sweet potatoes and various other plants, so although I try to practice the no-dig method, where you have root vegetables you must gently probe the soil for goodies. We left some of the roots, so sweet potatoes will again rise in this bed.

Miranda planting potatoes and shallots in rows. Between these rows and around the outisde other veggies were planted. We planted in rows. Usually I mix up seeds, but this time I wanted to demonstrate polyculture in row form. We planted three rows of organic potatoes (purchased from Peaceful Valley Organics), with a row of shallots between them. Between the root vegetable rows we planted a row of fava beans, and a row of sugar pod peas. Around the edges Miranda planted rows of bull’s blood beets, Parisienne carrots, and maybe some parsnips. This combination of plants will work together in the soil, following the template of a plant guild. We left the struggling eggplant, which came up late in the year after the very hot summer and has so far survived the light frost.
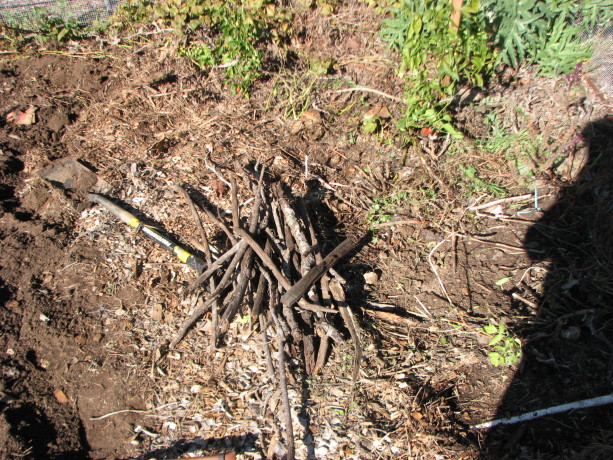
Sticks. So important for the soil. These went in vertically around the planting bed to act both as one type of gopher deterrent (a physical barrier) and also as food and as water retention for the veggies. On top of the bed we strew dead pond plants harvested from our small pond near our house, which will be receiving an overhaul soon (hopefully before the Pacific chorus frogs start their mating season in force). We didn’t water the seeds in, as there is rain predicted in a few days. The mulch on top will help protect the seeds from hungry birds.
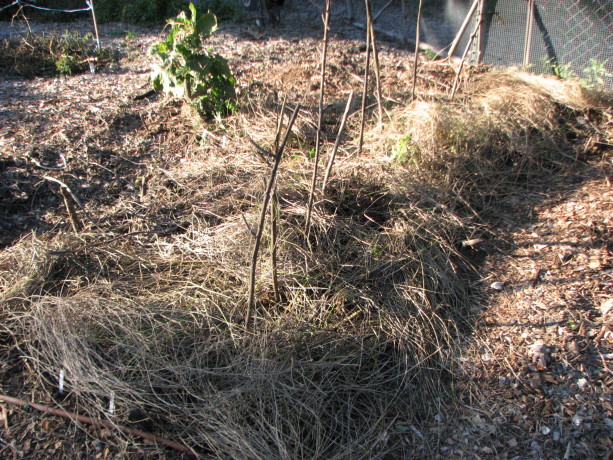
The finished bed topped with dead pond weeds (which don’t have seeds that will grow on dry land!). The sticks are to steady future bush peas. A good way to spend the last day of the year: setting seeds for food in the spring.
Before: The little pond, which is also a silt basin, almost completely filled by an enthusiastic clump of pickerel. This pond is wonderful habitat for birds, frogs, dragonflies, and so many other creatures, and as a water source for raccoon, possum, coyotes, ducks, and who knows what else that visits in the night. Then on January 1 I decided it was a good opportunity to clear out the excess pickerel that had taken over our lower small pond. With the well off for the winter, and very light rainfall, this pond has gone dry. A perfect opportunity for me to get in there with a shovel, especially knowing that I already had a chiropractor’s appointment set for Monday (!).

Making some headway. The mud was slick and spongy, but not unsafe, and not nearly as smelly as I had anticipated. Pickerel is not a native to San Diego, but it is a good habitat pond plant and it has edible parts. I wasn’t tempted, however. Its roots are thick and form a mat several inches thick hiding rhizomes that are up to an inch in diameter. I’d cut into the mass from several sides, pull the mass out with my gloved hands and throw the heavy thing out of the pond. Its good to be in contact with the earth, in all its forms. I couldn’t think of a better way to use the holiday afternoon.
Thick root mass hiding large rhizomes made removal a real exercise. This is why I practice yoga and attend Zumba class with Ann Wade at the Fallbrook Community Center! I moved at least a ton of material in four hours. Just before sunset I decided that I was done. About an hour before that, my body had decided that I was done, but I overrode its vote to finish. I left some pickerel for habitat and looks, and will try to contain it by putting some sort of a physical barrier along the roots, such as urbanite.
Removal of one of the three really nasty plants around the edge was a victory. The ends of their leaves are like needles, and impossible to walk past or work around, and dangerous for little kids. This root ball was harder to dig out than the mucky pickerel, and the success even sweeter. Revenge for all the pokes! We also might harvest some of the silty clay for use in the upper pond, although the prospect of carting heavy wet mud uphill isn’t as appealing as it might sound. That needs to happen today or tomorrow, as the aforementioned rain is expected, and I want to fill this pond again for the frogs.
After: Finished with the digging. Still more work to do -including cleanup of the mountain of organic matter – before refilling. One good thing about the pond going dry is that there are no more mosquito fish (gambuzia) in it. Mosquito fish are very invasive, and love to eat frog’s eggs and tadpoles far better than they do mosquito larvae. When the pond fills with non-chemically treated water (rain and well water), some of the microscopic aquatic creatures will repopulate the water. I’ll add some water from the big pond as well to make sure there are daphnia and other natural water friends in it, which will do a much better job at mosquito control without sacrificing our native frogs. I can’t get all the gambuzia out of our big pond, but at least they are out of the other two. Once dragonflies start in again, their young will gladly eat mosquito larvae.
So here on the morning of the second day of 2016, I lay in my warm bed prior to rising to start the chores of the day, stiff as an old stiff thing as my body adjusts to strenuous manual labor again, looking forward to more gardening duties to prepare Finch Frolic Garden for the reopening March 1, and for the rains.
The best part of heavy gardening duties is that I can finish off the Christmas cookies guilt-free!
You May Also Like
Native Insects and IPM
- Animals, Birding, Building and Landscaping, Chickens, Compost, Fungus and Mushrooms, Gardening adventures, Health, Heirloom Plants, Houses, Hugelkultur, Microbes and Fungi, Natives, Other Insects, Perennial vegetables, Permaculture and Edible Forest Gardening Adventures, Ponds, Predators, Rain Catching, Reptiles and Amphibians, Seeds, Soil, Water, Water Saving
Podcasts with Diane Kennedy
Two podcasts with me talking about permaculture, Finch Frolic Garden, and how you can save money and the world through gardening! 🙂 Please let me know what you think:
This is a podcast with Sheri Menelli of earthfriendlyhomeowner.com, where I talk pretty much without a pause for breath for about the first ten minutes. Recorded in May, 2015.
http://www.earthfriendlyhomeowner.com/ep7-interview-with-diane-kennedy-of-finch-frolic-gardens-and-vegetariat-com/
This is a podcast with Greg Peterson of Urban Farm Podcasts, released Jan. 7, 2016, and you can listen to it several ways:
Urban Farm U:
http://www.urbanfarm.org/category/podcast/
iTunes:
https://itunes.apple.com/us/podcast/urban-farm-podcast-greg-peterson/id1056838077?mt=2
You can sign up for free to hear all their great podcasts here.
You May Also Like
Native Insects and IPM
- Compost, Fungus and Mushrooms, Gardening adventures, Hugelkultur, Microbes and Fungi, Permaculture and Edible Forest Gardening Adventures, Seeds, Soil, Water, Water Saving
Plant Guild #4: Nitrogen-fixing Plants
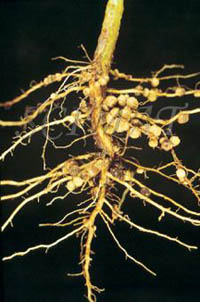
Photo credit USU What is the first of the three chemicals in bagged NPK fertilizer? Nitrogen. Nitrogen is so important for the health of plants that isolated into a chemical, along with phosphorus and potassium, it can keep plants alive and active. But as the human body becomes ill when it is just fed junk food each and every day, so will your plants when they can’t assimilate the other nutrients in the soil.
Again, in permaculture it is all about the microorganisms in the soil. We provide food, water and shelter for them, and they open up the nutrients that are already in the soil on which the plants feed. When you dump a lot of anything on the soil, its going to kill microbes. Dumping bagged NPK fertilizer on the soil burns the creatures in the soil, just as if you poured acid on them. They die, and it will be awhile before the irrigation and rains delutes those chunks of fertilizer enough so that microbes can again live in the soil surface, but by then its time to dump more chemicals on the ground. The plant gets a high, but will never be able to adequately draw out the trace minerals it really needs to complete its diet, which soil microbes provide to it, because they are burned out of existence by the chemicals.
It would be pompous for us the believe that plants, which began about 450 million years ago on Earth, just fiddled around until their true keepers (humans) came along and evolved enough to produce chemical nitrogen to dump onto their roots.

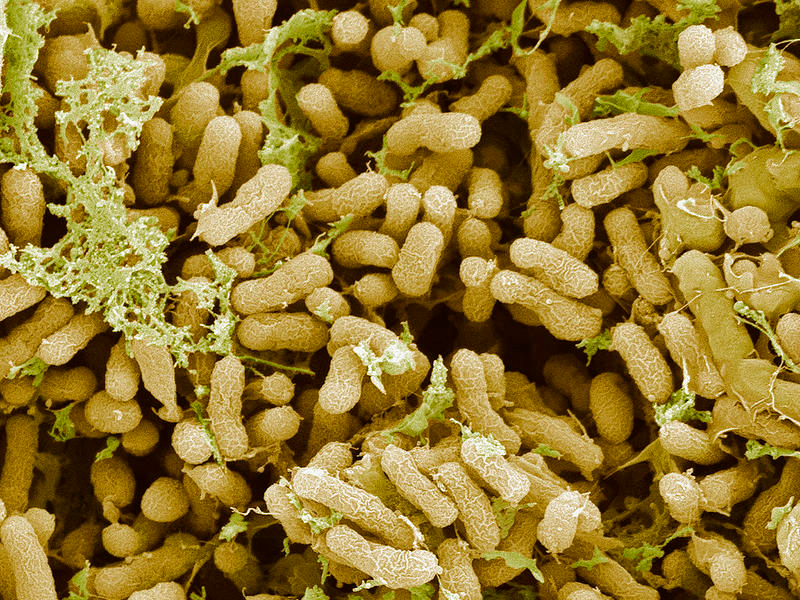
photo credit www.bio.miami.edu In fact, there are many ways that nature gets nitrogen into the soil. Lightning strikes, rainfall, cut greens, fresh poop, fallen ripe fruit, all help. Most of all, there are soil bacteria which can transform atmospheric nitrogen into fixed nitrogen: inorganic compounds that are usable by plants. More than 90% of nitrogen harvesting is done by these organisms. There are non-symbiotic (free-living) bacteria called cyanobacteria (or blue-green algae), and there are symbiotic bacteria that form relationships with particular plants. These symbiotic bacteria, namely rhizobium and Frankia, invade the root hairs of select plants and create enlargements on the roots called nitrogen nodules. This process sounds and looks similar to wasps stinging oak branches and creating galls; however, the frankia are helping the plant; symbiotic rather than parasitical. Atmospheric nitrogen is inert, therefore unusable by the plant. When the bacteria get their little hands into it, by changing it into ammonia and nitrogen dioxide the nitrogen is freed up to be used as the plant and the bacteria needs. When the plant roots die, the nitrogen is released into the soil. So, the plant, with the help of the bacteria, is sucking nitrogen out of the air, breaking it down and releasing it as a usable nutrient source in the soil. Who needs chemical fertilizer?
Nitrogen-fixing Bacteria, Sem Photograph Only certain plants still have the capability to join in this symbiotic relationships; some families have just a few species that can do it, and it is unknown if they developed the talent, or if the rest of the family eventually lost the talent. Legumes and all members of the Fabaceae family is the most commonly known and used nitrogen fixing family. Peas, beans, cowpeas, and clover are all commonly used cover crops. When mowed they produce both green mulch and release nitrogen into the soil. However, there are many shrubs and trees that are also nitrogen fixers. California Redbud tree, mesquite, mountain mahoganies, alders, ceanothus (California lilac), sea buckthorn, bayberries, cassia, acacias, lupines, and many more. There are also riparian plants such as azola, gunnera, some lichen and cycads which fix nitrogen with cyanobacteria.
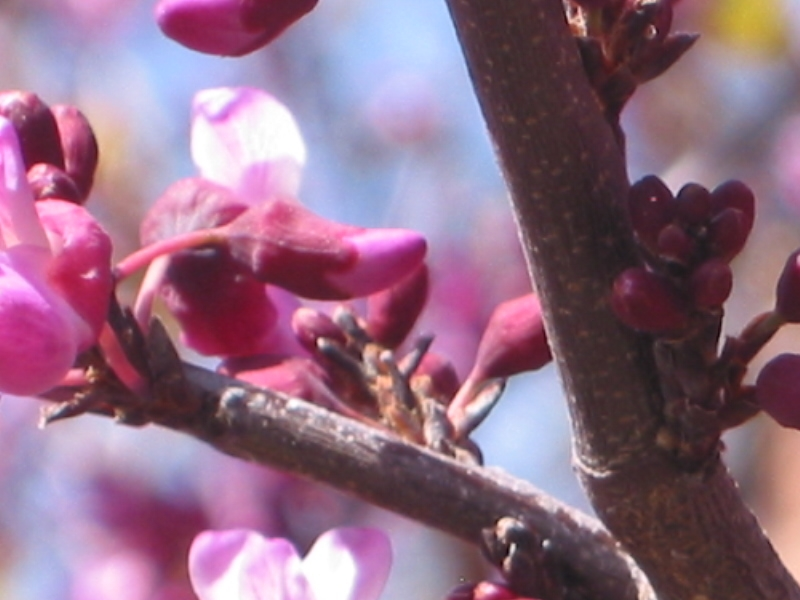
California redbud trees offer beautiful spring flowers which are edible, lovely fall color, and are nitrogen-fixers as well! In fact, 40-60% of native plants are nitrogen fixers. When you are planning your garden, your vegetable beds, your native Zone 5, and especially your orchards, you should be incorporating that percentage of nitrogen fixers into your design. Many of these can be mowed as cover crops, or used as quick-growing nursery plants, as canopy, or as chop-and-drop.
Chop-and-drop is when you grow your own fertilizer around your crop plants, and instead of purchasing and distributing fertilizer, a couple of times a year you take out a hand scythe and quickly cut back the nitrogen-fixing plants, scattering the tops around your food plants as mulch. When the top of the nitrogen-fixing plant is severely cut, the plant doesn’t need as much root base so it allows some to die, which distributes nitrogen into the soil. A double-whammy for your soil, and a small, easy and satisfying workout for you. Shazam.
Very important: when planting nitrogen-fixing plants there has to be the compatible bacterium in your soil for the whole thing to work. Purchasing inoculated seed for the first sowing on new planting areas is very important. As different bacteria react with different plants, study up some to make sure you are buying the right stuff if you are going to inoculate seed yourself. Then make sure that you are providing those tender bacteria with food, water and shelter – habitat – so that they can live and prosper. And what is the best habitat for soil microbes around food producing plants? Yep, mulch. Sheet mulch especially, and several inches of chopped leaves best of all.
You can find the entire 9-part Plant Guild series here: Plant Guilds: What are they and how do they work? The first in a series. , Plant Guild #2: Canopy , Plant Guild #3: Sub-Canopy , Plant Guild #5: Mining Plants, Plant Guild #6: Groundcovers, Plant Guild #7: Vines, Plant Guild #8: Insectiaries, Plant Guild #9: The Whole Picture.
- Animals, Bees, Birding, Compost, Fungus and Mushrooms, Gardening adventures, Hugelkultur, Microbes and Fungi, Natives, Other Insects, Permaculture and Edible Forest Gardening Adventures, Predators, Quail, Rain Catching, Recycling and Repurposing, Reptiles and Amphibians, Soil, Water, Water Saving, Worms
Plant Guilds #2: Upper Canopy

An oak is home to over 300 species. Not counting human. Whether you are planting small plants in pots, ornamentals in your yard or a food forest, you need plants that will provide an upper canopy for others. If you have small plants, then you will have a short canopy. Maybe your canopy is a tomato plant. Maybe its an oak. Whatever it is, canopy has many functions.

Upper canopy provides shade so that other plants can grow. It drops leaves, bark, flowers and seeds and/or fruit to provide compost and food for all levels of animals down to soil microbes. Canopy provides protective shelter for many kinds of mammals, birds, reptiles and insects as they hide under the leaves. A mature oak is home to over 300 species. Old scarred canopy full of holes is the natural home for honeybees, and many types of bird and other animal. It is a storage unit for acorns gathered by woodpeckers. Where you have animals, you have droppings. All the poo, feathers, regurgitated pellets, fur, scales and other organic waste that falls from canopy is vitally important for the health of the soil below.
Canopy provides a perch for raptors and larger birds that help with rodent control.
Canopy helps slow the wind; the fewer trees we have the harder the winds. Canopy also filters the wind, blocking dust and other debris. Canopy helps cool and moisturize the wind. The leaves of canopy trees help buffer the rain. Rain on bare ground is as compacting as driving over the dirt with a tractor. If rain hits leaves it bounces, rolls or shatters. Rain can then hit other layers below the canopy, finally rolling through leaf mulch to percolate into the soil without compacting it.
Canopy catches moisture as well. Here in Southern California we may not receive a lot of rain, but we do have moisture during the night.
 Often I’ve walked through Finch Frolic Garden of a morning to feed the hens, and the garden sounded as if it had its own special rain cloud over it. That is because moisture condenses on the leaves and rolls off. The more canopy and the higher the canopy, the more water we can collect. In that same way, canopy begins to hold humidity on the property, which the rest of the guild contributes to. Pollen dries out. With longer, hotter, drier summers there is worse pollination even if the pollinators are active, because the pollen isn’t viable. Less humidity equals fewer fruits, nuts and vegetables. Therefore, the more canopy, and other parts of a guild, the moister the air and the better the harvest.
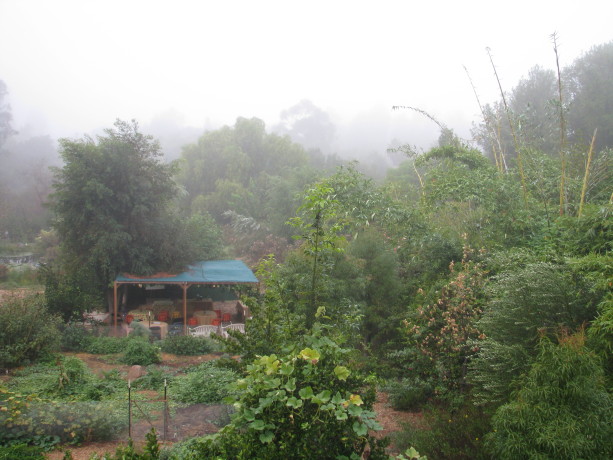
Canopy is in connection with all other plants in its community, linked via webs called mycorrhizal fungi. Through these webs the canopy sends chemical messages and nutrients to other plants. Every plant in the community benefits from the strong communications from the canopy trees.
Canopy builds soil. Canopy trees are large on top and equally large underground. Tree root growth can mirror the height and width of the above-ground part, and it can be larger. Therefore canopy trees and plants break through hard soil with their roots, opening oxygen, nutrient and moisture pathways that allow the roots of other plants passage, as well as for worms and other decomposers. As the roots die they become organic material deep in the soil – effortless hugelkultur; canopy is composting above and below the ground. Plants produce exudates through their roots – sugars, proteins and carbohydrates that attract and feed microbes. Plants change their exudates to attract and repel specific microbes, which make available different nutrients for the plant to take up. A soil sample taken in the same spot within a month’s time may be different due to the plant manipulating the microbes with exudates. Not only are these sticky substances organic materials that improve the soil, but they also help to bind loose soil together, repairing sandy soils or those of decomposed granite. The taller the canopy, the deeper and more extensive are the roots working to build break open or pull together dirt, add nutrients, feed and manage microbes, open oxygen and water channels, provide access for worms and other creatures that love to live near roots.
Canopy roots have different needs and therefore behave differently depending upon the species. Riparian plants search for water. If you have a standing water issue on your property, plant thirsty plants such as willow, fig, sycamore, elderberry or cottonwood. In nature, riparian trees help hold the rain in place, storing it in their massive trunks, blocking the current to slow flooding and erosion, spreading the water out across fields to slowly percolate into the ground, and turning the water into humidity through transpiration. The roots of thirsty plants are often invasive, so be sure they aren’t near structures, water lines, wells, septic systems or hardscape. Some canopy trees can’t survive with a lot of water, so the roots of those species won’t be destructive; they will flourish in dry and/or well-draining areas building soil and allowing water to collect underground.
In large agricultural tracts such as the Midwest and California’s Central Valley, the land is dropping dramatically as the aquifers are pumped dry. Right now in California the drop is about 2 inches a month. If the soil is sandy, it will again be able to hold rainwater, but without organic materials in the soil to keep it there the water will quickly flow away. If the soil is clay, those spaces that collapse are gone and no longer will act as aquifers… unless canopy trees are grown and allowed to age. Their root systems will again open up the ground and allow the soil to be receptive to water storage. Again, roots produce exudates, and roots swell up and die underground leaving wonderful food for beneficial fungi, microbes, worms and all those soil builders. The solution is the same for both clay and sandy soils – any soil, for that matter. Organic material needs to be established deep underground, and how best to do that than by growing trees?
In permaculture design, the largest canopy is often found in Zone 5, which is the native strip. In Zone 5 you can study what canopy provides, and use that information in the design of your garden.
 How do you achieve canopy in your garden? If your canopy is something that grows slowly, then you will need to nursery it in with a fast-growing, shorter-lived tree that can be cut and used as mulch when the desired canopy tree becomes well established. Some trees need to be sacrificial to insure the success of your target trees. For instance, we have a flame tree that was part of the original plantings of the garden. It is being shaded out by other trees and plants, and all things considered it doesn’t do enough for the garden to be occupying that space (everything in your garden should have at least three purposes). However a loquat seeded itself behind the flame tree, and the flame tree helped nursery it in. We love loquats, so the flame tree may come down and become buried mulch (hugelkultur), allowing that sunlight and nutrient load to become available for the loquat which is showing signs of stress due to lack of light. With our hotter, drier, longer summers, many fruit trees need canopy and nurse trees to help filter that intense heat and scorching sunlight. Plan your garden with canopy as the mainstay of your guild.
Therefore a canopy plant isn’t in stasis. It is working above and below ground constantly repairing and improving. By planting canopy – especially canopy that is native to your area – you are installing a worker that is improving the earth, the air, the water, the diversity of wildlife and the success of your harvest.
What makes up a plant guild. Canopy is improving the water storage of the soil and increasing potential for aquifers. The more site-appropriate, native canopy we can provide in Zone 5, and the more useful a canopy tree as the center of a food guild, the better off everything is. All canopy asks for in payment is mulch to get it started.
Next week we’ll explore sub-canopy! Stay tuned! You can find the entire 9-part Plant Guild series here: Plant Guilds: What are they and how do they work? The first in a series. , Plant Guild #3: Sub-Canopy , Plant Guild #4: Nitrogen-Fixers, Plant Guild #5: Mining Plants, Plant Guild #6: Groundcovers, Plant Guild #7: Vines, Plant Guild #8: Insectiaries, Plant Guild #9: The Whole Picture.
You May Also Like
Native Insects and IPM
- Animals, Bees, Birding, Compost, Fungus and Mushrooms, Gardening adventures, Health, Hugelkultur, Microbes and Fungi, Natives, Other Insects, Permaculture and Edible Forest Gardening Adventures, Pets, Rain Catching, Seeds, Soil, Water, Water Saving, Worms
Lawn Care and Lawn Alternatives for Drylands
Drought restrictions have caused many people to turn the water off of their lawns; many have already taken that leap years ago. One of the main questions I field now is what to do with that nasty patch that once was a lawn. There are many low-water-use alternatives.
First, please don’t use artificial turf or gravel. Read about why by following the links to past blogposts.
You can have a lawn and not use as much water, and not add any chemicals to it, by understanding how grass grows. You can starting learning everything about lawn caring at ngturf.com/area-calculator/.
If you want and/or need a lawn space, make it as minimal as possible. If you are going to reseed, choose a California native seed that withstands the drought and our alkaline soil. Creeping red fescue is a good choice that grows tall and floppy unmowed, but is a walkable/playable lawn if mowed.
A grass plant spreads at its base, not its tip. Grass needs its blades to produce food. Common mowing techniques recommend mowing low, but that is doing your lawn harm and resulting in the need for aeration and chemical fertilizers. When you mow low, the stressed grass plant needs to push lots of energy into quickly growing more blades to feed its roots. Most weeds have a growing point at their tip and with a strong weed killer it can be stopped. Mow as high as your mower allows – 4 inches if possible. High mowing allows the grass plant to keep its blades for food making, and to put energy into deep root growth and into spreading. Mowing high cuts the tops off the weeds, and the height of the grass shades out weed seeds so they can’t germinate.
Water deeply, and less frequently. Catch an inch of water in a cup set under your lawn irrigation and shut the water off. Don’t water again until the grass shows that it needs it. Constant irrigation, especially on short grass where the soil is exposed, and rainwater on bare earth is as compacting as running a tractor over the ground. When the earth is compacted water just won’t penetrate. You pour water onto the grass which runs off or evaporates. Your grass can’t grow deep tap roots and is slowly starved to death.
Use a mulching mower and allow the grass clippings to return to the lawn. Stop using chemical fertilizers. Completely. In permaculture we feed the soil and not the plants. Healthy soil has billions of fungi, bacteria, nematodes, amoebas, and other creatures in every teaspoon. This zoo of soft-bodied creatures break down organic matter and make nutrients in the soil available for roots to feed from. The better the soil health, which means the more microbial activity and population, the loamier the soil and therefore the better water penetration as well. Instead of dumping high nitrogen fertilizer on your lawn, use compost, actively aerated compost tea , and chopped up leaves. (If you don’t have a mulcher attachment on your mower, or a blower with a reverse vacuum attachment, then put leaves in a trash can and use a string mower to chop them up- while wearing eye protection of course!). Chopped up leaves are all you need to fertilize anything. Best of all they don’t harm your pets or family, unlike chemical fertilizers.
If you don’t want a lawn, then figure out how you want to use the space. Do you want to just see the area from your windows? Do you want a meditation garden? Room for kids and pets to play? An outside BBQ spot? Decide how best to use this space. If you aren’t using every square inch of your property, you are paying property taxes for nothing.
To get rid of your lawn you don’t need to dig it up. Please save your money. Sheet mulch it. Sheet mulch is an inch of cardboard and/or newspaper topped with 4-6 inches of mulch. Gorilla hair (shredded redwood) or shredded ceder bark spread well and sit lightly on the soil, and you get more for your money. Sheet mulch will turn the grass into mulch and start activating the soil. Best of all, it looks instantly great, to satisfy your neighbors and family. If you have Bermuda or other very determined grass, you may need a thicker layer of cardboard. Sheet mulch now and allow it to sit over the winter and absorb the rains. In the spring you can cut through the cardboard and plant right in the ground.
If you want a low-effort garden, then please go native. We need to replace habitat that has been destroyed and give the animals and insects the food and shelter that they need to survive. Many California native gardens are not well done and look piecemeal and stark. This doesn’t have to be. Look around at the hills; unless you are well into the desert, there are plants of all types everywhere. If you have sheet mulched a green lawn, then allow the grass to die completely before planting natives; they don’t like higher nitrogen from freshly decomposing grass, or the residual from high nitrogen fertilizer. Sheet mulching over the winter and planting in the spring should be fine. If your lawn is already dead, then you can sheet mulch and plant immediately. Then allow the plants to fill out and you don’t need to mulch again.
See how the area looks from your windows. Make pathways that are wide enough to accommodate whomever is going to use it (2 feet wide for one person, 3 feet for two or a bicycle, 4 feet for a wheelchair). Don’t skimp on the pathway material. An ugly or uneven pathway will draw all your attention and no matter what you do around it, it will look bad. A good pathway well done and complementary to your house is important for your own satisfaction and for the resale value of your home as well. Choose destination spots and focal points. Benches, a bird bath, a specimen plant – these are all important. Then choose plants. I highly recommend the book California Native Landscapes by Greg Rubin and Lucy Warren. These are San Diegans so they know what works well in Southern California.
One inch of rain on one acre in one hour is 27,154 gallons of free, neutral pH rainwater. Most lawns are slightly convex so that water runs off of them. That is why there is a bald spot at the highest point where you just can’t keep anything alive. You want to catch all the rainwater -and irrigation water – you can. Catch it, sink it, spread it. Do this with simple earthworks that you can do with a shovel. Perpendicular to the water flow dig shallow swales (level-bottomed ditches). They only need to be an inch deep, or you can go much deeper. They can be filled with large mulch, and sheet-mulched over the top. Rain will then sink into the ground rather than rolling off. Sheet mulch – or any mulch – allows the rain to hit, bounce and then gently fall to earth. Catch every drop that you can, and the best place to catch rain is in your soil.
To further add water retention and nutrition for your microbes, bury wood. Old logs, old untreated building materials (nails and all), shrub cuttings, nasty spiky rose cuttings, palm fronds and trunks, they can all be buried and planted over in a process called hugelkultur. Even old cotton clothing, straw hats, or anything made with natural fibers can be layered with dirt and buried. Get the most from what you’ve already spent money on and let your trash fix your soil.
So, steps would be to decide what you want to do with your lawn area, design the pathways and special areas, determine what kind of plants you want to put there, dig in some earthworks, sheet mulch to kill the grass and weeds, then plant. Natives will need supplemental water (not drip irrigation, but a long soak and then allowed to go dry) until they are established. Then many of them don’t want any supplemental water; some go drought-deciduous, so do your research. A good selection that is lovely and will invite birds and butterflies into your yard might include Cleveland sage (not Mexican bush sage, which becomes very woody), apricot mallow, desert mallow, fairy duster, and ceanothus. Great retail native nurseries are Theodore Payne nursery in Los Angeles and Tree of Life nursery in San Juan Capistrano.
If you don’t want to go native, then consider low-water-use plants such as many Mediterranean herbs. Rosemary, oregano, marjoram, lavender and others interspersed with drought tolerant plants such as bird of paradise, New Zealand flax, rockrose, Pride of Madeira, and a host of interesting succulents in between. Aloe blooms are attractive to hummingbirds.
If you live in areas where there is a real winter, where you receive snowfall, your lawn care to prepare for the cold is quite different. The folks at Yardday have excellent tips to help prepare for snow, and you can read about them here. Keep in mind that the ‘fertilizer’ should be actively aerated compost tea and/or compost, NOT bagged NPK or other chemical or condensed lawn care fertilizer. These concentrated fertilizers kill microbes leaving your soil lifeless, water-repelling dirt.
There are lots of things to do with your lawn that are lovely, useful, interesting and beneficial to wildlife and to the earth. Care for your soil by not poisoning the microbes with chemicals, use your leaves, sheet mulch, and design for low water use. Its worth the effort.
You May Also Like
Native Insects and IPM
- Animals, Bees, Birding, Compost, Gardening adventures, Health, Microbes and Fungi, Natives, Other Insects, Pets, Ponds, Predators, Quail, Rain Catching, Reptiles and Amphibians, Soil, Water, Water Saving, Worms
Why Buy Rain Barrels if you Own a Pool? Pool Conversion Discount!
Why buy rain barrels if you own a pool? You can collect about 20,000 gallons of rainwater in an average pool, and use it on your landscaping and for swimming if you don’t chlorinate it. If you have a pool or pond and put chemicals into it, or have a saltwater pool or one that is treated with UV light, you really need to read about how toxic those systems really are and how to change your pool into a swimmable, clean pond on PuraVidaAquatic.com. On that site is a host of great information about how bad mosquito fish are, how to make a truly healthy pond, why having a pond in a drought is a great idea and so very important, and so much more. If you live in Southern California and have a pool, you’ll be interested in this Fall Special:

You May Also Like
Native Insects and IPM
- Animals, Bees, Compost, Gardening adventures, Hugelkultur, Microbes and Fungi, Natives, Other Insects, Permaculture and Edible Forest Gardening Adventures, Rain Catching, Reptiles and Amphibians, Soil, Water, Water Saving, Worms
A Zero Irrigation Garden
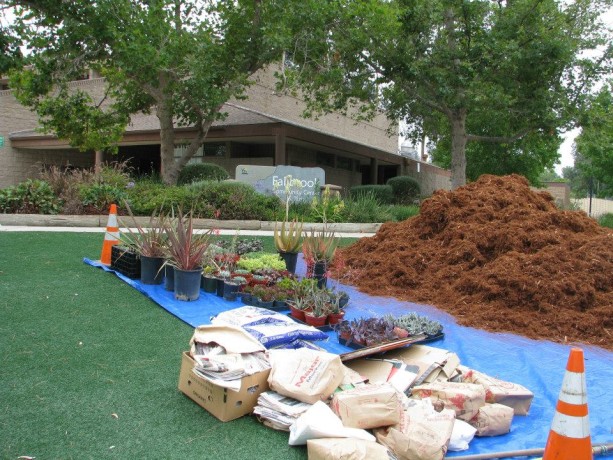
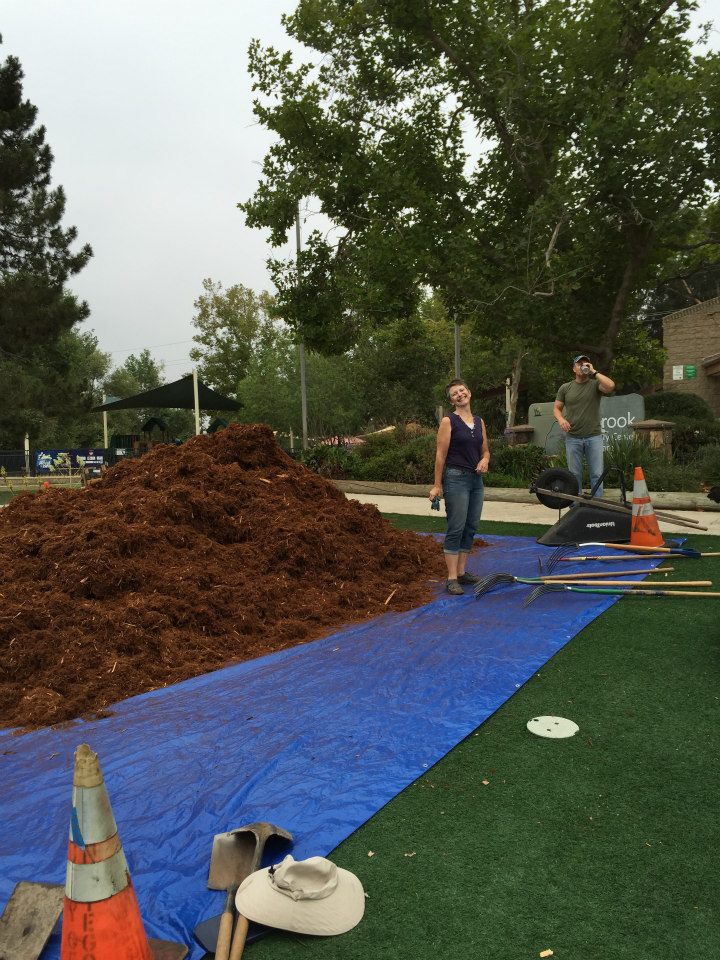
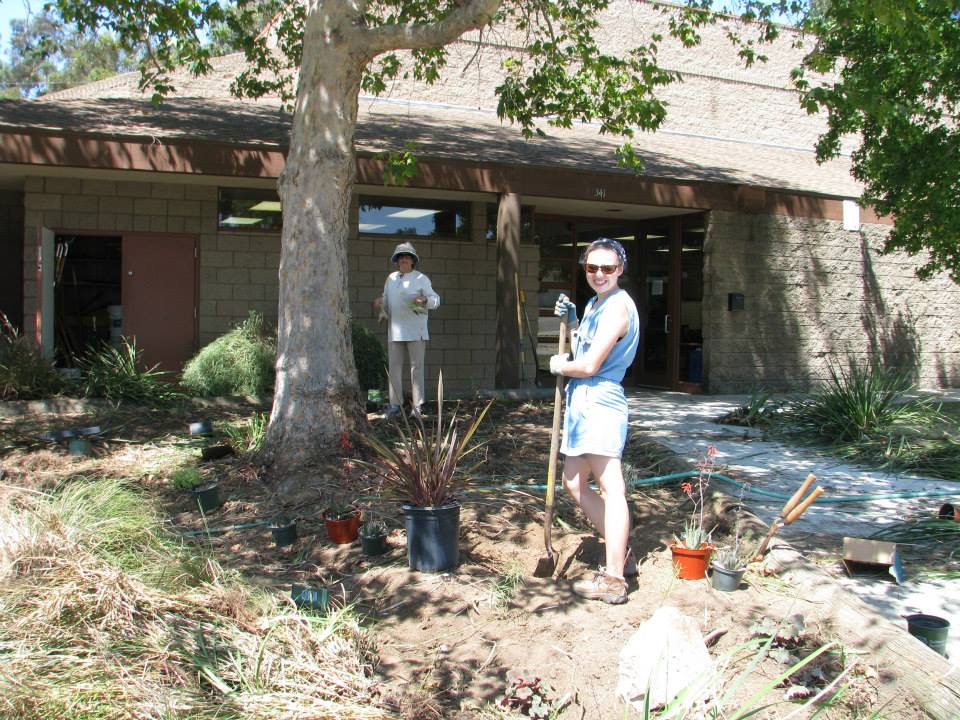
Plants, mulch and newspapers waiting for action. In response to the water cutbacks, the County of San Diego Dept. of Parks and Recreation deemed it necessary to turn off irrigation to the front two planting beds of the Fallbrook Community Center. The plan was to tear out the plants and replace them with decomposed granite and a bench.
At first this looked like too little mulch. Then it spread, and kept on spreading. You can see the overgrown planter behind me and Bill. Health and fitness instructor Ann Wade, also the president of the Friends of the Fallbrook Community Center, contacted me and I came up with a design using native plants and a variety of succulents that could survive without irrigation. More than that, simple earthworks in the form of swales and small rain catchment basins could be dug to hold run-off, and sheet mulch applied to retain moisture. The plan was accepted and several weeks ago we had a planting.
Lynne with the plant that pulled her in. A big portion of the planting was to remove the existing plants that would have died anyway. These plants had been haphazardly installed, and apparently most were leftovers from a long-ago Fallbrook Garden Club plant sale.
Ann and Lynne tackling a reluctant plant. We replanted as many as we could that could adapt to the lack of irrigation. Others went home with volunteers or were mulched. The Community Center sign was partially blocked, sea lavender had to be cut practically in half to keep it out of the pathway, and some bushes had to constantly shaped. As much as I dislike removing plants, they had to go.
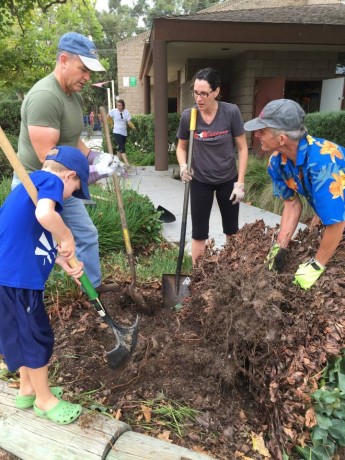
Lynne, Dorothy and Barbara with Miranda in the background. They had no idea what they had volunteered for! On a hot summer’s day many wonderful friends of mine and my daughter arrived to do permaculture at the Community Center. A good portion of the morning was spent hacking out the existing plants.
McKenna and Dorothy tackle bulbine. The ground was so hard from years of spray irrigation and rainwater runoff that these plants had to be chopped rather than dug. The roots had formed a solid mat close to the surface in their desperate search for water.
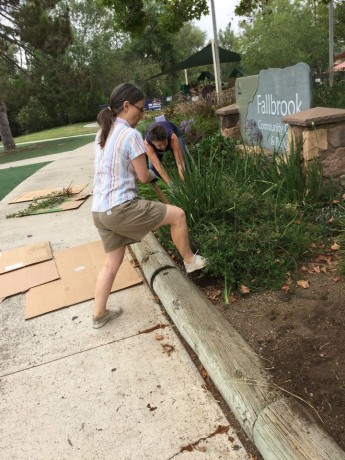
Dorothy and me clearing out the old. These plants blocked the sign. The irrigation had been run the night before, but very little of this water was evident, and some of it showed evidence that it simply ran off. This removal process took much longer than I had anticipated, but after the slaughter we were able to move ahead.
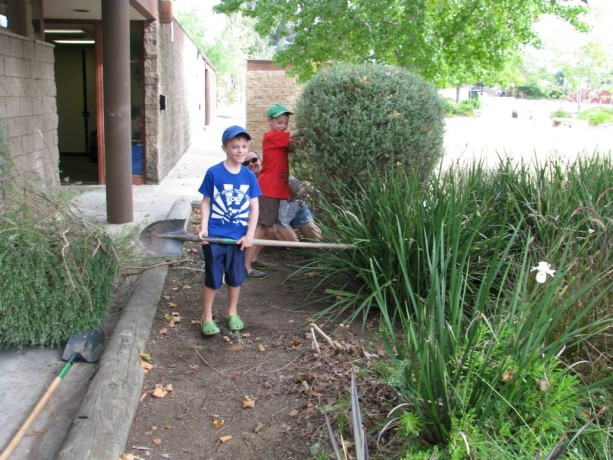
Jakie and Jackson help Miranda cut down a shrub. I dug shallow swales perpendicular to the flow of rainwater from the sidewalk and roof, you can see this for reference. Dug is not the best word here; chopped would be better as the soil was so hard. I also dug some shallow basins around the planting beds, making the soil surface uneven to collect rainwater.
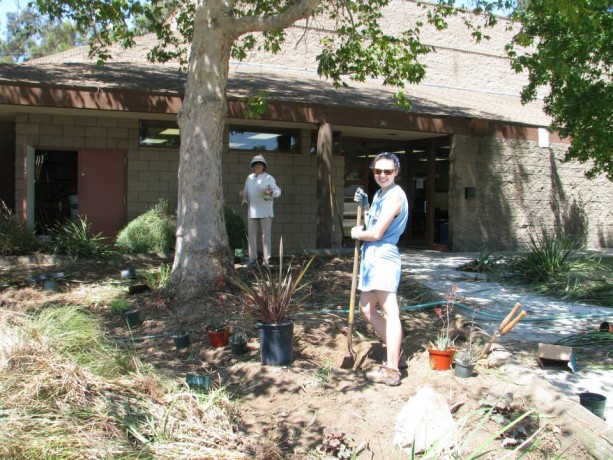
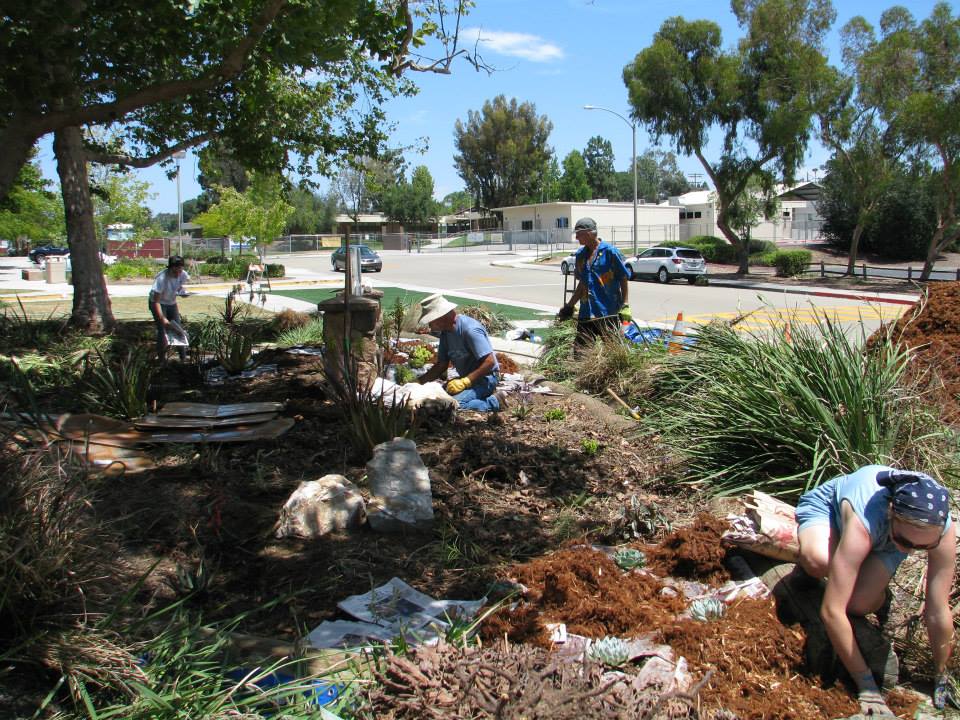
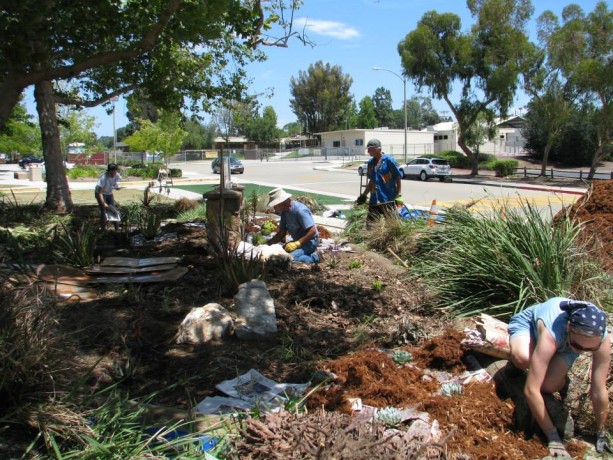
Barbara and Miranda planting in very hard dirt. Each bed sports an old beautiful California sycamore, a riparian tree, and with the reduction of lawn irrigation and termination of irrigation in the beds (however unhelpful that was), these trees could be imperiled. The swales – shallow ditches with level bottoms- would allow rainwater to percolate into the soil and travel deeply to the roots rather than run over the top. Small swales above plants are key to holding rainwater in the soil and preventing flooding and topsoil erosion. Swales are how we can recharge our subterranean waterways, refortify our wells and reestablish summer streambeds.
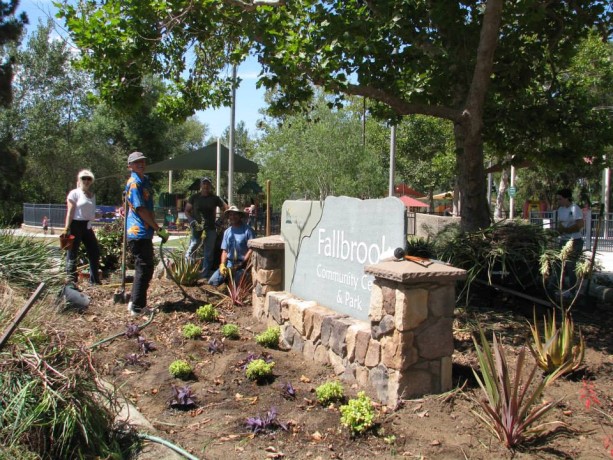
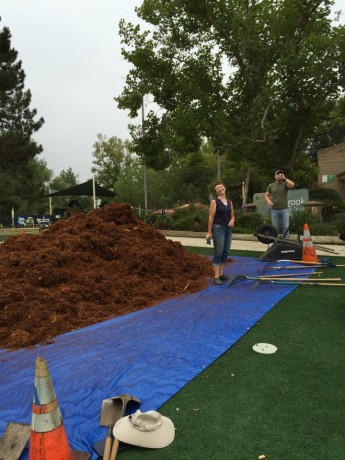
The front planted and watered. Ann, Bob, Bill, Gary and Grace. We had ordered four boulders as well, and these were placed to focus the eye on the sign and the plants rather than the back wall of the Community Center, and to tie in with the stone base of the sign. This sounds easier than it was. To look natural, boulders should be buried 1/4 to 1/2 way into the ground. I’m not sure which was more difficult for the volunteers: to dig a hole in that hard dirt or to move the boulders uphill and into position. Fortunately no fingers or toes were lost and the boulders looked great. They were chosen to be pointy so as not to entice children to sit or stand on them.
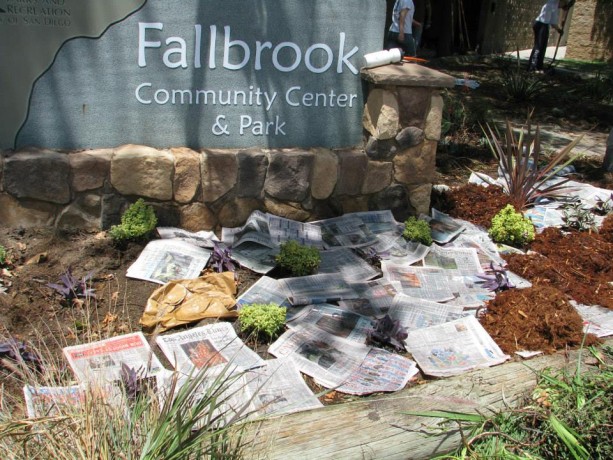
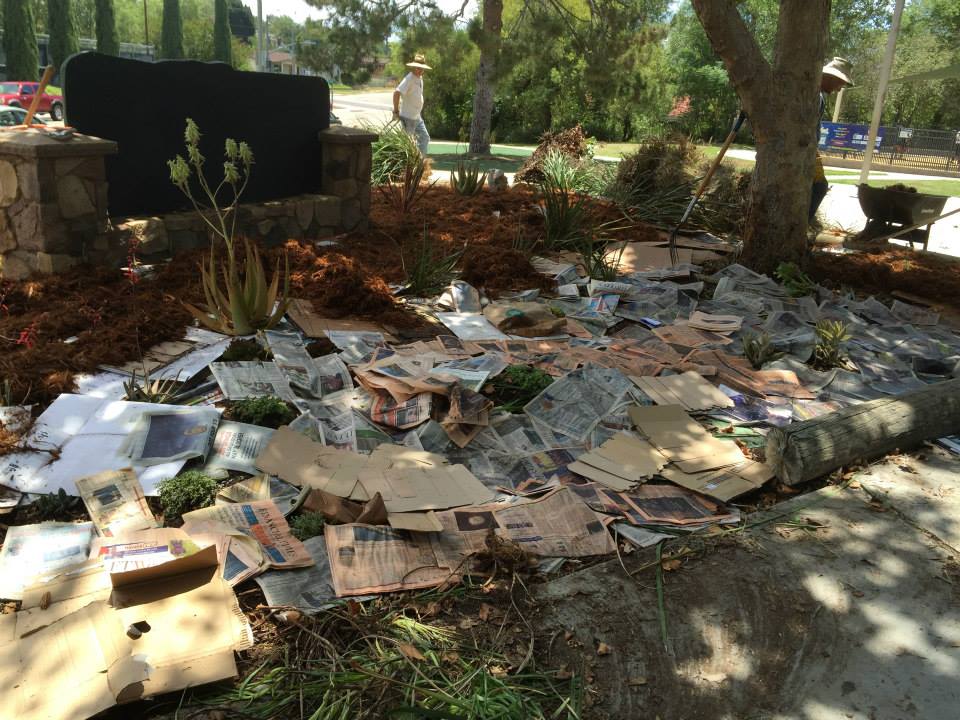
Newspapers and fliers were laid around the plants over a sprinkling of chicken manure. I got to spread that. After placing a selection of California natives appropriate for the shade, part sun and full sun areas, and placing the succulents, we sprinkled a little composted chicken manure over the soil surface and the team placed sheet mulch around the planted plants. Sheet mulch is another inexpensive miracle that can save so much water and improve plant growth in our dry climate.
This manure would help feed microbes as they began to populate the area. On top of that was spread cardboard, newspapers, and leftover freebie magazines (with the glossy cover discarded). We were repurposing trash from the community center back into the planting beds! How cool is that? For native plants, this layer didn’t need to be thick because it was to help nursery in the new plants, suppress weeds, hold in moisture during our hot months, and act as soil protector from rainfall.
Jakie, Bill, Susan and Bob versus a sea lavender. Rain on bare earth is more compacting than driving a truck over the ground. For thirstier plants such as non-natives, thicker layers of cardboard should be added. As a guide, think of what the plant in question at maturity might have around its base for mulch. An avocado tree would have a very thick layer of leaves and fruit. Avocados and citrus don’t like anything growing around their roots, so they block the sun with their foliage and cover the ground with debris. By adding 1/2″ to 1″ or more cardboard around these trees and those plants that require more moisture, you save a lot of water and give the plant what they need to live and produce without stress. No stress means much better chances of fighting insects and disease. The native plants in this garden were chosen because when established they don’t like additional irrigation water, especially in the summer.

A good layer of newspapers and cardboard. Jake and Gary working hard in the final stretch. Therefore the cardboard layer wasn’t thick. We also spread around some of the branches and leaves from plants we’d removed and topped them with cardboard.

Some old plant material was around to add to the soil health. If the ground had been softer, a lot of the removed plants would have been buried (hugelkultur). These, too, would protect the soil and decompose as great food for the worms and microbes. If the soil had been more forgiving, I would have buried a lot of the removed plants to build the soil. As it was, we were lucky to chisel out planting holes for the one-gallon plants.
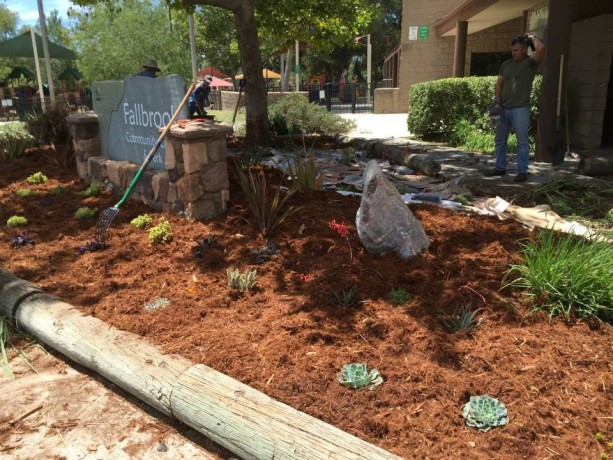
Watering in plants while sheet mulch is being laid. On top of the cardboard was spread gorilla hair mulch. This shredded redwood bark is excellent for use around natives and other vegetation for many reasons. It is fluffy, so it spreads much farther than wood chips and is the better value. The fluffiness also prevents it from laying firmly on the soil so it doesn’t decompose as quickly as wood chips, and most importantly it doesn’t wick moisture from the ground as do wood chips on bare soil. As gorilla hair decomposes it is a better match for our native soil composition than other mulches. It also looks great.
Planted! The plants were watered in around the rootball after being planted, which saved water usage tremendously. I was concerned that the surrounding dirt would wick the moisture away from the new plants, but after 5 days the root balls still had some moisture. I used a watering can and gave them all about a cup of water a week after planting. Today, after three days of triple-digit heat, I watered again and replaced a few plants that had cooked. These were my fault, having misjudged the intensity of the sun on these particular small plants. A few succulent showed signs of being stepped on as well, but overall the plants looked good.
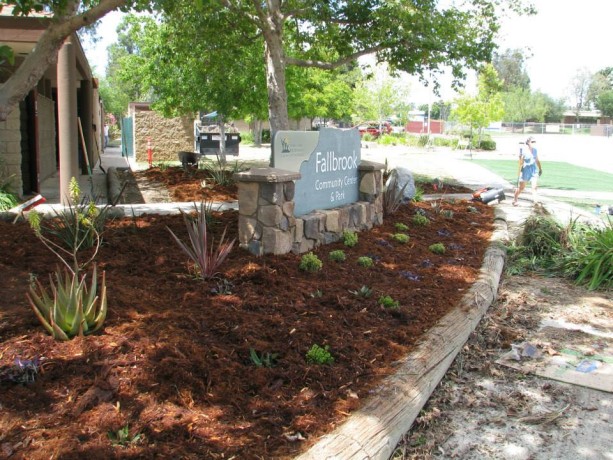
Mission completed, and a visible sign! The natives and succulents were all chosen to be extremely drought tolerant and to attract birds and butterflies. Many non-native plants have very little or no habitat for animals. We’ve removed their food and shelter and replaced them with plants that need far too much water and don’t provide nourishment or adequate nesting areas. The succulents installed will feed hummingbirds and insects, as well as the other natives which will also provide food for other birds.

Jake surveys the finished product. A garden should become alive with the movement of animals. Birds, butterflies, bees, lizards… they are the motion and the life of a garden. By using chemicals and only non-natives we rob these creatures of a home and adequate nourishment. By planting natives along with other plants we can share our gardens with the wildlife that so desperately need habitat.
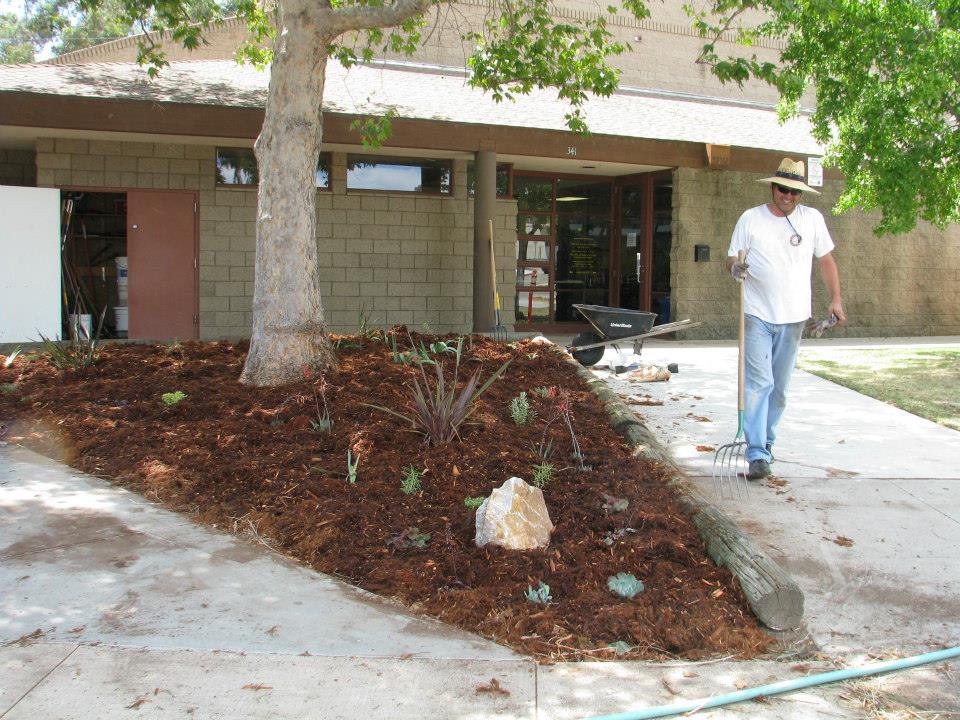
The gorilla hair also complemented the bark of the sycamores – a happy accident. The beauty of the trees popped with the new design and mulch.
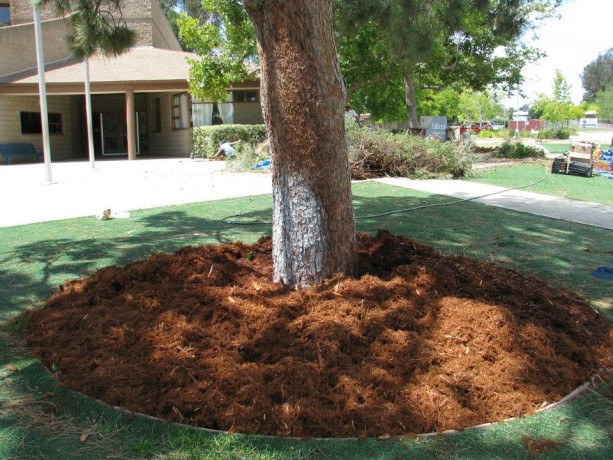
Sheet mulch around the base of the old pine. Be sure to leave a few inches between the trunk and the mulch so as not to rot the bark. The base of the historic Christmas pine was also sheet mulched to protect the roots from more compaction and to try and help counteract a little of the damage done to it by the artificial turf that was laid some years ago.
A successful and easy way to move a tarp full of mulch! Because the gorilla hair spread farther than expected, the extra was used over cardboard in two additional planters which gave the front of the center a uniform look. I could almost hear the plants sighing in relief.
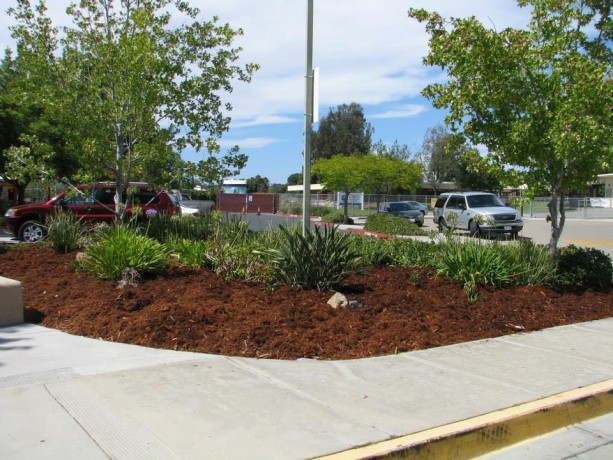
Extra mulch was used for another planting bed. If funds become available, plants can be added by simply cutting through the cardboard to plant. I was very fortunate to have been involved in this project, as it demonstrates permaculture techniques to the public and is in a very visual position in our community. It is also in a County facility, so perhaps other facilities will begin implementing permaculture practices to save water and build soil throughout San Diego.
This project was a long, hard job and if not for the dedication and affection of my friends and daughter it most certainly would not have come to fruition. There were many sore muscles the day after. Thanks to District Park Manger Jake Enriquez for okaying the project, Ann Wade for initiating the scheme and working with great spirits from start to finish (and providing frozen yogurt at break time!), Bill, McKenna and Grace Wade, Miranda Kennedy for sticking with her mom with every new ‘project’ that turns out to be long hours of hard labor, Bob Lloyd of PuraVida Aquatics who drove from Ramona to work hard in the sun, Susan, Jackson and Jake Liebes and Gary Beeler of the Fallbrook Land Conservancy’s Native Plant Restoration Team, Lynne, Dorothy and Barbara who are fellow students of Ann’s, wonderful friends of mine and who won some tough battles with reluctant plants, and Johanna, the FCC leader, and the staff of Live Oak Park who came in at the end for the grand finale. You all are wonderful people, and thank you for helping bring permaculture to a public facility!
You May Also Like
Native Insects and IPM