- Gardening adventures, Permaculture and Edible Forest Gardening Adventures, Ponds, Rain Catching, Vegetables
Yesterday in the Garden
Yesterday was the solstice, the formal beginning of summer. The longest day of the year. (Only six months to Christmas!) With months of growing season already behind us here in San Diego County, and the threat of drought and fire ahead of us, it is a time to enjoy the bounty that we already have. This is my year for gardening: I have the best vegetable garden I’ve ever had, after years of building raised beds and lining with aviary wire against gophers, improving the soil with compost, and buying organic seeds and fertilizers. I also have incredible freedom in my yard to plant whatever I like, wherever I like (within the constraints of tolerance by the plants). I’ve always had to cluster plants around where I’ve slapped together irrigation on the few stolen weekend hours I could devote to my yard. No more! With the permaculture gardens, the well and the drip irrigation, I am excited about my yard for the first time in the twelve years I’ve lived here. With the incredible job that Roger Boddaert and his team of Juan and Francisco, and also Aquascape’s Aart DeVos with his manager Jacob who has spent thirteen hour days on my property and is back early the next morning, the permaculture project is nearing completion and is spectacular. As a habitat it is succeeding, attracting more wildlife every day. As a food forest it has is off to a good start, with extra going to go to the Fallbrook Food Pantry. As an interesting, decorative garden it is unique and full of surprises. I’ll show you some photos; you can click on any of them to enlarge, but it will open in this window and you’ll have to use the back arrow to return to this page:
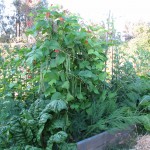
Long Scarlet Runner Beans 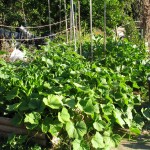
Vigorous vines 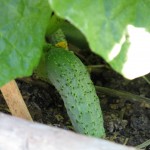
Little pickling cucumber 
Towering Quinoa 
Seeds on multiple stems 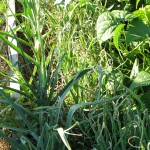
Garlic Nearing Harvest Time 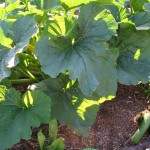
First zucchini harvest 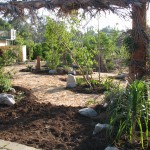
Through the main entranceway 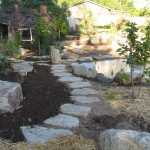
Streamside walkway 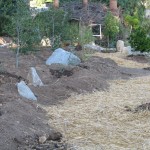
Mulched beds with swales 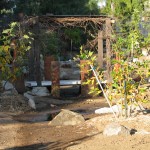
Tin-roofed bridge 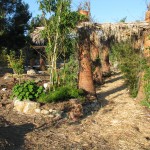
The Palm Aisle 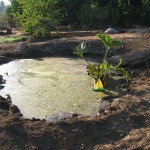
My First Yacht 
Yarrow between the stepping stones -
Is She a He???

Rooster in Disguise? Problems in Chicken Land! Of the seven hens we’ve raised from chicks, one has played us false! Or so my daughter (the birder) speculated upon her arrival home from college. Our one Rhode Island Red, which is a larger breed so we chose the smallest chick in the batch, is showing signs of not being, shall we say, hennish. First of all, she is large. Really big feet. Ever hear the Fats Waller song, Your Feets Too Big? That applies here. Most notably, though, are her tail feathers, which are starting to take on a more colorful life of their own. They are a little longer and have some bluish-green hues in them that hens, well, just don’t care about. She has become a bully to all the others, especially the largest Americauna, Chickpea.

And I thought they were being hen pecked! I had attributed the temper to her being a redhead, but apparently there are other explanations. She is developing admirable wattles, which is something I don’t get to say to just anyone. Also, she has very shiny neck feathers, and roosters have an oil gland they use to preen their feathers. However, she hasn’t yet crowed, but Internet research tells us that some crow early, some late, some not at all. Also, she hasn’t grown spurs yet, but the story is the same as the crowing. One chicken site informed us that it was easy to sex Rhode Island Red chicks because the females have a black stripe on their heads.

It seems like only yesterday.... No stripe on this one, yet if it is so easy to sex them, why was this male in with the females at the store? If indeed she is a male.

Trying to blend in.... So what if she is a he? I don’t know yet. My neighbors would have a fit if I had a crowing rooster in my yard. Rural as it is here, there is a certain peacefulness that rolls across the land and a screaming bird just doesn’t fit in. Also, I’m a lacto-ovo vegetarian. I eat eggs, but not animals, so I don’t want fertile eggs or chicks. Nor do I want my other girls harassed all the time. However, I’ve raised this bird from a day old, and I don’t give over my responsibilities lightly. The hens won’t begin to lay for a couple more months, so I have some time to consider.
I wonder if my vet would fix a chicken?
Here is the whole cast of characters:

Emerson Emerson: if our speculation is in error, and she is not a he, but she is a she, then she can assume the name Emily.

Blondie/Evelyn Blondie. Not the most original name, but the song Heart of Glass comes to mind whenever I see her. Blondie is Emerson’s chosen consort (another reason Emerson must be a male…. going for the blonds!) UPDATE: Blondie has been renamed Evelyn to move from music to fiction genres. Emerson, Miss Amelia and Eveyln are all characters in Elizabeth Peter’s Amelia Peabody series.

Lark 
Linnet Lark and Linnet: the youngest chickens by a few weeks, these Barred Rocks pair off and are quite smart. Comparatively. Lark is darker than Linnet.

Miss Amelia Miss Amelia: the Silver Wyandotte. Named after the intrepid heroine of Elizabeth Peters’s Amelia Peabody historical archeological mysteries. She likes to sit on the highest perch.
")
Kakapo (a New Zealand bird... she looks like one!) Kakapo: the lighter colored Americauna. Her posture and neck feathers are much like the New Zealand bird after which she is named.

Chickpea Chickpea: the largest Americauna since the beginning, but the most picked upon. Her coloring is dark where Kakapo’s is light. She manages to hide under the others effectively.
If it’s not one thing, it’s another!
You May Also Like

Native Insects and IPM
-
Cob Oven, Part One

Levelling the firebricks Today six members of the San Diego Permaculture Group converged upon my property to build a cob oven. No, not with corn cobs. Cob is an ancient building method that is similar to adobe, but without the brick. Cob buildings, some of them several stories high, have stood for centuries in as diverse areas as Turkey and Wales. Building a cob outdoor baking oven is a good exercise in cob building that is useful and easy. None of the members, nor my daughter who jumped right in to help mix mud, had made a cob oven before. That was okay, because neither had I! Using as a reference the book Build Your Own Earth Oven by Kiko Denzer, and having watched several YouTube cob oven videos, we set off on our learning experience with the energy and fellowship that this newly formed group radiates.
Because of all the deconstruction on my property, building materials were at hand. I decided to set the oven on a cement platform left from a torn-down shed. That eliminated digging and filling a drainage base. My son had helped carry bags of sand down to the work area, which besides straw and wood shavings were the only items I purchased for this project. With broken concrete and cinderblocks, the group made a circular base about two and a half feet high.

The base made with cinderblock and cement chunks The height helps the back of the baker, but if the oven isn’t used all day every day, a shorter one isn’t going to be a problem. Especially for a short person like myself. Not that short, but short.
When I moved onto the property there was all this gravel and stone around. I hated it. I removed a lot, but much disappeared into the pathways. Some has resurfaced with the tilling that has been done to loosen the soil and add mulch. We gathered a lot of the stone along with some dirt and used it to fill the base.
Then we made some rough cob. There was a pile of hard clay that came from the pond excavation. In fact, the bottom of the pond, which is unlined because of the clay content, is almost pudding-like in consistancy with the silky clay. How do I know? Well, let’s say that on a hot day this last week I got to know my pond a little better.

Collecting clay samples with my feet Anyway, the clay contains really hard lumps. It will make wonderfully strong cob, but first it has to be broken down. My daughter filled a wheelbarrow with it, then we dumped it out onto a tarp and added water, expecting it to be easy to mix when wet. Wrong!

This insulation batch is made with clay, sand and wood shavings We added a lot of water and some sand, and mixed pretty well, then added some wood shavings to it for tensile strength. This was used to gap holes in the oven stand and form a base for the insulation. The insulation was made of the flat vodka bottles somebody in the history of this property obviously preferred, along with a broken necked Coke bottle that were found when the pond was excavated. Pretty cool, huh?

A treasure of old bottles 
Bottles were layed on cob for insulation Meanwhile, another wheelbarrow was filled with clay and water, and a group started using their hands to mix it and disintigrate the hard lumps if possible. This took a long time, and still there were lumps. The scene looked like the part in Moby Dick when the whalers are kneeding the blubber with their hands, only a lot less gruesome. This clay mix must be smooth for the next step, building the oven itself.

Finding the lumps in the clay On top of the bottles went a layer of sand, which was levelled as best we could. On top of that went firebricks, which were also levelled.

The firebrick was layed on sand At this point we stopped due to time. The whole process was only a little over two hours long. The wheelbarrow of prepared mud has been covered, as has the oven base. In the very near future we plan to reconvene and make the rest of the oven. After that… pizza!

Everything was even except the middle -
Crazy Pot Salad

- Mixed greens plus blossoms, herbs and tiny potatoes
Crazy Pot Salad is what my daughter calls a main dish I make because it involves many different ingredients that vary as to availability. It always turns out great, though, which is truly amazing. It is a greens salad that also has cooked items and a balance of flavors, textures and colors that make every forkful slightly different. It involves both cold and hot ingredients, all thrown into the same bowl and mixed together to create a melded warm dinner that is as healthful as it is delicious. It is even good as cold leftovers the next day.
Tonight’s salad was born of the need to eat the mixed salad greens that were overgrowing in the garden. I cut and picked various greens and started from there. To create a Crazy Pot Salad, I keep in mind these components:
Fresh Greens: the more varied the better. Fresh herbs such as dill, basil, chives and cilantro, along with arugula and a lettuce mix, work well. Don’t forget some iceberg for crunch. If you don’t have or want to use iceberg (a much maligned vegetable) then cut up fresh celery.

- A mix of colors and textures is essential
Protein: Tofu, soy chicken strips (such as Morningstar Farms), soy bacon, soy tuna, etc. Beans such as garbanzo or Northern white work well. Using a couple types of proteins are tastier and more nutritious. Cook the protein and use hot.
Starch: Pasta in small shapes, rice, or a cooked grain such as quinoa. Use the starch hot.
 is high in Omega-3.")
- Quinoa (pronounced keen-wa) is high in Omega-3.
Other additions: diced carrots, steamed tiny potatoes or potato chunks (hot), feta or cotija cheese (crumbly), marigold petals, nasturtium blossoms, squash blossoms, capers, heart of palm, mushrooms, pea pods, avocados, green beans fresh or cooked… whatever you have that you need to use. Look for colors to add. I can’t stand Bell peppers, but that is usually the go-to choice when people want to add color to anything. You can avoid the Bell pepper taste-takeover of your salad if you want with a little creativity. Stir-fry up some chopped red cabbage and throw it in with some raw carrots.
Crunch: Nuts, such as pignoli (pine), cashews, sunflower seeds or almonds. Toast them in a little olive oil or in the toaster oven to bring out their flavor.
Dressing: This salad just about makes its own dressing. I like to make Italian dressing with a packet of Lowry’s Italian dressing mix, using red wine vinegar and olive oil. Or I make the dressing as I cook, which I’ll include in the recipe. The cooked shiitake mushroom gives the olive oil a deep, savory note and adds a very interesting flavor and texture. Along with the pignoli nuts, chives and crumbled soy bacon, this makes a delicious subtle dressing that is mixed into the salad rather than adorned on the top. The hot starch, including the potatoes, will readily absorb the hot flavored olive oil.

- Shiitake mushrooms, pignoli nuts and soy bacon dressing
Remember, this is a salad of opportunity; use what you have and what you love, but keep in mind the different components, the shapes and colors of the ingredients, the texture and nutritional value. Bland foods such as the potato will balance strongly flavored ones such as arugula.

- Yum. Just: yum!
Crazy Pot SaladAuthor: Diane C. KennedyRecipe type: Main Dish SaladPrep time:Cook time:Total time:Serves: FourThis warm combination of greens and other ingredients make a balanced, delicious healthy main dish that can change with what you have available.Ingredients- One cup quinoa, prepared with vegetable broth following box directions
- Four cups (approx.) mixed fresh greens washed and torn into bite-sized pieces
- Two sprigs each fresh dill, basil, chives and cilantro, chopped
- One cup torn iceberg lettuce
- Three calendula flowers and four squash flowers, torn into small pieces (just petals)
- Eight very small potatoes
- Cotija cheese (or veggie substitute. Dairy can be optional)
- Half an 8-oz can garbanzo beans
- Two small carrots, sliced into discs
- One tomato, diced
- A tablespoon olive oil (flavored, if you have it)
- One package Morningstar Farms Chicken Strips
- For Dressing:
- Six fresh shiitake mushrooms
- Four strips Morningstar Farms soy Bacon Strips
- Three tablespoons pignoli nuts
- ⅛th cup olive oil
Instructions- Prepare quinoa in medium saucepan using vegetable broth, according to the instructions on the box.
- Steam small potatos until tender
- Meanwhile, wash, dry and tear up fresh greens, herbs, iceberg and flowers. Put in large bowl.
- Crumble about four tablespoons Cotija cheese over greens in bowl.
- Add garbanzo beans
- Add carrot discs
- In frying pan, heat a tablespoon of olive oil and stir-fry the soy chicken strips until browned (if you have flavored olive oil, such as citrus or basil, use that to cook these).
- Add hot soy chicken strips to bowl.
- In same frying pan, heat ⅛th cup olive oil on medium high.
- Chop shiitake mushrooms and add to frying pan.
- Cook mushrooms on medium-high heat until they are almost crunchy.
- Add soy bacon strips and pignoli nuts.
- Stir nuts until they are browned (watch so they don't burn).
- Flip bacon and remove when browned.
- Pour contents of pan on mixture in bowl.
- Crumble bacon strips and add to bowl.
- Add steamed potatoes, quartered to bowl.
- Add quinoa to bowl.
- Toss contents of bowl until well mixed. Heavy ingredients will sink to the bottom, so be sure to mix well.
- Plate the salad and garnish with chopped tomatos and more cheese, if using.
-
Answers

Drinking the Small Pond Down I really haven’t been avoiding blogging. I’ve tried to do it, but I’ve just been exhausted in the evening, which is my usual writing time, and haven’t stayed awake long enough to finish writing. Obviously we’ve made it back to Fallbrook, pulling in about 9 pm on Saturday. Many things happened during my five days gone. As I am about to frost a Buttermilk Chocolate Ganache Cake (see recipes!) (I occasionally sell baked goods) that will be picked up at 7 am tomorrow, I’ll provide answers to the questions I posed before leaving on my Oregon Or Bust sojourn.

A Full Pond! Yes, the pond was filled! Gloriously full, and with a boat blowing from shore to shore in the breeze! The boat is on loan from Aquascape, who uses it in their work, but put out to float just to show off the pond for my return. Water plants are being transplanted and seeded around the ‘wicking’ areas, and the streambed area for rain is being sculpted. I’m not the only one who enjoys the pond!

If he thinks he can sleep on the couch after this....! The palm trunks are being made into a bridge, which isn’t quite finished yet.

Bridge to Be The cement stairs now have posts for a walk-through arbor.

Gateway to the Garden The gnawed-upon palm stairs are even more gnawed-upon, but there are piles of bunny poo left where the culprits spent plenty of time wearing down their ever-growing teeth! The Bitter Apple didn’t seem to make a difference when I sprayed it on the steps. I’ll need to try garlic next.

Bunny Poo As for my veggie garden, the pumpkin and watermelon have grown at least two feet in a week, and the pickling cucumbers have outgrown the two lengths of support twine that I put up above their heads just before leaving!

Vigorous Cukes I’ve added more and guided them up. All the plants not only survived, but they thrived. I so cannot wait for the taste of my own first of the season tomato!

Happy Vines I still have a question, though. Why is it that a roadside stand in Oregon sells avocados for .35 cents apiece, when back home – in the Avocado Capital of the US – they sell for $1.45 apiece in the grocery store? And they aren’t very nice, either! You can’t grow avos in Oregon, or at least in that wet and cold part of it.
Not all the irrigation has been buried, but a good deal has. The sunflower will not raise it’s head again. The pond is slightly green, but picturesque and natural-looking; I don’t want an unnaturally clear pond. So all in all, a great week!

The First Zucchini... uh-oh! 
A Hidden Broccoli Head - Gardening adventures, Permaculture and Edible Forest Gardening Adventures, Photos, Vegetables, Vegetarian
“Who’s That Chewing on MY Step?” or, Garden Update June 1

Hidden Treasure Many of the steps that were created out of the Washingtonia palm trees are doing just fine. However, there are some that were squared off with a chainsaw and their whiteness and neatness really stood out on the hillside. They stood out a little too well, apparently, because something is gnawing away at them!

Chew Marks It can be either rats or bunnies, and I’ve only found bunny scat in the straw. In defense of my nice stairs, I’ve sprayed them with Bitter Apple, which is a product used to spray on doctored pets to keep them from licking or chewing on bandages.

Heart of Palm I spread the straw over the steps again. I’ll see tomorrow what has happened.

Cherries! Other finds around the garden are my first (and probably only) two cherries! Cherries are not known to grow in our Zone 10 climate; however, there are a few hybrids that are supposed to be ‘low chill’. Cherries are one of my favorite fruits, so I’m thrilled that this tree is giving it a go.

Magnolia The magnolia trees are blooming, and a transplanted Blue Girl rose is much happier in the Blue Garden, which is also the Bee Garden.

Blue Girl A vegetable garden is a stern taskmaster. After all that waiting at the beginning of the year, plants are flourishing. This is the best garden I’ve ever had. After all that work building raised beds, lining them with aviary wire and filling them with good soil, it had better be good!

Last Two Beds I have two more raised beds to level, line and fill. I have more pumpkin seedlings up and I need the beds ready to plant. I can’t believe it is June first already.
Today I put up strings for the pickling cucumbers and the pinto beans to climb on. Those two beds, which are the newest and which have the least amended soil, are still doing very well.

Strung Up I also staked the three yellow tomato plants, and three ‘soup bean’ plants, as well as planting more of those beans by more stakes.

Bean and Tomato Stakes I had no idea that fava beans grew up! I mean, the beans don’t dangle like other beans do, but grow straight up, like huge fat caterpillars. Crazy! I also read where the young leaves are tasty so I tried one… then I ate several. They are much more flavorful than pea shoots.

Fava Beans Scarlet runner beans grow down, but are slightly fuzzy, which is a little creepy. They can be eaten young, or let dry on the vine.

Runner Beans are Fuzzy I planted a white and yellow sweet corn, now that the popcorn is well up. I’ll wait a month to plant the full yellow sweet corn, not only to stagger harvests but because corn will cross-pollinate. Meanwhile, I have my trusted rubber snake watching the bed.

Corn snake This package contains carrots of various colors, so I planted some just for fun. I’ve heard that some of the darker colored carrots aren’t that sweet, but I want proof.

Crazy Carrots When spacing seeds for corn or other plants which need room, use your trowel as a guide. It is about a foot long, and corn needs to be a foot by two feet apart. Plant corn in blocks so that they can pollinate better; the pollen will drift off the tassels onto the silk of the neighboring corn.

Trowel Ruler I also planted cinnamon basil, which has the most wonderful aroma. You can use it in cooking, especially for sweets, but I just let it go to bloom, then cut some and set them in water in the house for the perfume.

Cinnamon Basil This bed contains garlic, shallots, bush beans, tomatoes and basil, all of which are contending for sunlight. The bed receives sun all day and the rows are planted south to north, so the plants won’t shade each other for any length of time.

Full Bed The sunflower that was pouting last week has trouble staying awake this week. Her heavy head just can’t be lifted. Lesser goldfinches love to eat the leaves, leaving them skeletonized.

Heavy Head Of course, the best thing that is growing in my garden is this volunteer melon, which appeared under the peas I just cut out, and now that it has found the light, so to speak, it has grown one and a half feet long and going strong, and has a flower! But what is it? A remnant from melons I planted in the past? Seeds from the compost from melons I have eaten? There’s nothing like a mystery!

Volunteer Melon -
Well, Well, Well!

A Big Rig The battle for the water looks as if it is slowly being won. Today a 100 foot deep eight inch hole was drilled behind my pond. I feel sorry for the earth, like a big mosquito has stabbed into it’s bedrock.Fain drillers had quite a time maneurvering their truck in backwards. A portion of the fence had to be removed for the ginormous truck to back in. Then it had to move back and forth by inches to get around all the plants and rocks.

Backing through the fence 
Backing down the property Finally it was in place, and they balanced the truck with lifts so that the back end was off the ground!

Leveling the truck Raising the drill bit was very impressive. It is so tall!

So tall! As they drilled, up came slurry of water, clay, and decomposed granite.

Water and slurry They drilled 100 feet today, and and found water that is moving at about fifteen gallons per minute.

Adding bits For the drip system, I only need a mere five. However, I don’t know what may happen, if I may want to hook the house water up to the well some year or something. If I have them drill more deeply now since thieir truck is in the yard, the well might have a better rate of flow, better water, and possibly a more reliable supply.

Changing parts What I have might be just fine, and there is no guarantee that anything will improve with more drilling. I’ll make my descision over the weekend. On Tuesday they’ll drill some more if I want it, then put in a casing, gravel around the casing, cement the top, and then we can lower the pump and get well water! Cross my fingers!

Mean-looking grinding bit -
Drip

Lines layed out up the property The key to any garden is the availability of water. Today I signed a contract to have a well drilled on my property to furnish irrigation and pond water. The irrigation for the permaculture project, and for most of my other gardens, will be subterranean drip. Yep, this is expensive. However, it will pay off in long-term water bills, plant loss due to drought or the heavy salt that is found in our water (the well should pull from beneath the salt penetration), and the replacement of sprinkler heads, broken PVC pipe and connectors for which my dogs and tortoise seem to aim.

Drip lines uncoiling As the plant guilds mature and roots and loam deepen, the less water I’ll need to provide for the gardens. The system will be there for the drought months, and for future unknown circumstances.

Where future plants will be I have the luxury of having a little inheiritance to spend on having others install this garden for me. That is because I do not have the luxury of having available labor in the form of willing, available and capable family members, nor do I have the physical strength in my back or hands that I once had to do it all myself. And I want it done NOW, so that I can play with it, enjoy it, plant and replant it, watch the habitat fill with animals, and show others what a success permaculture can be so they can practice it themselves.

Irrigating the beans and vines My real thrill is in my veggie garden. As I’ve mentioned before, I’ve had a garden most of the twelve years I’ve lived here, and have been foiled by bermuda grass and gophers. I finally was able to nail together boards from an old bookshelf to make raised beds, then buy on sale some pre-made raised beds. I’ve stapled aviary wire into the bottom, leveled them, filled them with a mixture of dirt, compost and whatever else that could fill those babies up. I’ve used natural fertilizers and microbes this year to energize the soil, and ran PVC pipe to each bed with a riser and a split hose bib on each one.

Double hose bibs Finally today I finished the drip system in each bed. (Yey! Hurray! Whoopee!). I’ve used drip irrigation before in the beds, with the long black soaker hoses perforated all over so that they ooze water. They say that they can be buried, but the mud cakes onto the tubing and gums it up. Also, to connect pieces you have to ram ends onto the cut ends which I have found really hard to do. Then you have one configuration of the hose with not many options for change. Ick!

Old soaker hoses I found another kind of drip hose (at WalMart) which is 75 feet of thin plastic tubing sheathed in a permiable nylon casing.

Plastic tube inside a nylon sheath The hose is fitted with a male and a female hose end, and the whole thing rolls up. Perfect!

Flexible drip hose! What I wanted was to be able to lay out drip from each hose bib on each bed that could be rolled up without a fuss when I’m working on the bed. I also wanted individual controls in the beds so that I’m not watering a bed that isn’t planted, or I can water half a bed and not the other half, or allow more water for crops such as melons and little water to crops such as quinoa… all at the same time! Complete control! Ease of use! Water savings! Ha!
Instead of using both sides of the divided hose bib for each bed, at this time, I ran one line in each bed. I can and probably will change that later which won’t be a problem, but I wanted to get these babies going! Since my beds don’t need 75 feet of hose, I lay down the amount needed then cut the end, tying a knot in it to stop the flow of water.

Tying off the end On the next section of hose I attached a female hose end, and moved onto the next bed.

Attaching female hose ends It worked! I had to adjust two of the hose bibs that leaked, but with my trusty Phillips screwdriver all went well. I have two more raised bed frames that I bought to install, and I have hose enough for both of them left over. I still have a sprained wrist (I’m really trying not to use it much, and wear a brace, but there is just so much to do!) so digging and leveling the ground for the beds is probably not a good thing for me to do right now, and I sure have a lot of weeding to do in the front yard (left handedly!), so the beds might wait.

Quinoa doesn't want much water So I’ve conquered the gophers, and I’ve conquered the hand-watering and bad drip hose, but I am seeing bits of that darn Bermuda grass coming up in some of the beds. I swear that that stuff could come up through anything. I’ve seen it break apart asphalt, and also come out the top of a six-foot pipe. Horrible, nasty stuff. Fortunately the soil is so much better in my beds now, it is easier to root around and pull the stuff out from way down low.
Anyway, that’s my drippy story for the day. I’m immensely happy about my veggie garden, and slightly less panicky about the dry days cooking all the new plants in the permaculture garden if I’m not out there dragging hoses around with my bum wrist watering for several days. And I didn’t talk about peas once. Oops!
- Bees, Gardening adventures, Grains, Permaculture and Edible Forest Gardening Adventures, Ponds, Vegetables
What’s Happening in the Veggie Beds
“When planting seeds plant four in a row: one for the mouse, one for the crow, one to rot and one to grow.” (unknown).

Baby Baby Corn I know what you’re thinking; you’re thinking, “Oh, no! Not more about peas again!” Well, yes, a little more about peas. It was time for them to go. I grew most of them from old seed just to use it up and to set nitrogen in the soil, since they are legumes. Some plants even had powdery mildew on them, which surprised me.

Powdery mildew I had to cut the plants off at the roots instead of doing it the easy way and pulling up the whole plants.

Cutting peas at their roots Since I’d hurt my right wrist a few weeks ago and I still haven’t allowed it to heal enough, the cutting wasn’t a fun job. It was worth it, though. I left the roots with their nitrogen-fixing nodules in the ground where they would do the most good.

Peas set nitrogen in their roots Then I took all the pea vines up to the driveway, set up a chair, put on shorts and stuck my pale legs in the sun, plugged in an audiobook, and spent about an hour and a half tearing pea pods off of all the vines.

Harvesting time That night after dinner I began sorting through the pods and shelling them. I’m still not done.

Pea harvest I managed about half a big bowl of peas, which I sleepily shoved into the refrigerator before stumbling up to bed. My son was very calm in the morning when he told me about his surprise when he went for a midnight snack and spent about half an hour gathering up peas from the floor and adjacent rooms. I worked on more peas tonight. I’ve already frozen a couple of bags for our use; the rest will be frozen and used to feed the tortoises and chickens. All those pods and vines will combine with trash cans full of weeds I’ve been pulling along with kitchen trash to reconstruct my compost pile.
But there is life beyond peas. There are beans! I’ve planted several types of beans this year. Fresh green beans as well as soup beans and pinto beans. I’ve created two new raised beds and set them off from the rest of the garden. In them I’ve planted sugar baby watermelon, green melon, sugar baby pumpkin, and butternut squash.

There's a pinto bean on the rise These vines will grow out rather than over other garden beds. In the middle of the beds I’ve planted pickling cucumbers, baby corn and pinto beans. They will all grow tall above the vines writhing and twining below. ( Hmm. Note to self: stay away from vine beds at night.)
Here’s an interesting piece of trivia: most gardeners have heard about ‘the three sisters’, which are the Native American pairing of corn, beans and squash. Actually, it should be four sisters, at least for Southwest Indians. The concept of the ‘sisters’ is that they form a complete plant ‘guild’. In other words, these three planted in combination produce more food than any one planted alone. The corn provides a trellis for the beans, the beans are a legume that fix nitrogen in the soil with nodules on their roots that feed off of sugars secreted by the corn roots (all this going on beneath your feet! Yikes!), and the squash forming a cooling, weed-suppressing ground cover that also deters raccoons (notorious corn-eaters who don’t like to walk through the vines). What is missing is a plant to attract and feed the pollinators. In the Southwest Anasazi settlements it was Rocky Mountain bee plant (Cleome serrulata), which has edible parts to it and fixes iron (the Anasazi used it as a dye plant as well as food). With an edible plant guild, we feed the soil and the pollinators as well as ourselves. You can read more about this in the fantastic book on permaculture by Toby Hemenway, Gaia’s Garden. An excerpt is right here: http://patternliteracy.com/the_three_sisters_or_is_it_fou I’m trying my fourth sister as dill weed, which is an excellent bee plant because of it’s small umbellate flowers. Dill also goes well as a flavoring for corn, cucumber and squash, and usually plants that complement each other taste-wise do well planted together, such as basil and tomatoes.

Cucumber, baby corn, watermelon and squash Speaking of which, my garlic/shallot/tomato and basil bed has taken off with the warmer weather. These are slicing tomatoes; I have planted Roma and a yellow variety in other beds.
Where the peas have come out, the broccoli, carrots, parsnips, lettuces, endive and cilantro are doing well. I’ve planted some small eggplant sprouts and more carrot seed so there is a continuous supply.

Life without pea plants Organic sweet corn will go into this bed, which will provide shade for the lettuces. Corn of different varieties must not come into silk simultaneously or they will cross-pollinate. The baby corn in the other bed will mature earlier by nature and by planting times. Those little corn ears can be eaten fresh or left to harden to be used for popcorn. The whole ear can be put into a microwave, for those of you who have such a newfangled contraption (I haven’t owned a microwave, um… ever!).
We’ve had new visitors to the garden. Besides my gopher snake friend (see my post Unsticking the Snake of May 14th), who has been seen again, and a longer gopher snake, my son and I saw a king snake whipping down a gopher hole in the lower Bee Garden, and then today this fellow came through the Chicken Tractor then through the Swiss chard and onion bed, and across the property.

"So good to rest my weary head for a minute!" I’ve only seen one king snake in the yard who shows up in the height of summer to look for mice under the bird feeders. The standing water in the pond and the disturbance of the soil has attracted more of these friends, especially since my dogs are elderly and aren’t ‘making the rounds’ like they used to.

Banded kingsnake Kingsnakes are a little more tetchy than gopher snakes, and will eat other snakes including rattlesnakes. They can be striped or banded, even in the same clutch of eggs. Just like siblings with different hair colors.
Speaking of ponds, the standing water in the lower pond hasn’t receded very much, but has had an algae bloom.

Pea Soup Pond I’m going to have to have a well drilled on site, and have spoken with two well drillers and have received one bid, and am waiting for the third day for a call back. Honestly, is there so much work for some people in this economy that they can’t return phone calls or show up to appointments? During this gardening adventure of the last few months there have been several people of different occupations who just haven’t kept appointments or returned calls although they are still in business and initially shown interest. What’s up? Grrr.
The quinoa (pro: keen– wah) is doing well, and the potatoes are ready to harvest.

Quinoa rows Although I planted a whole packet of sunflower seeds throughout the property, only this blue jay-planted one in my strawberry bed came to anything. It looks like a puckered face!

"Too much lemon!" You May Also Like
Native Insects and IPM
-
Water!

Upper pond and the Nest For the last two days we’ve experienced enough rain so that my permaculture adventures could be tested. Two storms, each bringing about half an inch of rain, created enough water for the watershed to begin to flow. Roger Boddaert and his team were busy rototilling urea into the areas which hadn’t yet been planted,

Freshly tilled areas soaked up water and Jacob from Aquascape and Jose were digging trenches for the drip irrigation system. They were very glad of the rain softening up the dirt!

Trenching for Irrigation Everyone was wet. Finally the rain gathered enough strength to flow down the street, under the fence from my wonderful neighbor’s property, and down the rain channel created by Jacob.

Water running in the trenches Some trenching had to be done to divert the water around the new Nest hut.

A diverting occupation Rapidly the upper rain catchment pond filled then overflowed down the rain channel into the second lower catchment pond.

Jose and I awaiting the overflow 
First Pond Filled 
Roger and Jacob ponding The scheme is that overflow from this pond will be channeled around the lower permanent pond and away so as not to overflow the big pond and erode the weakest and lowest end of the property around it.

Overflow water from the upper pond However since we were eager to see the big pond filled, Roger cut a trench from the second rain catchment pond to the big pond.

Overflow filling the second pond Earlier I had been in and out that morning on errands, and had settled in the house with a hot cup of tea and comfortable fuzzy pants on, when I realized that I was wasting water. I have three fifty-gallon rain barrels set around the house, which fill up within minutes and then overflow. Why wasn’t I channeling that water into the big pond? So of course I exchange my slippers for outdoor shoes (at least I did that!), put on a windbreaker with a hood, and go hauling hoses around to connect to the rainbarrels. I’ve had a sprained right wrist for a couple of weeks and pulling hoses was not the best medicine. So of course I did it, with my fuzzy pants wicking up rain and mud and beginning to drag under my feet. That’s me in a nutshell. Loving every minute of it. With three hoses leading down to the pond, all that wonderful roof runoff wouldn’t go to waste.

Connecting hoses to rainbarrels 
The Big Pond already collecting rainwater The big pond had had some water in it, enough for my son and I to put in a few mosquito fish to eat all the mosquito larvae. That water had been evaporating so there wasn’t much more than a large puddle at the bottom. By the time I put the hoses leading from the rain barrels into the pond, it had already been catching a significant amount of rainwater directly. Too bad I hadn’t thought of the hoses much earlier in the storm!
The rainstorm broke up too early for me, but more rain was on the way that night.
Waking up to the sound of rain is one of the nicest experiences for me, mostly because I live in a dry climate, I expect. The rain had set in well overnight, and I could see from my bedroom window a reflection from down below which turned out to be the lower pond!

Morning view from my bedroom! For a minute I thought it had filled up, but then I realized it was about a quarter full, and was impressed and excited about how it would look when completely full of water! The watershed rain was following the trench and going through the ponds, which were still holding water and allowing it to perculate into the soil.

Second pond in the morning The planted and mulched areas, and the areas newly tilled were soaking up water so well that there wasn’t any run-off from it. Of course, the rain was steady and we didn’t have any of those crazy intense rainstorms like we get in the winter, when it feels and sounds as if an enormous endless bucket has been overturned over Fallbrook. Those will be a true test of the system. Until then, I was very fortunate to have had this great rainfall to test the system right when the two major players were on hand. It was exciting.

The Lower Pond after the rains