-
The Duck Boathouse

Mallards in the pond Our large pond has been attracting many waterbirds. We’ve seen mallards, widgeon, shovelers, snowy egrets, greater egrets, green heron, great blue heron, plus fishers such as phoebes and a kingfisher. In fact one mallard couple has become brave enough to waddle near when I feed the chickens. I throw a little scratch out, and the ducks snack on that along with the grasses. The male, who my daughter dubbed John Drake after the Secret Agent Man series main character, stands nearby and scolds me for not throwing out scratch on demand.
Since the garden plants are within their first year they haven’t grown in. I thought how great it would be to continue providing habitat by having a duck nesting box. I began to search online but the ones I saw were incredibly expensive for what amounts to just a box. You could place them on shore, but they would be within reach of predators. Or you could connect them to a pole sunk into the pond.

The front, with aquatic iris in front of the entrance. I broached Jacob with the subject and he was enthused, so he built one entirely out of scrap materials. I had a length of 4-inch PVC pipe with caps on the ends, which had come with the house. He used this as plastic pontoons for support. He tied on the side of a crib, built a little house out of a lightweight wooden crate I’d brought home that day which had transported potted plants, and dug up some of the plants already in the ponds to use as camouflage. The plants will live with their roots trailing in and helping clean the water. What came of all these recycled materials is just the cutest duck boathouse nesting box ever, I’m sure. I haven’t seen the female mallard for a few days, so she may be sitting on a nest elsewhere. I hope that a duck does enjoy the house, and if not, it is very fun to look at and is helping clean the water as it floats. What fun!

The back and sides, which will be hidden by plants as they grow. You May Also Like

Native Insects and IPM
- Gardening adventures, Heirloom Plants, Permaculture and Edible Forest Gardening Adventures, Ponds, Soil
Finishing Flagstone

The task this morning: move and place flagstone and dirt. Today I finished cleaning up the disaster that I made when I dug out my upper pond (see Reponding). There have been piles of dirt, stacks of flagstones and rocks, and mess everywhere for two months too many. The reponding project is still not a complete success as the decomposed granite mixed with clay soil allows seepage in the pond. I have to keep filling it up, but at least it is with well water, and eventually I believe it will seal.

My faithful hound growing bored waiting for me past the heirloom daffodils. I didn’t want or need the same flagstone surround that I previously had holding down and covering the pond liner. I wanted a more natural look, but yet I had all this flagstone! So I completed the walkway around the pond, adding some overhanging flagstone under which the Pacific Chorus frogs may hide. One jumped out indignantly when I moved a rock. I did a little planting, and Jacob began to plant aquatic plants now that the season is beginning and transplants are possible. I found that the pond was full of mosquito larvae, and much to my surprise and joy, tadpoles! More mosquito fish were added. They are now lolling around groaning and holding their fishy stomachs with all the larvae they have (and still have to) eat.

Moist soil and a tangle of flowers and weeds... magical. I made flagstone stairs through the overgrown embankment, for access to the bird feeders. The grass, borage, daffodils, weeds and wildflowers are so dense in there that as I was kneeling in the moist dark soil I felt as if I were in a Beatrix Potter book, or some other English garden story. It was magical and redolent of springtime.

A pathway up through an English children's story. When I finally placed or stored all the flagstone, I had great piles of dirt to contend with. Some I carried in buckets over to the side yard where I’d placed some flagstones. That got old pretty fast. I only carried them full twice, then only filled them 3/4 full for the rest of the trips. My arms are a little longer now. I really didn’t want to haul wagonfulls of dirt down to the lower property again, so I stood and thought about what I could do. Then I spotted leftover scalloped edging bricks and decided to use them and the soil to make another garden bed. Why not? I can always take it out. It sure beat hauling all that dirt out of there this afternoon!

Have extra dirt and edgers? Make a new bed! Finally I was able to plant some herbs and flowers I’d purchased for this area. Violas and violets, two of my favorites! I’ll plant seeds another day. I’m hoping all this newly moved dirt won’t wash into the pond when we have our predicted heavy rain this weekend. Maybe I’ll cover the new beds, just in case.

Violets and violas... big favs. I watered everything in, which caused mud to scum up the newly swept flagstones (grrr!), filled the bird feeders (it is Project Feederwatch count days Thurs. and Fri.), and closed the gate on this project (for now!). Once again, I shall have no trouble getting to sleep, but probably some trouble getting up in the morning!

A touch of flagstone and rock; plants will fill in. 
Finished! -
Questionable Carpentry

A carpenter's nightmare. I’ve said it many times: I can’t build. I envision what I want. I go about the deed full of instructions and positive energy. Somehow during the attempt I go haywire and what I create isn’t what I’d wanted. I am the Cakewrecks of building. Does that stop me? Noooo! Always optimistic, and without a handy carpenter, I seek to build. This time it was a couple of trellises for the two passionvines which had taken over each other, a fence, a pathway, a dead tree, a live tree and a walkway.

The vine mess. I didn’t want to cut the plants back. They were fruiting and the small one was flowering. So I spent hours untangling vines. I finally sorted out the small one. Then I began to be creative. I had all this old bamboo that I had cut from plants at my mother’s house years ago, and it really wanted me to use it. So I wired it together over the fence, going for a creative look that turned out looking more as if a couple had slipped, but no matter! Then I got the idea to put some wire along the fence, behind the vines, so they would have something on which to grasp. That took some interesting maneuvers as the wire curled and clung, as did the vines.

Up, I say, UP! The small passionvine I tied onto the wire and flipped over the bamboo, without doing much damage to the plant, and felt pretty happy about the result.

The little vine looking much happier. Then I looked at the huge, vigorous passionvine which was eating the world, and decided it would be good to make it grow over some trellises that spanned the pathway, and use old wire and wood for the project. (You should be squirming uneasily in your seats about now).

Untangling a broken dead tree from the vines. Now here again, I KNOW what I wanted. I saw it in my mind’s eye. I can do that with cooking, just envision a dish or a taste and I can recreate it. Probably because I can use measuring cups and spoons like a pro.

A crysalis of a Gulf Fritillary butterfly, which lays eggs on passionflowers. Using a measuring tape is another story. It always lies to me. Oh, and I try not to cut wood, because I screw it up so easily. Anyway, I found wood that was pretty equal, nailed on a crosspiece, made a ‘T’ with scraps for the bottom, and found some unrusted wire that would do well.

Strategically placing ladder to hold up post. To make a long story short, leaving out the wrestling with wire, using my head to hold pieces in place, hammering yet more reinforcements onto the bottoms to keep the whole thing from pulling itself down, I managed to get them up and the vines over the top. They aren’t bad looking from a distance. Just don’t get too close. And in the big windstorm that is due Friday, don’t even come onto my block! Who knows where these things will land!

The trellis looks deceptively good... from a distance. Oh, and then glowing with the success and ease of that project (just short term memory loss), I wanted to make a wire walk-through squash thingy. I bought the heavy gauge fencing wire, t-stakes, and measured and remeasured. All looked okay, although the stakes looked a little short (perhaps I should have bought the six-foot rather than four-foot?) until I began playing with the wire.

Dealing with reused wire... trying to get the bends out. As much as I dislike working with wire, I certainly end up tangling with it a lot. I had a 50-foot roll that I wanted to cut in half, so I layed it out on the ground, walking on it to keep it from viciously curling and scraping my back or imprisoning me. I wired one side onto the t-stakes, and then thought they weren’t high enough and found… what else? Old bamboo! On they went to hold the wire. Then I did the opposite side. And at this point the realization that I’d been trying to fight came to me. It did so as the wire, instead of reaching into a graceful dome, sagged so much in the middle that the structure now spelled out a capital letter M. I had bought the wrong gauge wire. It was too floppy to ever make a nice dome.

The Vine Alley. So I did what I usually do when faced with the product of my ineptitude. I took a walk and did something else for awhile. I do this often. Coming back to the M, I thought of making two very slender passageways, but that wouldn’t work. I considered tearing it all down, but I was pretty tired by then and I hadn’t screwed up the placement of the stakes, after all. So I decided to make two parallel vine walls, like a viney alley. No wonderful squash hanging down from overhead, but I’ll get over it. I planted four kinds of viney veggies, and am now getting my mind convinced that walls are what I really wanted anyway. Otherwise, between the viney alley and the wobbly passionvine trellises, this won’t be so much a garden as an amusement park! I also have another overgrown passionvine that needs to grow over a trellis, in a very visable area of the garden. Anyone know a courageous local carpenter?

Sigh. It would have been lovely with a domed top! - Animals, Bees, Gardening adventures, Other Insects, Permaculture and Edible Forest Gardening Adventures
Catching My First Bee Swarm
 Today was warm but very windy, and I was stealing some time to work on trellises I’m building for the passionflower vines (another story for another time, and definitely for the humor section). The area I was working in was close to my house. Inside an enclosure for my trashcans there stands a stack of nine extra bee supers (or boxes). Last year a swarm moved in and I’ve let them stay since they were so happy (and had so much room!). I have a hive and two empty Top Bar hives down in my specially planted Bee Garden; why should a swarm go there when it can be near trashcans? So today I’m out there trying to unroll a roll of cattle wire without losing a finger, and I hear a loud buzzing. I looked up to see bees flying in ever widening circles around the trashcan enclosure. Normally they are in and out in a straight line (a honey flow) when gathering pollen. I wondered if they were being attacked or bothered by something because in my mind it is still early in the year. Then I remembered it is March already! The hive was swarming.
Can you see the swarm? Right in the middle. Just before a new queen hatches, the old queen takes a group of bees (depending upon the size of the hive, it could be 20,000 bees) to go find a new home. First they exit the hive and find a place to rest and reconnoiter. This is when people see them hanging from trees, underhangs, trashcans, whatever. Scouts are sent out to find a good place to stay. Sometimes they will stay where they are, even if it isn’t a good idea, such as the underside of a palm frond which a swarm built comb on for a short time some years ago in my yard. This swarm mercifully gathered in a guaje tree just opposite the enclosure.

There they are. I let the wire go and realized how unprepared I was. I hadn’t completely finished preparing the bars for the top bar hives (so much to do!). My daughter and I have kept a hive for years. I really wanted that swarm, and although I’ve read about it and watched YouTube videos about it, just haven’t captured a wild swarm myself. I decided to try and get them.
First, I ran inside and rewatched a YouTube vlog on capturing a swarm, just to refresh my memory and boost my confidence. Then I ran down to the bee garden and prepared a top bar hive. I moved it to a better location, poured oil in the cups it sits in to keep out ants, and then finished preparing the bars. I’d serendipitously purchased craft sticks just yesterday ( a special stop at JoAnns), and I rubbed old wax into the grooves to make the craft sticks stick. Top bar hives have no foundation like Langstroth hives. The bees are encouraged to build their own comb, using the bit of craft stick hanging down from the bars as a guide. This is a healthier way to for bees to live when captured. Then I dropped a few drops of lemongrass oil into the hive; bees really like it and are attracted to it. I also smeared a little organic honey inside for some instant food. This sounds so smoothly done, but actually there were a dozen trips between the bee garden at the bottom of the property, the house, the shed and the swarm, all done in a crazed, frantic and nervous sort of way. A mad woman. Again I’m grateful for good neighbors.

Top bar hive, with craft sticks waxed onto the underside of a bar. I suited up in full bee gear. Many people catch swarms without protective gear, or with just a veil. When bees swarm they are the least likely to attack because they aren’t defending a hive. They are clustering around their queen, not wanting to be separated from her. However, since I now swell up dramatically when stung, I decided to take no chances.

Hi. Fortunately the bees weren’t high up. I dragged out a stepladder and found a smallish cardboard box.

Fortunately within easy reach of a stepladder. Standing on the ladder and shoving the box under the swarm, I shook the branch, knocking the bees into the box. When I thought I had most of them, I carried the box, full of crawling bees, down to the hive. I wish I could have taken a photo, but with the thousands of bees in the box I didn’t want to go get the camera and fumble with it with my gloves; I didn’t want to hurt any of the girls and they needed to be relocated before they took flight. I shook the box into the open top of the hive, and then put the top bar lid on. There were still bees back on the tree. I didn’t see the queen, and I really needed to make sure I got her. I shook in the rest of the bees and then carried them back down to the bee garden.

I shook the cardboard box of bees onto the ramp. I didn’t want to open the hive again, so I propped a board up to the entrance holes, then shook the box of bees out onto the ramp. Bees will climb, and climb they did. I used a bee brush to carefully collect bees that had clung to the outsides of the hive, and dumped them on the ramp, too. There was quite a traffic jam for awhile.

Traffic jam of bees climbing up the ramp into the opening. Eventually all the bees were in. I removed the ramp and cleaned up… not a sting. Actually, once I first climbed the stepladder I felt and heard the lack of anger in the swarm. They weren’t making a high-pitched angry buzzing noise. Tradition has it that you should talk to your bees; make sure to tell them about any change in the household. So I talked to them as I transported them down to what would hopefully be their new home. Just before dark I rapped once on the side of the hive and all 10- or 20-thousand of them hummed at me. If I got the queen and they are happy, then they will stay. Otherwise they’ll swarm again. No bees were harmed, and the few left up by the tree wondering where the old queen went were close enough to the old hive to go back, and make their allegiance to the new queen.

Almost all in. 
The girls are spraying pheromones to mark their location. I came inside feeling good about gently relocating them, and had some dark chocolate to settle my nerves! Then I went on to wrangle with the wire and the trellises, which was far more trouble than moving a swarm of bees.
You May Also Like
Native Insects and IPM
-
Soil: Weeding by Sheet Mulching

Sow thistle For this next part of how to build soil by weeding, I’ll discuss one of the easiest and laziest ways. If you want nothing to grow in an area, and don’t care about how it looks or length of time, then sheet mulching may be for you. I’ve used cardboard and newspapers around my vegetable beds with great success. To fully knock out tough weeds such as Bermuda grass, you should put down a good inch of newspaper or cardboard (or a combination). If you are using newspaper, leave the sections intact or else the wind will blow it everywhere, or cover it with a piece of cardboard. Water it in and let it rot.
If you have old plywood lying around, drag it over to your weed patch and pop it on top. Walk over it all you want, just watch out for old nails.

Sheet mulching with plywood... at work! Another method is to water your weeds, then cover them with thick black plastic held down with rocks. On hot days the weeds will cook under the plastic. I’ve used this before successfully, but now I would only use it if I had the plastic already. I’m trying hard to not contribute to the creation of more plastic.

The area after the plywood was removed. Then there is sheet mulching where you actually build your soil over the top of weeds. The new catch-phrase for this is lasagna gardening. Start with a layer of corrugated cardboard or three layers of newspapers (or a combination!) right on top of your weeds and where you want to plant (this isn’t for clearing pathways). Water this in really well. Then gather together compost items such as coffee grounds, weeds (without seeds), grass clippings, shredded paper, seaweed or algae… whatever you can compost. Sort your compost into browns and greens. Browns are mostly dead stuff such as leaves, shredded paper, pine needles and dried plant clippings. Greens are fresh things like dinner scraps, green cut grass… anything with some life still left in it. Manure is perfect for your ‘greens’ pile. Chasing down landscapers as they rake leaves and bag up grass from their lawnmowers is a good way to collect ingredients. Now start layering. The best ratio would be two parts brown to one part green, but don’t stress over it. The green stuff will heat up and cook the browns. Depending on how much stuff you can layer, your bed should be about two feet high, and however long that you want it. Water it regularly. Within weeks your lasagna will have sunk down into fantastic garden soil. If you want to plant right away, then add several inches of compost to the top. Otherwise, let it sit a season and you’ll be able to plant right into it. The newspaper or cardboard at the bottom will help suppress weeds and keep it moist. Remember that the deeper your loam, the more rainwater it will hold and the less you’ll need to water.
What all of these methods of weeding does, is to decompose the weeds right where they are. The minerals that they hold in their leaves are distributed into the soil, and as their roots decompose they leave tunnels for worms and other soil creatures to move around in. You are keeping the soil moist and dark, which are wonderful conditions for our soil friends to flourish. I’ve left plywood down on pathways during the entire growing season, and when lifting a piece have discovered treasures such as newts and salamanders underneath, that I wouldn’t have seen otherwis. They are great bug eaters for the garden. Sheet mulch also can harbor slugs and ants, but they are easily dealt with, especially if you have chickens!
Sheet mulching is very easy, it combats even tough weeds, it builds soil, and it repurposes things you might normally put into the trash. So save all those boxes from Christmas, the contents of your paper shredder, what newspapers you didn’t use to light the fireplace, your garden waste, your kitchen waste, and whatever your neighbors want to get rid of (tell them you’re making lasagna with it!) and begin layering. You are helping your garden, helping your soil creatures, building loam, opening underground stores of minerals for usage by plants, making your fruit and vegetables rich with nutrition, lightening your impact on the dump, creating a beautiful garden, and all without backbreaking work and certainly no chemicals! Just say, “NO!” to Monsanto!
- Birding, Chickens, Gardening adventures, Houses, Living structures, Permaculture and Edible Forest Gardening Adventures
Building a Withy Bird Hide
I was going to continue my series on weeding, but I’ll pick it up next post. Yesterday we received almost an inch of rain. Whoopee! It wasn’t the damaging downpour we had a few weeks ago, either. It was steady and soaking. The temperatures dipped but not to frost (what a strange February!). This morning after I sat clutching my warm tea mug and doing some Internet research, I went outside to check out the yard and it felt like the first day of spring. Cool but not cold. Wet but not soggy. Cloudy and a little threatening but with patches of sunlight. Birds going nuts in all the bushes and trees. It reminded me of our first trip to England during Easter week five years back. There was this feeling, both there and here today of movement everywhere. The soil was stirring with awakening seeds and slumbering creatures.
I put on a knit hat and old clothes and a jacket (ever the lady!) and was all set to pull weeds from the wet ground. Instead I felt inspired to create a bird hide. So, right now you’re thinking of places where birds can hold up. Actually I already have these; they are brush piles all around the fence just for the purpose of providing shelter and escape venues for critters. A bird hide is actually a structure where bird watchers may watch and photograph birds without being seen by them. We have mallards, wigeon and egrets coming to our pond, as well as plenty of songbirds in the surrounding trees. I wanted a bird hide for us and visitors in which to sit and watch.
Since I can’t build anything (the whole measurement thing… I’ve already told you about that) I obtained prices from Quality Sheds in Menifee who built my two sheds so well. Expensive… yep, but not as much as hiring a carpenter, even if he used scraps from my old sheds. Then this morning I started browsing the Internet (trying to stay by that warm teacup as long as possible) and researched withy structures, tree branch structures, living buildings…. all fascinating. Withy is a bendable piece of willow, and sometimes other wood. I’ve always wanted to make a living thing out of willow; stick pieces in the ground, weave together the shoots and it roots and grows! I’ve seen living willow benches before.
So I figured I’d seize the day, this beautiful unofficial start of spring, and see if I could make a decent hide. There are other wonderful structures on the property build by Roger Boddaert and crew, so something natural would not only fit in and be ecologically more sound (than having a structure built), I know the wonderful feeling of being in a structure that is made of natural materials.

The spot. This spot was left untouched during the creation of the garden because somewhere in the area there had been a fairy ring, which is a ring of mushrooms growing out from a central fungus. I’ve given up hope that its still alive, and this is an ideal spot for watching birds both in the pond and in the trees behind.

A ten-foot circle. I guessed where the center was, measured roughly five feet (I stepped on the string and held it to my head… I’m 5’3″) and made a ten-foot circle. Why ten? Eight looked too small and twelve too large. I also uncovered the irrigation lines so that I could avoid breaking them (only one casualty).

These logs have to go over there. Old burnt tree stumps had been given to me by Juan, who constructed most of the garden. They’ve been happily growing fungus and providing some habitat as they’ve sat waiting for me to figure out what to do with them. Of course, I wait for the day after a heavy rain when they are good and soaked to move them, and uphill at that! Most of them were old and light enough to roll without too much effort.

This didn't work. I ended up walking it. Then there was this squat, misshapen devil. It was just oddly shaped enough to not roll, too short and heavy to move with the dolly. Finally I just walked it, bit by bit, curse by curse. I laughed like a madwoman when I put it in place. I’m really glad that I have tolerant neighbors. I often tell my chiropractor about my garden projects. He seems to really like them, and encourages me to keep on hauling flagstone, rolling logs, etc. Hmm.

Besides growing interesting fungus, a sleepy lizard was hiding in the log. Of course, right as I position it, some of the back breaks off. There was a sleepy Western fence lizard trying to keep warm.

With some interesting swearing, I tipped it onto my wonderful wagon. Just when I thought I’d moved the heaviest, the last one proved to be a monster. It wouldn’t roll. It wouldn’t wheel. I brought out my incredibly handy garden cart, tipped it up, hoisted that guy onto it and off we went! It wasn’t that easy, but I did it. I had a feeling of satisfaction and accomplishment similar to when I took Tai Kwon Do with my kids, and broke a board with my hand and one with my foot. I felt as if I could chop down walls! Anyway, making this ring felt right, and perhaps their acid decomposition will inspire another mushroom ring.

If Stonehenge caught fire. Then I scavenged for old twisty branches and willow. Although I have native willow growing in the streambed, I opted for curly willow for the sides. Not only is it more architecturally pleasing to my eye, it likes full sun and is more drought tolerant than other willows.

Cut oak trees stuck in for camoflage. Since the willows would just be whips yet, I wanted to kick-start the hide with some camouflage in the form of dead oak trees that hadn’t yet shed their leaves. I stuck them in the mud on either side of the main viewing window. They can be incorporated into the design as the willows grow, or come out easily. Everything is reversible! (I try not to build anything that isn’t).

The girls helping me plant the willow withys. I managed to find some long curly willow off of the plants that aren’t even a year old in my garden yet. I want the withys to meet overhead. The ‘windows’ will be over the stumps, except for the main window looking down to the pond. The hens came over to help plant willow by standing on the shovel and in the hole slurping valuable worms. I sure loved the company.

From the entrance. I planted all the willow, but didn’t really finish working on the upper portion before sunset. I really wanted to finish, too, and move on to weeding. Giving the project a little time will help me in finishing it, especially since I’m making it up as I go! I’m not weaving the structure like many willow structures are, but I will be shaping them so that they grow in the right way.

As it looks to ducks. A little anticlimactic, but I’m not done yet! The willow will be growing and filling out with leaves, making the roof canopy all in good time. I bet there are ducks in the pond right now not paying any attention to the hide! 🙂 Tomorrow I might look at it , recoil in horror, and pull everything out. Or not. I’ll let you know.
-
Soil: Weeding

Lesser goldfinch eating sow thistle seeds. Good soil is the basis of life as we depend upon it. Rich, loamy soil with a neutral pH is what every gardener dreams of. The smell of fresh soil is called geosmin, which is a scent released by happy soil. Good soil makes for healthy plants, which in turn grow healthy fruits and vegetables.
Soil is different than dirt. Dirt is what happens on a roadway after a lot of traffic passes over it and the oxygen is compressed out of it. Dirt is what is left when erosion is allowed to carry off topsoil. Dirt is what remains after unsustainable farming practices where chemical fertilizers are dumped onto plants year after year until nothing will grow anymore. Dirt is what most people have when they move into a new house, because to make the property level all the topsoil has been scraped off and buried. Dirt is nearly dead. But dirt is an ingredient in soil, and luckily Mother Nature is always trying to repair the soil. What we call weeds grow in dirt because these are plants on a mission to bring dirt back to life.
Plants have different jobs in nature. Some have deep tap roots to mine minerals from deep down, bring them up to their leaves which die and transfer the minerals to the surface. Some are groundcovers. Some attract insects. Some fix nitrogen in the soil. Some provide a shady canopy. Most provide mulch in the form of fallen leaves, twigs, flowers and fruit. Some provide habitat for animals, whose droppings fertilize the ground. Plants help each other in a symbiotic relationship, and permaculturalists call a set of these plants guilds.
Now look at weeds in a vacant lot and try to identify them. Wild radish? It has an enormous taproot that breaks apart hard soil, then mines deep minerals and delivers them to the topsoil in the form of leaves. It also attracts bees and other pollinating insects. As does mustard, which has a very tough root system that also breaks up hard soil and creates tunnels for worms and other soil creatures to move through. As the plants die off, so do the roots, which decay and feed the microbes and worms, whose castings turn dirt into perfect soil. Grasses hold onto the soil keeping it from eroding away, shades the soil from harsh sunshine, retains water and provides good habitat for worms as well as food for birds, depending upon what type of grass is growing. All plants have a purpose, even if they aren’t in their native environment.
However we don’t want our gardens to be like vacant lots. Usually, quite the opposite. Many people will look at their backyard full of weeds and poor soil and decide just to dump white sparkly rock all over it and stick in some unhappy cactus. These people are actually much kinder to the soil than those who start the relentless, expensive, laborious and deadly cycle of spraying chemical weed killer, dumping on chemical fertilizer, forcing plants to grow in areas not suited to them and yet never creating soil.
When you use permaculture practices in your garden, the most work is done in the first year. You plan your garden for functionality, plan plant guilds, plot out your own usages and desires, and then plant accordingly. You may plant close together, but keep in mind the needs of the adult tree. Don’t plant invasive plants unless they are properly contained. Don’t plant vines without installing support systems such as trellises first. Lay the groundwork for your garden. Don’t spray. Don’t pour lots of money into chemicals. Don’t even till unless your soil is horrible and you can’t wait to plant (and then, only till once and then never ever again!). There is a lot less physical labor to do in a first year permaculture garden than one with chemicals, and none of it involves poison!
Permaculture makes you look at everything in different ways, even things that conventionally seem bad. Instead of looking at your weeds as devil spawn, look at them with a view to what their purpose is in the garden. What are they telling you about the soil? I’ve talked about this in earlier posts, about what type of soil supports different types of weeds. For instance, nettle grows in high nitrogen areas. Now think of the weeds as a potential crop. Lambs quarters, purslane, even stinging nettle are all edible (boil the nettle briefly to dissolve the acid) and very healty for you. Dandelion wine! Or think of the medicinal values. Watch your weeds for awhile. Do birds eat the seeds? Are they covered in ladybugs? So now that you know your weeds a little better, you may think more fondly of them and perhaps allow some of them to live. Or even reserve a corner of the property for weeds to grow just for those birds, insects and your own harvesting. I’ve allowed purslane and scarlet pimpernel to grow over newly planted areas because they helped hold the soil, preserve moisture and helped prevent more nasty weeds from growing. Now you’re thinking: but what if they reseed? Well, of course they’re going to reseed unless you don’t let them live that long. Seeds are coming onto your property via air, animals and your own shoes every day. There is a horror about reseeding weeds that is all blown out of proportion. Have you ever cut all the weeds and had none come up the next year? Only if you dump Roundup or other chemicals on plants and kill them and everything around them in an annihilation of all that’s good along with all that you don’t want, do you keep anything from growing in that area. So how do you get rid of weeds? Okay, hold that thought.
How makes up good soil? Decomposed organic matter. It is actually the microbes and worms in the soil that make soil alive and healthy, and they are decomposing all that organic matter. How do you get good organic matter? Haul truckloads of horse manure from a farm? Save kitchen waste? Have a worm bin and harvet the castings every six months? Wait until trees are mature and harvest the leaves? Well, yes to all of these, but in the meanwhile, as it often is in nature, the answer is right in front of you: the weeds!
That’s right! Weeds are just compost that hasn’t happened yet. The fastest way to develop good soil when you have no other resources (or not enough resources) is to help nature along. Define your walkways (where foot traffic will compress the soil and where you don’t want anything to grow), and then when you pull weeds, toss them in your garden beds. If you weedwhip or mow, rake the cuttings into the beds. If you do this prior to the weeds setting seed, fine, but don’t lose sleep if you haven’t. You’ll grow some more weeds… great! More compost! I hand pull most of my weeds and then throw them in the guilds under the plants, root ball up. Within a few weeks they have decomposed, and all those nutrients they were holding in their leaves and roots have been delivered to the soil in the same areas. (If you have different types of soil on your property, keep the weeds near where they grew because they were busy amending that particular soil). The layer of weeds will also suppress other weeds from coming up, and will hold in moisture. Sure beats hauling weeds to a compost heap, and certainly beats having the trashman haul off plants that are holding nutrients from your garden soil!
There are exceptions to this practice. Invasive weeds such as Bermuda grass, Johnson grass, and anything that spreads via underground runners (rhyzomes) should not be handled this way. These useful plants for a vacant lot are terrors of your garden. However they can become useful. If you have a compost heap that really heats up, you can cook the weeds in it. What I do is put the weeds in an old trashcan, put the lid on it and let it sit in the heat for weeks until the weeds are cooked and completely dead. If it is Bermuda grass or Johnson grass, I also pound a stake through its heart. Then I compost it. Putting it in a trashbag works, too, but then you’d be contributing to the plastic industry in one more way and also to the landfill. I have set out trashcans with Johnson grass in it to go to the dump when I had so much that I had no place to cook it, and figured that sending organic weed material to the dump really can’t hurt.
How does one get rid of invasive weeds without spraying? Relentless hand-pulling in combination with occlusion, which is covering it with plywood, thick layers of cardboard, black plastic or whatever you have that will deprive it of what it needs to live.
This has been a long, lecturing post, and I apologize (if anyone actually has read to this point!) . I want you to look at the varied functionality of everything in the garden. If you have a problem, can you turn it into a benefit? For instance, if you have a wet clay area, why not harvest the clay from it to build a cob oven or garden feature, and let the depression become a natural pond? Or sheet mulch that area (what some people call lasagne mulching), which I won’t go into here but simply search the Internet for it and you’ll find hundreds of examples. Or plant peppermint or spearmint, or some other wetland-loving plant such as watercress… all of which are edible.
In subsequent posts I’ll talk more about different types of weeding and soil building. For now, go
-
Bamboo: A Rant

It looks innocent enough... (Note: I’ve modified this rant so that its more of a grumpy bit of advice and some whining. If you want to skip the rant altogether, just scroll to the third paragraph from the end where I’ve made some heartening observations and have posted happy photos of daffodils.)
I love the look, the feel and the beauty of bamboo. It is an amazing grass that is edible, durable and because of is fast growth rate makes a renewable building resource. There is clumping bamboo, which slowly spread out from a main clump, and which can be controlled. In my parents’ driveway, surrounded by asphalt, there was a patch of clumping bamboo which had been there for… forty year? More? It never escaped its boarder. Then there is rhizomatous bamboo, which sends out underground runners in all directions and can quickly undermine any nearby growth. Rhizomatous, or running bamboo, can be grown in containers, or you can chance it in the ground if you block it in with an underground barrier that is a good two feet deep, and six inches above ground. Even then you should watch out for escapees. Surrounding running bamboo with water is another way to keep it controlled… a bamboo island?
There is a lot of bamboo planted in my yard. A lot. The larger bamboo I anticipate harvesting after the culms are several years old and using for trellises or fencing. The smaller bamboo such as the beautiful black or variegated varieties aren’t that useful to me because of the thinness of their culms, but are very beautiful.
That is until I happened to trip over something in the pathway that reared up and back into the ground like a sea serpent. It was a black bamboo runner…unconfined invasive bamboo in my garden!

Just one of the 20 + rhizomes from one plant! 
Lark and Miss Amelia cluck over the unearthed root ball with severed rhizomes. I started tracing that runner back to the mother plant. With some excavation I found that there were about 25 such runners just below the surface, all heading in different directions, all rooting and ready to send up shoots for new plants. The runners were an even 1/2 inch to 3/4 inch thick up to their tips. I stared in horror at the hydra I’d just uncovered, and then looked around. I had five clumps of black bamboo, and one of variegated, all along a heavily planted walkway. The plants were one year old and were on the verge of completely taking over one of the main areas of my garden.

Gotta give it credit for eagerness. (Here the rant really begins, as does the whining!:) Then began the backbreaking and laborious work of tracing all the rhizomes and pulling them up, making sure to get every piece. The rhizomes were 15 – 20 feet long. They snaked under my precious heirloom roses, under young citrus trees, under boulders and palm trunks, under other vines, through gopher cages and around the delicate subterranean irrigation system. The runners had to be pulled up, and since they rooted all along their lengths, when I pulled them the soil would fling up into my eyes. The clumps were planted where it was full sun and of course, it was a warm week when I tackled the project so I had to stop in the afternoon when I was roasting. I spent Valentine’s Day, which is a ‘holiday’ I’ve always disliked anyway, sweating, crying, laboring, running into the house to wash dirt out of my eyes, cursing. My dog General had had a seizure the weekend before and still wasn’t eating; I had found out that a person very dear to me had died. The bamboo was setting me back many days worth of work. It was not a good week.

Trying to unearth a rhyzome without harming an heirloom rose, but not without scratches! The mother plants themselves were deeply rooted and had heavy root balls. I had to use boards as levers to try and hoist them from their holes; several I wasn’t able to pull out on my own and they are there waiting for me to have help. I was on my hands and knees tracing rhizomes, using a trowel to unearth the runners that went right through the root balls and around the trunks of my roses and citrus. Trying to lever up a boulder or a cut palm trunk with a board while digging and pulling on a thick rhizome was very taxing. It was dirty, frustrating and exhausting work, and merited a trip to the chiropractor, and my wrists and hands are still tingly and numb from the stress. If I hadn’t tripped on the rhizome, within six months (or less!) that entire walkway area with all of its productive food plants and heirloom roses would have been taken over. Everything would have had to be dug out, the entire area emptied (and with mature plants, I would have had to kill them or hire help to dig them out) and then the bamboo hand-traced and dug out.

Rhyzome squeezing irrigation line 
Lots of irrigation repairs to make It would have been a catastrophe. It would have ruined the garden, and would probably have convinced me to give up. I am one fifty-year-old woman trying to do all the work myself, and I really can’t hire regular help until I begin earning some kind of income again. I am an organic gardener and will not go over to the enemy and use weedkilling products.

The steadily growing pile of cut rhyzomes. I haven’t finished with the bamboo. There is another one that I haven’t started on yet, and I think there is another at the top of the property where it might begin to interfere with the neighbor’s underground cable line that leads off of the pole in my yard. The access road is littered with cut rhizomes and bunches of cut bamboo. Several clumps reel in their holes awaiting me to find help to pull them out. Meanwhile we had a heavy rain and windstorm which made the stream overflow in several places, flooded my chicken coop, and ripped the roof vent off of my new greenhouse (not under warranty, Rion says! It is broken, and I have to figure out how to keep it on). Seeds need to be planted, the ragweed laughs at me and the Bermuda grass starts coming back to life. There are trees planted in areas where they are now shaded, or won’t grow successfully, and I need to transplant them; heavy work when they are in gopher cages filled mostly with wet clay. My hayfever has started up, limiting time in the garden. So much to do. And I’m weary of wrestling with the stuff. A small house with a little garden, up against a wild area, sounds very, very good sometimes. So take warning when planting anything, or having anything planted: research it yourself and plant with an eye to the future.
")
An unearthed rhyzome, a good 15 feet long (cut datura on top) On the plus side, I’ve taken a brief vacation from the cursed bamboo and have planted flats of seeds in the greenhouse. I’ve finally planted all the bulbs and sweetpea seeds that should have been in months ago. I planted cold weather veggie seeds in my raised beds, although its the end of the season for them. I’m enjoying the daffodils that are opening up along the driveway, their happy faces turned in different directions with different attitudes… I swear they have personalities.

"Eh?" Some of the fruit trees are blooming, and my two bee hives are very active. I’m drawing up plans for my outdoor composting restroom, my outside worm bin, my new (and better placed) chicken coop, and a new composting area. Best of all, I’ve been able to renew work on a middle-grade novel that I had begun and abandoned several years ago, and I am in the polishing stages before I send it off to an agent and hope for acceptance. It is very good to be creating again.

"Did you see that?" In early March, my zumba class (http://www.wadeintofitness.com/) will be touring the garden. On the second Saturday in April the San Diego Permaculture group (and anyone who wants to!) will be touring the garden and helping to finish building the cob oven that we started last summer. On May 12th, the day before Mother’s Day, the garden will be on the Association of University Women’s garden tour. After that, I hope to have groups in by appointment, with either a fee or a suggested donation. The weeks fly by and there is so much to do. Today the birds are crazy with spring, loud with stuffing themselves with seed to be if full health for mating season. It is still February, so I still have some time before the very hectic spring and summer seasons begin.
- Animals, Bees, Birding, Chickens, Gardening adventures, Heirloom Plants, Other Insects, Permaculture and Edible Forest Gardening Adventures, Photos, Ponds, Rain Catching, Vegan, Vegetables, Vegetarian
Garden’s One Year Anniversary
Happy Anniversary! One year ago on Feb. 1, 2011, I signed a contract with landscape architect Roger Boddaert (760-728-4297) to create a permaculture garden. For twelve years I’ve had this sloping property that was covered in weeds and worthless Washingtonia palms. Not only do these 2 acres slope down to a barranca, but it was filled in due to catching all the rainwater that runs from the street and properties above. I have to give credit to friend Gary B., who brought up the subject of permaculture in a conversation the year before. I’d heard the term and thought I knew what it was about, but months later when I was researching what to do with my property I remembered him mentioning it, and looked it up. I found what I was looking for. I’ve been an organic gardener for many years, have owned chickens for their eggs, have refused to till the soil so as not to kill microbes, have worked naturally with animals and plants, have created habitat, composted, recycled, collected rainwater… and all of that was permaculture. And so much more. How can one not be attracted to the term Food Forest? Certainly not a foodie and gardener like myself.
What happened on the property starting the week of Feb. 1 for the next six months altered the land so that it is truly two acres of habitat. It is useful, it is natural, and it is beautiful. Roger’s team led by Juan built beautiful walls of urbanite, planted and hauled, worked in scorching sun and frosty mornings and made what was dreamed into reality. An integral part of the garden has been diverting the water from erosion points and into rain catchment basins and natural ponds, and that is where Aart DeVos and Jacob Hatch of Aquascape (760-917-7457) came in. They also installed the irrigation. Dan Barnes did the rough and the precise tractor work (760-731-0985) and I can’t recommend his experience and skill enough. Fain Drilling dug the well (760-522-7419) and the wonderful sheds were built by Quality Sheds of Menifee (http://www.socalsheds.com) .
Along with some volunteer help from Jacob, I am the sole caretaker of the property. I am planning the plant guilds, weeding, improving soil, moving problem plants and trees and, did I mention, weed? Oh yes, then there is weeding. On Saturday May 12th, the garden will be on the Garden Tour of the Association of University Women of Fallbrook, and hopefully many people will be inspired to go organic, to create habitat, conserve water and grow extra food for the Fallbrook Food Pantry. We’ve come a long way, baby!
The following photos are comparisons between the precise location last year at this time, and today.
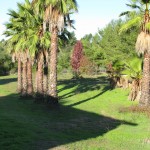
The property last February. 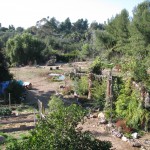
The property today. 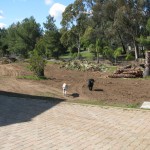
Sophie and General loved all the excitement. 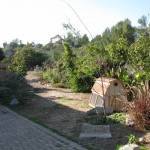
They love the new gardens and pond even more. 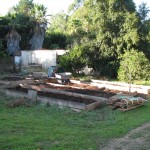
My veggie beds with the old sheds behind. 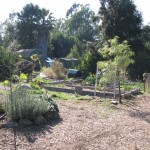
My veggie beds with the new sheds and greenhouse behind. 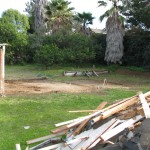
Where the big sheds were: everything usable was reused. 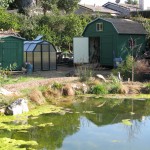
New sheds that aren’t a safety hazard, and the greenhouse. 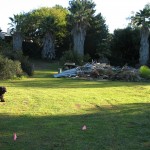
The lower area with shed debris (lots of mowing area!). 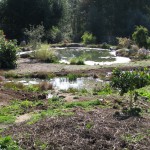
Hey, there are ponds there now! 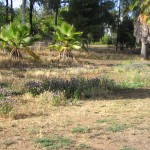
Not much for the neighbors to look at. 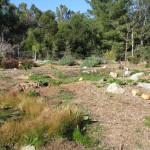
Quite a lot for the neighbors to look at! 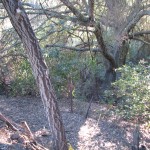
Access to the old oak was hazardous. 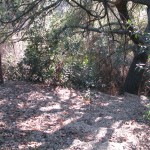
Palm stairs lead past the oak to a birding area. 
Stonefruit were old when I moved in. 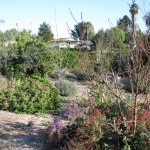
New stonefruit adorn what is now the Bee Garden. 
An erosion area sloping down to the barranca. 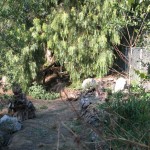
Water won’t flow through here anymore. 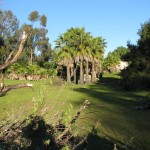
Lots of mowing and palm frond removal. 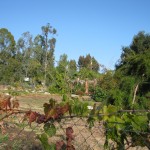
Not so anymore. 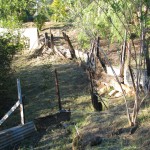
Horrible looking debris failed to hold back the embankment. 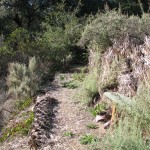
Palms were used to stabilize the new paths and camoflage the supports. 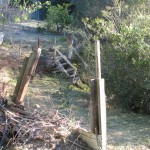
Old unstable stairs led to washout areas. 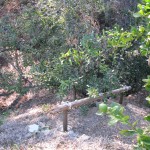
New railings, stairs and urbanite retaining walls lead to another viewing area. 
The view from my balcony. Part of the old shed remains. 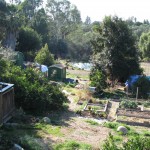
Hey, there’s a pond there! You May Also Like
Native Insects and IPM
-
What I Accomplished Today

It takes a village... to put on a roof! (Thanks, Julie, for the photo.) The roof of the greenhouse was lifted by a whole group of my friends, who all helped to try and fit it onto the base. After a good half an hour of futzing, we gave up and left it. The roof was on but wouldn’t slide into place anywhere. Today I returned to spray it with cooking oil, bathe it in soapy warm water, pour capfuls of boiling water onto it, and remeasure and re-balance the entire thing. Still no luck. I circled around it dozens of times poking and prying at the panels with the included glazing tool. Finally, I put the door on (which wasn’t easy, either), and said, “That’s it for today, folks!” Tomorrow I’ll try their customer service and see if they have any miracle solutions.
 on.")
The roof is (almost) on. Besides that, though, I hooked up my outdoor sink! Something I’ve wanted for at least ten years. I saved the kitchen sink when I had my kitchen remodeled and it has been disappearing under red apple iceplant between times I’ve had to lug it into a new storage place. Now it sits on top of an old fishtank stand, which stands on the top of an old picnic table. I bought an extremely cheap plastic shower sprayer and connected it to a garden hose and… voila! An outdoor sink! Two buckets underneath catch water. Now not only can I wash my hands, but I can rinse my veggies (especially the root veggies) outdoors and throw all that good dirty water right back into the garden. Some women want diamonds… silly them! They don’t know about outdoor sinks!

My outdoor sink! Not beautiful, but 100% recycled! Maybe I should make a little curtain for it. I also was industrious and fixed a leaky water pipe, attached handles to the doors of my two sheds,

Shiny handles. Its the small things in life that can make you happy. and planted many flower bulbs. The bulbs were purchased in a bulb frenzy, as I am wont to experience, before Christmas. They all should have been in the ground already, but I only managed some daffodils which are now coming up. All around the trees I’m planting ranunculus, daffodils, crocus, tulips (with protection!), and my favorite flower scent freesia. A productive day, even if the @#$%* greenhouse roof didn’t fit yet!