-
Stinkhorn!

What is that? There was a surprise in our garden this afternoon. We were weeding and planting a flower seed mixture around the back of the house, and suddenly my daughter excitedly shouted, “Stinkhorn!” I didn’t take offence. I was excited, too. What she was referring to was a reddish, odd-looking fungus that had emerged from the ground next to a rose bush. This fungus makes a rather unpleasant odor, which attracts flies who then carry off the spores. A pretty tricky plant. We had our first and only stinkhorn emerge last year in a different part of our yard, and I was afraid that with all the walking and weeding done in that area, that it wouldn’t be back. Silly me. The fungus was traveling!

Flies enjoying the stink and spreading the spores Then shortly after this discovery and only a few feet from it, I was digging up weeds and found what I thought was a reptile egg. We thought that maybe it was an egg from Mrs. Sabatini, the Western pond turtle that we found on our property and released into our upper pond, never to be seen again. Or perhaps a snake egg.

Not a reptile egg When I felt it, however, it was firm and had a little give to it, like it was made of soft rubber. My daughter figured it out. She had read where the stinkhorn spores grow into an egg-shaped, um, thingy, which breaks open underground revealing the slimy gooey part which then pushes up through the ground and begins stinking. The slimy part has the spores on it.

The shiny green interior will thrust out of the ground Fungus is incredible and wonderful. The threads of fungus hold together the soil, feed us, medicate us and yet we know so little about them. An incredible book to read is Mycelium Running: how mushrooms can help save the world, by Paul Stamets. Although most people wouldn’t welcome a stinkhorn into their perennial border, we think it is very cool, as long as there aren’t too many of them!
-
Midsummer Garden
When I’m in the garden everyday, I find that I forget that only seven months ago, things looked radically different. I’ll post some before and now photos below:
View to pond, before 
View to veg now 
Out to neighbors before 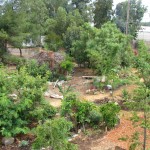
View to neighbors now 
Entryway before 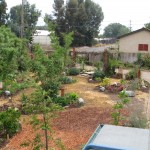
Entryway now 
Middle property before 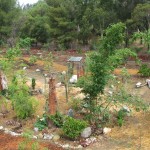
Middle property now 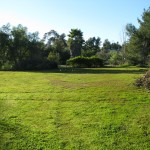
Lower yard before 
Lower yard now What a difference six months can make!
-
Pepinos

They look like white eggplants There is an unusual plant in my garden, one that I mistook for a white eggplant. Indeed, it is from the same Solanum family as eggplant, potatoes and tomatoes. The plant right now is small and has dark, shiny attractive leaves and flowers that remind you of eggplants. Then there are the egg-shaped and larger than egg-sized white fruit, which have purple striping. The plant arrived in my garden via Roger Boddaert, the landscape architect who has been working on my property, and there was no name on it. My daughter and I speculated on what the plant could be. A couple of years ago when we were traveling in Ecuador, we were usually served fruit with a sugar syrup for dessert. One of the fruits served was called a Tree Tomato. It was a local treat. It was one of the most god-awful things I’d ever put in my mouth. Thin, red bitter skin filled entirely with small hard seeds and sour pulp, it was everything we could do to eat enough of it to be polite. In our research for what this plant was, the Tree Tomato came into mind and we were apprehensive that we were now the owners of a white version of this disgusting fruit.
We were wonderfully incorrect! The plant in our yard is called pepino, or Solanum muricatum, or pepino melon, or sweet pepino, it is a South American shrubby plant with incredible sweet fruit. It is a relative of the Tree Tomato, and that only goes to show how different members of the same family tree can be! The fruit as it ripens doesn’t become particularly soft; in fact, when it wrinkles it is overripe. The fragrance of the uncut fruit is marvelous. When you open the fruit it has a small center of easily scooped small seeds, and flesh that isn’t too soft or too crunch and has a taste of a ripe melon with a hint of fresh cucumber.

A pleasant fruit with an exotic taste and fragrance The scent is intoxicating, and reminded one friend I showed it to of some elusive childhood fragrance. The perfume is even better than the fruit, but the fruit is wonderful cut up in a fruit salad. The bush itself is attractive, especially with the egg-like fruit dangling from it.

This small bush can grow up to seven feet tall Although pepinos are new to me (I’m always amazed at how many things I don’t know about, even with reading about five books a week and keeping my eyes and ears open in life), they’ve been in San Diego since the late 1800s, and are often grown in greenhouses. They’ve been eaten in the Andes, Ecuador, Peru and Chili from whence they came for so long as to appear in some artwork. If you have a spot in your yard for an unusual and highly satisfactory fruit, look for pepino. The fragrance of the fruit alone is worth it!
- Gardening adventures, Other Insects, Permaculture and Edible Forest Gardening Adventures, Rain Catching, Vegan, Vegetables
Beginning an Edible Forest Garden

Pumpkins by the chickens An edible forest garden is a mode of growing that mimicks the relationships between plants in a forest, while substituting food producing plants for humans. To achieve this, you have to examine what plants grow in forests near you. Here in San Diego County, we have chapparal communities, along with some pine and oak forests in the mountains. I cannot replicate a forest such as found in, say, Olympia, because we have completely different climates, soils, and plant interrelationships. Even for people who live in deserts, you can examine what once was there before the area was a desert, or what plants are in a nearby oasis if you have one. I’d substitute plants for more desirable ones, such as lemonade berry for its cousin poison oak. Plants should provide canopy, groundcover, mulch, nitrogen-fixing, and insect attracting. After these plant guilds mature they will provide fertilizer and moisture for themselves.
However, most of us are far away from this type of gardening, or just don’t want to go that far. Integrating your ornamentals with food plants, though, is not radical anymore and entirely practical. Any nook in your yard can be a place for food producing plants. Too many squash or tomatoes? Take them to a local food pantry.

Melons by a dead lime tree trellis 
A single Cinderella pumpkin vine under an apricot 
Zucchinis make lush bushes 
Watermelons suppressing weeds Tomatoes are a vining plant which will use any upright structure on which to climb.
")
Can you see the tomato plant? (Its up the palm trunk) Is your produce sprouting in the house? Try planting it instead of composting. Onions make particularly pretty plants with flowers that attract pollinators and hummingbirds. You may collect the seed from them as well. If the produce doesn’t survive, its okay: you’ve just buried compost.

Plant sprouting produce for ornamentals and to gather seed Sweet potatoes are perennial plants that produce swollen rhyzomes rather than swollen roots as other potatoes do. Plant them where you can dig up some of the roots but leave the main plant to thrive for years, depending on your climate. Their leaves are beautiful, and the plants are often sold as ornamentals.

Sweet potatoes have beautiful leaves Herbs in the shrubs, strawberries in the flowers, and melon and squash under the trees all make for a beautiful edible landscape that will provide food, compost, mulch and habitat while you study up for your edible forest garden.

Strawberries with yarrow 
Apple mint attracts pollinators and is good on fruit 
Passionvines are a host plant for Gulf Fritillary butterflies 
Hops are vigorous, tall vines for brewing and sleep pillows 
Grapes will hide a chain link fence - Gardening adventures, Heirloom Plants, Permaculture and Edible Forest Gardening Adventures, Vegan, Vegetables, Vegetarian
Scarlet Runner Beans, A Perennial Bean for Food and Beauty

Scarlet Runner Bean Seeds Scarlet runner beans (Phaseolus coccineus) are beautiful plants that are easy to grow, and are often grown just for their red flowers.

Use taller stakes than I did! A trellis or 8-10′ pole is necessary because the vines wind their way up high.

Eat green beans when small They produce a broad bean that can be eaten very young when green, or allowed to dry and the seeds harvested for storing and cooking later.

Shell the pods to store in a dark, cool place The seeds are a spectacular purple and black, making this whole plant ornamental. Cook the seeds before eating them.

Beautiful purple and black seeds The entire plant is also edible, including the starchy roots. The flowers and young tendrils dress up a salad. Although the vine will die down for the winter, the roots will live on in areas where they won’t receive heavy frost. They are native to many places in South America and have been harvested for hundreds of years. This is a perennial bean which will live about six years with care. It is also a nitrogen-fixer, which is excellent for your soil. How fantastic is that?
-
Zucchini
I have four vigorous zucchini plants. Why four? Because in winter with a lap full of comforter and gardening catalogs, the January eye peers back at July’s garden and the plants are smaller, the harvest never enough. What if something happens to one spindly seedling? Then there would be no zucchini, and summer without it just wouldn’t be the same. So four tiny sprouts went into the ground and four large plants are what I have. The zucchini harvest began several weeks ago. My daughter and I have happily eaten sauteed zucchini, seared zucchini, broiled zucchini and have even made sun-dried zucchini chips. It has been too hot to make Rosemary Zucchini Soup (see my recipe section). Zucchini bread uses far too little zucchini for the amount of calories it contains. The problem with zucchini recipes is that they use far too little zucchini! Zucchini has many health benefits, and is low-calorie, versitile, and is the butt of many summer-harvest jokes. I say this while considering who I know that I might unload some of the harvest upon.

Zucchini Chips ready to sun-dry on the roof We’ve both been harvesting under the enormous leaves this year’s zucchini plants have produced, and have kept up with it with few surprises. Until today.
In summer the days can run into each other with a speed that is breathtaking. We’d gone two days without checking. Then this morning after a second morning of trying to teach our old dog General the new trick of not hunting the chickens, which we were allowing out of their coop, we were on our way back to the house. It was hot already, the morning mist having burned off as if with an acetyline torch. My daughter carried strawberries in her hat and I was headed up to water stressed plants stranded without irrigation. Then I caught a glimpse of something along the edge of the raised bed. It was green. It was wedged against the corner and pressing against the edge of the wooden end. It was trying to break free. Trembling and exchanging fearsome glances with my daughter, I lifted a spiny leaf: There lay a six-pound zucchini.
This might not impress you. Perhaps you’ve recklessly gone on a summer vacation and forgot to mention to your neighbors that they should keep a cool eye on the big plant in the veg bed, and returned to find a green Moby Dick sucking up all the water in the garden. Perhaps you know already that the world’s record zucchini weighed 65 pounds. The world’s longest was 69.5 inches long, which is 6 and a half inches taller than I. Yet to find a six pounder trying to break down my much-cherished raised bed was something of a shock, especially when there was only a two-day gap between checking. This zucchini is only slightly less weight than my daughter at birth. Yet, I feel strangely deprived of maternal instincts toward it.

Big Zucchini How luxurious it is to complain about too much food. I’ll make steaks out of this big one, and perhaps donate the smaller ones to the Fallbrook Food Pantry. And begin to harvest the squash blossoms more vigorously!
-
The Importance of Leaving a Mess

Animal tunnels through a brush pile A clean yard is usually a pleasing sight. Picking up loose boards, plywood, sticks and logs keeps people from tripping, is encouraged by the fire department to reduce fuel for fires, and makes for more room to walk. Also, things live under debris and we’ve always been told to not poke our fingers into dark places (excellent advice! If a giant stuck his huge finger into our bedroom window we’d try to hurt it to make it go away, too!), and by eliminating so-called debris we reduce the chance of bites by snakes, spiders, or whatever bitey things may be living in your part of the world.
However, by reducing the debris, we also reduce habitat. Those bitey creatures need a place to live, as do the non-bitey creatures we are also displacing by removing wood. All these creatures are part of the intensely woven food web that keeps our planet populated and working. I cannot disagree about making your yard safe for children and pets, but if you have a space, make an area for habitat, too. Rope off a corner of your yard and tell your children and pets not to go into there, and leave bundles of sticks, pieces of plywood, old logs, piles of leaves, etc. in that corner. This is a home for the wild things, and your children can understand, observe and respect the fact that the world should not be made clean for them. Teach your children not to hunt and catch wild things, not to tear apart nests and destroy habitat. Observe and wonder instead.
In my yard, especially since I’ve had some sheds removed (in which racoons, wasps and possums raised families… I’m hoping to make a new place for them), I have stacks of plywood and old buidling materials which are good for recycling back into projects around my house. A junkheap, yes; a goldmine, yep. Under these stacks I have found such wonderful creatures that I didn’t even know came into my yard (perhaps they didn’t until the wood was left out).
The most exciting creature was a female Western pond turtle.

Female Western Pond Turtle In Washington, the Western pond turtles are endangered, and they are considered threatened in Oregon and are becoming rare in California and Baja California. Besides loss of habitat and an increase in pollution, one of the major factors in our native turtle’s slow demise is the release of non-native aggressive species such as the red-eared slider turtles. Red-eared sliders are America’s favorite pet turtle although they are native to the Southern United States. Due to releases they are everywhere. DO NOT RELEASE YOUR PET INTO THE WILD! As much harm has been done by and to domestic animals and wild animals by the releasing of pets as by habitat loss. A number of years ago there was a salmonella scare allegedly traced to pet turtles. The public’s response was to dump their children’s turtles in any waterway close by. Red-eared sliders have a distinctive red line by their eyes, and are named sliders because that family of semi-aquatic turtle can slide into the water quickly. They are omnivorous, aggressive, adaptable and become large. They eat anything that they can fit into their mouths, including the less aggressive smaller Western pond turtles.

Females have flat plasterons; notice her left stumpy leg. Finding a female Western pond turtle in the yard was fantastic, and I can only surmise that she had made her way up from the shallow streambed below the property to hopefully lay eggs. I haven’t found signs of a disturbed area yet where she may have layed, but am keeping the whole area protected just in case.

Long tails She is missing one front foot, probably bitten off while a youngster when something was trying to eat her. Before we knew she was a she, we thought of giving him a piratey name due to the missing foot and her semi-aquatic nature. Captain Blood was too fierce, but the author of that and other swashbuckling tales which had been made into movies is Raphael Sabatini. Now that is a terrific name. Go ahead and say it to yourself. See? So he became Raphael Sabatini until we checked her plasteron (the underside of her shell) and realized that it was flat not concave, which meant that she was a female. Males need concave plasterons so that when they are, um, amorous, they don’t fall off so easily. So she became Mrs. Sabatini. Long story… sorry. Nothing simple in my life. Anyway, we checked out Mrs. Sabatini’s health, and then released her into our small upper pond, which has an excess of mosquito fish and bugs, so that she wouldn’t be hurt with all the work that is being done down where she was found. We haven’t seen her since, so hopefully she is healthy and happy.

Good-bye Mrs. Sabatini! Under another piece of plywood I’ve found blue-tailed skinks (I couldn’t take a photo because they move too quickly), California Slender Salamanders,

California Slender Salamander gopher snakes, king snakes,

California Kingsnake and Pacific chorus frogs.
In a brush pile there are many birds hopping through, especially California towhees, Western fence lizards, alligator lizards, tree rats, mice and many other creatures.
In the ground are insects that you’d never expect. For instance while weeding one of my heirloom bulb beds I disturbed this huge caterpiller that had a horn tail.

White-lined Sphinx Moth Caterpiller The only horn tails that I’m familiar with are the tomato hornworms, but this guy was far away from my veggie patch, and instead of stripes had spots. We looked him up, and he is the caterpiller form of the White-Lined Sphinx Moth, also known as the hummingbird moth because of the way it hovers in front of night-blooming flowers to drink nectar. It is one of the important nighttime pollinators which few ever see. We put him back and left some weeds in for him.
Of course mason bees, among other pollinators, use holes in wood in which to nest. Some bumblebees nest in abandoned gopher holes, and they are the natural pollinators of many native North American plants such as blueberries (honeybees were imported from Europe with white settlers; until then native plants developed their flowers to attract and accomidate bumblebees, wasps, and hundreds of other native insects.)
All around my property there are logs and brush piles, and plywood layed down to choke out weeds in my veggie garden. Underneath there is a world of habitat. Isolated refuges for animals and insects who desperately need places to feel safe. So go ahead, throw down some mulch, some logs, a pile of sticks or some plywood. Know that you are doing the Earth a favor.
You May Also Like

Native Insects and IPM
-
Cob Oven 3

The bottom layer stayed damp This is the third installment of the cob oven building story. In our last episode, we saw permaculturalists mounding and shaping sand, then beginning to build the first insulation layer on the sand form. The lack of straw made the mixture of sand and clay a little challenging to work with (straw would burn off so it isn’t used for this layer). When my intrepid daughter and I ventured out this morning in the July heat, we found that the wet burlap and newspaper had worked well for keeping the insulation moist. The mixture still on the tarps was a little drier, and a batch that had been put into a 5 gallon black nursery container so it was easy to grab, and then forgotten, had turned into a cylindrical brick. That was good news, for it showed that the mixture was a good one.

The mud was still good on the tarps Although hot today, it wasn’t nearly as searing as yesterday. Intermittent clouds blew over and created some humidity, but sheltered us from the direct sun and the breeze stayed pleasant. I’d already baked a layer cake and a peach/apricot tart after blanching and peeling the fruit, to make sure the oven was used during the cool part of the morning. We also sliced extra fruit and put them out on cookie trays on our roof to dry (look at my post about drying fruit, if you would like to know more). I made sliced polenta with cheese and egg for breakfast, and cleaned up a mountain of dirty dishes from the cooking and baking by 10:30 am; a good start to the day.
So we began layering the 2/1 sand and clay mixture, digging it into the layer below and being careful not to press inwards on the sand dome. We used our fists as guides to measure the same width all the way around, guiding with our other hand. If you don’t like having dirty fingers, or you value your fingernails, this isn’t the hobby for you. I think ninja masters must toughen up their hands by building cob ovens. Certainly no physical therapy I might have to do for my months-old sprained wrist could equal this kind of exercise!

Slowly working up the sides While we worked we’d periodically hear chirps from a palm tree where a hooded oriole family was being fed by diligent parents. We were also watched most closely by our chickens; Emerson (who was supposed to have been a hen) practiced crowing.
Despite our drier mud, the sides liked to succumb to gravity. We used 2×4’s to press mud up from the bottom, similar to rolling out pastry dough. To make the front even, I took a mortar spatula and sliced off extra mud, then patted it even.

A bald pate The most valuable tools we used were a spray bottle of water, the pieces of 2×4’s and folding chairs. A good arguement for making the oven stands higher is to save your back when mudding!
Finally the top was attained!

Closing up the top! The next part was to use the board to smooth out all the sides and make a beautifully rounded shape. An area in the back was a little slumpy due to extra wet mud, but it wasn’t a big problem. After it was smooth, we took the board and gave the dome gentle whacks to compress the insulation.

Using a board to shape the dome After about 3 1/2 hours today, and 45 minutes yesterday, the first layer is finished. All during the process it felt as if we were creating an entity. I was trying to puzzle it out as we worked, and I think working with soil from our own property, mixing with hands and feet, and the rounded soft shape of the earthen dome all created that illusion. Also, the handle of the door that we made of cob looks like a big nose. My daughter dubbed the oven Harry Mud (and all you Star Trek Classic fans will love that name even more).
The next phase will be to mix straw with the sand and clay and create another layer over the insulation layer. That process will be in the near future, but definitely after our hands heal up from the sanding they received today. Hot and humid as it was, we had a real sense of accomplishment and pride when we finished the bones of Harry Mud.

Harry Mud -
Cob Oven Part Deux (and still not done)

Mounding sand within a template Today three members of the San Diego Permiculture Guild joined my daughter and I in another go at finishing the cob oven. We had only two hours in which to work on a warm morning which was rapidly turning into a hot day. With the base already built, we now needed to build a sand dome which would serve as the inside mold for the oven. Mixing sand with water until it clumped wasn’t as easy as it looked in the books, and it never really clumped. However, after a long effort the group did a fantastic job making a sand mound of correct dimensions.

Measuring and spraying the sand with water My daughter and I had made a template to show how high and round the sand should go, and eventually the sand dome became something of which Sir Christopher Wren himself would of been proud. It is a shame that after the cob is added the sand will be scooped out, but the hollow that is left will be perfect for the roiling flames of the fire, with no cold spots.

A beautiful mound, with a door Our choices for a door was to make one out of wood with insulation on the inside, cut one out of the cob and then create one, or make one out of cob ahead of time and build around it. My daughter and I made one the day before, and albeit topheavy one, and propped it up so cob could be built around it.

Mud door The sand dome was then covered with wet newspaper for protection from the cob.

The door looks like a big-nosed creature! Next came the insulation layer, which was two parts sand to one part clay. No straw was added because it would catch fire. The mud we used was a batch in a wheelbarrow that had been worked (all the hard pieces either discarded or squished) by the group during the first oven building session. We kept it wet and covered so that the clay would soften. This became a problem, though, because the clay was already saturated when we worked in the sand. As the sides were beginning to be built, the cob was soft enough to bulge out at the sides. Thinking quickly, the group put pieces of wood around to use as a frame while I began mixing another batch from the rest of the mud in the wheelbarrow and sand, using my feet. Others leant their feet to the project.

The cob dance This batch was wet as well, but not as wet as the first batch.

Two sand and mud mixes, the left one too wet The theory was that since the clay was in water, the heavier particles sunk to the bottom displacing the water, and so the first batch of mud from the top of the wheelbarrow held more water than the second, lower batch. This made perfect sense.
When building the insulation layer, care must be taken not to press into the sand mound. The first layer of insulation should be 3-4 inches wide. Each layer must be pressed into the one beneath so that the cob is uniform and doesn’t dry in layers. At first it is built straight up, then gradually around the curve of the dome.
With only 45 minutes to go, and the sides bulging enough to prevent any more building, we opted to take out what was already built and start in again with the drier mud mixture. This, too, needed some wooden support, but it was by far easier to use than the first batch. The wetter mud was spread out on a tarp to dry out more in the sun.
With the time coming to a close we stopped, covered the mound with wet burlap and the mud with tarps. Perhaps the next time will bring about the finale of the oven, and the long-hoped for pizza!

Covered with wet burlap until next time - Animals, Gardening adventures, Heirloom Plants, Other Insects, Permaculture and Edible Forest Gardening Adventures, Photos
Ladybugs

Insect Egg Cluster on Parsnips My daughter’s eagle eyes spotted a cluster of insect eggs on the underside of our parsnip leaves. Many moths and butterflies are laying their eggs right now, so seeing a little white pearl glued to the underside of a leaf isn’t strange.

Unknown Butterfly Egg The parsnips in question are late in the garden; they’ve been in the ground for a while and don’t like the heat so they are stressed. Just as we become sick when stressed, so do plants, and the parsnips are under attack by aphids and ants. Ants feed off of the sticky excretions of the aphids, so they have become ranchers. Ants cultivate herds of aphids on stressed plants, grooming them and collecting their, um, poo. So trying to put that image out of your head, if you see a lot of ants on a plant, expect aphids to be there also. Aphids have rasping, sucking mouthparts that they use to eat away at a plant and suck the vital juices out of it. Sorry, there is another image that you probably don’t want. How to get rid of aphids? The natural way would be to make sure your plants aren’t stressed, and allow ladybugs to flourish in your garden.
So what would you do if you saw THIS in your garden?

Ladybug Larvae Eating Aphids Run screaming? Hit it with a trowel? Wait! You shouldn’t do any of those things! These are baby ladybugs! Just as many children do not resemble the adult into which they will grow, ladybug larvae look like something that Godzilla might take on… if the larvae were the size of a house or something, which they aren’t. Okay, I’m digressing here.
Back to that cluster of eggs my daughter saw. They were hatching ladybug larvae!

Hatching Ladybug Egg Cluster I’ve never seen them that small before. Good news for the garden: rescue forces are being hatched!

Ladybug Larvae Hatching Ladybug larvae eat more aphids than the adults do (just think of teenagers and refrigerators). When they’ve grown as much as they can, they will transform in to the ladybugs that we all know and love (even though we sing a horrible song to them about leaving the garden to check on a false alarm about fire and their children. And people complain about not being able to keep ladybugs in their yards!)

Ladybug! So if you see a creepy bug on your plants, the sides of your house… anywhere… don’t squish him! It may be part of the Ladybug Larvae Special Forces out to break up the illegal ant ranches in your garden!
You May Also Like
Native Insects and IPM