-
The Inspiration
After twelve years of working full time and part time, raising two children on my own, rescuing animals, living vegetarian and as organic as I could afford, I reached a point in my life last year where everything changed. I quit my job, came to terms with living alone for the first time, and tried to find out what the last quarter of my life would embrace. Just as in nature, the answer was close by. It was my property, a watershed filled with Washingtonia palm trees (unsellable and fire hazards). Every year here in San Diego county, the rains come and all the neighborhood water funnels through my property down to a shallow stream below. Tons of water pass by my house. The rest of the year we bake and dry out, and I pay for irrigation water. In researching how to keep that precious rainwater, I discovered permaculture. Although I’d heard the term permaculture, I only vaguely knew what it meant. Have you ever discovered something that makes so much sense and makes your life so much better that you are amazed that you lived so long without discovering it? Yep, me too. That’s what happened this time. Permaculture is a wholistic means of living naturally where you no longer live in competition with nature, but as a part of it. By creating swales, rain catchment ponds and spongy rain-absorbing loam water is retained in your property. Creating plant guilds, edible forest gardens (even the term makes my foodie soul sing!), and natural greywater filtration, can all be done by everyone wherever they live without a great deal of expense. The term permaculture was coined by Australians Bill Mollison and David Holmgren in the 1970’s. It incorporates many of the practices I’ve already done in my life: organic veggies, the slow-food movement, raising chickens (for eggs and manure), beekeeping, planting bird and butterfly attracting plants, and no-till gardening. So I said to myself, “Duh!” (envision me smacking my head with my open palm). I can do this, I have the resources, and what better healthy, exciting path could I choose for myself? I asked a friend, landscape architect and activist Roger Boddaert to help me on this project, and together we’ve started down this exciting path of learning and creating. Roger is an overflowing well of information, inspiration and ideas, and envisions turning this adventure outwards to educate everyone we can about permaculture. This part of my blog is the progress on my land as we get the basics down. Thanks for walking the path with us!
-
Easy and Incredible Buttermilk Chocolate Ganache Cake with Perfect Chocolate Frosting

Spread ganache on cake layers, leaving some in the bowl for licking! A rare thunderstorm in San Diego, after days of 100+ degree heat. A few drops of rain and enough crashing to make my dogs nervous. They are happily taking advantage of my push-over self and are in the living room, while my cats are furious in the rest of the house. The cooler fallish weather and darker skies makes me want to cook!
I bake for friends, and this is one of my most requested cakes. It is easy, it is wonderful, it is satisfying: it is chocolate. I don’t like wimpy chocolate cakes; if I’m going to invest my calories in a dessert, it better pay off in flavor and texture. Making this cake a day ahead allows the flavors to meld, but it can be eaten right away in case of chocolate emergency. This recipe does use dairy products, and the acid reaction between the buttermilk and baking soda helps it rise and makes the chocolate flavor be yum. I have directions for a layer cake or sheet cake, but it makes great little bundt cakes, too. I have a humongous sheet cake pan and I quadruple the recipe with complete success. I’ve given directions for chocolate frosting, which is absolutely great, by the way, but feel free to use other colors for decorations. Although I enjoy dark chocolate, I find semi-sweet is best in the ganache, although I’ve used extra-dark baking cocoa for the batter and frosting with much success. Enjoy!
Easy and Incredible Buttermilk Chocolate Ganache Cake with Perfect Chocolate FrostingAuthor: Diane KennedyRecipe type: DessertPrep time:Cook time:Total time:Serves: 10 - 12My best and most satisfying chocolate cake recipe, without a lot of hassle!Ingredients- Buttermilk Chocolate Ganache Cake
- For Cake:
- 2 cups white sugar
- 1 ¾ cups all-purpose unbleached flour
- cups powdered unsweetened baking cocoa
- 1 ½ teaspoon baking powder
- 1 ½ teaspoon baking soda
- 1 teaspoon salt
- 2 eggs
- 1 cup buttermilk
- cup vegetable oil
- 2 teaspoons vanilla extract
- 1 cup boiling water
- For Ganache:
- cup heavy cream
- 2 tablespoons unsalted butter
- 4 ounces semi-sweet chocolate in pieces
- For Frosting:
- 1 stick (1/2 cup) butter
- ⅔ cups powdered unsweetened baking cocoa
- 2 cups powdered sugar, sifted
- ⅓ cups milk, water or buttermilk
- 1 teaspoon vanilla
Instructions- Heat oven to 350 F.
- Grease and flour 2 9-inch round baking pans, or one sheet cake pan.
- Combine dry ingredients in a large bowl.
- Add eggs, milk, oil and vanilla; beat on medium speed for 2 minutes.
- Stir in boiling water (batter will be thin).
- Pour evenly into baking pan(s).
- Bake 30 – 35 minutes, or until wooden toothpick inserted in center comes out cleanly.
- Cool ten minutes.
- For layer cake, or for the more adventurous sheet cake bakers, turn cake(s) out onto wire racks and cool completely.
- For ganache, combine heavy cream and butter in a small saucepan and bring to a simmer.
- Turn off heat.
- Add the chocolate pieces and swirl around to cover them with the hot milk mixture, and then cover for five minutes until chocolate is melted.
- Stir until smooth and creamy.
- Pour into a small bowl, cover and refrigerate until ganache is thick enough to spread.
- For frosting, melt butter and pour into bowl.
- Stir in the cocoa.
- Alternately add sifted powdered sugar and milk, beating on medium speed to spreading consistency.
- Add more milk if needed.
- Stir in vanilla.
- Makes about 2 cups.
- To finish: If making a layer cake use the ganache as filling.
- Cake may then need to be chilled to keep ganache firm before and after frosting. Ganache can also be used both as filling and as a coating for the top layer, and the frosting spread around the sides of the cake and piped decoratively around the top edge as a barrier to contain the ganache.
- If making a sheet cake, spread thickened ganache on top of cooled cake.
- Pipe frosting decoratively around edge to contain ganache and, if you’ve managed to turn the cake out of the pan, spread the frosting around the sides.
- This cake is excellent if made the day before serving, to give the flavors a chance to meld.
-
Sun-Dried Fruit

- Drying produce is easy!
When I look outside at the over 100 degree F. sunshine baking my property, I’m frustrated that I can’t use it all. I feel the same when it rains here in semi-desert San Diego county. I am hoping to purchase solar panels for my house, but until then I have my laundry on the line and fruit on the roof. Yep. The bounty of fruit and vegetables always appears during the hottest months, and I’ve spent many summers sweltering in the kitchen cooking jam and canning tomatoes. Something in my Celtic and Eastern European genes ignores the long growing season here and sends a message to my brain to preserve everything for the coming harsh winter imbedded in my genetic memory. Survival food for the blizzardy months! Um… yeah… reality check here. Although I try to eat locally grown seasonal produce, you can buy just about anything anytime of year here, although not without a decline in the quality. To give in to my desire to not waste sun energy or food this summer I’ve been slicing and drying fruit and vegetables on trays up on the roof, with excellent results.
If you have a flat sunny spot that ants haven’t found, you too can dry food. You don’t need to use preservatives. It is a great way to save bananas that are just about to go black, or the ends of the tomatoes that are too small to put on a sandwich. The most labor is in slicing the food and then later flipping it on the trays.
Sun-Dried Fruit and Vegetables
You will need:
Produce such as fresh apricots or other stonefruit, apples, pears, berries, tomatoes, squash.
Reflective cookie sheets (not Silpat)
Cheesecloth
Thinly slice produce such as apricots, tomatoes, apples, bananas, etc. You don’t have to peel stone-fruit or tomatoes; actually the skin helps hold the innards together. If you have produce with inedible skins such as melon or bananas, then by all means take it off. I like small pieces so that the dried fruit can be directly used in baking or on top of fresh fruit or cereal without having to be cut up again. (Snipping dried apricots with a scissors is soooo time-consuming). However, don’t slice them too small or when they dry they will turn into little dots which are hard to scrape up. You can leave small fruit such as blueberries and alpine strawberries whole but they may take longer to dry.

Don't chop them too small! Place the sliced or whole fruit or vegetables on cookie sheets or pizza pans that are reflective aluminum. Space the fruit so that it isn’t touching, but the pieces can be very close together (they will shrink considerably).

Measure pieces of cheesecloth so that there is enough to cover the tops of the trays and hang over the sides so that it can be pulled taught and not touch the fruit
 .
.Place prepared trays of covered fruit on the roof, on a hot porch, or anywhere it will not be invaded by ants. Leave the trays out all day until the sun is no longer on them, then bring them in for the night. Don’t leave them out in damp weather.
Using a sharp spatula, scrape up the fruit bits and turn them over, re-spacing them not to touch, and replace the cheesecloth.
The next day set the trays out again. Depending on how hot your roof is, the fruit should be dried at the end of the second day. If using whole fruit like blueberries or grapes, it may take a few days. Fruit is dried when there are no moist pockets in them.

Ta-daaa! Store the fruit in covered jars, and use during those bleak winter months when you plot your spring garden.
-
Pomegranate Paste
4 cups fresh pomegranate juice
1 tsp. fresh lime juice to taste (if juice is sweet; you are aiming for sour)
1 tsp. salt
In a heavy four-quart saucepan combine the juices and bring to a boil over high heat. Reduce the heat to medium-high add the salt, and let simmer uncovered, stirring occasionally, until thickened, about one hour. Remove pan from heat. Store in a glass jar in the refrigerator. Makes about half a cup.
This is often combined with walnuts.
-
Pomegranate Sauce
1 tbsp. oil
1 large onion, sliced
2 cloves minced garlic
4 tablespoons pomegranate molasses
1 cup vegetable stock or broth
¼ cup whole walnuts (optional)*
Dash of sugar (optional)
In a medium frying pan heat the oil over medium-high heat and add the onions. Sauté until the onions are translucent, about 8 minutes, stirring often. Lower the heat to medium-low. Add garlic, molasses, stock or broth, and walnuts and dash sugar, if using, and combine well. Simmer until at desired thickness. Season with salt and pepper to taste. Serve warm over seitan, tofu, vegetables, rice or grains, or add browned seitan or tofu to the sauce during the last thickening stage. Serves two to four.
*Whenever using nuts or spices, toast them first in a pan or in a toaster oven. Watch carefully because they can burn quickly. This brings out the flavor and adds texture.
-
Pomegranate Syrup or Molasses (or ‘reductions’):
The difference between these two is only in the cooking time; the difference between the syrup and grenadine is the addition of sugar. If you like a tarter flavor, add ½ to 1 teaspoon of lemon juice.
4 cups pomegranate juice
½ cup sugar
Combine in a 4 quart saucepan, and stir over medium heat until the sugar dissolves. Turn heat down to medium-low and cook until reduced to 11/2 cups for syrup (about two hours), or until reduced to 1 cup for molasses (about 1 hour 20 minutes). Cool completely and store in a glass jar in the refrigerator for up to six months.
Use the syrup in beverages, jelly, over fruit or ice cream; use the molasses with vegetables and tofu, in marinades and sauces.
-
Jeweled Kasha
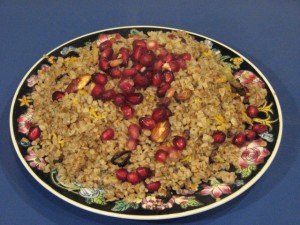
Inspired by the wonderful fruit and nut studded rice dishes of the Middle East, I came up with this and it really worked! Kasha is roasted buckwheat groats, and if you have not tried it, you really should. I find some grains hard to get through sometimes, but kasha is just plain yummy. It is also very low in fat, and high in protein. It can be made sweet for breakfast, or savory as a side dish or stuffing. In this recipe, the kasha plus the almonds and egg make it an even better protein source, and with the pomegranate seeds and seasonings, high in antioxidants and very low in fat and sodium. Can’t beat that with a stick!
2 cups water
2 tablespoons olive oil
1 cup kasha
1 egg (or egg white)
¼ cup whole almonds
½ tsp. ground cinnamon
½ tsp. fresh orange zest
Salt and pepper to taste
¼ cup water
¼ cup fresh pomegranate seeds
Boil water and oil in a medium saucepan that has a tightly fitting lid. Lightly beat egg in a bowl with a fork and stir in the kasha kernels to coat. In a separate skillet, heat egg-coated kasha over high heat, stirring constantly until the egg has dried and the kernels are more-or-less separate. Quickly stir kasha into boiling water. Cover tightly, reduce heat and simmer 7-10 minutes until kernels are tender and liquid is absorbed (water hangs out at the bottom if not done. Check with fork rather than spoon so you don’t mash the fluffy kernels). In the skillet you just used, toast the almonds over medium-high heat stirring constantly for about 3 minutes. You should just start to smell them. Add cinnamon, a pinch salt and a little freshly ground pepper and stir for one minute. Add orange zest and ¼ cup water and stir until almost dry. When kasha is done, take off heat and stir in almond mixture and pomegranate seeds. Serve immediately. Makes about 4 cups; serves 4-6.
Variations: lightly brown sliced onions and/or mushrooms and stir them in with the almond mixture.
-
Pomegranate Fizz
3 cups fresh pomegranate juice
½ cup fresh lemon juice
1 tsp. orange blossom water (available at ethnic groceries or online)
Sweetener to taste
½ cup seltzer water
(Alternatively, instead of sugar and seltzer use a mild ginger ale or a lemon-lime soda)
Combine well and serve over ice from a glass pitcher to show off the beautiful color.
Serves four.
-
Grenadine
For one cup of grenadine, bring 3 cups of pomegranate juice (see above) to a boil over medium-high heat, then simmer uncovered until reduced to one cup, about an hour, stirring and skimming the froth now and then. Cool and store in the refrigerator.
The store-bought grenadine of my childhood Shirley Temple days is mostly sugar and red dye. This recipe produces slightly sweet pomegranate juice concentrate that isn’t cloying. For Shirley Temples, fill a glass with ginger ale, add a splash of grenadine, a twist of orange or lemon, and don’t forget the cherry! For a boy’s Rob Roy, fill a glass with cola, add a splash of grenadine, add a twist of lemon and a cherry. So sophisticated!
-
What to do with Pomegranates
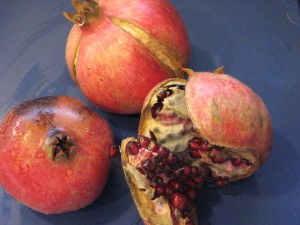
Pomegranate trees are beautifully exotic. The deciduous shrub has glossy green leaves, bell-shaped crimson flowers that hummingbirds love, and heavy handfuls of round purse-shaped fruit loaded with edible seeds. In the heat of Southern California October, pomegranates evoke colorful images of ancient Persia, the splashing of cooling fountains and the scent of roses and orange blossoms. Closer to the holidays they are joyful decorations and eloquent additions to special menus.
This partially explains why on a dry and sweltering 99 degree October day I’ve gathered pomegranates off my tree, many of them split by the heat, and am laboriously harvesting the seeds dressed in my shorts and bikini top. I know I am doing myself a favor for later.
Whether you buy or grow pomegranates, there are three basic ways to prepare them: you break them open and eat the seeds, you remove the seeds to use in recipes, or you juice them. Actually, the seeds are the little black bits inside the red flesh, and what we call seeds are called arils. To make this easier on all of us, I’ll call them seeds.
To buy pomegranates, find heavy, glossy red fruits from September through about February. Make sure they don’t have any really soft spots on them. Store them decoratively in bowls for a week or two, or in the refrigerator for longer.
To eat fresh, find yourself a stain-proof area: this is messy and the juice stains. Cut the top off the fruit, make a slit down the side and with your thumbs or with the tip of the knife, pry it apart. This should be quite easy if the fruit is ripe. Inside are sections of glossy, deep red juicy seeds encased in a bitter white cushion called pith. If you say this word around anyone with a middle-school sense of humor you will be treated to an explosion of giggles. Anyway, you eat the seeds. They are not very sweet, but they should not be overly sour, either. Whether you just consume the juicy part and spit out the inner black bit (the real seed) or not is a matter of taste; they are good for spitting contests (outside!). However that little black seed holds the most fiber, so crunching away is healthier.
To juice, you can cut the fruit in half and use a juicer, or remove the seeds as noted below, and whirl gently in a blender. For either method you need to strain the juice through cheesecloth. The problem with the juicer method is that some pith does get into it, making the juice bitter. If you are using the juicer, a hand one or one that presses the fruit rather than an electric one that whirls is better. You don’t want any of the bitter pith to be grated into it. If using a blender, liquefy quickly without causing it to foam, or it won’t strain quickly. Two cups of seeds makes about one cup of juice. Drink as is, chilled or slightly warmed, or use to make molasses, syrup, grenadine, marinades and sauces. Store in the refrigerator.
Pomegranates are acidic so avoid using aluminum and carbon steel knives or pots as they can turn the juice bitter.
To prepare the seeds for recipes, this is what you do:
Dress in old clothes.
Set a bowl of water in the sink (this isn’t like shelling peas while sitting out on the porch rocker with the bowl on your lap. You need damage control!).
Put out a container for the pith. (!) I compost it, and hopefully you can compost, too.
Put out another bowl and a sieve for the finished seed.
Set up a cutting board with a paring knife.
Make sure you have a sponge handy.
Put on a good audio book or CD. I was listening to classical selections while doing this.
On the cutting board, slice the very top off a clean pomegranate and slice down the side, just through the outer layer. With your fingers or tip of the knife, crack the fruit open.
This is important: submerge the fruit in the bowl of water! (unless you like the ‘someone was just murdered here’ look for your kitchen walls). In the water, slide your fingers under the seeds to separate them from the pith, without squishing them much (you don’t want to lose the juice). If you start daydreaming and the fruit comes out of the water, it will squirt. Use that sponge on the walls, etc. Compost or discard the pith and shell. Pick out any pith that is floating in the water. It is edible but bitter.
When finished, or when the bowl is getting full, some of the extra pith will be floating on the top, so try draining it off, or skimming it with a small sieve. Then drain the seeds into a large sieve and put them in a bowl until you have seeded all the fruit you are going to do, or are just tired from standing.
The seeds can now be used fresh in recipes, juiced, or frozen in sealed freezer baggies. One 9 oz pomegranate holds about ¾ a cup of seeds. I’ve used frozen seeds on top of fruit salads or with certain main dishes over the holidays.
I’ve let smaller, less ripe pomegranates stand on flat platters (not touching) as decorations, and they have dried well for use in arrangements.
Nutrition:
One half cup of arils (87g) has 80 calories, zero fat and 5 grams of dietary fiber (if you eat the whole aril), one gram of protein, and vitamin C, iron, and very high amounts of antioxidants.
The Pomegranate in History:
Many scholars believe that Eve’s apple in the first book of the Christian Bible was actually a pomegranate, which is the right size, shape color, and most importantly, grew in that area. The name pomegranate comes from the Latin word for apple, pomum and seeded, granatus. Indeed, the heavy red fruit with crimson arils bursting with juice against the soft white pith can be, lets say, food for thought. Ahem. No surprise then, is its symbol of fertility, new life, and most good things. Pomegranates hold strong symbolic meaning in Judaism and the Greek Orthodox Church. In Greek mythology, Persephone was tricked into eating pomegranate seeds by her kidnapper Hades, and could only then return to the world that many seasons (the number varies depending on the number of dry seasons). During the months of Persephone’s absence, her mother Demeter’s (goddess of the harvest) mourning kept anything from growing, explaining winter.
Trivia: the Spanish capitol was renamed Grenada after the fruit during the Moorish occupation.


