-
From Fallbrook, CA to Corvallis, OR
Tonight I’m sitting on a very promisingly soft bed at the Hilton Garden Inn by OSU in Corvallis, OR. This will be the last time I’ll see my daughter for several months, which is a heartache I just can’t get used to, but that’s a mother’s plight. The trip took 9 hours yesterday and 7.5 hours today. My hinder is quite angry with me.
We traveled Hwy 5 the entire way. Because of the late rains, the hills and mountains through Southern California were covered with

Velvety mountains a green velvet that accentuated their worn contours.
Up through the Angeles National Forest there were clouds touching the hills, and we could see some snow on the Tehachapi Mountains from Tejon Pass. This was big deal for San Diego residents like us. If only we knew then what we’d be driving through later! Of course the bright yellow Runaway Truck Ramp signs,

Runaway Truck Ramp made large enough one would suppose for truckers who are desperately tugging at their emergency brakes on icy, twisty mountain slopes to see with one wild glance, give drivers of small cars a wonderful feeling of adventure.

Hungry Valley Once over the Grapevine we entered the long stretch of Central California where mostly almonds and wine grapes are grown. There are many other crops as well, such as olives and rice, but these are the most evident.
- Grapes
At first we passed some oil wells,
- Oil rigs
with the monster bird-like extractors tipping up and down. Then there were miles of crops. Miles upon miles upon miles of crops. Acre upon acre upon acre of crops. It is an awe-inspiring sight.All the waterways, ponds, rivers, ditches, etc. were filled with water, which was a very good thing for these farmers desperate for water. I couldn’t help but think about how permaculture could help with the fields of nut and fruit trees and vines. The ground under the trees were almost bare dirt; I can’t give it the name soil. Having them clear allows for machinery to get through the rows to spray and harvest.
Almonds What if the trees were underplanted and not crowded? A harder time of harvesting, and not as many trees per acre. However the lessening cost of water as the soil deepened and the lack of need to purchase and apply pesticides and herbicides must balance it out. We did pass one plantation where there were lots of weeds under the trees, but whether it was organic or just not seen to yet I don’t know. It still didn’t practice permaculture.
We made it past San Francisco, just getting a glimpse of the towers of the city. I attended school at UC Berkeley back in the early 80’s and visited the City several times and have wanted to go back. Especially back to the bakeries in Chinatown where they had these incredible steamed buns filled with a green melon-flavored jelly that was – obviously – memorable. We drove until just before Mount Shasta, which we couldn’t see because of the clouds. Stopping for dinner at Black Bear Diner in Willow, we decided to go across the street to the Travelodge and make it a day. Tired, headachy and eyesore, there was no way at 7 pm that we were going to drive another seven hours that night. And, no reason to.
More on the trip tomorrow, for tomorrow morning will be an early one to begin the trip back.
-
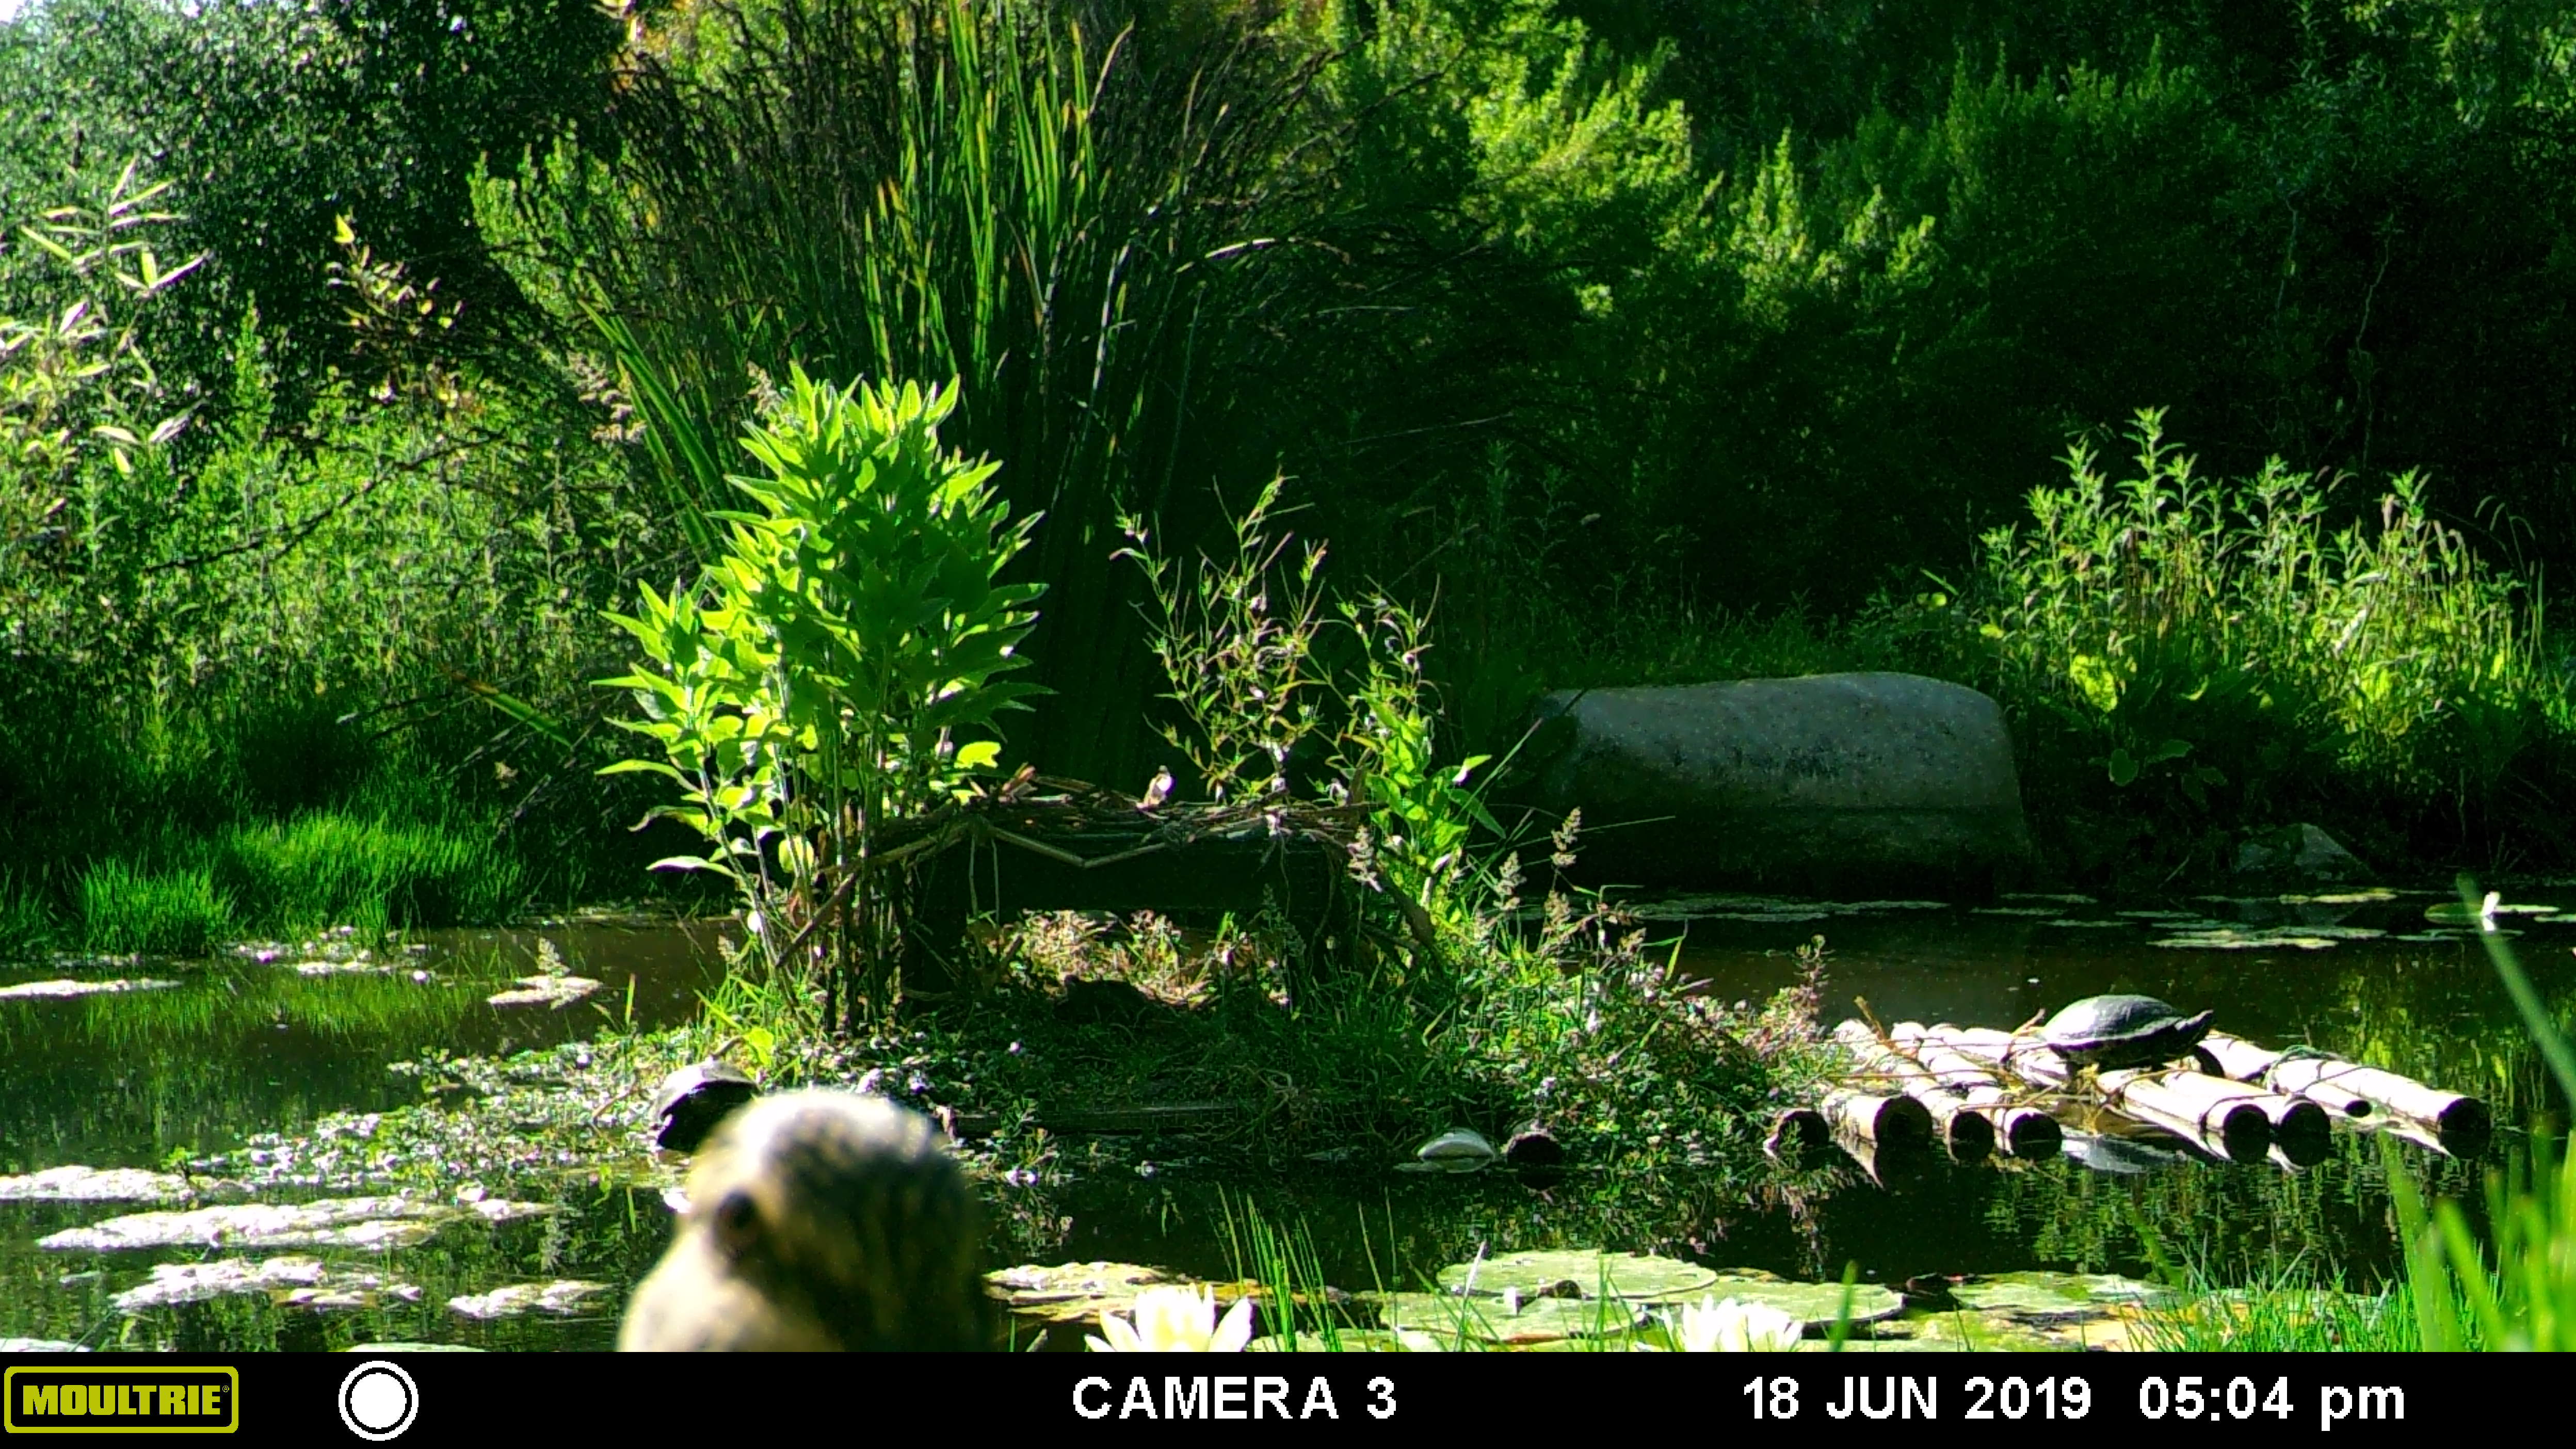
Gardens Taking Shape
The recent abundance of rain is wonderful, and I surely wish that the catchment ponds and swales were in place to capture what is running off my land. However, with the newly planted trees and tilled soil some of it is percolating down instead of flowing out. The rain has also slowed progress to some degree, and the soil is too wet for any large vehicles to drive on. Our next big issue is: water. How best to capture roof run-off, greywater, watershed, and how to keep it until its needed in the hot, dry days of summer. In the coming week we’ll be talking to many authorities on water to come to a sensible solution that fits in with the tenets of permaculture. For one thing, this rainy winter probably won’t be repeated often, and so less water will be filling the swales. However, as the loam deepens and the plants mature, less and less water will be needed until the property takes care of itself. That’s the goal, and it has been done successfully elsewhere.
Meanwhile, tomorrow morning I drive my daughter back to Oregon State University (Beavers, not Ducks!) and I’ll report from the road.
A lot of planting and shaping has been going on despite the rain, and the garden is taking shape. As I walked down yesterday evening, I had the feeling that the property was larger, because there were pathways and destinations gradually emerging. It was an interesting feeling, that I couldn’t take in the property in one glance around anymore. The destruction phase is in the past and a new life has begun to emerge. For every garden has a character – a personality. It is more than the feeling you get from being in it. It is the interaction between ponds, soil, shade, plants and all the animals and insects that call it home. All that nuance and chemical exchange that makes a habitat. With permaculture, humans fit into the puzzle, not as lords and masters but as part of the interaction. It is a wonderful feeling to enable a garden such as this, which will be organically teaming with life from soil microbes to circling raptors, and not feel as if I were intruding.
Here are some photos of the progress:

Skinned palms The palm trunks that have been left standing were painstakingly skinned to create a different effect (rather than just a beheaded palm tree!).

Arching bamboo Bamboo not only will supply building materials, but it provides upright, arching interest in the garden. Some rocks have been placed near planted areas as focal points and resting spots. All around the fruit trees and bamboo are smaller plants, which are the beginnings of the plant guilds which will become much larger and take up most of the property. The palm logs and piles of boulders are awaiting use in the rain catchment streams, ponds and swales. Our dog, General Mischief, is making sure the garden smells right, in his own special way.
Entrance-way This is the entrance-way to my front door. The geraniums climb up a chain-link fence on the left adding vivid color most of the year. There is also on the other side of the fence a pyracantha, a honeysuckle, a Double Delight rose, and a purple butterfly bush that I’m training to arch overhead. Once in a garden in Hawaii I walked through a tunnel formed by two butterfly bushes planted close together. I don’t want to remove any of the lantana that lines the right side of the path because it is such a great nectar source for butterflies, so I just have the one butterfly bush. I’m not bothered by the low branches because I’m short, but my visitors often have to duck. As it fills in I keep pruning it higher. If you see something brown by the front door, that would be my other dog, Sophie, who wants back on the couch even though the weather has cleared and it is warmer. So spoiled!

Frustrated gophers These are the holes of a frustrated gopher. My raised garden beds I constructed out of old unpainted bookshelves and lined the bottoms with aviary wire. In the top bed is Swiss chard, shallots and garlic. In the bottom bed are white and red potatoes. Sorry Charlie!Tomorrow starts early for a long car trip, so I’ll say good-night now. I’ll keep you posted! Thanks for reading. -
Chicken Tractors
To most people a chicken tractor sounds like some lame joke. Until fairly recently, I did too. However there are whole websites devoted to them. And as of this week, thanks to local carpenter Jay Tull, I am the proud owner of one!
Chicken Tractor One of the fundamental ideas of permaculture is a holistic approach to land management and food supply. Keeping animals that produce food in a compassionate, healthy and useful manner is part of the puzzle. I am a lacto-ovo vegetarian and want dairy products that are produced using humane methods. Therefore, a chicken tractor! A chicken tractor is a movable coop with an unlined bottom. The chickens root around eating bugs, digging up weeds and pooing within the safety of their lovely tractor. You throw in some straw and they mix it into the soil and poo on that, too. In a few days or a week, that square of soil has been dug up, mulched and fertilized and it’s time to move on! So you move your tractor, chickens and all, to wherever you would like them to work next. Meanwhile you collect enriched eggs that have been laid by unstressed chickens who supplement their mash with bugs and greens out in the fresh air.

Back view If you have ever eaten eggs from backyard chickens, it may take a little getting used to. That is because the flavor is so interesting and fresh. Going back to supermarket eggs is like switching from chocolate to carob: as a satisfying substitute it just doesn’t fit the bill.
Chicken tractors come in all shapes and sizes. Check out these images: http://home.centurytel.net/thecitychicken/tractors.html. I must admit that my chicken tractor turned out heavier than I’d like, but it’s beautifully made and I’m very happy with it. We’ve joked about entering it in the Christmas parade. If you’re interested in chicken tractors (or chicken arks as they are also called), read Chicken Tractor: The Permaculture Guide to Happy Hens and Healthy Soil by Andy W. Lee. The San Diego County Library system has copies. (Did you know that you can order books from any County library online and it will be shipped to your local library? Visit https://dbpcosdcsgt.co.san-diego.ca.us/search).
This tractor is large enough for maybe four or five chickens at most, which would provide more than enough eggs for me. There are hundreds of web pages that focus just on chickens, and a handy chart that lists egg-laying characteristics can be found here http://www.mypetchicken.com/chicken-breeds/breed-list.aspx, as well as other places. Many birds lay brown eggs or bluish eggs; they don’t have any difference in any respect than white eggs other than shell color, so to pay more for brown eggs at the supermarket is criminal.
Oh, and of course, if there is a chicken tractor, there must be chicks:

Two week old chicks These three ladies are two weeks old, and are from left to right a Silver Wyandotte, a Buff Orpington, and a Rhode Island Red. I want an Ameraucana (which is a hybrid of Aurucana, which lays the greenish and bluish eggs), and a Barred Rock, which is the traditional black and white chicken, but there were none to be had today as they are very popular. When some become available I’ll raise them seperately until they are mature and introduce them to these three so there is no bullying. Chickens lay eggs without a rooster, and do quite well without being harrassed and pecked at, too. My neighbors wouldn’t forgive a rooster, either. Right now my little chicks are too young for the Tractor, so they live in a Rubbermaid 50-gallon storage container with a 60-watt lamp on one side, water and mash in separate containers, newspapers and shredded bark underneath, and wire across the top because they are Chickens make wonderful pets and have a welcome spot in any permaculture system. Besides, they’re very cute.

Sleepy chick (Photo credit: Miranda Kennedy)
You May Also Like

Native Insects and IPM
-
Lemon Strawberry Jellyroll Cake

Lemon Strawberry Jellyroll Cake Have you ever made a jellyroll cake? It looks very fussy, but is extremly easy. My daughter, home from college for a week, wanted a birthday cake that wasn’t “heavy and gunky like college food”. So I made a Lemon Strawberry Jellyroll cake for her, and it was wonderful if I do say so myself! You will need a jellyroll pan, which everyone should have anyway because you can do so much with it. You can fill this basic sponge cake with whipped cream, custard, curd, or even… um… jelly or jam. You can make a chocolate version with chocolate ganache, or even with pastry cream and mixed candied fruit to follow an Italian meal. I’ve made one with whipped cream and mango. This is the basic Yule Log, too. This recipe is bright with lemon, which is saved from being too much by the fresh strawberries inside, and is very light. Yum!
Lemon Strawberry Jellyroll CakeAuthor: Diane C. KennedyRecipe type: DessertPrep time:Cook time:Total time:Serves: 8-10An easy and delicious cake that looks complex.Ingredients- For the cake:
- ½ cup all-purpose flour
- 1 teaspoon baking powder
- 4 eggs at room temperature, separated
- 1 teaspoon fresh lemon juice
- ½ teaspoon vanilla extract
- 1 teaspoon lemon zest
- ⅓ cup granulated sugar
- and ½ cup granulated sugar
- One cup lemon curd (see recipes)
- 2-3 large ripe strawberries, sliced, then halved
- Sifted powdered sugar
- Sweetened Whipped Cream, Lemon Icing (recipes follow) and Meringue Mushrooms (optional; see 'recipes' on blog)
- For Icing:
- 1 cup powdered sugar
- 1 teaspoon fresh lemon juice
- For Sweetened Whipped Cream:
- 1 cup heavy whipping cream
- 1 teaspoon granulated sugar
- ½ teaspoon vanilla
- Add meringue mushrooms to complement the 'log' if desired (see 'recipes').
Instructions- For cake:
- Line a 15x10x1-inch jellyroll pan with parchment paper (not waxed paper, it will stick), or grease and lightly flour it.
- In a small bowl stir together flour and baking powder.
- In a medium mixing bowl beat egg yolks and vanilla with an electric mixer on high speed for 3-4 minutes or until frothy.
- Gradually add the ⅓ cup granulated sugar, beating until sugar is almost dissolved.
- In another bowl beat egg whites with very clean, dry beaters on medium speed until soft peaks form.
- Gradually add the ½ cup sugar, turning up the speed and beating until stiff peaks form and stop the mixer.
- Gently fold the egg yolk mixture into the beaten egg whites.
- Sprinkle flour mixture over the batter and gently fold in until just combined.
- Spread batter evenly in prepared pan.
- Bake 375 degrees F. for 12 to 15 minutes or until cake springs back when lightly touched and is just golden brown.
- Lay a towel or piece of parchment that is larger than the cake pan on the counter and sprinkle liberally with powdered sugar.
- Quickly invert the hot cake onto the towel and peel off parchment that was on the bottom of the cake, if used.
- Roll up the towel and cake, making sure the cake doesn't touch itself, starting from the short side.
- Cool rolled cake on a wire rack. You can refrigerate the cake now for a day, slid into a plastic bag.
- When ready to fill (on the same day as being served) bring the cake back to room temperature and carefully unroll. I haven't had a lemon jellyroll that hasn't stuck a little to the towel because it's so moist. If it cracks, its okay. You can cover the cracks with icing.
- Spread with lemon curd leaving one inch around the edges.
- Arrange sliced strawberries across the cake in rows.
- Carefully re-roll cake without the towel.
- Place on serving plate.
- Spoon lemon icing along top of jellyroll cake; it will slowly drip down the sides.
- Spoon sweetened whipped cream on servings or into a frosting bag and pipe rosettes or other decorations around cake.
- Add meringue mushrooms to complement the 'log' if desired.

Baked sponge Lay a towel or piece of parchment that is larger than the cake pan on the counter and sprinkle liberally with powdered sugar.

Powder a towel Quickly invert the hot cake onto the towel and peel off parchment that was on the bottom of the cake, if used.

Peel off parchment Roll up the towel and cake, making sure the cake doesn’t touch itself, starting from the short side.

Roll it up Cool rolled cake on a wire rack. You can refrigerate the cake now for a day, slid into a plastic bag.
When ready to fill (on the same day as being served) bring the cake back to room temperature and carefully unroll. I haven’t had a lemon jellyroll that hasn’t stuck a little to the towel because it’s so moist. If it cracks, its okay. You can cover the cracks with icing. Spread with lemon curd leaving one inch around the edges. Arrange sliced strawberries across the cake in rows.

Mine cracked because I was too hasty, but cracks be hidden! Carefully re-roll cake without the towel. Place on serving plate.

Rolled cake ready for icing Spoon lemon icing along top of jellyroll cake; it will slowly drip down the sides.
Spoon whipped cream on servings or into a frosting bag and pipe rosettes or other decorations around cake.
Add meringue mushrooms to complement the ‘log’ if desired.

Yummy Slice Makes 8-10 servings.
-
Meringue Mushrooms

Stems and caps I had wanted to make these for Christmas, but didn’t get a chance. My chance came yesterday when I made my daughter’s Lemon-Strawberry Jellyroll birthday cake. What better to decorate a log than mushrooms? So here is the recipe; I’ll add the birthday cake recipes soon.
Meringue MushroomsAuthor: Diane C. KennedyRecipe type: Dessert GarnishPrep time:Cook time:Total time:Serves: ManyPiping little mushroom decorations for cakes is fun and will bring you great admiration from your family and friends! And they are so good to eat, too!Ingredients- 2 large egg whites, room temperature and with no bits of yolk in them
- ¼ teaspoon cream of tartar
- ½ cup superfine sugar (if you don't have it, you can use regular white, or blend white sugar up a bit in a blender)
Instructions- Oven to 200 degrees F., and place the two oven racks to upper and lower thirds. Line two baking sheets with parchment paper (don't use waxed paper; the 'shrooms will stick)
- Fit a large pastry bag with a number 6 (1/2 inch diameter) (1¼ cm) round plain tip.
- In a mixer bowl beat the egg whites on moderate speed until they are foamy, a minute or so.
- Up the speed a little and add the cream of tartar, beating until soft peaks form.
- Turn the speed to high and add sugar slowly.
- Beat until stiff peaks form and sugar is dissolved (you can rub a little between your fingers to make sure it isn't gritty). Reserve about an eighth of a cup of meringue for later.
- With a spatula, spoon the meringue into the pastry bag.
- Piping
- To make caps: Holding the bag upright and close to the parchment paper, pipe a round about 2 inches wide and one inch high, giving the bag a twist to separate. Make the caps as close to the same size as possible for even baking.
- Leave a good two inches between caps. Use your finger or a toothpick to smooth any points on the caps.
- To make stems: Holding the bag upright and close to the parchment paper, pipe a cone about one inch high straight up, making the base a little larger than the top. Some may fall over during baking, so leave good space between.
- Make as many stems as there are caps.
- Bake both sheets for an hour, rotating the sheets up and down, front to back about halfway through the baking time.
- The 'shrooms should be firm enough to be lifted from the sheets without sticking. Using a knife, make a little hole in the underside of the caps.
- Pipe a little of the reserved meringue into the hole, and stick in a stem, bottoms up. Return upside-down mushrooms to parchment paper, and bake for another 15 - 20 minutes until dry. (I found that some were still sticky, so I turned off the oven and let the pan sit in there for awhile to dry, like you do with traditional meringue cookies. It worked fine).
- Stand mushrooms up.
- Some might lean, some stand, some lie down... it all looks natural.
- Take about a teaspoonful of cocoa powder and very carefully shake a little over the caps.
- Using your finger or a kitchen paintbrush, smudge the cocoa just a little to make it look natural.
- Store these cute little devils in an airtight container for a week or so.
- Any exposure to moisture will make them sticky, so if using to adorn a cake put them on at the last minute.
- Makes about 25 little shroomies.

Piping To make caps: Holding the bag upright and close to the parchment paper, pipe a round about 2 inches wide and one inch high, giving the bag a twist to separate. Make the caps as close to the same size as possible for even baking. Leave a good two inches between caps (I put them too close together and the baking was uneven). Use your finger or a toothpick to smooth any points on the caps.
To make stems: Holding the bag upright and close to the parchment paper, pipe a cone about one inch high straight up, making the base a little larger than the top. Some may fall over during baking, so leave good space between. Make as many stems as there are caps.

Space them farther apart! Bake both sheets for an hour, rotating the sheets up and down, front to back about halfway through the baking time. The ‘shrooms should be firm enough to be lifted from the sheets without sticking. Using a knife, make a little hole in the underside of the caps. Pipe a little of the reserved meringue into the hole, and stick in a stem, bottoms up. Return upside-down mushrooms to parchment paper, and bake for another 15 – 20 minutes until dry. (I found that some were still sticky, so I turned off the oven and let the pan sit in there for awhile to dry, like you do with traditional meringue cookies. It worked fine).
Turn the mushrooms right-side-up. Some might lean, some stand, some lie down… it all looks natural. Take about a teaspoonful of cocoa powder and very carefully shake a little over the caps. Using your finger or a kitchen paintbrush, smudge the cocoa just a little to make it look natural. Store these cute little devils in an airtight container for a week or so. Any exposure to moisture will make them sticky, so if using to adorn a cake put them on at the last minute. Makes about 25 little shroomies.

Sift cocoa powder onto shrooms An option for putting the dried stems and caps together is to dip the end of the stem in chocolate ganache (see recipe for Buttermilk Chocolate Ganache Cake) or frosting, and using that as glue. Don’t do the additonal baking. With even a little ganache, the chocolate flavor overwhelms the meringue flavor, but that isn’t all that bad, is it?
- Birding, Gardening adventures, Heirloom Plants, Permaculture and Edible Forest Gardening Adventures, Photos
Brief Garden Updates

Palm Throne I spent the day making two birthday cakes for my two children, both of whom will be flying in from different directions tomorrow. Recipes will be the next thing I post! So for now, just a few garden updates. As you can see in the photo above, I have yet another palm throne, this one at the entrance to the garden. These are so fun. As the palms decompose, I can always plant in the seat!

Six loads of rock A total of six truckloads of rock have been delivered, and are piled in various areas on the property. At about 12 tons a load, that’s over 700 tons of rock! These will be used to surround the ponds, line the dry streambeds, and as interesting features in the natural garden.

- Garbage Can Enclosure
Jay finished the enclosure for the garbage cans, and it is pretty ritzy. Those incredible hinges are hand-made and you can see the imprint from the blacksmith’s tools on them. Jay had several sets and I had to have them. I go nuts over skilled craftsmanship, such as woodworking and metalwork. Right now there is only a latch on the outside, so it would pay not to close the door while inside. It would be a little climb and a long reach to get out again.

- Frond Fence
Along the radically improved and stabalized area above the embankment, some of the chain link and posts used to hold the soil were showing. So today lots of pond fronds (hey, we have a lot of them!) were being attached to the exposed fencing as camafloge. It looks great in that area. Also, little birds like house wrens love nipping between old palm fronds, and they’ll provide some hiding areas for the Western fence lizards, too. The stairs were made from railroad ties, and the area around them planted and then mulched with palm chips.
In the bulb beds, one of my favorite daffodils has opened today, and unfortunately I was snapping photos in the evening and the close-ups were blurry. At the bottom of the bulb photo are Hoop Petticoats, and at the top, Little Witches, which I wrote about the other day. The little center unruffled hoops are so unique; besides Rip Van Winkle (which haven’t bloomed yet) these are my favorite.Also, Double Delight rose has bloomed. It is a double delight because its coloration is gorgeous and ranges from almost pure reddish pink to almost all white with some red on large, softly ruffled blooms. It also is extremely fragrant; my daughter said that it smelled the way rose water tastes, and that is perfectly true.Meringue Mushrooms coming up soon!
-
Permaculture Update

A Pile of Rocks As promised, I have more photos for you. Roger and his team have worked with all stops out for this last month and a half. Lots of heavy labor, skilled work and planning has been done. One of the big decisions that needs to be made next is about water. Besides digging a couple of unlined rain catchment ponds, which will perculate run-off into the soil and be dry most of the year, should there be a lined pond that would stay wet all year for birds and other wildlife. This pond would be cleaned by filtering the water through a bog area. Also, should I invest in a huge above-ground water tank to collect the thousands of gallons of water that pours off my house roof during rainstorms? So we are interviewing pond builders, and having pow-wows with other professionals who know about water.In the meanwhile, many trees and small plants have been planted, about half the pile of urea spread and tilled in.

Tilled and mulched I am not an advocate of tilling in healthy soil. It tears apart the microbes and underground inhabitants that are what changes dirt into soil. About twelve years ago when I first moved here, I succumbed to those enticing Troy-Bilt tiller ads and purchased a 6 HP tiller; an enormous investment at the time, but with all this weedy property I thought it would help me ‘fix’ the soil. The tiller came dismantled. After a lot of trouble putting it together and getting it running, the machine I bought turned out not to be a tiller, but a device that endeavors to separate your arms from your torso and dislocate each vertibrae in your spine, all without actually tilling anything. The Troy-Bilt ad photos that show a neatly dressing young woman casually standing by her tiller pushing it with one hand, leads one to believe that the tillers are easy to run. Actually, the lady in the photo is having a good time only because the tiller isn’t turned on! She’s leaning on it! Someone made all those groves in the dirt with a hoe, because that tiller sure didn’t! You may surmise from that rant that I didn’t have much luck tilling, so the machine sat in my shed until recently. It was just repaired and yesterday, having been starved for so long, it tried to eat Roger as he used it around my property. Roger is a big, strong man, so I don’t feel so badly about having been so unsuccessful with using the tiller that I wanted to chain it in a dark celler where it wouldn’t hurt anyone again. Despite the evil tendancies of this machine, much urea has been tilled in around the planted trees, which is the first layer in the plant guilds that form the edible forest garden. Under the trees, other components of the guilds are being planted. Those components perform what roles plants in a natural forest hold: mulchers, groundcovers, shade, insect-attractors, nitrogen-fixers, and nutrient-miners. The guilds will grow larger as the project unfolds.

Jose and Roger with the first load of rocks Rocks are a wonderful focal point in any garden, and we needed a lot of them. With predicted rain this weekend, and the probability that the 10-wheeler wouldn’t be able to access the yard with the soil any softer, sped up the delivery date to… ASAP. Two deliveries of boulders were deposited today, and starting at 7 am tomorrow, several more loads will be dropped. I can just see all the lizards on the property rubbing their little hands together in anticipation of a great king-of-the-hill push-up contest. Two sections of my wooden fence had to be disassembled so the truck could pull directly into the yard. Later, the boulders will be placed with a small Bobcat. This is a nice mixture of rock, and this first load pictured shows the largest of the boulders. This is about 12 tons of rock. I can’t wait for time alone to go climbing! 🙂
I asked Roger if he knew a really good carpenter to help build some items for me, and he did. Local carpenter Jay Tull was brought into the job and is also a craftsman of skill, inspiration, problem-solving, and a lot of fun ideas. He made two top-bar bee hives first of all (I’ll go into bee hives in another post, as well as my blue bee garden), using almost all leftover materials on the property. They are beautiful. Next, I wanted to build a little fenced area to block off my trash and recycling cans so my long-suffering neighbors didn’t have to look at them anymore.

Garbage Can Closet or Guest House? So with lumber and more of that broken concrete (which actually came from his property!), he and Roger’s team are working on an incredible enclosure that probably should be a guest house! The walls, made of leftover fencing, and a gate will be added probably tomorrow after the cement all dries. Jay suggested that the cement chunks be cemented in rather than surrounded with gravel for easy hosing down. There is room for a planter on the side! Another project Jay is working on concurrently is a chicken tractor.

- Chicken Tractor in the Making
There are many websites devoted to just images of chicken tractors. These are portable chicken coops that rest on the ground. The idea is that the chickens root around in the ground weeding, pooing, eating bugs, etc., which is all extremely healthy for the birds and great for the soil. Then in a few days you move the tractor a little ways and set it down and they start on a new batch. I found a photo of one I liked, and Jay is building it almost entirely out of used wood from my old sheds, and wheels off my old gate. It works like an extremely heavy wheelbarrow; apparently the image I gave Jay to work from used two people to move it, but he’s adapted it for one person. I’ll show you the finished version in a couple of days. We’ve already joked about entering it in the Fallbrook Christmas Parade.
Other things that have been going on are the building of benches and seats for viewing areas around the property, using the materials that are here.
 Jose and Francisco, Roger’s team, have stripped some of the palm trunks and cut them into chairs. This shows one set up on the newly repaired erosion area just above the barranca. Along the fence are planted more stonefruit, and on the other side of the fence are planted berry vines. The seat overlooks the mature toyons, sumac and willows that grow down the embankment, and a great place for bird watching. A garden isn’t a garden if there aren’t resting places for you to just sit and listen.
  Stumps along the Liquidamber Allee
Today Roger saw an adult kingsnake under the native plants on the embankment, and it startled and slithered away. I think this may be our annual visitor to our upper pond and birdbath. Every summer he shows up once or twice looking for mice and getting a good long drink from our pond, then disappears. I’m hoping he has his eye on our gopher population.

California Slendar Salamander So the loud machinery, sounds of screeching rocks sliding on metal, and the whiff of urea continues on my usually quiet and unobtrusive property. Some day in the near future it will again be quiet, and all the animals I’ve scared off will return. Actually, many birds have been enjoying the piles of brush, and Roger has encorporated some brushy piles into the design just to allow the birds and bunnies and lizards small havens.
 These piles are small, and are located well away from the house so as not to cause a fire hazard. Also I was sorting through the stack of old plywood on the weekend and uncovered two California Slendar Salamanders. One was larger than the other, so I think that was the female. I removed them to my upper pond area so that they wouldn’t get squished. These wonderful discoveries of life on my property make me all the more determined to complete this project in as a compassionate and organic way as possible.
 My two elderly dogs, Sophie and General Mischief, have been having such a hard time of it. They lived their lives here outside, sleeping on an old futon in a small garage-type building. Now that they are both deaf, and Sophie likes to sneak out to go visit my long-suffering and wonderful neighbors, I’m afraid of them being injured with the gate opening and closing and large trucks pulling through. So, for the first time in their lives, they’ve had to adjust to living in my library on a sheet-protected couch. You can see how hard it is for them:

Suffering Couch Potatoes You May Also Like
Native Insects and IPM
-
Hiking the Observatory Trail

- Pines on Palomar
For those of you who are waiting for an update about the permaculture garden, I’ll do that tomorrow or the next day. Many small things, although labor-intensive, have been happening, and some big things are happening tomorrow, so I should have good photos to share.Meanwhile, today was hiking day, and a gorgeous day it was. My hiking buddy Alex came up with an old magazine article about the Palomar Mountain Observatory Trail, which neither of us had heard about. You drive up to the gate that leads into the Palomar Observatory parking lot and look right… and there is the trailhead.

The Observatory closes this season at 3, and the parking lot at 3:45, so we parked on the street past the ‘no parking’ signs. (Disclaimer: These photos were taken with a lightweight cheapy digital camera which I use now when hiking instead of the big heavy camera, so the resolution isn’t superb.) To our surprise on this warm Spring day, there was still snow along the roadsides.

Snow Flower Alex made a Snow Flower instead of a Snow Angel. So artistic.
If you decide to hike this trail, at the sign there is a well-worn path to the left and a not-so-well-worn path to the right. We, of course, not taking Robert Frost’s advice, took the well-worn path, which led us into a maze of cut brush piles, fallen logs and criss-crossed paths. We laughed about survival skills just to get through the first five minutes of the trail. On our return we clearly saw the real pathway that was beautifully laid out, skirted the brush pile maze, and came around to the other side of the entrance sign. Of course. This trail is supposed to be 2.2 miles one way, and it travels downhill through mixed pine and oak forest, paralleling the roadway a lot of the time, until you reach the Observatory Campground. Then you have to hike uphill on the return. During the time of year that the campground is open (it isn’t now), you can park there and hike uphill first to the Observatory, take a tour and hike back down. Not all of the pathway is shaded, and it wasn’t a hard trail at all (if you didn’t get stuck in the brush piles!).

Woodpecker Tree If you are a birder, this is a wonderful area. I saw red shouldered hawks, nuthatch, spotted towhee, banded pidgeons and of course plenty of acorn woodpeckers. Woodpecker families ‘own’ trees. In the Fall when oak acorns drop, they compete with many other animals who eat the nuts for their high protein value. The acorn woodpeckers grab an acorn with their beak, fly up to the family tree, then nod and shake their heads slowly measuring the acorn up and down. Then clasping it in their feet they drill a hole exactly the size of the acorn. They jam that acorn in so that no one can get it out. They fill trees (and the sides of houses, too!) with acorns, and this is their pantry. Since acorns fall only once a year, this storehouse has to help feed the family for a year, with the addition of insects to their diet. During the year the woodpeckers will check on the acorns buried in the bark, and if the nuts have shrunk, they redrill a smaller hole for it. At this time of year and on into early summer you should be able to spot activity in tree cavities.
 What a wonderful thing it is to see later in the season little red and black heads peering out of their nest!
This area had been burned in the past, and the trees still show the burn marks.
 Many of the deciduous oaks are still bare, and there are stands of very old incense cedars,oaks and pines. The heavy smell of resin permiated the air, making me feel a little sleepy in the sunshine. What a fragrance! The terrain changes a lot, from shady forest, to streambed with a log crossing, to open areas bordered with manzanita just going into bloom.
 Against the bluest of blue skies some of the white-barked bare trees made wonderful designs. A little more than two-thirds of the way down, you get to a platform jutting away from the trail, and from there is a view well worth the hike (if the beauty of the forest wasn’t enough). Down across the tree-studded mountain you can see the sweep of Mendenhall Valley, with brilliant green grazing land studded with cows and ponds.
Mendenhall ValleySnow We also passed an area where there had recently been a controlled burn to clear out the undergrowth. Then we’d dip down and cross a streambed with mossy rocks and deep, spongy loam.
Streambed 
- Along the pathways were boulders ranging from gigantic, mossy troll-like beasts, to well-constructed stone retaining walls.

Stone Wall 
Smaller Observatory From the path you can see the smaller of the two observatories glinting in the sun. How fortunate we are to live so close to such a famous research facility! You of course know that there are two roads up to the observatory because the first one switched back and forth too much for the truck to navigate that was hauling up the huge lens, so the second one is more straightforward. When traveling back down the mountain there are many scenic pull-outs. Take advantage of them, even if you’ve stopped many times before! The view down into Pauma Valley, and across the shapely mountains and hills that roll right out to the Pacific, is a reminder of how beautiful the land is and how lucky we are to live here.

Out to the Sea I apologize for the random craziness of the photos. I’m trying to insert them where I want after uploading them one at a time (whew!), and the program doesn’t agree with my placement. In fact, I just posted this and about four of the photos had disappeared, so I had to readjust. A work in progress!
-
Heirloom Plants

- Fragrant Antique Freesias and Cyclamen

Little Witch Daffodil I am so fortunate to live here in Northern San Diego County, where Spring has come and gardening weather is wonderful. I may be a cold-weather wimp, but that’s okay. A morning filled with the scent of freesias and the repetoire of a mockingbird in love fills and feeds my inner self. I wish that I could waft that incredible fragrance to you from the photo! I was born in New Jersey, the youngest of five, and we came West when I was five years old. My mother never wanted to even look at snow again in her life, and my dear dad made that possible. I published a fiction story some years ago in the premier children’s magazine, Cricket ( http://www.cricketmag.com/CKT-CRICKET-Magazine-for-Kids-ages-9-14), called Taking Tea with Aunt Kate. In it I wrote about a lush, mixed-up garden. The illustrator for the story lived in some cold state, and emailed the editor with alarm that I had daffodils blooming at the same time as squash was in the garden. It took me a little to convince her that our narcissus bloom in early Fall when squash is still being harvested, and daffodils are still blooming when we can transplant squash starts out in the Spring.

Early Louisiana Jonquil ")
- Van Sion (1620)
Despite the fires, drought, and cost of living, we live in an Eden most of the time, in my opinion. But I’m well off the track of what inspired me writing this morning.
I revere heirloom plants. I became involved with heirloom varieties when I was a Senior Park Ranger for the County of San Diego, and was in charge of the newly restored Rancho Guajome Adobe in Vista. http://www.co.san-diego.ca.us/parks/ranchoguajomeadobe.html . If you haven’t visited, you really need to. Its right next to the Antique Gas and Steam Engine Museum http://www.agsem.com/ and open for tours on weekends and for special events. The most common comment has always been, “I’ve lived in Vista for years and driven past this place almost daily and never knew it was here!”
")
Tommies crocus (1847) Anyway, for the Adobe’s grand opening after it’s restoration, I was asked to create a Victorian wedding area using period-appropriate plants. In about 8 weeks. And, in one of the fastest group efforts ever, I did. Since different areas of the Adobe were built and interpreted for different times, I researched and planted gardens in the inner courtyard and in the front which reflected the plants available in San Diego at those times. The gardens have changed plant materials over the years, but have been lovingly kept by docents and staff. Two wonderful resources (among many) which I still shop from and refer to today, are Old House Gardens Heirloom Bulbs https://www.oldhousegardens.com/index.asp , and Heirloom Roses http://www.heirloomroses.com/index.htm. These are two mail-order plant suppliers who research and care for their stock, listing introduction dates and histories. Old House Gardens is particularly warm and fuzzy to deal with; they add personal notes onto the orders, want feedback about how the bulbs do in your area, and make sure that you know if
Cherokee Rose 
A cutting from the Cherokee Rose planted at Rancho Guajome Adobe circa 1880. So in my gopher-populated garden at home, I have been building bulb beds which are set on landscape fabric (to try and keep out the Bermuda grass which can grow anywhere) and lined with aviary wire. This is the time of year when these beds make my heart soar, because one after another these incredible flowers tell me more than anything that Spring is here. Daffodils aren’t supposed to be appetizing to gophers, so in January I bought a couple of bags of the common King Alfred variety (45 in a sack for about $7!) at Home Depot, and planted them all over. I got them in the ground a little late, so I may have to wait until next year for blooms. I love the explosion of daffodils all over Santa Ysabel and Julian.

Rosa rugosa, our native rose I have far too many roses planted; but I have to confess, one of the real perks of the permaculture work that is being done on the rest of the property is that I get to have more roses! 🙂 My side yard has the destinguished personages of Agatha Christie, William Shakespeare, along with Double Delight, Blue Girl,
 Blue Girl
Mirandy, and some big red rose that was here when I moved in. Two Damask roses (which they use to make Attar of Roses) that my nephew gave to me are in the front, along with Rosa rugosa (our native) and some unidentified ones. The driveway is filled with artistocratic names along with Joseph’s Coat, and beginning to work its way up the post that stands outside the bedrooms is Kiss of Desire. (Sigh). In the back are many more which were here when I moved or came to me free and unlabeled, including two spectacular red roses which are side-by-side, are now enormous and lush, and whose bloom colors clash so loudly you could hear it inside!
Although they aren’t native, many of these heirlooms need to be saved from extinction, are often much hardier than any modern hybrids, and are gorgeous and unique. They have to be hardy, because my plants need to thrive on some neglect. I also fertilize them with Roses Alive natural fertilizer from Gardens Alive http://www.gardensalive.com/ . Organic fertilizer doesn’t build up salts in the soil or destroy the soil microbes that are essential for good plant health.

Unidentified David Austin rose About the recommendations: I don’t work for any of these businesses. I recommend them as a friend, for I have found them to be excellent in my dealings with them and they support good causes. I hope that you enjoy their breathtaking catalogs! (I actually have to go through the catalogs a little at a time because I get too excited and my heart rate goes up and I want all they have!).

Ice Follies daffodil So this was a long post, when actually this beautiful bird-song-filled morning I just wanted to bring you photos of Spring flowers, to brighten your day. Also, I’ve been trying to learn this user-friendly (ha!) blog thing, and I think I’ve made it possible to leave comments without you having to go through so many hoops (to prevent spamming.) I’d love to hear what you say! Have a great day.

Cineraria 
Wisteria chinensis -
Birds

Nesting season has begun. The raptors have been screaming and chasing each other for a couple of months now, making all the little birds uneasy. I’m not overly fond of crows (they are vicious to other animals for fun), but I respect them. These two have routinely preened each other on the telephone wire over my front yard for a couple of years. Now they are making a nest in the pine tree in my driveway. The weeds that I have pulled and tossed back onto the ground to decompose and return all that nutrition back into the soil, have become prime nesting material for Mr. and Mrs. Crow.
My front yard is a National Wildlife Habitat, with a plaque and all. Actually, you meet the qualifications of providing shelter, food, water and nesting areas, make a donation, and the National Wildlife Foundation sends you a plaque. Feels righteous anyway. In this yard we have a small pond, a multitude of bird feeders, and lots of bird and butterfly friendly plants.

This yard is forever changing because I futz with it. My daughter and I dug and laid the pond (the flagstone and pond liner were free!), and I plant things, challenge them with neglect, and see what happens. We have so many feeders because from our dining room window we watch the birds. It is incredibly time consuming. You sit for a minute to watch some white crowned sparrows, and suddenly its two hours later. My daughter, who is studying Wildlife Conservation focusing on wild birds at Oregon State, is a far more intense birder than I am. She also participates in the Cornell University Project Feederwatch, and in her absence I do the counting on the weekends. http://www.birds.cornell.edu/pfw/ . She’s logged over 65 species of birds in our little front yard alone.

Migratory season has begun, and you should be seeing and hearing a lot more hummingbird activity. We have a couple of hummers who are year-round residents here in San Diego, most notably the Anna’s Hummingbird. If you see a hummingbird fly up incredibly high in the air then divebomb, and hear a small whistle followed by a chittering call, that’s our Annas.

They divebomb to protect territory and to impress the opposite sex. The whistle is made by the wind whistling through their tail feathers as they pull out of their dive; in fact, the height of their dive is probably to make a really impressive and fearsome whistle. Then they do their warbling chitter right after. Have to boast, after all. Here in North County you’ll see (and hear… he buzzes when he flies) the Rufous Hummingbird, Costa’s, and Black-Chinned. There are other varieties in other areas of San Diego as well, but these are the competitors around our house. And boy do they fight. Hummingbirds are so incredibly territorial that they will try to kill each other, then must fill up with nectar to feed that incredibly fast metabolism. During mating season they pretty much eat to fight. Its funny to see them call a temporary truce at the feeders so they can all drink, then go off and chase each other again. Hummers eat bugs, too. If you see one doing some weird flying in a place where there doesn’t seem to be any food, then they are probably gathering cobwebs which they use to line the insides of their nests, along with other things.

If you put up a feeder, you may want to consider a couple of things. One would be buying a feeder with bee guards, as in the above photo. Bees need food and water, too, and they love hummingbird feeders. However, sugar water is not good for bees or for their honey, and certainly not good for the hummingbirds. (I’ll talk about bees another time; I keep bees, too. I know, I know.) The above design hasn’t impressed me because the bottom tends to fall off, but there are better designs. You don’t have to buy nectar. Boil four parts water and add one part white sugar (not honey or brown sugar), then stir to dissolve and allow to cool to room temperature. You do not need to color the nectar red! Supplement the feeders with plants that hummers love such as fuchsias and hummingbird bush, so that they can feed on real nectar that has all the vitamins and minerals that they need. Always provide water, too, such as in a bird bath or a mister that they’ll love to fly through. If you do have a feeder, you must take care of it weekly in the wintertime, and every few days in the summer. Why? Because a black mold grows on the sugar water, especially where the hummingbird puts its beak to drink. That mold will cause a beak fungus that can be deadly to the bird. Instead of helping and enjoying the birds, you will be killing them. Mold is easily found floating in the water, clinging to the sides of the feeder jar, and blackening the feeding holes. To clean your feeders you should bleach them.

I fill half of my kitchen sink with hot water, dump in about 1/4 cup of bleach (I don’t measure), and then carefully without splashing on yet another shirt like my favorite purple tank top that now has a white spot on it, with rubber gloves on, I submerge the feeders and let them soak for about 15 minutes while I go off and forget they are there until I smell the bleach and remember. I use a long narrow bottle brush to clean the insides, and make certain that the feeding areas where their beaks will go in are scrubbed. Then I rinse everything in cold water and fill with the cooled sugar water and hang. If I’m coordinated enough I’ll line up other things that need bleaching so I don’t waste the water, such as something not-quite-white anymore, the cat food bowls and the compost bucket. Since my house is on septic I try to remember to put some of that black bacteria stuff down the drain afterwards.
Ants are a real problem with feeders, and the only organic thing I’ve found that really works is to coat the top of the feeder and the hook from which it hangs with Vasaline. During the really hot summers it does melt, so I have to reapply a couple of times, and make sure that nothing touches the feeders to give the little devils a bridge. But, it works! And without spraying poison.
Just to leave you with a happy image, here is a perennial bird favorite. The House Finches are all over Fallbrook; the males all colored up red in the front and the women daintily brown striped and everyone looking their most attractive as they choose their mates. Almost every year, however, some female will have an unfortunate molt. A bad feather day. Evidence of the cruelty of life without mirrors. We call the unfortunate one: Devil Finch.

You May Also Like
Native Insects and IPM