Irrigation For Drylands: Conclusion
This is the last of the series of posts on irrigation, and I’d like to briefly address the issues of water pressure and valves. As I’ve said in a past post, if you don’t know about these things then hire someone who is an irrigation specialist (not just someone who says he’s put together irrigation before… they are guessing!). That specialist will obtain for you the right sized valves, the right irrigation timer, and monitor the water pressure so that your sprinkler heads won’t blow off and pipes break.

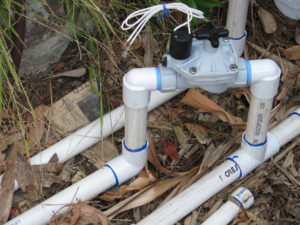
For pipe, don’t use small 1/2″ pipe for large jobs. Bigger – to a point- is better. Smaller pipe doesn’t mean higher pressure. It reduces the volume of water going to the sprinklers. The smaller pipe creates more pressure loss due to friction and turbulence as the water flows through it. We took the advice of our irrigation specialist and ran 1″ pipe from the valves to the first sprinkler, and reduced it to 3/4″ pipe, then reduced for the 1/2″ risers.
Most sprinkler systems need a water pressure of between 30 – 50 psi. Drip systems need less, around 20 psi. Too high or too low a water pressure will adversely affect your system. If you attach a water pressure gauge to a spigot you can see what your pressure is. If it is very high, you will want to check the indoor pressure as well because too high a pressure can mean pipe damage and leaks, and no one wants wet walls. You can use a pressure regulator on your line to reduce the water pressure for your irrigation.
 How many sprinklers you can put on a valve depends upon several factors, but mainly the flow rate, or how much water is flowing through the pipes at one time. Sprinklers have an output rate so you can do the calculations on how many you can put on a line. Flow rates are measured either in gallons per hour or gallons per minute, with gpm the most common for householders. Drip systems are less concerned with flow rate. We ended up adding valves to our system because we had so many sprinklers.
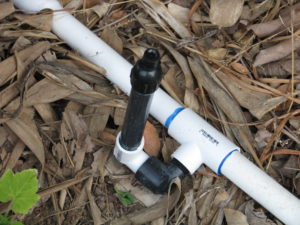
When installing your system, be sure to add a ball valve (rather than a cheap gate valve) close to your water source so that if you have to work on your system you can shut it off; otherwise you’ll have to shut off the main to your outside water. If you have a large system, installing ball valves along the line to isolate different areas will help down the road if you need to troubleshoot. Having hose bibs along the line are very nice, too.
There is a lot to learn about irrigation valves – using globe valves with an expensive back-flow preventer or using anti-siphon valves that must be above ground and above the closest sprinkler head. I’m not an expert, but there is expert advice on valves here. 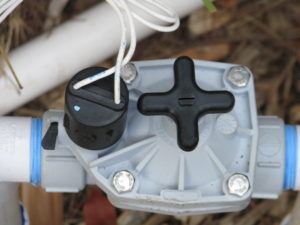
Another thing to consider is your electrical line. If you have valves, you must run electrical line to them (at this writing, solar valves are not that dependable for the long run). Electrical line must also run from your irrigation clock to your electrical source at your house. Usually electrical line is buried. Please spend the little extra money and have the electrical pulled through conduit first, rather than direct burial! Having loose wires buried in your yard is a recipe for disaster. I know this. I asked for conduit with the original system, and the wire was directly buried before I could protest. Sure enough, two years in and a valve wouldn’t turn on. The problem was with the wire… but where? How to dig it all up without nicking any of the lines? Impossible. So until this project two of my valves had to be tied together and both stations running simultaneously, which really stunted the water pressure and was a real headache. This time the conduit is run above ground along with the PVC pipe, which will be covered with mulch, and also along the top of my chain-link fence up to my house. If there are any problems, the conduit comes apart every ten feet and wires can be checked or replaced. Pulling electrical wire through conduit is not for the fainthearted; I developed new muscles and callouses working on that, but it was worth it.
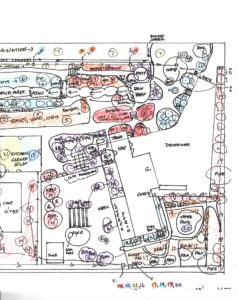
Skipping ahead, your irrigation project is finished and your landscape planted. Be sure to take the time to update your plan so that it is an ‘as-built’, reflecting any changes you’ve made. This is an invaluable document not only for your own use, but for any future owners of your property or workers who might need that information. Use a rough plan of your yard and identify each valve and the area the valve covers in different colors. If you want to draw in every sprinkler head, that is fine. On large projects that isn’t practical, so just use zones. Take a waterproof marker and write the valve numbers on the valves themselves, so that you won’t become confused in the field.
Be sure to run each valve during the daytime while you inspect the sprinklers for clogging or broken heads. A lot can go wrong during the night when most systems run, and you won’t know it until you get the water bill or your plants start to die.
You may want to put in the wire for additional valves that may be added in the future. Making double valve stub-outs and only using one is far easier than pulling new electrical if you find that you need to add a valve. 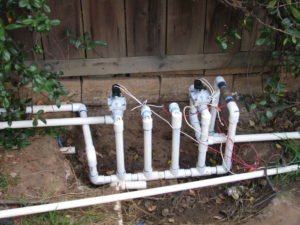
So don’t think that irrigation is a simple endeavor, and begin to glue miles of 1/2″ pipe together with 2 – 3′ risers that shoot water up embankments. This is a waste of money, plastic, water and plants. Put as much thought into your system as you put into the design of plants, and your system will give you little trouble in years to come.
Oh, and remember to shut your system off when it rains!
 You can read Options, Part 1 of this series here, Part 2 Evaluating Your System here, and Designing Your System Part 3 here .