- Bees, Birding, Gardening adventures, Heirloom Plants, Other Insects, Permaculture and Edible Forest Gardening Adventures, Photos
Bouquets for Birds and Butterflies

Lilliput zinnia At the beginning of this summer, the new subterranean drip irrigation system was installed on my property. It features tubing with holes at either twelve or twenty-four inches apart. When it runs (from my well) it leaves circles of dampness polka-dotting the soil surface. I had purchased two packets of wildflower seed, one with a selection of plants to attract bees, and the other for butterflies. Mixing them together, I figured that they wouldn’t fare well scattered, at least this year. My daughter and I pressed seed into many of the wet spots and hoped the rabbits wouldn’t notice.
What happened was a delightful surprise, as only a garden can provide. In many locations around the yard grew mixed bouquets of wildflowers.

Mexican sunflower, cosmos, nasturtiums, zinnias, surround a white calla lily If we had separated selected seed and planned the planting, nothing so beautiful would have come of it. Although many species either didn’t emerge or were eaten, the most common survivors were zinnias, cosmos and borage.

Cosmos, borage, zinnias and alyssum. I was amazed and thrilled; I had purchased a borage plant and then fed it to the rabbits (at least, that is what they thought). Here now are borage plants all over the yard, their royal blue, cucumber-flavored flowers dipping modestly behind the flaunting cosmos.

Sweet basil, cilantro, dill and zinnias In fact, I now have several very hearty sweet basil plants that put the carefully cultivated plants in my raised veggie beds to shame. There is also dill and cilantro growing well even this late in the season.

Cosmos, sweet basil, zinnias, borage, camellia balsam, alyssum There are some plants in the bouquets that haven’t reached maturity yet, so there may still be some surprises. The only flower that emerged that I didn’t recognize and had to look up was camellia balsam (Impatiens balsamina). Two stalks of it, one pink and one red, give these ‘arrangements’ a vertical line.
")
Camellia balsam (Impatiens balsamina) Although not all of these wildflowers are native to San Diego, or even California, they provide food for birds, bees and are host plants for butterflies, providing the caterpillars food, a place to form their chrysalises, and nectar for the mature butterfly. Bees like small flowers with little drops of nectar too small to drown in, with a nice landing pad of a petal close by. Everything in the carrot family works well. Here are some suggested flowers to plant:
For butterflies:
Mexican lupine, Mexican sunflower, borage, calendula, camellia balsam, scabiosa, cornflower, milkweed, parsley, crimson clover, aster, coreopsis, cosmos, prairie gayfeather, purple coneflower, sweet sultan, sneezeweed, sweet William, bishops flower, black-eyed Susan, dill, snapdragon, yarrow, bergamot, cleome, verbena, and butterfly bush.
For bees:
Cosmos, sunflowers, borage, coriander, Siberian wallflower, dill, coreopsis, poppies, gaillardia, zinnia, sweet basil, purple prairie clover, globe gillia, catnip, lemon mint, black-eyed Susan, goldenrod, lavender hyssop, bergamot, yarrow, mint, California buckwheat.
Be sure to plant flowers that bees love away from paths and walkways if you or your family want to avoid contact with the bees.
You May Also Like

Native Insects and IPM
- Animals, Bees, Gardening adventures, Heirloom Plants, Other Insects, Permaculture and Edible Forest Gardening Adventures, Vegetables
What Bugs See
To veer off from the vacation photos, I thought I’d talk about bugs! I’ve been working in the garden a lot and watching the myriad types of insects drawn to the various flowers blooming all over, and it reminded me of something amazing that I learned last year. The way flowers look to us is not what most insects and birds see. The flowers are bright and showy, but they offer up visual clues to pollinators through colors and patterns that can only be seen with eyes that see UV light. Humans can’t. We can’t assign colors to UV light in the way that we understand them, so when photographing with UV light we substitute our colors to show the change in patterns. The markings on the flowers are guides to where the pollen is, like lights and painted lines on airport runways. Just as baby chicks’ mouths are large and brightly colored to show mom and dad where to put the worm, especially on the inside as they gape and wait to be fed, so have flowers made sure that the pollinators get to the right place for pollen! The differences between what we see and what insects see can be startling; there is a whole hidden world right before our eyes, just as there are supersonic and subsonic sounds that we cannot hear. Elephants make subsonic noises that other elephants can hear miles away, but we aren’t aware of it.
Below are photos taken with and without UV light by the brilliant Norwegian scientist-cameraman Bjorn Roslett. Remember that the UV colorization is man-made to show the difference in patterns. More technical information can be found at his site here: http://www.naturfotograf.com/UV_flowers_list.html , with lists of types of flowers and what approximate color changes there are under UV light.

Dandelion 
Vinca minor 
Vinca minor under UV 
Norsk mure (Potentilla norvegica) 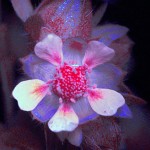
Norsk mure under UV 

Primrose 
Crocus 
Anemone You May Also Like
Native Insects and IPM
-
The Lost Gardens of Heligan
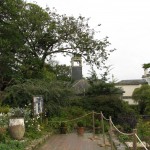
If you ever go to England, go to Cornwall and spend at least a day at the Lost Gardens of Heligan (http://www.heligan.com/ ). Due to a flat tire we only spent four hours there and we didn’t see even half of the 400 acres of incredible restored gardens. The story is this: a thousand acres on the southern coast of Cornwall has belonged to the Tremayne family for about 400 years. At the end of the 1800’s, one of the Tremaynes had built extensive theme gardens. There were walled gardens, enormous hedges, glass houses, cold frames, a pineapple pit where the only pineapple grown in Cornwall grew warmed by horse manure. Melon houses, leisure gardens, formal flower gardens, woods, kitchen gardens and unbelievably, tropical gardens, filled the estate. Due to Cornwall’s position by the English Channel the climate is such that with care tropicals can be grown there. The estate was fantastic; then came WW I, and almost half the family and staff were killed. The gardens were abandoned. Subsequent wars and taxes took their toll, and the gardens became overgrown. Vines, brambles, trees and weeds ran rampant, breaking through the glass roofs, pulling apart brick walls, upsetting carefully laid pathways and covering every trace of the gardens under a head-high blanket of tangled, thorny brush.
Twenty-one years ago, the Tremayne who inheirited the gardens, asked one of the founders of the neighboring Eden Project ( http://www.edenproject.com/ ) to try and restore the gardens. The task was phenomenal and reads like a mystery. Hacking through the overgrowth they found the walls, the foundations and the clues as to what had been. Since then the gardens have been restored. They are everyone’s dream of a garden combined. There is a mound that was a beacon mound during Nepolianic times, but then discovered dates back to the Armada, and then back to Medieval times! There is a jungle with massive gunnera plants and palm trees, about half an acre of vegetables all grown from seed that dates from the late Victorian time, walled flower gardens, ‘antique’ poultry and cattle, unique sculptures recently added, and a wildlife garden to encourage the existence of so many insects, birds and animals that are disappearing. Even with weeding through photos I came up with so many that I want to share, that I’ll just post them below. Visit the website and read up on the Lost Gardens, voted Britain’s Finest Gardens. They are magical.

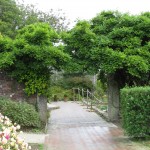
Entrance to a magical world. 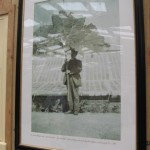
The Tremayne who built the gardens holding a single Gunnera leaf in front of his famous pineapple pit. 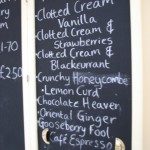
Flavors of ice cream… we didn’t get to have any! 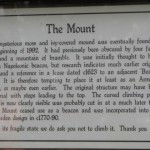
A mysterious mound was uncovered and thought to have been a beacon site in Nepolianic times, and for centuries beyond that. 
Stone steps into the ravine 
The Italian garden 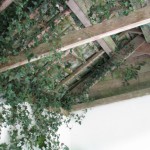
Ivy coming through the roof, trying to reclaim the building once again. 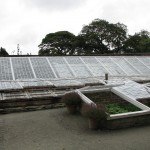
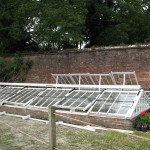
Hot houses and cold frames 
Cold frames for veg. 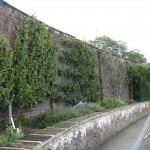
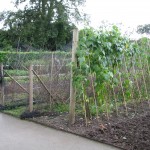
Espaliered pears of many varieties. 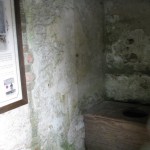
Writing on the wall of the ‘thunder room’, or original composting toilet 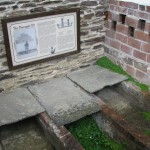
All plants and veg grown are from the late Victorian period 
Espaliered fruit trees make use of warm wall space 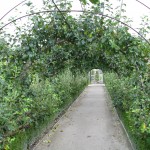

About a quarter acre of mixed greens. 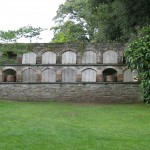
Bee skeps (baskets, pre-movable hives) were kept in boles for winter protection. 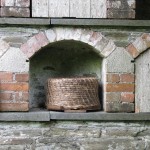
A bee skep in a bee bole 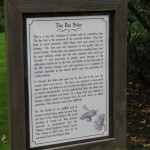
History of the Bee Boles 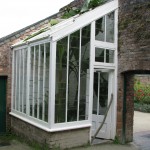
A banana grows in Cornwall! 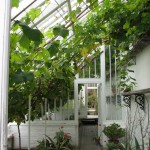
Melon houses 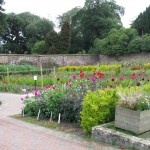
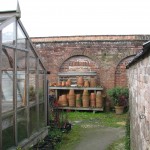
Potting shed with greenhouses in a walled area. Sigh. 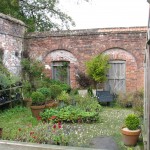
Cold frames in the potting shed 
A robin watches, just like in The Secret Garden 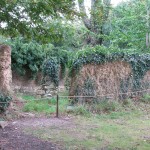
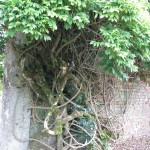
The overgrown remains of mud brick walls 


A very steep pathway lined with chicken wire to prevent slipping 
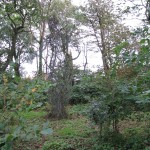
The Jungle 

A wire sculpture of a woman with her arms out… can you see her? 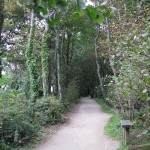
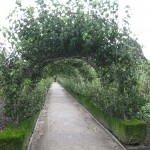
A deciduous walkway 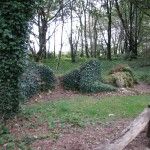
Mud Woman 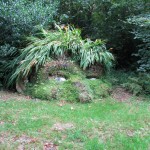
A very green man -
The Importance of Leaving a Mess

Animal tunnels through a brush pile A clean yard is usually a pleasing sight. Picking up loose boards, plywood, sticks and logs keeps people from tripping, is encouraged by the fire department to reduce fuel for fires, and makes for more room to walk. Also, things live under debris and we’ve always been told to not poke our fingers into dark places (excellent advice! If a giant stuck his huge finger into our bedroom window we’d try to hurt it to make it go away, too!), and by eliminating so-called debris we reduce the chance of bites by snakes, spiders, or whatever bitey things may be living in your part of the world.
However, by reducing the debris, we also reduce habitat. Those bitey creatures need a place to live, as do the non-bitey creatures we are also displacing by removing wood. All these creatures are part of the intensely woven food web that keeps our planet populated and working. I cannot disagree about making your yard safe for children and pets, but if you have a space, make an area for habitat, too. Rope off a corner of your yard and tell your children and pets not to go into there, and leave bundles of sticks, pieces of plywood, old logs, piles of leaves, etc. in that corner. This is a home for the wild things, and your children can understand, observe and respect the fact that the world should not be made clean for them. Teach your children not to hunt and catch wild things, not to tear apart nests and destroy habitat. Observe and wonder instead.
In my yard, especially since I’ve had some sheds removed (in which racoons, wasps and possums raised families… I’m hoping to make a new place for them), I have stacks of plywood and old buidling materials which are good for recycling back into projects around my house. A junkheap, yes; a goldmine, yep. Under these stacks I have found such wonderful creatures that I didn’t even know came into my yard (perhaps they didn’t until the wood was left out).
The most exciting creature was a female Western pond turtle.

Female Western Pond Turtle In Washington, the Western pond turtles are endangered, and they are considered threatened in Oregon and are becoming rare in California and Baja California. Besides loss of habitat and an increase in pollution, one of the major factors in our native turtle’s slow demise is the release of non-native aggressive species such as the red-eared slider turtles. Red-eared sliders are America’s favorite pet turtle although they are native to the Southern United States. Due to releases they are everywhere. DO NOT RELEASE YOUR PET INTO THE WILD! As much harm has been done by and to domestic animals and wild animals by the releasing of pets as by habitat loss. A number of years ago there was a salmonella scare allegedly traced to pet turtles. The public’s response was to dump their children’s turtles in any waterway close by. Red-eared sliders have a distinctive red line by their eyes, and are named sliders because that family of semi-aquatic turtle can slide into the water quickly. They are omnivorous, aggressive, adaptable and become large. They eat anything that they can fit into their mouths, including the less aggressive smaller Western pond turtles.

Females have flat plasterons; notice her left stumpy leg. Finding a female Western pond turtle in the yard was fantastic, and I can only surmise that she had made her way up from the shallow streambed below the property to hopefully lay eggs. I haven’t found signs of a disturbed area yet where she may have layed, but am keeping the whole area protected just in case.

Long tails She is missing one front foot, probably bitten off while a youngster when something was trying to eat her. Before we knew she was a she, we thought of giving him a piratey name due to the missing foot and her semi-aquatic nature. Captain Blood was too fierce, but the author of that and other swashbuckling tales which had been made into movies is Raphael Sabatini. Now that is a terrific name. Go ahead and say it to yourself. See? So he became Raphael Sabatini until we checked her plasteron (the underside of her shell) and realized that it was flat not concave, which meant that she was a female. Males need concave plasterons so that when they are, um, amorous, they don’t fall off so easily. So she became Mrs. Sabatini. Long story… sorry. Nothing simple in my life. Anyway, we checked out Mrs. Sabatini’s health, and then released her into our small upper pond, which has an excess of mosquito fish and bugs, so that she wouldn’t be hurt with all the work that is being done down where she was found. We haven’t seen her since, so hopefully she is healthy and happy.

Good-bye Mrs. Sabatini! Under another piece of plywood I’ve found blue-tailed skinks (I couldn’t take a photo because they move too quickly), California Slender Salamanders,

California Slender Salamander gopher snakes, king snakes,

California Kingsnake and Pacific chorus frogs.
In a brush pile there are many birds hopping through, especially California towhees, Western fence lizards, alligator lizards, tree rats, mice and many other creatures.
In the ground are insects that you’d never expect. For instance while weeding one of my heirloom bulb beds I disturbed this huge caterpiller that had a horn tail.

White-lined Sphinx Moth Caterpiller The only horn tails that I’m familiar with are the tomato hornworms, but this guy was far away from my veggie patch, and instead of stripes had spots. We looked him up, and he is the caterpiller form of the White-Lined Sphinx Moth, also known as the hummingbird moth because of the way it hovers in front of night-blooming flowers to drink nectar. It is one of the important nighttime pollinators which few ever see. We put him back and left some weeds in for him.
Of course mason bees, among other pollinators, use holes in wood in which to nest. Some bumblebees nest in abandoned gopher holes, and they are the natural pollinators of many native North American plants such as blueberries (honeybees were imported from Europe with white settlers; until then native plants developed their flowers to attract and accomidate bumblebees, wasps, and hundreds of other native insects.)
All around my property there are logs and brush piles, and plywood layed down to choke out weeds in my veggie garden. Underneath there is a world of habitat. Isolated refuges for animals and insects who desperately need places to feel safe. So go ahead, throw down some mulch, some logs, a pile of sticks or some plywood. Know that you are doing the Earth a favor.
You May Also Like
Native Insects and IPM
-
Honey Extraction by Crushing Comb

Honey Harvest Commercial bee hives, and most backyard beekeepers, use Langstroth (American standard) hives with frames lined with pre-pressed wax comb. This allows the bees to spend less time making wax and more time filling the hive with honey. To harvest this honey, keepers usually take out the honey-filled frames, run a de-capping knife down either side to cut off the white beeswax caps, run a knife or comb rake down across the cells to start the honeyflow, then place the oozing frames into the extractor. The extractor is closed, on some models it is heated, and then started. The frames whirl around the inside, using circumfugal force to get the honey off of the comb. The heated sides allows the honey to flow down through screens into a collection chamber. The frames with their cells can then be re-used into the hive for several years before the wax needs to be replaced. There are different scales of extractors, from a home-made one that holds two frames and is run with a drill motor, to large extractors that hold many frames and are heated so much that the honey runs like water. Extractors don’t work very well with frames that don’t start with pre-pressed comb, or Top-Bar Hive frames because the comb is too brittle to be reused.
There are a growing number of people who are not only pursuing organic beekeeping, but going to natural beekeeping. What is the difference? Organics don’t use pesticides to kill mites or treat the bees for various problems. To kill mites, they dust powdered sugar over the frames filled with mite-laden bees. The powdered sugar not only makes the mite’s sticky feet unable to stick, but also forces the bees to groom themselves more, which knocks the mites off and down through a bottom screen on the hive where they can be done away with. Natural beekeepers allow the bees to take care of themselves, using as little interference as possible. By observing what requirements the bees need to survive, by location of the hives and by not over-harvesting the honey, natural beekeepers are more in tune with their bees. For instance, the pre-pressed cells on wax foundation is larger than the larvae cells that bees would normally make. Varroa mites, a terrible scourge of bees, like the larger cells. If bees are allowed to festoon and make their own smaller-celled comb, there are fewer mites because the mites reproduce better with larger cells.
Naturally formed comb doesn’t work well in an extractor, so there are two things a beekeeper can do with it. One is to cut it up and sell it as pure honeycomb. The second is to crush it and allow the honey to drip through a mesh screen into a collection bucket. The latter is the process that we do, since we don’t have a lot of hives. Even with one hive, this process is a long one and physically demanding. As with all honey collection, it is best done on a warm day so that the honey will flow.

Honey-filled frames awaiting crushing The following photos are from a honey harvest last summer from our hives, and also from a wild swarm that I put into a hive just a couple of weeks ago (see my blog post Moving Bees on May 5th).
To crush comb, first we get our basic equipment. You need a long flat pan with sides, a potato masher, a spatula and a knife. You also need a clean food-grade bucket with a spigot on the bottom and a screen on the top and a lid. You can buy these, and believe me they are worth the price.

Empty bucket, screened top, and waiting comb If you don’t want to buy the bucket, you can always do what we did for our first honey extraction. You put clean buckets on the ground between two chairs, over which is suspended a sturdy and steady pole such as a broom. Once the comb is mashed, you put it either into layers of cheesecloth, or into cheap paint strainer bags sold anywhere paint is sold. Then you suspend it over the buckets and let it drip. If you squeeze it, the honey becomes darker. The cons of this are that dust will settle in the open buckets, and the chance of knocking the broom down is always a threat. Even on hot summer days, the dripping may take a week or more until almost all the honey is extracted. That is why covered screened buckets with bottom spigots are so worth the little extra money.

The Cheesecloth-Broom method! Cover the floor with newspapers, put some wet paper towels close by, put on some lively long-playing music and go to.

Cutting the comb from the frames First, remove a frame of comb and cut out the cells into the crushing pan. I stand the empty frames up on another pan which will catch the drips. Using the potato masher… start mashing.

Mashing the comb The goal is to crush the comb enough so that all the honey will drip out of it, taking pollen with it. Since you won’t be heating the honey artificially, and will only be screening once, most of the pollen and all the good vitamins, minerals and anti-bacterial goodness will flow right through and not be destroyed or screened out.

Cut comb laden with honey When that frame is thoroughly mashed, scrape it into the screen that is on top of your bucket… making certain that the spigot is tightly closed. Then start with the next one. This process will take some hours to do, even with two working on it.

Dark, brittle comb from a wild hive When the strainer becomes full then you can give it gentle stirs with a soft spatula, so you don’t tear the screening, or if you have another bucket put a lid on the full one and move on. Place full, lidded buckets in a warm area safe from ants where the sun can help with the warming and dripping process, without destroying the good stuff through heating.

Screen full of mashed comb When your bucket fills up with honey, then its time to decant. I use sterilized Mason jars with screw-on lids. Just open the spigot and be ready for honey to flow. Be ready to shut the spigot off quickly and wait for the inevitable drip.

Drawing Honey Honey should be kept in a dark cabinet, not in the refrigerator. It is naturally anti-bacterial, and has been used for centuries on wounds. It will not mold. It may crystallize, which is a reaction to the ambient temperature, since bees keep their hives between 91 and 97 degrees F. There is nothing wrong with crystallized honey; if you would like it liquid again, set the jar in a pan of hot water, or microwave it briefly. You even can get instruction on unclutterer on how to microwave specific foods like honey.
Once you are done extracting, you can set all the equipment and pile of discarded crushed honeycomb (unless you have other plans for it) out in an ant-free place near your hive for the bees to clean up.
The honey from our hive is very light in color and flavor, although it crystallizes within a couple of months (no problem there… it is also called creamed honey). The honey from the swarm that was in the nursery containers was almost caramel-like in color and consistancy, and had a darker flavor. Avocado honey is often dark, and there were many avocado trees in the area of the swarm.

Differences in Honey Crushing may be time-consuming, and not practical if you have a lot of hives, but for those of us with a hive or two it is worth the time and effort to not heat our honey and let it drip. Anything worthwhile is worth the time and effort it takes to do it. Just always, always, always be sure to allow the bees to keep at least one whole full super of honey for themselves, rather than robbing their honey and substituting it with sugar syrup. Hopefully you wouldn’t put soft drinks in your infant’s formula bottle, and neither should you give sugar -devoid of all the miraculous properties that honey has for the bee’s existance – as a substitute food for your bees. Bee a good bee parent.
You May Also Like
Native Insects and IPM
- Animals, Bees, Gardening adventures, Permaculture and Edible Forest Gardening Adventures, Photos, Vegetarian
Moving Bees

Honeycomb with Capped Cells Backyard beekeeping is catching on in the United States, and there is more pressure on local governments to relax laws that prevent people from doing so. There are many misconceptions about beekeeping, and many keepers treat the bees cruelly in their pursuit of bee products. Bees are honey hoarders, so taking some honey from a hive isn’t going to do them harm. Taking too much starves the hive during non-pollen times and is cruel. Bees are complex, fascinating, and are disappearing for unknown reasons. The most evidence to explain Colony Collapse Disorder links it to a combination of Genetically Modified crops, pesticides and herbicides, and the waves from cell phone and power towers. In other words, we are screwing them up, and we will suffer for it.
About six years ago, a bee swarm set up house in an old couch I had outdoors for my dogs to lay on. They stopped laying on it. I left the hive until I had to get rid of the couch. I was writing for the magazine Edible San Diego and interviewed a couple who were beekeepers (http://www.ediblecommunities.com/sandiego/pages/articles/summer08/secretDances.pdf ). They came over and helped me move the hive. Actually, I took photos and watched as they worked as a team. When they turned the couch over, the honeycomb hanging in contoured patterns from the springs was incredibly beautiful. I thought at the time that I understood organic beekeeping, but I doubted many of the things that I was hearing. Since then, I’ve learned a lot more about working with bees without doing harm. I glean a lot of information from Organicbeekeepers@yahoogroups.com , which is a listserve that fields questions about natural beekeeping.

What Was Under the Couch 
Comb and Bees around Couch Springs That hive was put in Langstroth boxes and my daughter and I kept them for several years. This last December during the same week, this hive and a swarm that had settled in my shed wall both disappeared. Bees don’t die in their hives if they can help it, and for both hives to abscond was strange, so it sounds like Colony Collapse. Since then I’ve planted a Bee Garden in the lower half of my property, flush with flowering plants, particularly in the color blue, that bees love and that flower at differnent times of the year. I also had a couple of Top Bar Hives built to accompany the Langstroth hive which is the American standard hive you see everywhere. I’ll talk about TBHs in another post. A friend had a swarm in a stack of enormous tree-sized black plastic nursery containers, and I took the opportunity to move them to my new bee garden.The best time to move a hive of bees is after dark. Bees are all home at that time, and they don’t fly. They will crawl, however, so you have to watch your pant legs. The stack of containers was far heavier than I had anticipated, and getting them onto the back of my truck without jolting the hive too badly (don’t want to kill the queen) was more than what we had bargained for. However it was done, roped on, and I made my unusual journey back to my house… not that far away, thank goodness!
Bees at Night are a Delight My son and I off loaded the heavy thing and left it in front of the Langstroth hive where the colony would be moved to. That way the bees could familiarize themselves with their surroundings and mark pollen-gathering sites while still in their comb. The other day I took apart the containers and moved the colony into the hive. It was a good thing that I did because the comb was so convoluted that the swarm would probably have suffered soon. Bees build comb hanging down from a surface, securing it to sides if it is available. They do this by festooning, which is where they hold on to each other’s legs across and down, and make wax from bodily secretions into linked chambers in perfect distances apart. The containers had been tipped over, stood up and moved over the roughly year and a half that the swarm inhabited them, and the comb was proof of it. The following image is of the container on its side.

Inside the Container 
Bees on Underside of Second Container It wasn’t a large hive, only about 15,000 bees. A large colony like what was in my couch could contain 30,000 to 60,000 bees during peak pollen season.
Feeling awful about having to disrupt the bees, but knowing that I was actually helping them (ants were also getting into their hive), I began to cut out the comb, looking for larvae, and attaching it to frames that would fit into the Langs. To do this you need a knife, empty frames and pieces of pre-cut wire, rubber bands, or I’ve heard, those jaw-like hair clips. All your equipment should be ready to go because it is very, very hot in the bee suit, the bees are angry with you and the more time you spend the more harmful for them, and your gloves are covered in honey and you stick to everything that you touch. When bees are under attack they send out a pheramone (which smells a little like banana) telling the returning workers that there is trouble. When they sting, they also release a smell that tells other bees that there is an intruder. However, it also alerts bees from other hives that there is a ruckus, and they are attracted so they can try to rob the hive of honey. Very much like looters taking advantage of an emergency.

Being Gentle 
Carefully cutting out comb My son was nice enough to take these photos, up until the bees took exception to paparazzi and stung him on the end of his nose. Fortunately he doesn’t swell up.
Honey Dripping from Comb I do use a smoker. Smoke doesn’t calm the bees, it just makes them order their priorities away from attacking you. They think that fire is imminent, so they begin gorging themselves with honey in an attempt to save as much food as possible in the event of hive destruction. I use only a little smoke because too much hurts the bees and doesn’t make them eat any faster. Mostly the smoke ends up blowing in my face the whole time. I used to not have any reaction to bee stings, but in the last couple of years I develop a large swelling with blisters, so I wear the full bee suit with thick clothes underneath despite the heat, rubber bands around the pant legs or boots, I use smoke and take allergy medication before I begin (I’m usually sneezing from hayfever anyway so it helps keep my nose from running while I’m suited up.)

Placing Cut Comb onto Frames The comb must be cut to fit, hanging the same way it did originally, and must be attached so that it hangs evenly. Otherwise the bees will attach it to the next frame with burr comb (comb that is used to attach honeycomb to support surfaces) and it will be hard to later remove the frames for examination without harming the bees and brood.

Placing Comb Into Hive Comb with brood goes into the middle of the bottom box, which is larger and called a brood box. A couple of frames with honeycomb go on either side of the brood for insulation and food. The frames are spaced evenly… bees like a particular width between combs. In the second box which is shallower, called a super, more honeycomb goes in along with enough frames to fill the box. Frames are traditionally fitted with pre-made wax comb on which the bees build more comb, ensuring that the comb is straight and giving them more time into honey production rather than comb production.

Pre-formed wax foundation in a frame Some use a plastic comb. Also, if you are extracting honey with a centrafugal extractor, the pre-made comb doesn’t break off as easily as regular comb, and it can be re-used. I’ve always wondered about this, since I’m not a large-scale honey producer and am mostly interested in giving the bees safe harbor, although I do like honey and pollination. I’ve recently learned from a seminar from the Backwards Beekeepers (http://beehuman.blogspot.com/) in Los Angeles that using empty frames is just fine. Giving the bees a place to start, like a thin line of beeswax or a popsicle stick helps. For these first two boxes I put in pre-formed wax frames… just a couple… between the moved honeycomb. In the other boxes that I’ll gradually stack on top as the hives grows, however, I’m going with empty frames. Let the bees do what they want. Also it has been shown that bees naturally make slightly smaller rounds in their comb than the ones of the pre-pressed wax foundation, and may be less suseptible to the mites that are a deadly scourge of honeybees.What comb I couldn’t fit into frames I swept clean of bees as well as I could and dropped into a covered pail for later crushing and honey extraction.
With most of the comb gone, there were still several thousand bees in the container that needed to be moved. I hadn’t seen the queen, and she may well have been in that last batch. I had to lift the container (which was big, round and heavy) and gently tap the bees into the open box.

- Tapping Them Out Into Hive
The ones that didn’t tap out I gently brushed with a bee brush.

Brushing Bees into Hive Still more bees were on the bottom of the other container. I placed the hive lid on the ground in front of the opening to the hive like a ramp and tapped and brushed those bees onto it. Bees like to climb, so up they went into the box! There was a lot of debris in the containers such as dirt and leaves, so I had to be careful not to get too much of it into the hive with the honeycomb.
After I moved all the bees I could into the hive, I moved my equipment away and left pieces of honeycomb on the piece of plywood next to the hive. The hive stand rests on long screws, which are placed in cans of oil to prevent ants from invading the hive, so I didn’t worry about all the drips of honey being invaded. Many bees sat on the outside of the hive and waggled their bottoms in the air producing pheramone messages. One of the messages was to inform returning gatherers how to get into the new hive, another would be the state of emergency and who to look out for. I’d hate to know what they were waggling about me!

Spreading Pheramone I covered the hive with a California off-set cover, which allows ventilation in our hot climate and another place for entry. The bees settled in and by this morning they were gathering pollen, cleaning up the honey and going about their business.
There is so much to say about bees, and there is so much we don’t know about them yet. Some interesting facts are that honeybees are not native to the US, and of the 3,000 types of bees they are the only ones that make honey. Almost all bees are female except a handful of drones who have the purpose in life of hopefully mating with a new queen. Worker bees start out tending their queen, where they acquire her particular pheramone, then they move up to housekeeping and then feeding larvae. When they get to middle age, they go out for their first flights and spend the rest of their lives as gatherers. That yellow blotch on your windshield is first-flight bee poo. Worker bees make the larvae develop into drones, queens or workers by feeding them different foods such as bee bread, honey and royal jelly.
If you are interested in backyard beekeeping, attend a meeting of the San Diego Beekeeping Society (http://www.meetup.com/The-San-Diego-Beekeeping-Meetup-Group/ ), which meets the third Monday of each month at 6 pm at Casa del Prado, Balboa Park, room 104. Read books such as the Barefoot Beekeeper by P. J. Chandler or Natural Beekeeping by Ross Conrad, or read this wonderful blog http://beekeeperlinda.blogspot.com/2007/06/honey-harvest-crush-and-strain.html. I live in San Diego County, and I have a permit for beekeeping.
Honeybees sting in defense of their colony, and with the sting comes part of their abdomen and they die. Here is a photo of the stinger that was left on the tip of my son’s nose while he was photographing me. Although stung through the suit many times (with the regretful loss of bee life that entailed) no sting reached me during this process.

Stinger You May Also Like
Native Insects and IPM