-
Melon Pie!?!

Melon. Pie. Nom. It is melon time in the garden. Fresh green melons served with a little lime juice, or fresh orange melons served with a little lemon juice, are just heaven. When you have too many melons, it is time to look for things to do with them.
Last year we froze melon slices in a mild sugar syrup. This worked well when using the melons in something; the texture was too goopy for eating fresh with any pleasure.
This year I found a recipe in my Baker Creek Heirloom Seed catalog for melon pie. Melon pie? I did a little Googling on the subject and found a lot of melon pie, cake and bread recipes. Who knew? Well, not me anyway.
This recipe works for any melon, the more fragrant the better. It was written for Mother Mary’s Pie Melon, an heirloom that we grew this year. It is small and fragrant, and just makes the right amount of melon the recipe. The version of the recipe in the catalog – which is also in their book The Baker Creek Vegan Cookbook – is vegan. I’ve changed it to vegetarian and you can do what you want with it. The cookie-like crust paired with the creamy yet firm filling is wonderful. Top it with a little whipped cream! They suggest topping with toasted coconut, but I’m not that much of a coconut fan. However I could really see this topped with merangue, like a lemon merangue pie. Yep.
Melon PieAuthor: Originally from Baker Creek Vegan CookbookRecipe type: DessertCuisine: AmericanPrep time:Cook time:Total time:Serves: 8A fragrant, yummy pie with a perfumy melon flavor and crisp cookie crust.Ingredients- Crust:
- ½ cup butter or vegan alternative
- ¼ cup packed brown sugar (or white)
- 1¼ cups unbleached flour (organic if possible)
- Filling:
- ½ cup sugar
- 3 Tablespoons cornstarch (organic if possible)
- 1 egg, beaten
- 1½ cups cubed melon, liquified in blender (makes 1½ cups)
- ¼ cup water
- 3 Tablespoons butter or vegan alternative
- 1 teaspoon fresh squeezed lemon juice
Instructions- Prepare crust: beat butter and sugar in mixer until fluffy.
- Add flour and mix thoroughly.
- Press into bottom and sides of a 9" pie pan.
- Bake crust at 375F for 10 - 12 minutes until lightly browned.
- Meanwhile, stir sugar and cornstarch together in medium saucepan and set aside.
- Blend egg, melon and water together until smooth.
- Over medium heat, gradually stir melon mixture into cornstarch mixture, stirring constantly until mixture thickens and begins to boil, about ten minutes. Don't rush!
- Reduce heat and cook 1 minute more.
- Remove from heat and stir in 3 T butter and lemon juice.
- Pour into pie shell, cool and then refrigerate at least an hour before serving.
- Serve with whipped cream... or not.
-
Spicy Chocolate Squash Bread

Cocoa + squash + habinero = YUM. My collegiate daughter needed a recipe to use up leftover frozen kabocha squash. She found a chocolate kabocha bread recipe, adapted it for ingredients she had on hand, and sent me the recipe. I’m such a proud foodie mom: this is the first recipe she’s sent to me. She had substituted yogurt for the oil, and only had cinnamon as a spice, but really liked the results. She said that it was kind of like hot chocolate in bread form; not too sweet and not too plain. Hot chocolate in bread form? I’m so there.
Today has been cold and a little rainy. My shoes and socks were wet from standing in wet grass trying to coerce my 100-lb tortoise back inside his heated room before he became too cold to move. I had some thawed pink banana squash puree leftover from making pumpkin scones for my son last weekend. It was so squash bread time.
I had all the spices, but I changed them up a little. I added some freshly ground nutmeg in place of some of the cinnamon. Due to conversations with others in my exercise class about eating fresh homegrown fruit with chili pepper and other warming spices sprinkled on them (spring fantasies!) I thought I’d heat up this recipe, too. Before Christmas I purchased some habinero powder at Old Town Spice Merchants in Temecula, and fell in love with their habinero sugar which they sprinkled over samples of dark chocolate brownies. I added some habinero powder to this recipe and it is fantastic.
The loaf took an hour and five minutes to bake. It was slightly crispy on the crust and dense, moist and dark on the inside. Yet it wasn’t cloyingly heavy or too wet. The cocoa flavor was satisfying; too often cocoa recipes taste as if the chocolate was just a coloring rather than a flavoring. This was good. The spices were just enough and not overpowering. The habinero powder was just right, making just a little heat in the mouth that really accented the chocolate flavor and warmed me up from the inside. I am freezing the rest of it, just so I don’t eat any more today. It was really wonderful, and it had vegetable in it, too! Thanks, daughter of mine!
I’m sure you could eat this with cream cheese, marscapone cheese, or dust it with powedered sugar, but it doesn’t need anything. Not even, apparently in my case, a fork or plate. So much for dieting today.
Spicy Chocolate Squash BreadAuthor: Diane and Miranda KennedyRecipe type: DessertPrep time:Cook time:Total time:Like spicy hot chocolate in bread form.Ingredients- 1½ cups all-purpose flour
- ⅓ cup unsweetened cocoa powder
- 1 teaspoon baking soda
- ½ teaspoon ground cinnamon
- ¼ teaspoon ground nutmeg
- ¼ teaspoon ground ginger
- ¼ teaspoon ground cloves
- ⅛ teaspoon habinero powder (or ¼ teaspoon if you like it spicier. It will be a slow warm heat in your mouth)
- ¼ teaspoon salt
- 1⅓ cups sugar
- ⅓ cup vegetable oil or plain yogurt
- 1 cup squash or pumpkin puree (or plain canned pumpkin)
- 1 large egg
Instructions- Preheat oven to 350 degrees F.
- Grease and lightly flour an 8½ x 4½ inch loafpan.
- In a medium bowl, sift together all the dry ingredients.
- In a large bowl combine the oil, puree and egg until well combined. Beat in dry ingredients until well blended. (If using electric mixer, beat on low speed. You don't want a lot of air in the batter).
- Pour batter into prepared pan.
- Bake 350 degrees F for 1 hour and five minutes, or until a toothpick stuck into the center comes out clean.
- Cool on a wire rack for fifteen minutes then cut around loaf and turn out onto a plate or wire rack.
- Serve warm, or any way you'd like to!
- (Options: serve with cream cheese, marscapone cheese, or dust with powdered sugar. It is also great drizzled with chocolate frosting (what isn't?) or with chocolate ganache. Both recipes can be found on my blogpost on Buttermilk Chocolate Ganache Cake).
-
Delicious and Fun Thai Custard-inna-Pumpkin

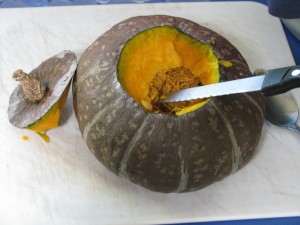
Thai Custard-inna-Pumpkin I know that you lose sleep over trying to figure out how to get more vegetables into your dessert. Well, snuggle up for a good long snooze, because here’s a recipe to bring you peace! I found this recipe in the Heirloom Gardener Winter 2012- 2013 edition. The magazine is created by the people who bring you Baker Creek Heirloom Seeds (organic). A wonderful article about Thai cooking by Wendy Kiang-Spray features this intriguing recipe, and I had to try it. You hollow out a small Thai or Kabocha squash (they are drier in texture), fill it with a coconut milk custard, steam it, and Bob’s your uncle!

Scoop out the seeds and fibers and feed them to your chickens! I just happened to have a 2.5 lb homegrown Kabocha squash handy, so I made the recipe (adding a little cinnamon). Not wanting to be scared alone, I brought the whole cooled squash over to my friend Lara’s house, who helping me fulfill last year’s New Years resolution by teaching me basic piano. Being a vegetarian and a loyal friend, she was game to try it. It came out very good. I was impressed. I will do this again!
Troubleshooting: whisk the ingredients together. I thought I’d be fancy and put them into my VitaMix on the lowest setting, but even that added a little too much air to the custard mixture.

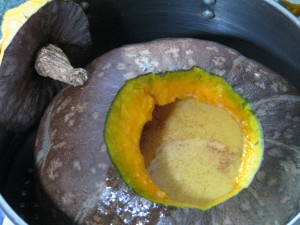
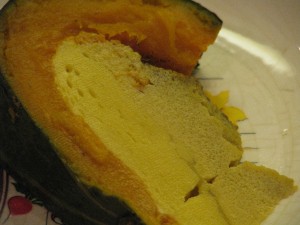
Don’t fill all the way up. Steam the lid off to the side. The top of the custard that I could see was yellowish, and I figured that this was due to the dark yolk in the eggs from my chickens, but I don’t know. Once cut into, though, the custard as a lovely white.
I turned my steamer on high until it was boiling, then turned the temperature down low and the custard wasn’t done in the allotted time. Next time I’ll keep it at a higher boil so that the steam is hotter. I cooked it much longer (I think too long because I was doing other things) and the squash split a little as it was very soft. I kept it in the steamer with something between the soft side and the inside of the steamer so that the squash would keep its shape as it cooled. After it was room temperature, I put it in the refrigerator for a short time and it the squash didn’t fall apart when I removed it.

Creamy coconut custard and dry delicious squash. Ms. Kiang-Spray states in her article that this recipe is known in Thailand as Sankaya and is a classic dessert. With all the eggs and tasty squash, I’d call this breakfast or lunch, too!
Thai Custard-inna-PumpkinAuthor: Diane C. Kennedy (adapted from recipe by Wendy Kiang-Spray)Recipe type: DessertCuisine: ThaiPrep time:Cook time:Total time:Serves: 6A simple, fun, lovely dessert that people will remember as they get their beta carotene.Ingredients- 1 2 -3 pound dry-fleshed squash such as Kabocha or Thai pumpkin.
- ¾ cup coconut milk
- 5 eggs (preferably at room temperature)
- ⅓ cup sugar
- Pinch of salt
- 1 teaspoon vanilla extract
- ¼ teaspoon cinnamon
Instructions- Bring two quarts of water to a boil in the bottom half of a steamer pot.
- Use a cup to trace a circle around the top of the pumpkin.
- Cut the lid off around the guideline.
- Hollow out the inside with a spoon, making sure to get all the fibers.
- In a bowl gently whisk until combined the rest of the ingredients.
- Place the squash into the steamer basket.
- Pour custard through a sieve into the pumpkin leaving an inch to the top (filling will rise).
- Include the squash lid next to, but not on top of, the squash.
- Steam covered and undisturbed for 55 minutes until a knife inserted into the custard comes out clean.
- Remove steamer basket from over heat and allow squash to come to room temperature.
- Slice into wedges (in front of admiring company!) and serve.
- Serve at room temperature or chilled.
-
Awesome Candy Alert: Cayenne and Cashew Brittle

Spicy brittle I’m not big into candy; give me cake, pie or bread, or a good rice pudding instead. However I’ve made this brittle at Christmas for years now, and it is always a big hit. The cayenne makes a nice mild burn to counter the sweetness of the brittle. Cayenne is good for you, too, as are cashews (no matter how creepy it is that cashews grow!), so it makes sense in some distorted way that this candy is good for you. It is so easy, too. I have much less salt tolerance than the general American public. If I eat out I find myself desperately thirsty for days. The original recipe was made for high salt intake, but I have shown options on cutting it back. You don’t need it, for the delight of the candy is in the burn with the sweet. I also don’t like very hot (spicy) foods, but I like this. Make some and try to share.
Cayenne and Cashew BrittleAuthor: Diane C. KennedyRecipe type: DessertCuisine: AmericanPrep time:Cook time:Total time:A yummy easy-to- make brittle with a slow spicy burn.Ingredients- 2 cups unsalted roasted cashews, whole or pieces (you can use salted, but I don't)
- 10 tablespoons (1¼ sticks) butter (if using salted cashews, use unsalted butter)
- ½ cup sugar
- ¼ cup packed light brown sugar
- 1 tablespoon light corn syrup
- 1 teaspoon cayenne pepper
- ¼ teaspoon salt (optional)
Instructions- Butter a nonstick baking sheet and set aside.
- Combine all the ingredients in a large nonstick skillet.
- Stir mixture over low heat until the butter melts and the sugars dissolve.
- Increase heat to medium and boil.
- Stir constantly until mixture turns golden brown, thickens and masses together, about 5 minutes (if you cook it longer it won't be as shiny; too little and it will be soft but still yummy).
- Immediately pour candy out onto the prepared baking sheet and quickly spread evenly using a spatula to help.
- Cool completely.
- Break into pieces.
- Makes about 1⅓ pounds