Vegetarian
-
Seitan: An Easy Mock Meat

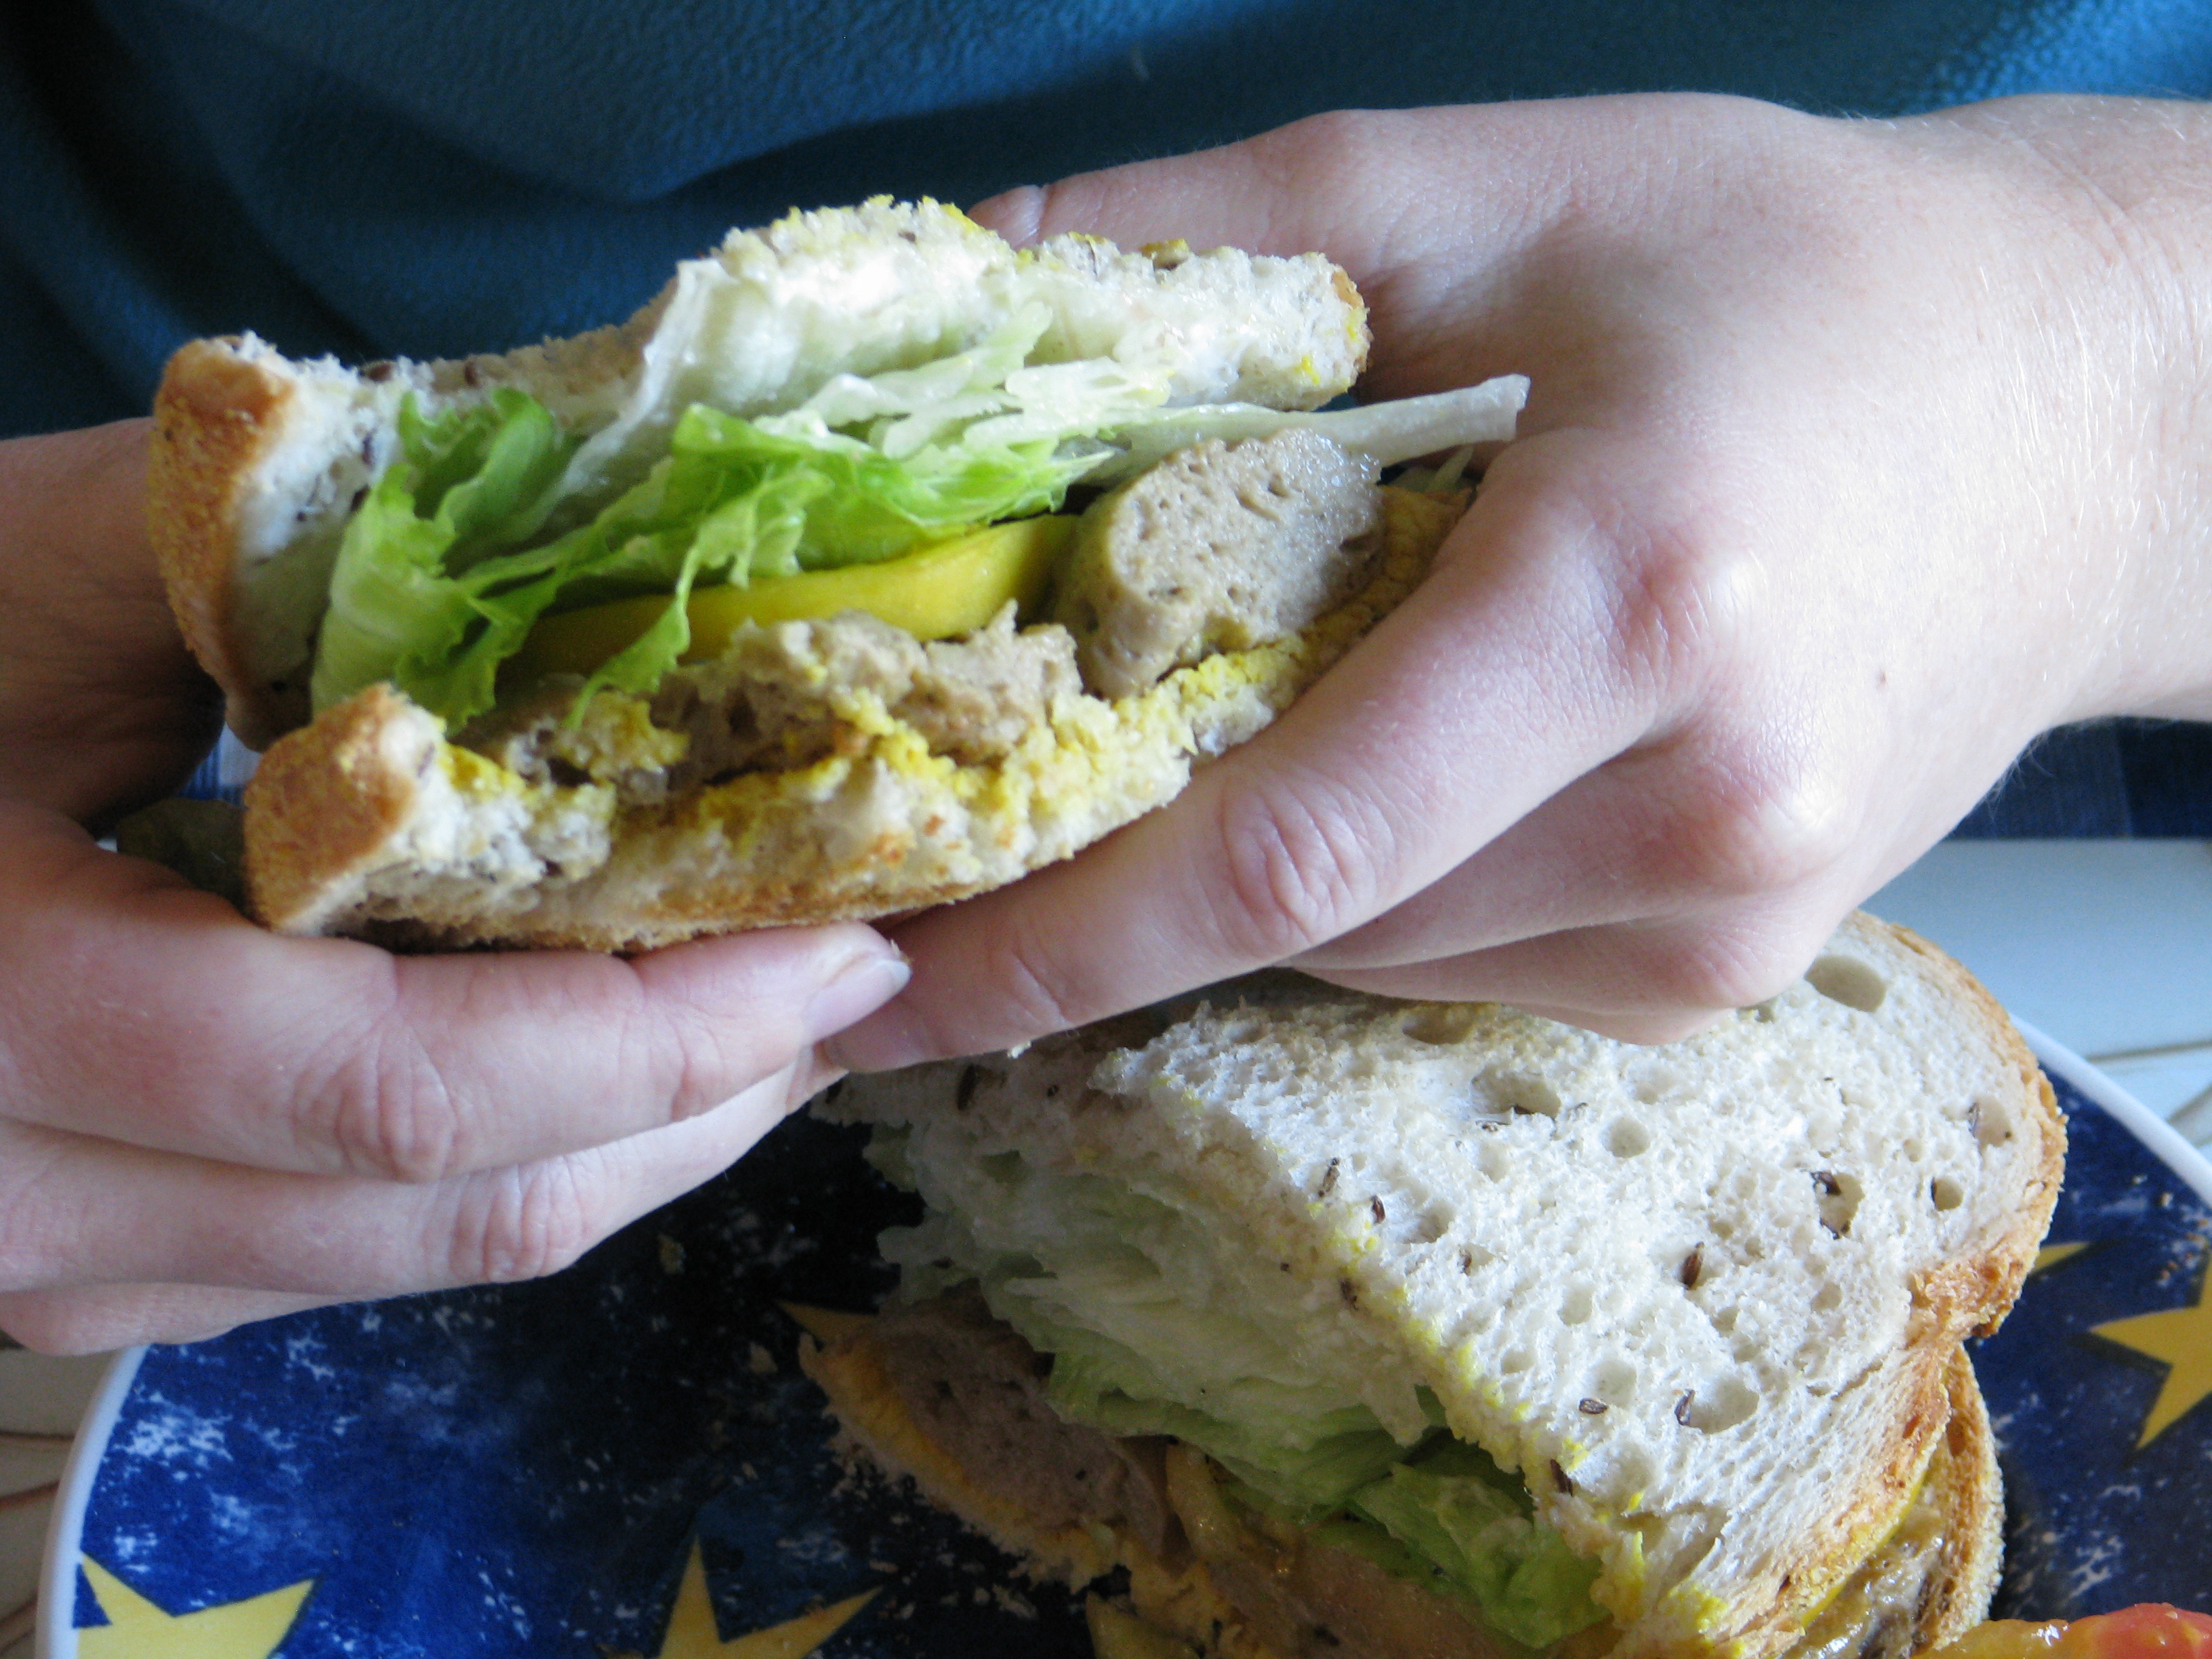
A juicy seitan sandwich is really, really good. For the past year I’ve been making my own vegan meat out of organic vital wheat gluten. This meat is called seitan (pronounced, humorously enough, say-tan, just like the fork-tongued guy in red). If you’ve eaten mock meats, especially in restaurants, you’ve most likely have eaten seitan.
I am not gluten intolerant, and I know that the current ‘epidemic’ of celiac disease is not what it seems. People eat far too much wheat in their diets, and that wheat is not only genetically modified, but sprayed with herbicides and pesticides, then processed until it has to have nutrients added back onto it to qualify as food, and then it is shipped and stored. The consumer has no idea when that poor tortured grain actually came forth into this world. As my good friend Bill says, “You can’t see the farm in it.” I believe that when people eliminate wheat from their diets they feel so much better because they aren’t eating all those hamburger buns, batters, snacks and other empty-calorie foods. They are also reducing the amount of pesticides and herbicides they consume.
I know about developing an intolerance to food. I’ve developed an intolerance to soy milk (organic, mind you), which made me realize how much of it I have been consuming. Now I drink rice milk or water mostly, and manage my soy intake while keeping an eye out for other products I may be indulging in too much. My grandfather Walter Brower in the 30’s had developed a bad dermatitis. He was in the hospital with it, being treated for all kinds of things with no relief. He was missing work, and he was the sole supporter of his family. Finally someone recommended that he visit a chiropractor… a chiropractor? For a skin condition? In the 1930’s? This was radical thinking. Thankfully he was desperate enough to go. He visited the chiropractor’s office, sitting across from him at his desk, and told the doctor about his affliction. The chiropractor asked what he did for a living. My grandfather was a delivery man for Bordon’s milk. The chiropractor said that my grandfather had developed a milk allergy due to all the dairy products he consumed. My grandfather went off dairy, and the skin problem disappeared within days. (This was at a time before cows were fed pellets of corn and chicken feces laced with antibiotics as they are today, too.)
All that said, I make my own meat with organic products, as well as my own vegan butter , and am now experimenting with vegan cheese (more on that later). Do I have a lot of time on my hands? No. I spend a couple hours once a month making the seitan and the butter, enough for a month, and freeze both.
Seitan isn’t pretty before it is cooked. It is grey and spongy. However compare it to the flesh of a butchered animal and it is beautiful. You can buy vital wheat gluten just about anywhere now, but different brands have different quality. I use Bob’s Red Mill which has outstanding flavor and never gets rubbery. I also use Bragg’s Liquid Aminos instead of soy sauce, tamari and often other salt. It is organic and nutritious, and a little bit brings out the flavor of soups, main dishes, salad dressings, scrambled eggs, and anything its added to. Compare prices online for both; Amazon.com has good deals if you want to buy a lot.
When seitan is frozen, the patties are quickly thawed in a lightly oiled pan. The ‘meat’ is juicy, flavorful and delicious, and can be used in place of chicken strips, ground up instead of meat for stuffing or sausage, used as is in a sandwich or hamburger, or cubed for stew, curry… whatever. The problem I have is wanting to eat it too often!
Basic SeitanAuthor: Originally from ShrimpGhost on Allrecipes.comRecipe type: Main DishCuisine: VeganPrep time:Cook time:Total time:Serves: 12Organic vital wheat gluten makes a yummy, all-purpose meat substitute for very low cost.Ingredients- 2 cups organic vital wheat gluten
- 1 teaspoon organic crushed dry rosemary (or minced fresh)
- 1 teaspoon organic dried thyme
- 1 teaspoon organic dried rubbed sage
- ¼ teaspoon organic cumin seed, lightly crushed
- ¼ teaspoon organic garlic powder
- 2 cups water
- ⅓ cup Bragg's Liquid Amino Acid (or tamari sauce, but it is saltier)
- 8 cups water
- ¼ cup tamari sauce
- ¼ cup Bragg's Liquid Amino Acid
- ½ teaspoon organic onion powder
- 1 4-inch piece dried kelp (kombu) (you may omit)
Instructions- In a large non-reactive bowl, mix together the vital wheat gluten, rosemary, thyme, sage, cumin seed and garlic powder. In a measuring cup mix the 2 cups water with the Bragg's. Quickly add the liquid to the dry and working fast mix thoroughly. The gluten will develop quickly; use your hands to work it to make sure there are no patches of dry gluten. There should be extra liquid. The gluten will be rubbery. Shape the gluten into a long loaf, about 3 inches in diameter. Allow to rest while you make the broth.
- In a tall stock pot combine 8 cups of water with the Bragg's, tamari, onion powder and kombu and bring to a boil.
- Cut gluten log into slices no wider than ¼ inch, or in strips (you can always cut the finished patties into strips later). Individually drop pieces into boiling stock (they'll stick together otherwise). Reduce heat to low, cover and simmer for 45 minutes. Drain and either store seitan in refrigerator in some broth for no more than 5 days, or layer seitan patties flat in a plastic freezer bag laid on a cutting board or plate and freeze. When frozen gently break apart patties in the bag and keep frozen, taking out what you need. Patties can be heated quickly in a pan, sliced and stir-fried, thawed and breaded and baked or fried, or used any way you'd like.
I tried several seitan recipes, most of which were either too bland or too strong and muddy flavored. This recipe I really like for all-purpose, chickeny seitan. I freeze the finished slices flat in a plastic bag so I can pull out however many I need whenever I want them. - Compost, Gardening adventures, Perennial vegetables, Permaculture and Edible Forest Gardening Adventures, Recipes, Seeds, Soil, Vegetables, Vegetarian
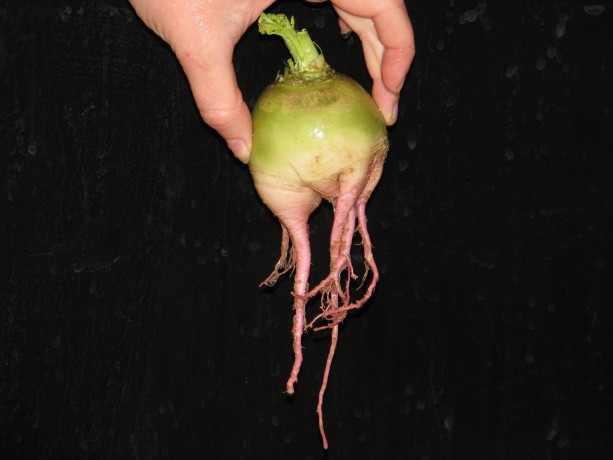
Perennial Vegetables: Jerusalem Artichokes
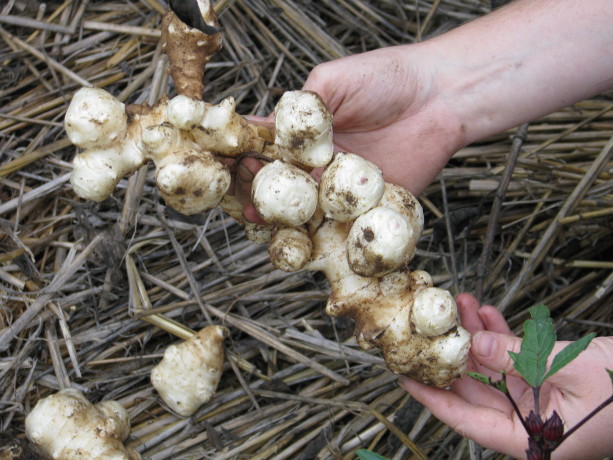
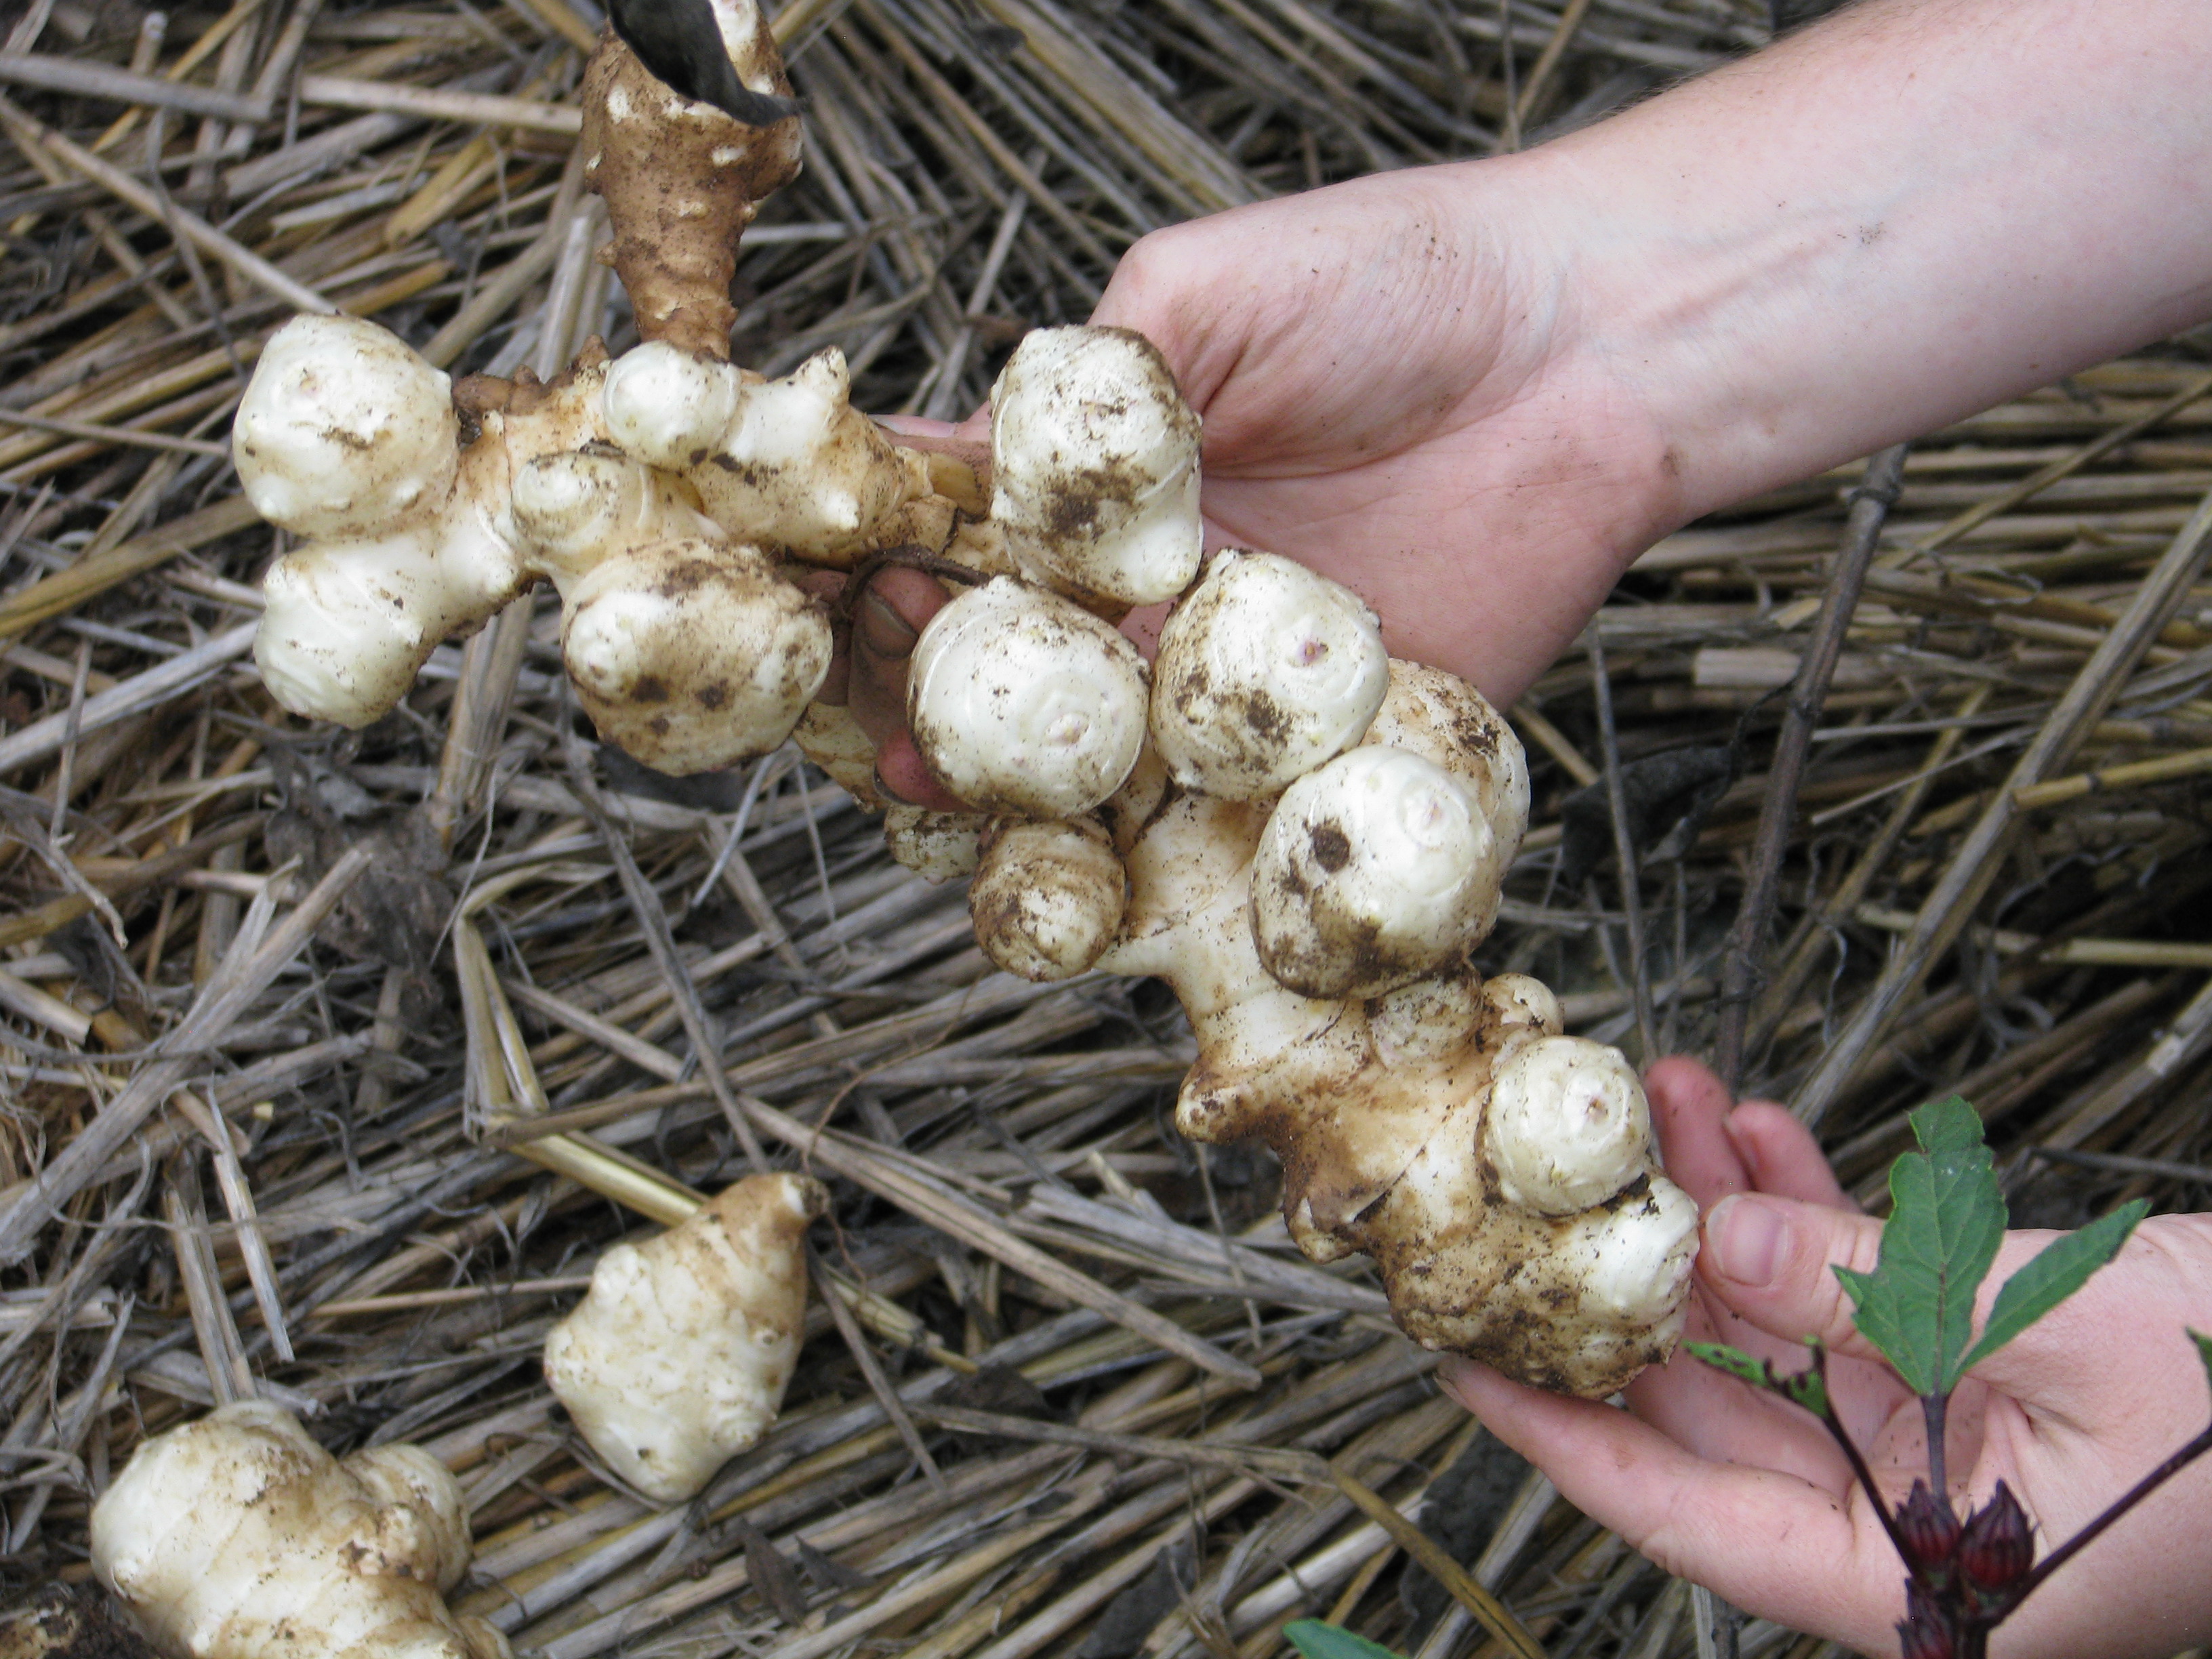
A knobby root of deliciousness. Jerusalem artichokes aren’t artichokes nor are they from Jerusalem. They are also called sunchokes, which sounds something like an unfortunate cosmic event to me. We grew them this year and I have only great things to say about them.
I ordered organic tubers from Peaceful Valley in California. By the way, all of the strawberries and rhubarb that I had ordered from them were inexpensive and yet of prime quality. The tubers grew into tall, sunflower-like plants that graced an area of the new kitchen garden that didn’t have the best soil in it.

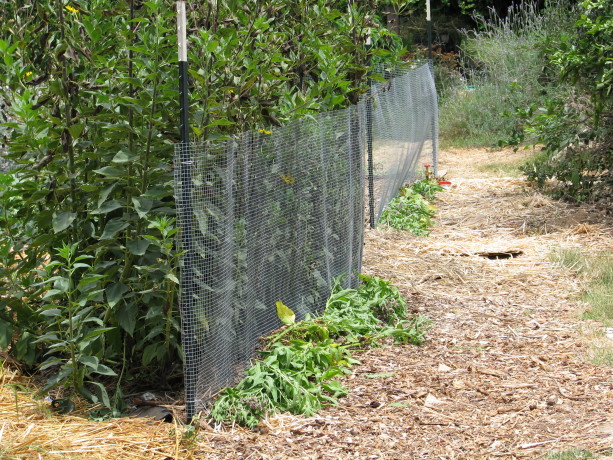
JAs have beautiful sunflower-like flowers that pollinators love. They flowered most of the summer and just this month – October – began to die off. The plants had some difficulty with lace bugs, but with good soil fertility and some actively aerated compost tea foliar spray they rallied exceptionally.
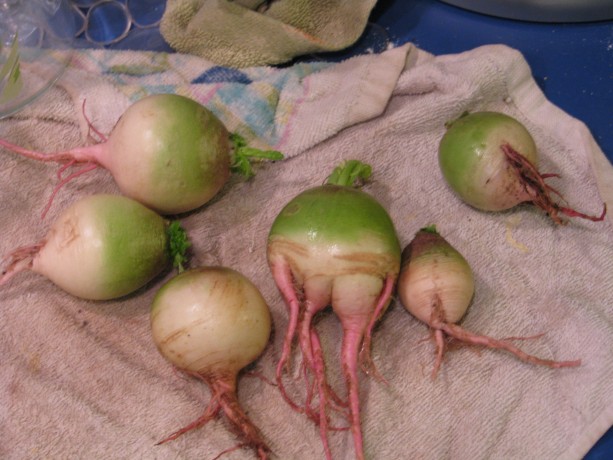
The Jerusalem artichokes made a nice living wall. Today, for our Halloween lunch, we thought some creepy-looking tubers would be appropriate. They share a basket with Black Beauty zucchinis (caught them small!) and our first sweet potato of the year, Spanish Red Improved, which we also steamed and ate – heaven!
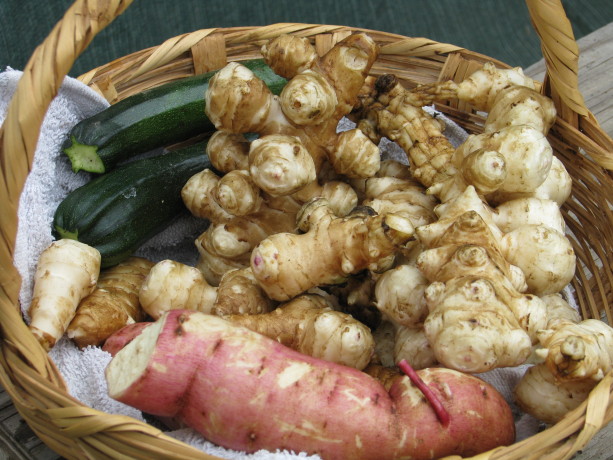
Our Halloween harvest. The ‘chokes are supposed to sweeten up after a frost, but here in San Diego county that might take awhile.
The chokes grow tubers all around the base of the plant, and also spread them underground. They are very easy to harvest; the plant wants the tubers to make new plants so they break off easily.
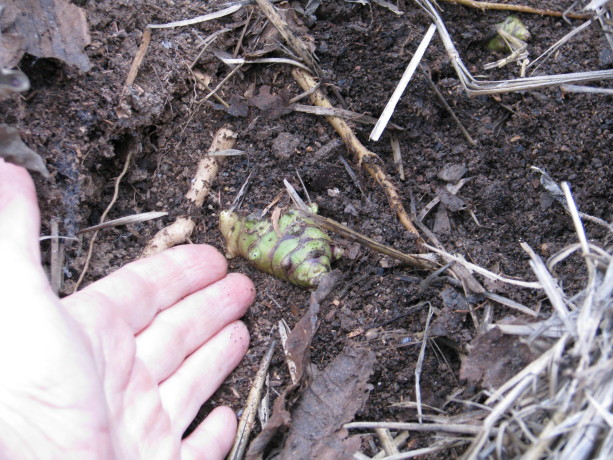
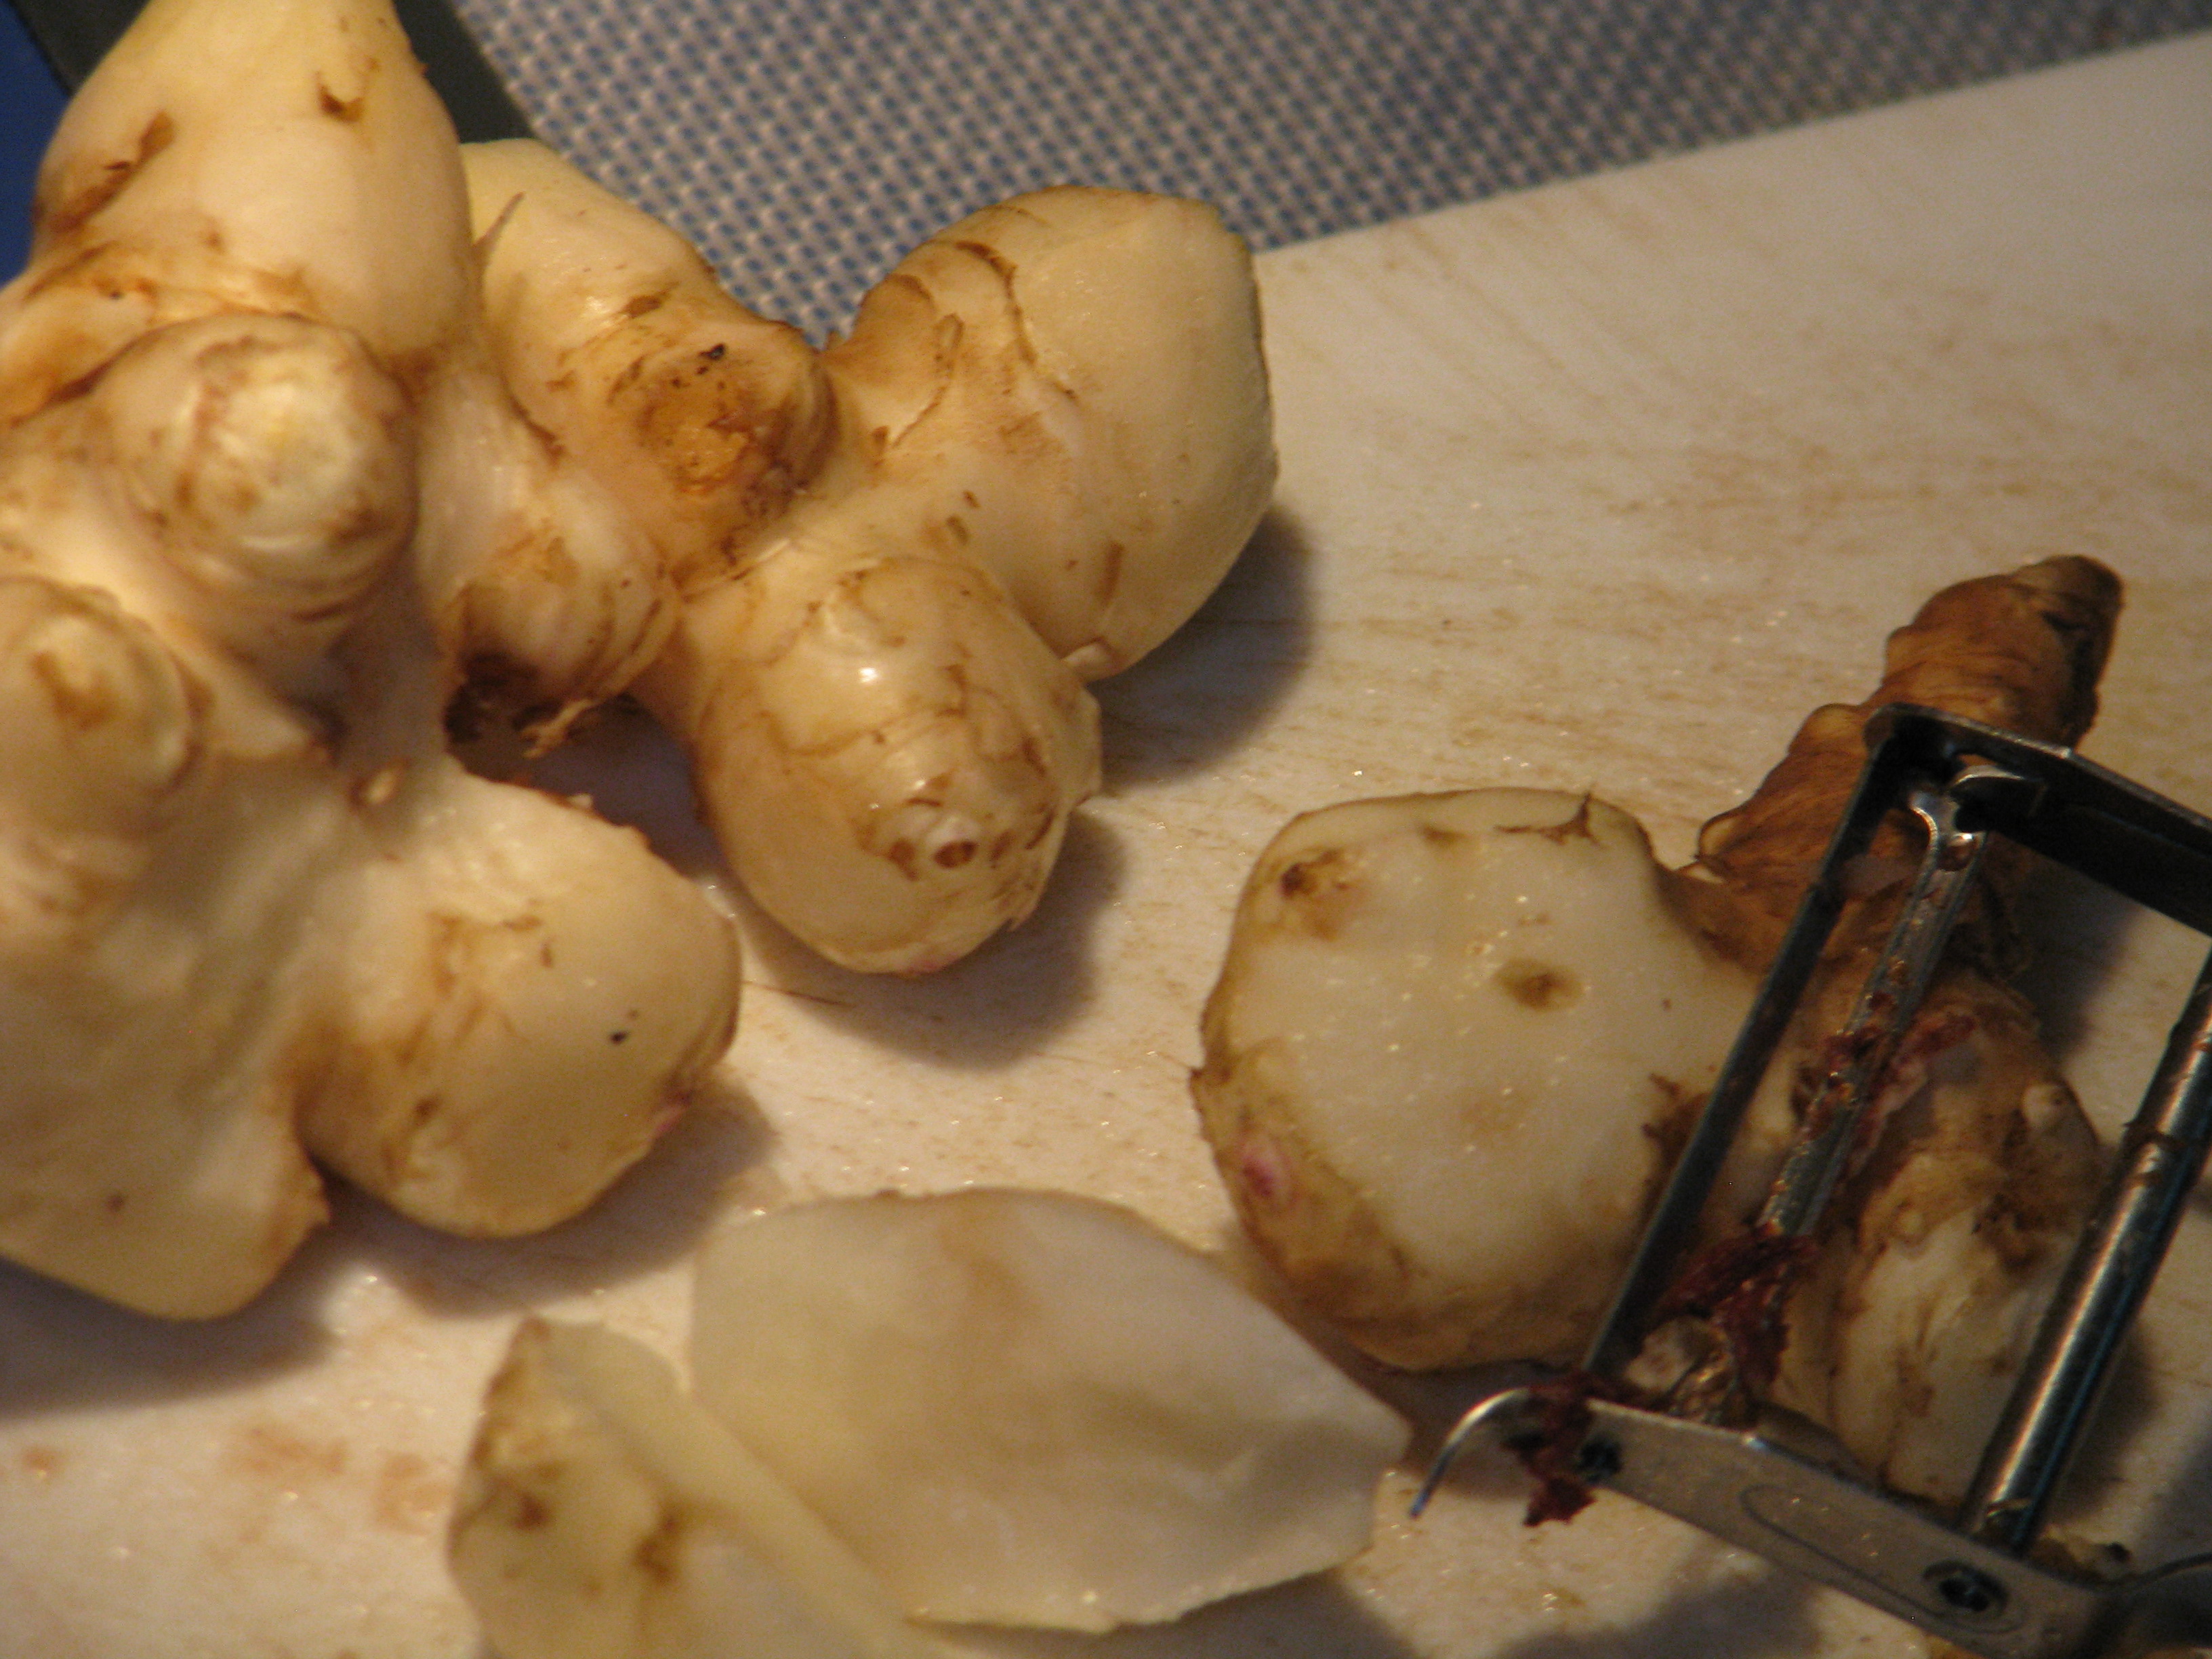
Cover green tubers back up so that they can continue growing. Although they are knotty, they wash off easily and the skin is thin and mostly easily removed with a vegetable peeler. I didn’t scrape all of it off and it wasn’t bitter or unpleasant at all. I roasted them after just washing them with a vegetable brush and the skins were a little firm and the insides very soft. There wasn’t any unpleasant taste.

Peeling them is kind of easy, but the skin doesn’t taste bad. Raw they are crisp. Steamed, the JAs become very soft and – by gosh! – taste very similar to soft, buttery artichoke heart! Wonderful! My daughter and I ate them down with a little vegan butter . So wonderfully good. They can be easily mashed as well. We also roasted them along with other vegetables.
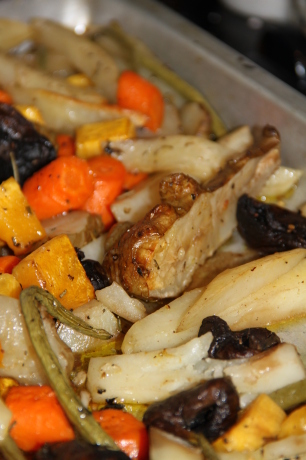
Jerusalem artichokes, carrots, beans, mushrooms, potatoes and squash are roasted with garlic, rosemary and olive oil. Yum. I mix all the veggies in olive oil with dried rosemary, minced fresh garlic and pepper, spread out on a tray and roast at 425F for about an hour, depending upon the size and thickness of the veggies. Roasting keeps them more solid yet tender, and sharpens their flavor a little. Absolutely fantastic.
I’m saving small tubers to plant ALL OVER THE YARD! What a great perennial vegetable – perennial in that you leave some tubers in the ground and they keep coming up every year. They are attractive, give shade to smaller plants, are great for attracting pollinators, create good mulch when the tops have died down, and have wonderful tubers. The tubers may be eaten raw as well; they are crisp and mild.
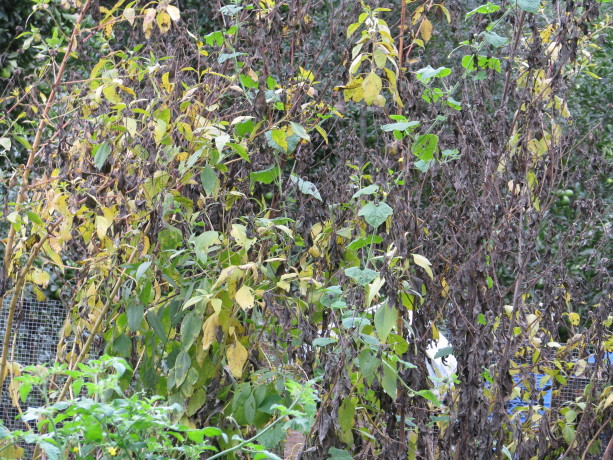
The foliage dies off in the Fall. I’ll cut the stalks at the ground level and lay them down on top of the bed to feed the soil. If you have a corner for some tall flowers, definitely try growing some organic Jerusalem artichokes. Yum.
- Breads, Breakfast, Cake, Condiments, Dessert, Frosting, Permaculture and Edible Forest Gardening Adventures, Recipes, Sauces, Vegan, Vegetables, Vegetarian
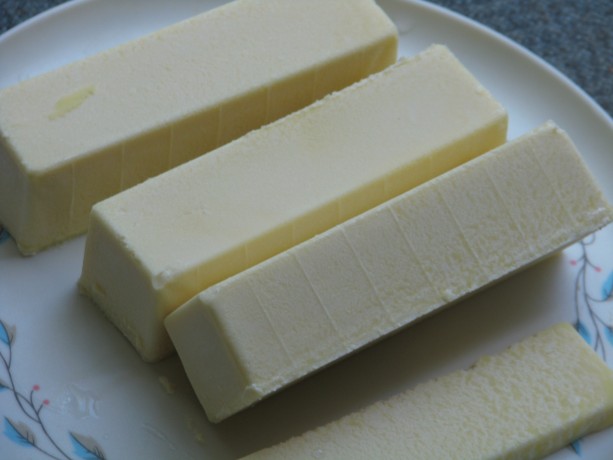
Making Ethical Butter

Vegan butter! I’ve labeled myself an ‘ethical vegetarian’ for nearly two decades. I stopped eating animals when I became horrified at the dichotomy of having glue traps under the house to catch wild rats and mice (and any poor, poor animal that happened upon it, such as lizards. Glue traps are horrendously cruel. I hadn’t put them there.) and a cage with an exercise wheel and specialty food for ‘pet’ mice in the bathroom. Justice is a man-made effort, and by not eating animals I was no longer approving of mass torture by buying into it. Although I no longer ate animals, I have still indulged in animal products, namely dairy products. Slowly it has sunk in how badly animals are treated for those, too. As someone who loves cooking, it has been difficult for me to wean away from dairy products. Butter is especially difficult. Unlike hens who have been bred to continuously lay without needing the services of a rooster, dairy cows must be lactating to produce milk. Cows are usually artificially inseminated, then after giving birth their calves are replaced by milking machines. The calves are most often slaughtered for veal. This process is repeated until the cow is used up from the constant pregnancies and lactating, and then she is slaughtered. This horrible practice is disguised by advertisements showing happy cows grazing in fields. That is a fantasy. ‘Grass fed’ and ‘pasture raised’ are sly terms that give you an image that is nowhere near to the truth. Please read Michael Pollen’s Omnivore’s Dilemma to understand where your food comes from and why.
To find an acceptable butter substitute has been an expensive and frustrating endeavor. For awhile I used a dairy substitute from Trader Joe’s, who I swear keeps tabs on what I buy the most and then discontinues it. All other butter substitutes either taste horrible, can only be used for spreading, or more commonly contain palm oil. The sudden fad for palm oil has created extreme clearance for the growing of palm in the areas which are habitat for the orangutan; indeed, if we don’t curtail our consumption of palm oil quickly the orangutan will go extinct within our lifetimes.
I finally found a recipe for a butter substitute that works pretty well for both spreading and baking. It is made mostly of refined coconut oil. At this point coconut oil is sustainably produced – please make sure that you support companies that do so. Refined organic coconut oil has no flavor or scent; unrefined has a mild coconut flavor and a toasted coconut scent. If you are using a batch of this butter for baking where coconut flavor is desired, then use the unrefined.
This recipe is by no means my own. I found it and a detailed description of the science behind it at VeganBaking.net . There are several options listed and a lot of cooking science behind the butter.
The mouth-feel is amazingly creamy and satisfying. I used the basic recipe, Regular Vegan Butter, Coconut Oil Base. The recipe calls for curdling the soy milk, which will drive the butter flavor. I tried the full teaspoon of cider vinegar, then half cider vinegar and half coconut vinegar, then just half a teaspoon of coconut vinegar, and finally no vinegar, and thus no curdling, at all. I found for my taste that the vinegar flavor carried through and was much too dominant. Even at just half a teaspoon it was so noticeable to me that I didn’t like it on toast. It was good, however, when my daughter used it on sourdough and topped it with fresh avocado. The slight vinegar flavor enhanced the avocado deliciously.
The batch I made without vinegar seemed perfect. The mouth-feel of this butter with or without the vinegar is creamy and all that a high-fat butter should be. It looks, cuts and spreads like butter. The flavor is creamy and very mild, almost like a slightly salted sweet butter. This was a winner for me. For the soy milk I used Trader Joe’s Organic Plain, which does have some sweetener in it. I’ll try with an unsweetened plain organic soy milk another time.
I keep my butter on the counter. I know that organic butter holds its shape better in the heat than processed butter, but both stay stable unless the temperature is in the 80’s. Coconut oil melts at 76F, and in my summertime Southern Californian kitchen, this vegan butter must be kept in the refrigerator. The butter is hard when needed, so the next batch I will take the author’s advice and swap out a tablespoon of coconut oil with regular oil to make it more spreadable.
I wanted to test the butter in cooking and baking. I melted it in a pan and cooked eggs and other breakfast items in it successfully. I used it on toast and on mashed potatoes with great success. The experiment with shortbread cookies went wrong, however, but I don’t think that that was the butter’s fault. These were lemon rosemary shortbread cookies, and contrary to my baking sense I followed the author’s (another blog) directions and didn’t sift the powdered sugar before adding it. There were lumps, therefore, in the batter and I mixed it extra to try and beat them out, which I believe was responsible for making the cookies tough. They were flavorful, but not crumbly. Oh well, I’ll just have to try again! The cookies rolled out, cut, and baked well, retaining their shape and performing as well as with cow’s butter.
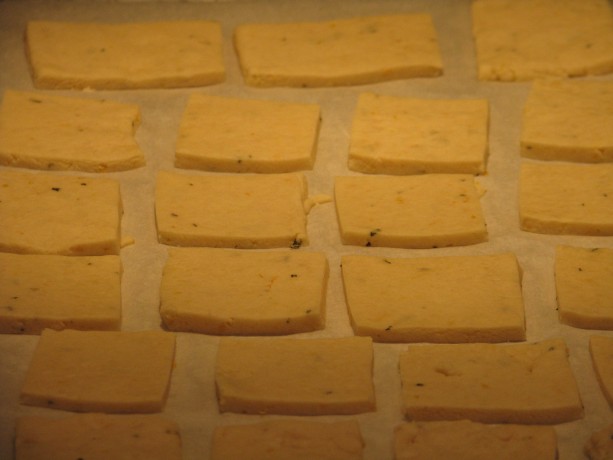
Shortbread didn’t spread using this butter, which was great. I don’t have a finished photo of the lemon-rosemary cookies because, well, they were eaten. As with all substitutions, there is always a difference and vegetarians and vegans have to embrace it. Of course fake bacon and ground ‘meat’ is not quite the same: the great part is that it is far more healthy for your body (lower fat, few preservatives if any, often organic, and not the pesticide-drenched and drugged animals that people eat) and doesn’t perpetuate the extreme cruelty to animals about which humans have become nonchalant. Yes, other animals aren’t kind when feeding off of other animals (those which aren’t vegetarians). Yet we as humans have the option the others don’t, to make eating choices.
Here is the basic revised recipe; please see the original blogpost on VeganBaking.net and give the options a try. I found xanthan gum from Bob’s Red Mill at my local grocery store, and liquid lecithin and coconut vinegar online through Amazon.com.
You can double or triple the recipe with no problem! Enjoy.
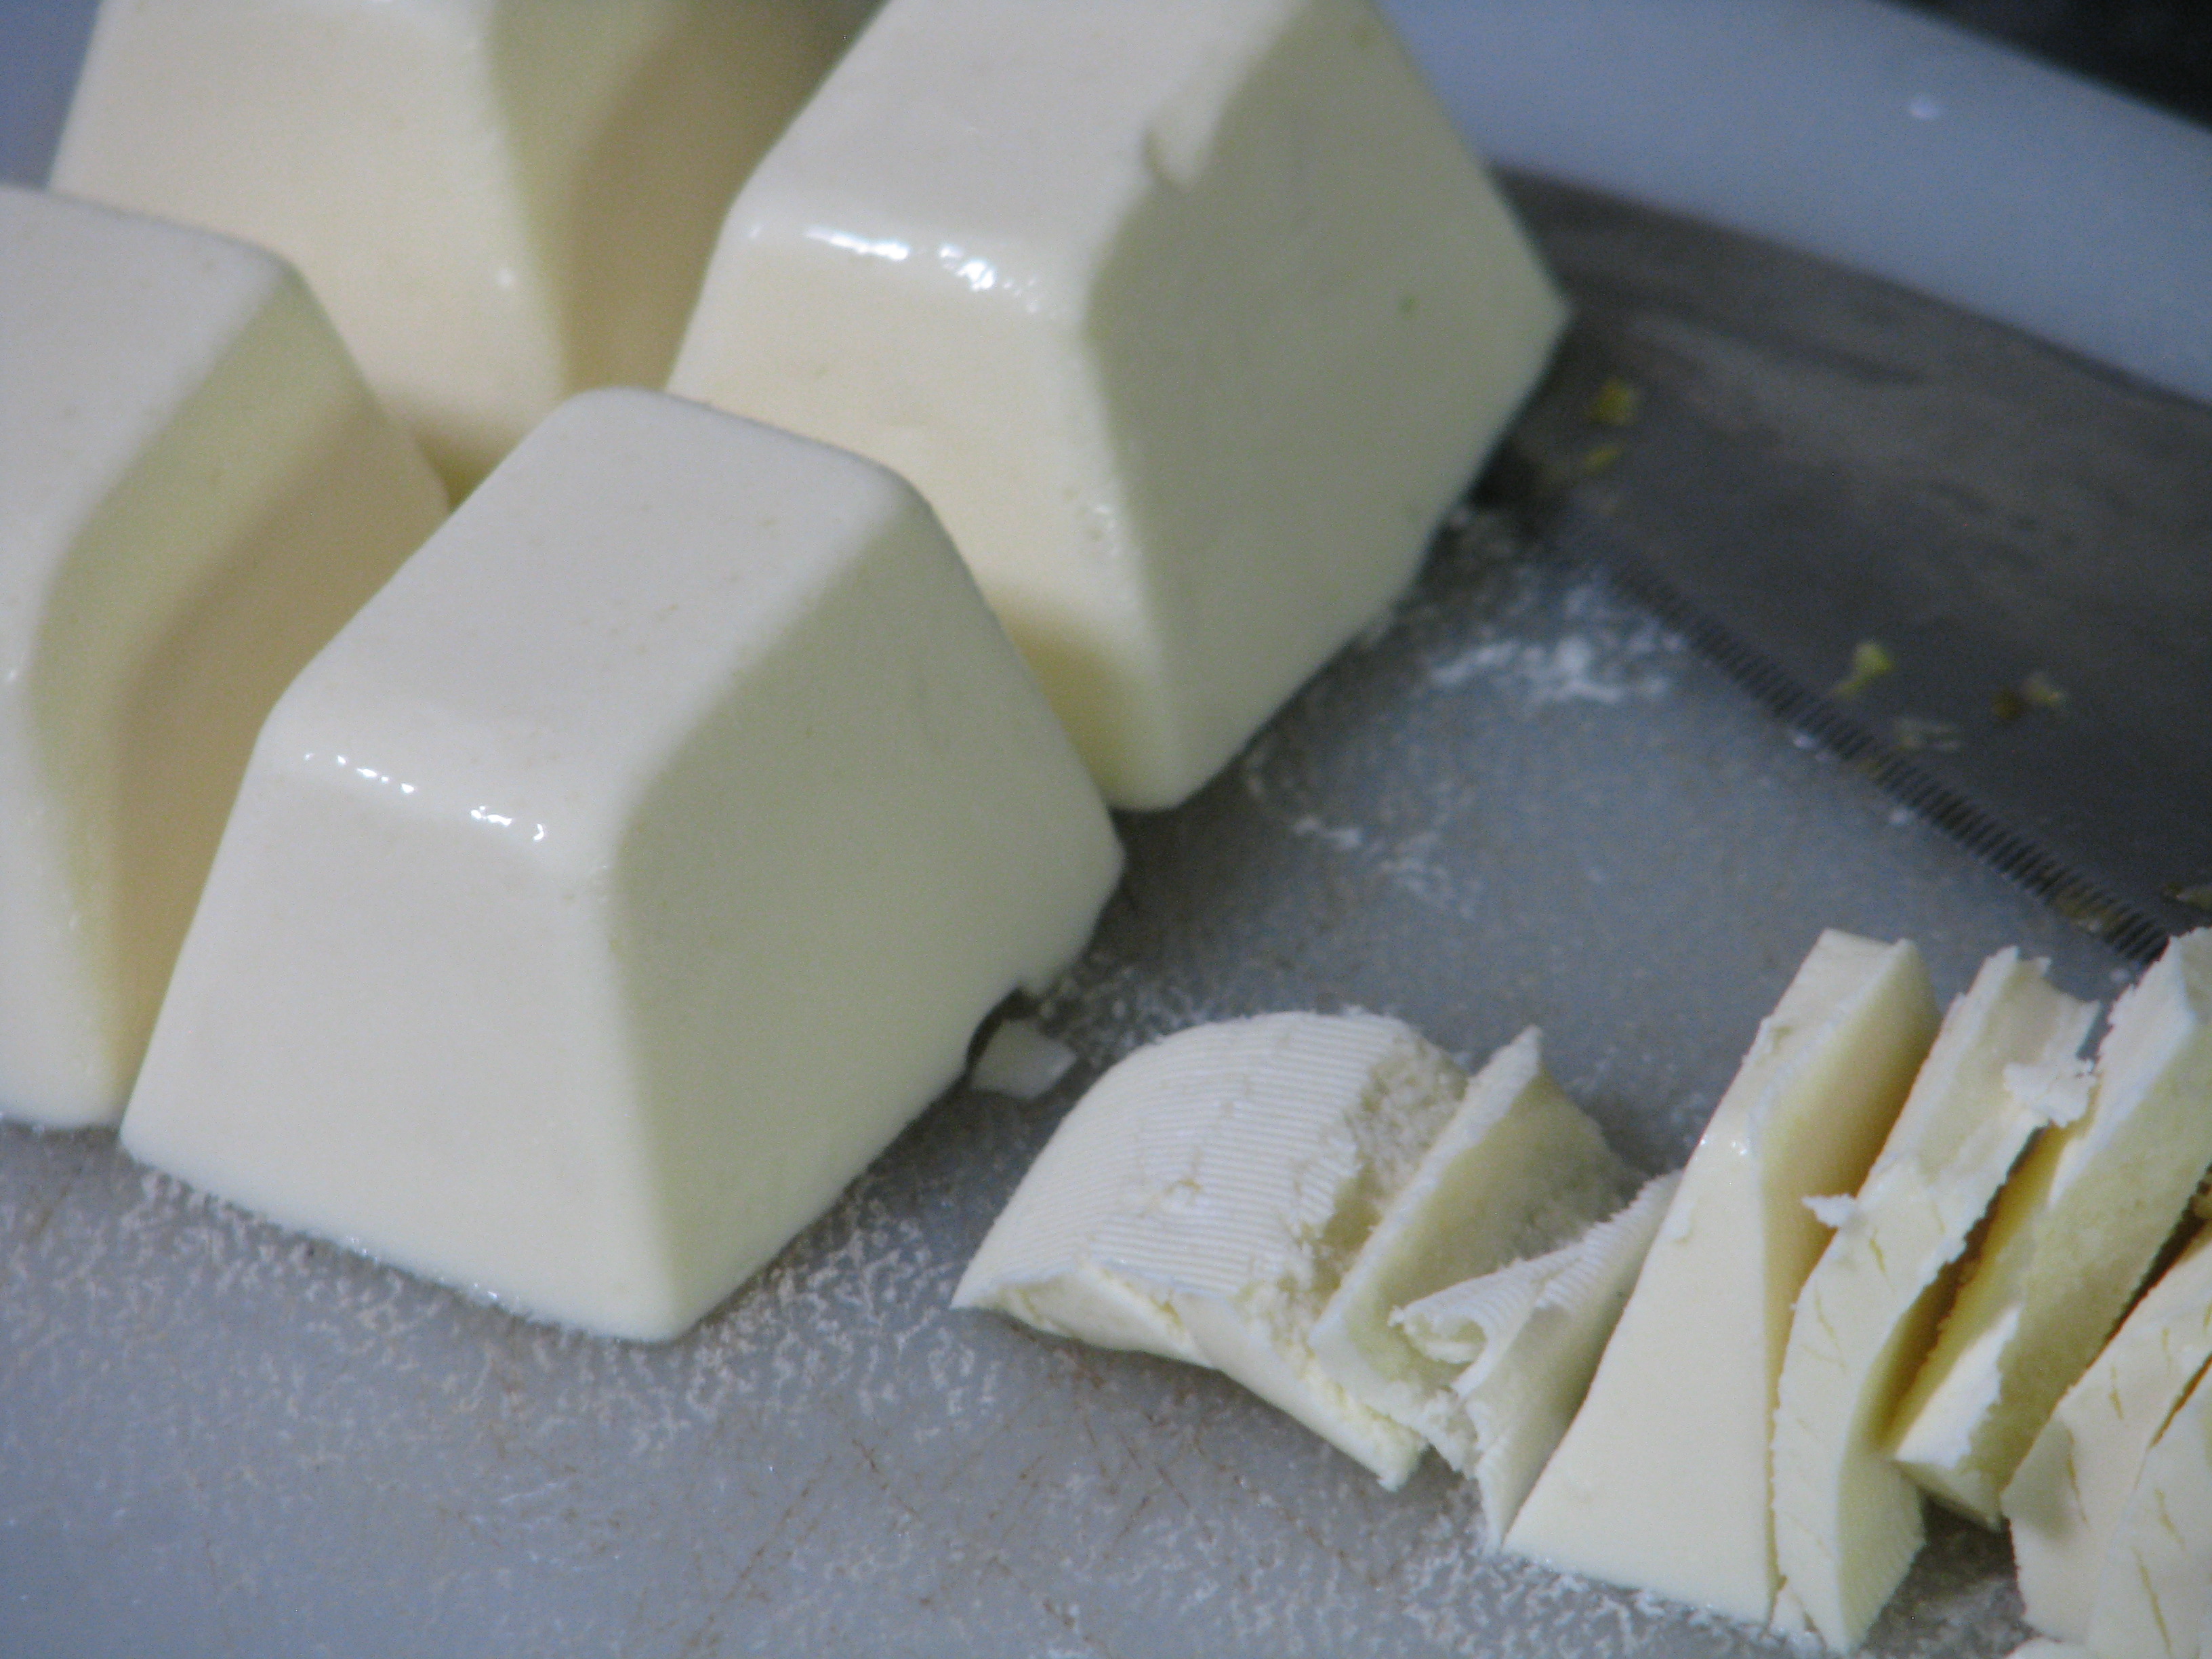
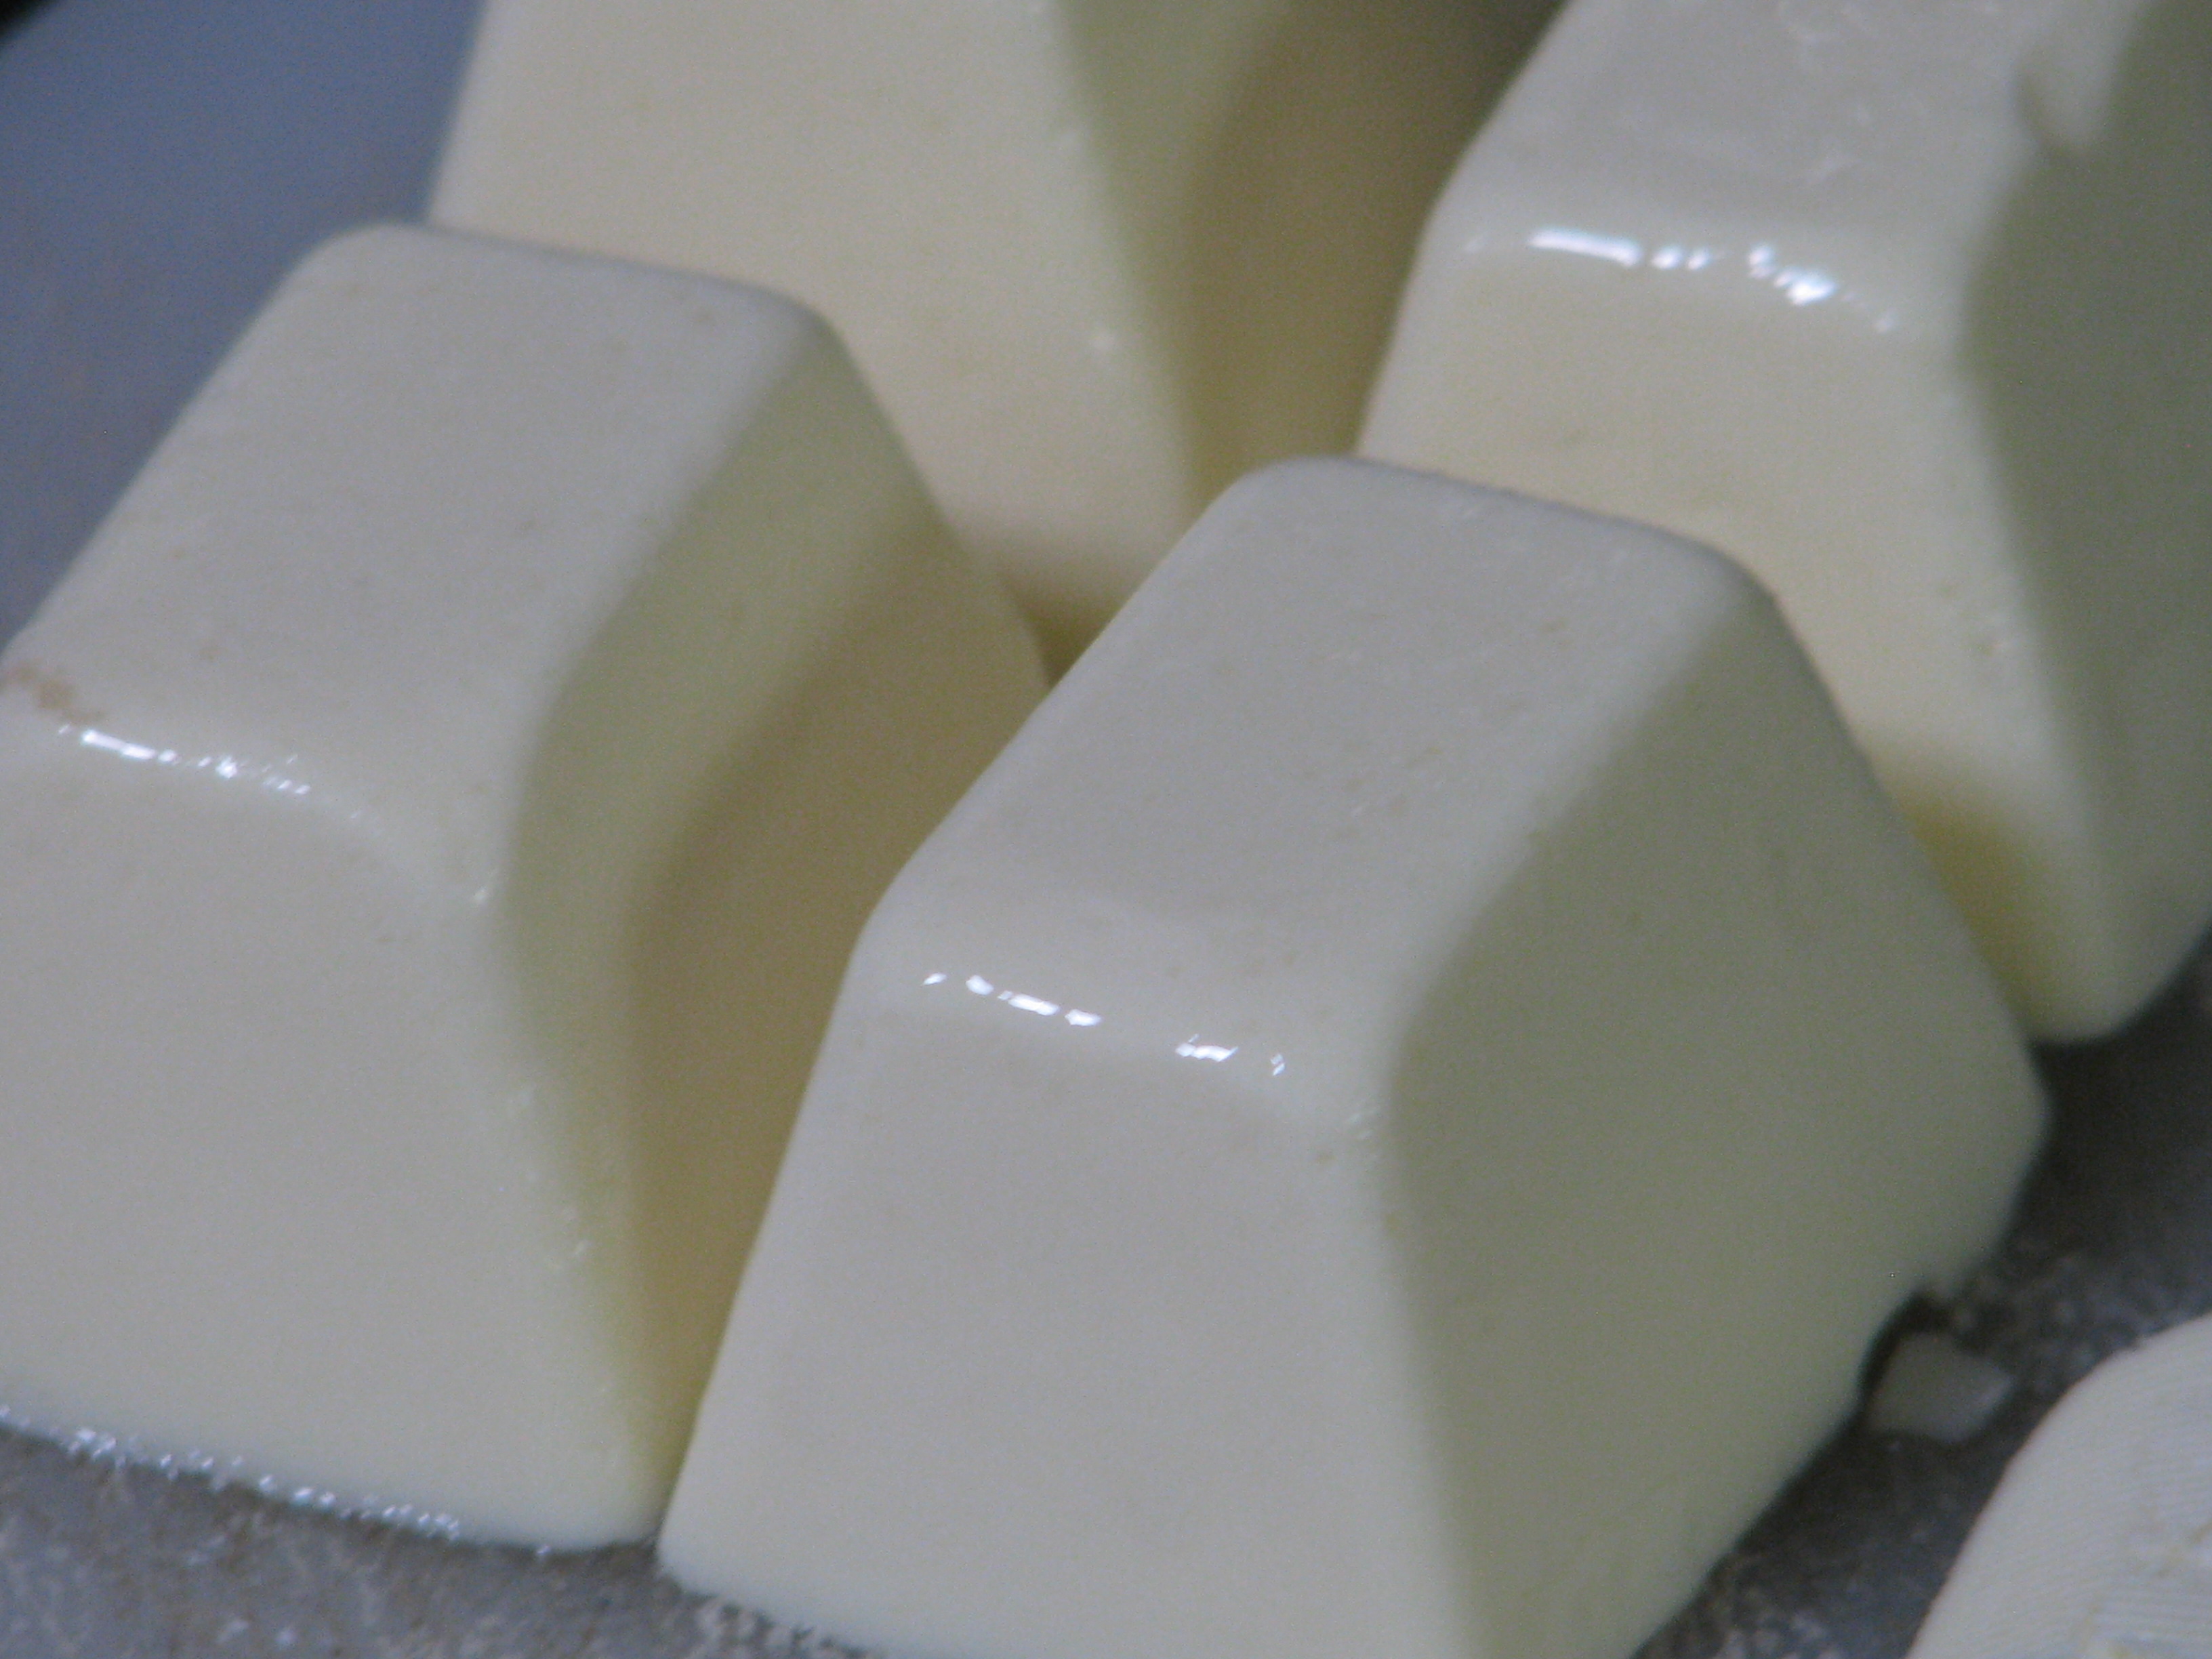
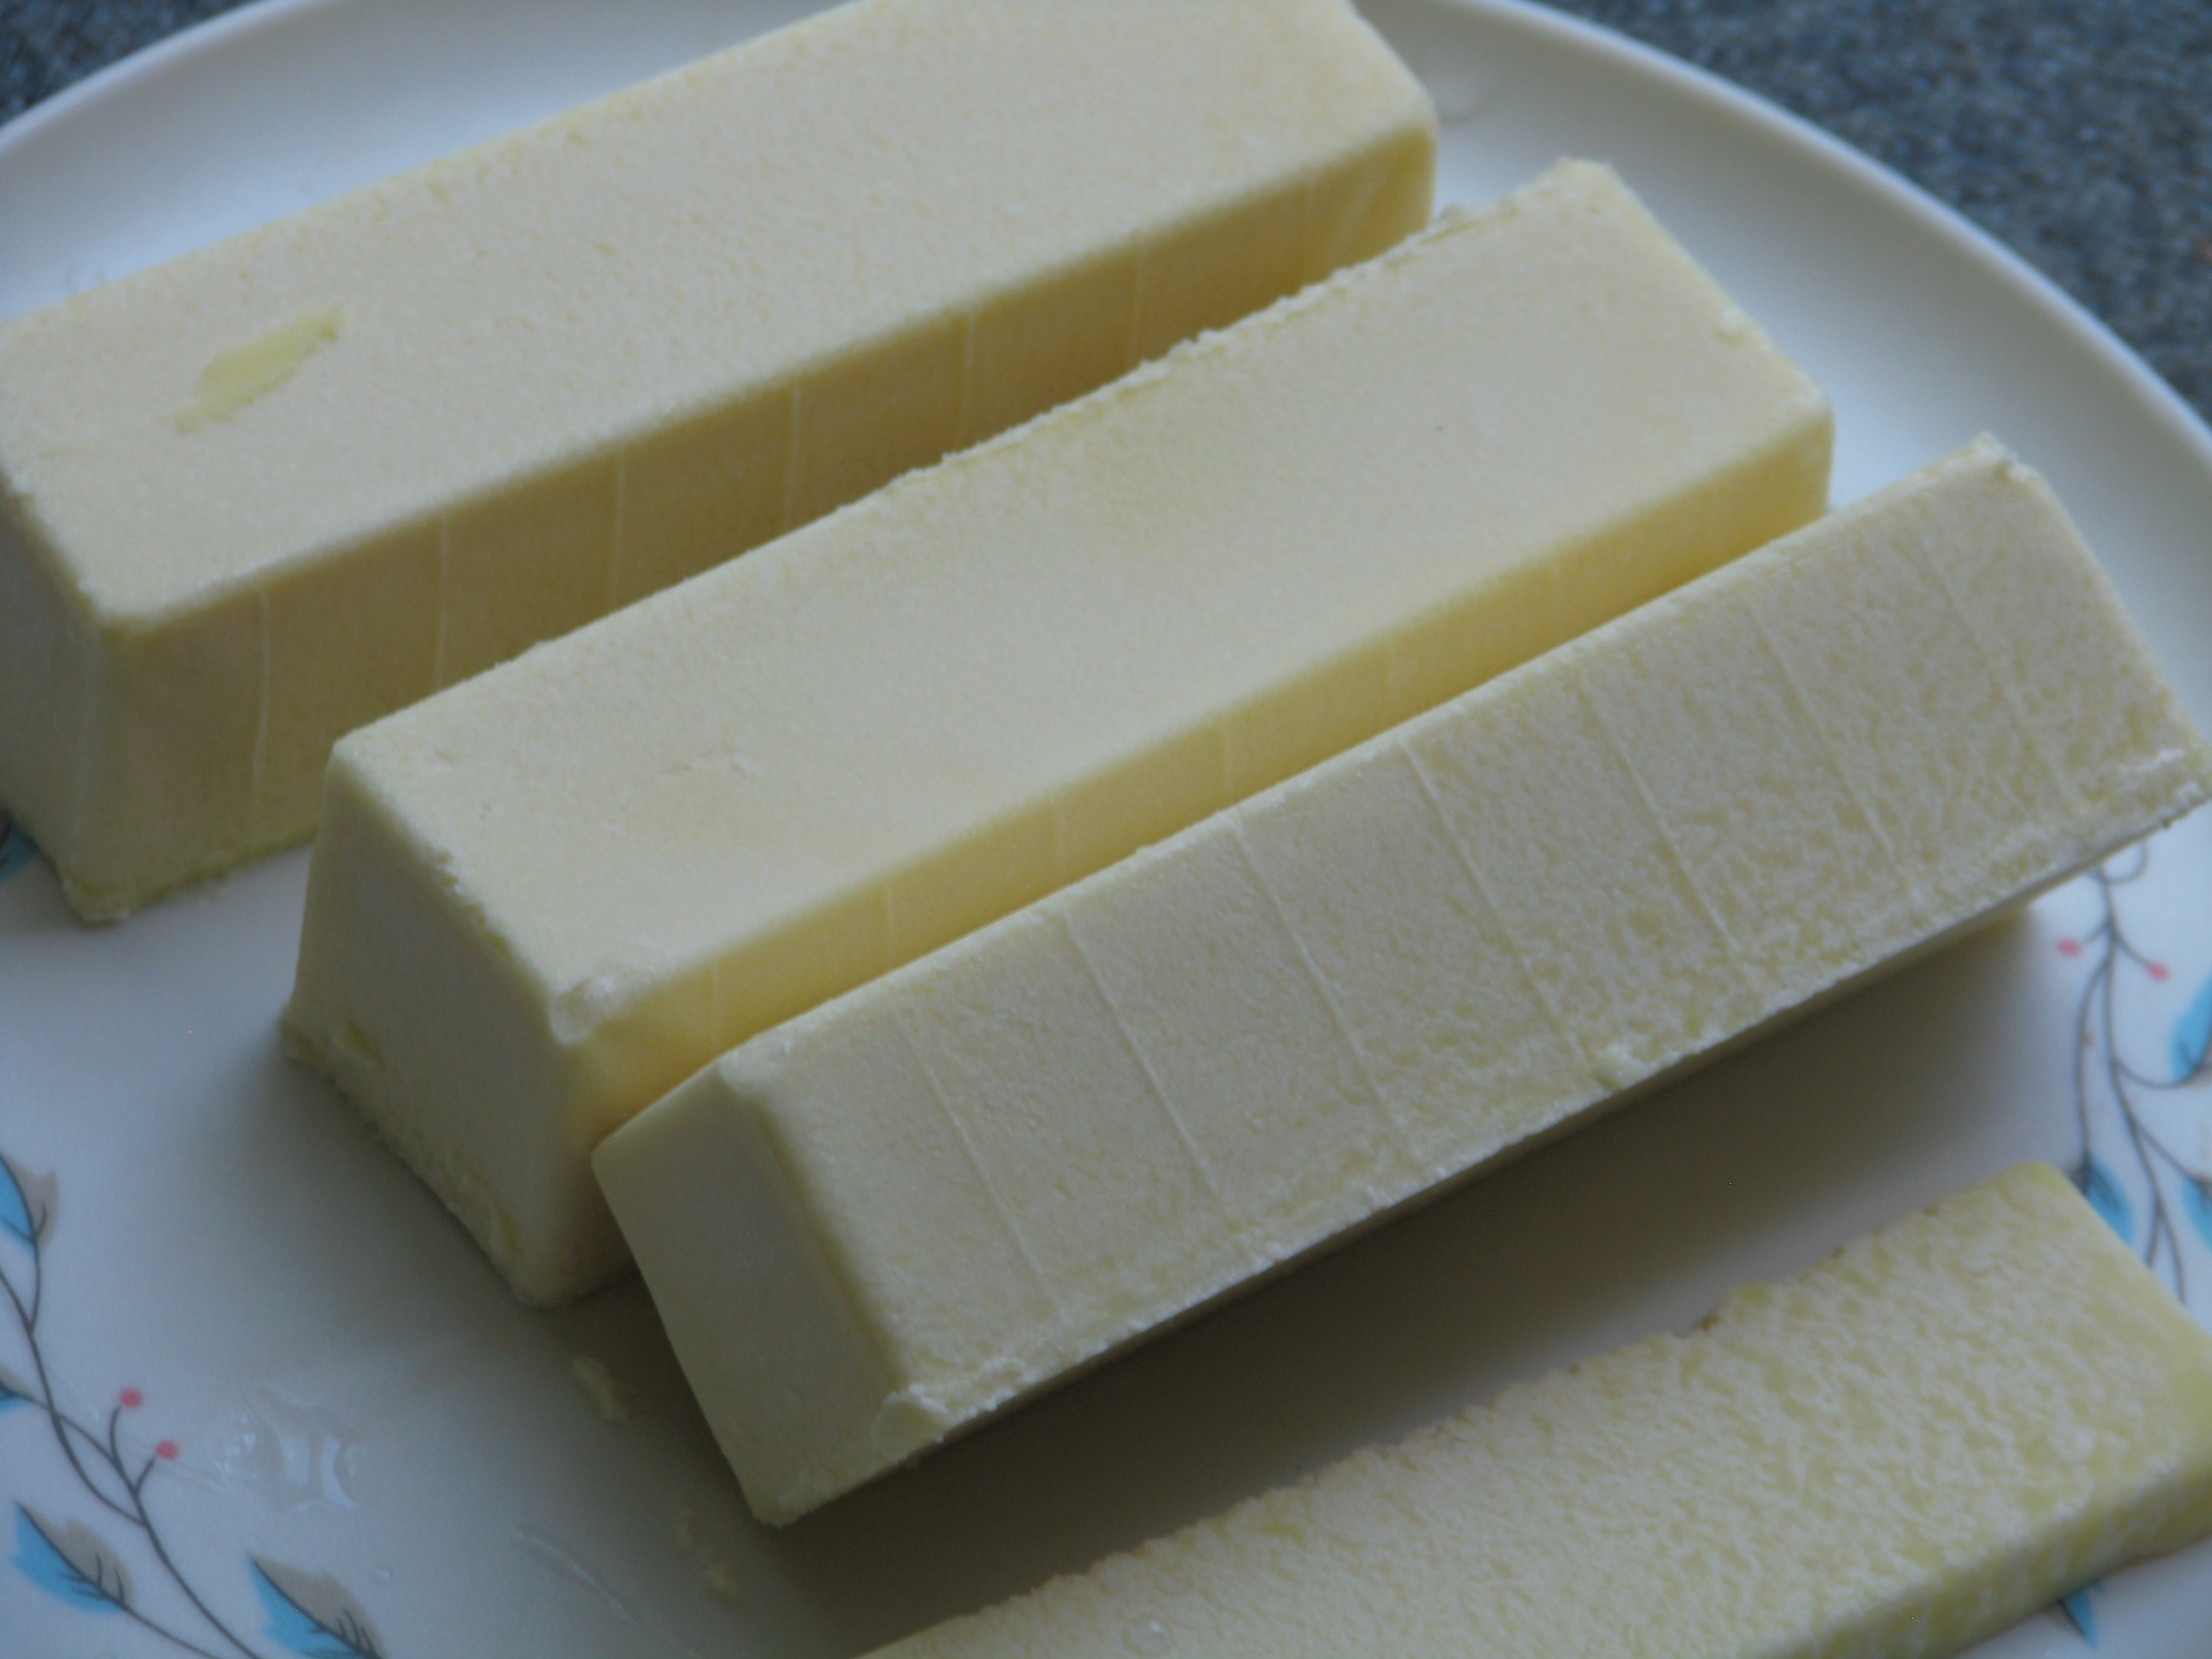
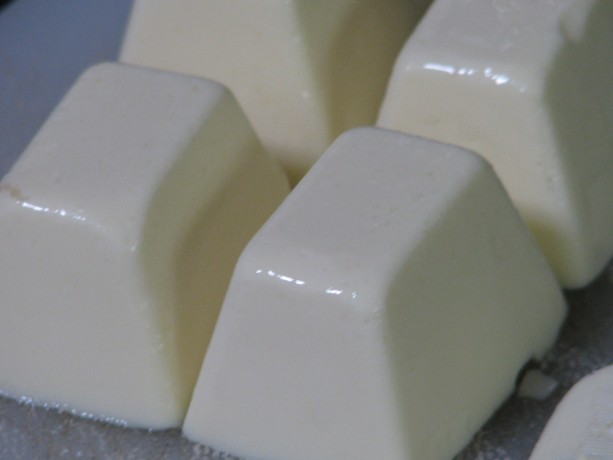
Recipe update: I’ve since made some changes to the recipe, exchanging some vegetable oil for some coconut oil for more spreadability, and adding a little more salt for a more satisfying (to me) taste when spread on toast. I’ve been using this butter for a month now, and have noted that: when melting in a hot pan it will brown faster than regular butter, so keep the temperature down, that it will melt and separate at room temperature (its summer now, so the kitchen is usually in the 70’s – in the winter it will be different) so I keep it in the refrigerator. I found butter stick molds that have the teaspoon markings along the side, so I’ve made 8x the original recipe and poured it into the butter molds, then wrapped each unmolded stick in wax paper and frozen them.
Vegan butter sticks with teaspoon markings along the side for ease in baking. I’ve also poured it back into the cleaned coconut oil jars and frozen them, keeping one in the refrigerator for unmeasured use. I’ve used it along with a non-dairy creamer in the Chocolate Ganache recipe and it is very chocolaty, but not as rich as the original. Part of that is due to the creamer; heavier creamer will produce creamier results, but in no way was it disappointing. It was very tasty, but not as heavy. When refrigerated it didn’t solidify as much as the other, so more chocolate might need to be added depending upon the type of creamer used but it was still spreadable and yummy.
Another Recipe Update:
I’ve been making the butter with unsweetened organic rice milk and it turns out well. At first it tasted too light to be satisfying, but when I had dairy butter at a restaurant it tasted greasy and heavy – my taste buds wanted the vegan butter! I found out that even when the kitchen is colder than the melting point of the coconut oil, it isn’t a good idea to leave the butter refrigerated because unlike dairy butter it will grow mold. The rice milk butter with the increased vegetable oil makes it perfectly usable from the refrigerator. I make sticks and freeze them in a freezer bag for baking and pour the rest into glass jars with screw-on caps for spreading. The jars are kept in the freezer until needed, then switched to the refrigerator. I’ve made biscuits, cookies, cakes, scones and breads with this butter, and with proper handling they all come out just fine. We offered both dairy and vegan butter to our holiday guests and they didn’t detect much of a difference. Since vegan butter is so much lower in calories, and coconut oil is so good for you, I don’t have to hesitate to use it. It is actually part of my weight maintenance program!
Ethical ButterAuthor: Mattie, at VeganBaking.netRecipe type: CondimentCuisine: VeganPrep time:Cook time:Total time:A wonderful vegan butter with no palm oil, but lots of options. My version is without curdling the soy milk. Please see the original excellent post for more explanations and options.Ingredients- ¼ cup + 2 teaspoons organic plain soy milk
- ¼ + ⅛ teaspoon salt (I increased the total salt to ½ t. for spreading butter)
- ½ cup + 2 Tablespoons + 1 teaspoon (130 grams) refined coconut oil, melted to room temp. (For more spreadability, I used ½ cup coconut oil and changed the 2T and 1 t to vegetable oil, along with the following 1 T for a total of 2 Tablespoons and 1 teaspoon vegetable oil.)
- 1 Tablespoon vegetable oil or light olive oil
- 1 teaspoon liquid soy lecithin or liquid sunflower lecithin or 2 ¼ teaspoons soy lecithin granules
- ¼ teaspoon xanthan gum or ½ + ⅛ teaspoon psyllium husk powder (I used xanthan gum)
Instructions- Combine soy milk and salt in a food processor or blender.
- Melt the coconut oil until it is just room temperature and barely melted.
- Add the coconut oil and the rest of the ingredients to the soy milk.
- Blend or process for about 2 minutes on low.
- Pour into ice cube trays, or into butter molds or trays.
- Freeze until firm, about an hour.
- Serve.
- Keep wrapped in refrigerator for a month, or frozen for a year.
- Makes one cup.
- Gardening adventures, Heirloom Plants, Permaculture and Edible Forest Gardening Adventures, Seeds, Vegan, Vegetables, Vegetarian
Watermelon Radish
It looks a little like an alien species! We’ve planted a lot of new varieties this year. Still there are seed packages left unopened! So much fun, though. One veggie that we bought from Baker Creek Heirloom Seeds is a beautiful radish called Chinese Red Meat Radish, or Watermelon Radish.
The green/white/pink outer color on the swollen roots is a little disconcerting. I’m not a huge fan of radishes. They grow quickly, help identify rows of slower-growing seeds, and are great for kids to plant. Still neither me nor my tummy really likes the strong radish flavor.

Slicing into them is a little creepy. The Watermelon Radish, however, are large, crisp and sweet on the inside. My daughter cut them into small triangles and stir-fried them. They had a little of the bitter radish flavor, but if you expect that you will be delighted at the taste and color.
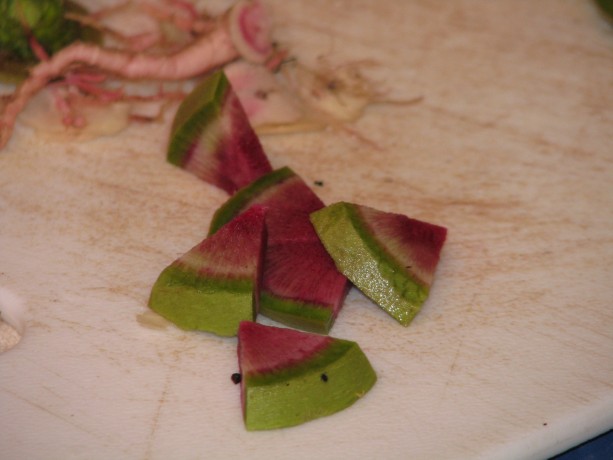
These brilliant little wedges don’t hold much heat and are great raw, in stir-fries, or lightly cooked on their own. Younger ones have more of a starburst of red in the center. Older ones grow brilliantly red, set against the green outer skin, as dramatic as a dragonfruit.
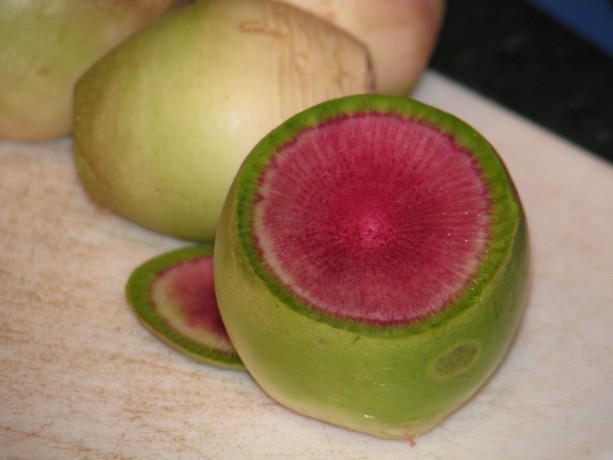
The brilliant center color is fantastic. Radishes are cool-weather plants; these I planted late but were shaded by vigorous volunteer currant tomatoes that are taking over the bed!
When planting annuals, plant your favorites but don’t forget to play. There are so many varieties of veggies, herbs and flowers available now, especially heirloom and organic (non-GMO!). Why not try some and share the seed with friends?
-
Sauteed Fennel
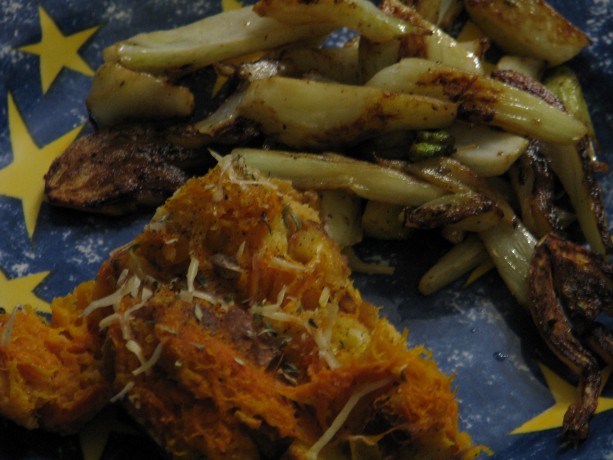
Sautéed fennel alongside squash bread pudding. The bread pudding recipe I have to work on, but not the fennel! It was so easy and so fantastic! Fennel is a sweet-tasting bulb with a satisfying crunch. This recipe is quick and easy, and absolutely delicious. I don’t have a good photo of it because, frankly, we ate it before I could make the light better.
Fennel apparently doesn’t have any companion plants according to every source I’ve checked. I grew a couple of bulbs in a polyculture bed without any problem, but to be on the safe side give it a spot by itself. Allow some to go to flower and you’ll attract lots of pollinators, and also have a host plant for swallowtail and other butterflies.
This recipe serves two as a side dish; feel free to up the number of bulbs. Enjoy!
Sauteed FennelAuthor: Diane C. KennedyRecipe type: Side dishCuisine: AmericanPrep time:Cook time:Total time:Serves: 2A simple, quick and utterly delicious vegetable side dish.Ingredients- One fennel bulb
- ⅛th cup olive oil
- Salt and pepper to taste
- Squeeze of lemon or lime
Instructions- Cut the top and bottom from the fennel bulb, then slice the fennel into small strips, about ¼ inch thick or so.
- Heat oil in a large frying pan and adjust heat to medium.
- Add fennel and cook, stirring occasionally to evenly brown, about ten minutes or until fennel is tender. Fennel should be slightly carmelized.
- Add salt and pepper to taste.
- Serve with a squeeze of lemon or lime, if desired.
- Beverages, Breakfast, Fruit, Permaculture and Edible Forest Gardening Adventures, Recipes, Vegetarian
The Passion of the Fruit: Homemade Juices
Hi there. It’s Miranda the Guestblogger again, and today I want to talk to you about juice. You know, The Big Drip – Drosophilid Milk, Agua Fresca, Drupe’s Tears, Essence of Mesocarp: JUICE.
Here at Finch Frolic Garden, we like a nice fresh juice. As I am officially the FFG Harvester (a.k.a. Fruit Maven), I also take on the mantle of One Who Figures Out What To Do With Some Of The Stuff That’s Been Harvested – and let me tell you, that’s not a title to take lightly.
In the summer, it’s hard to keep up with all the produce and we hate to waste anything, even though spoilt food just goes back into the soil via compost here. We really like to get our produce into our mouths, though. Therefore, a lot of our fruit bounty gets juiced and frozen to keep. I want to walk you through some of our juiceplorations.
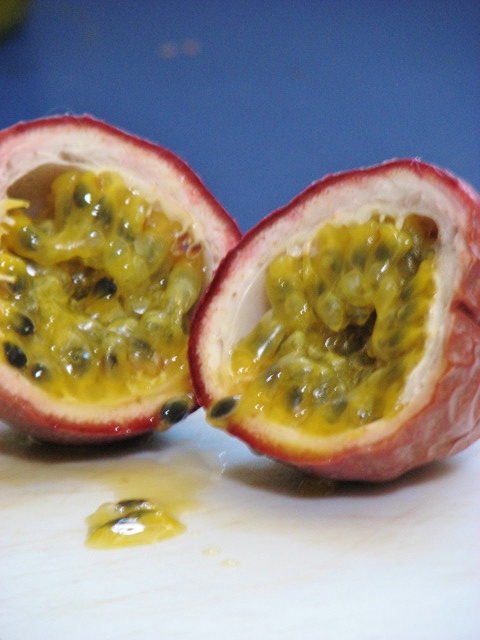
Finch Frolic Redoubtable Fruit of Almost Every Month in the Year: the Purple Passionfruit. These exotic and fragrant fruits are dropped by the bushel-load from our vigorous vines almost continuously, but overwhelmingly in midsummer. I pick them off the ground under the vines and wait for their smooth purple shells to wrinkle over in ripeness. Then the process begins.
I sit down for this and usually bring up a show on my laptop, because it takes a while. I have the bag or bowl of fruit on my right and a plastic bag looped over the back of a chair on the other side for the empty shells.
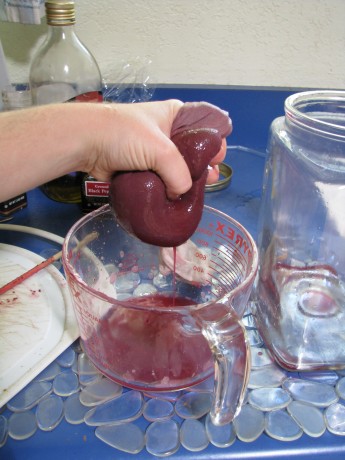
A fruit is picked up, dipped in a bowl of water, then wiped quickly on a paper towel and deposited on a cutting board that has a little rim on it to catch juice.

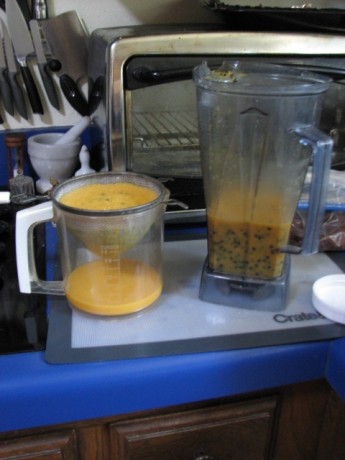
With a sharp knife, I halve the fruits and use a spoon to scoop the many little packets of bright gold-orange juice and hard black seeds into a bowl. Those packets have to be broken to get the juice.
I used to press the pulp into the mesh of a sieve with a spoon, but that’s hard on the hands and on the sieve. Now, I throw it in our Vita-Mix and turn it up to 3, tops – you want to spin all the juice off the seeds, but you don’t want to chop up the seeds. I judge whirl completeness by whether or not the little black seeds are free-floating as they sit in the mixture.
Then I run it through a sieve to separate out the juice.
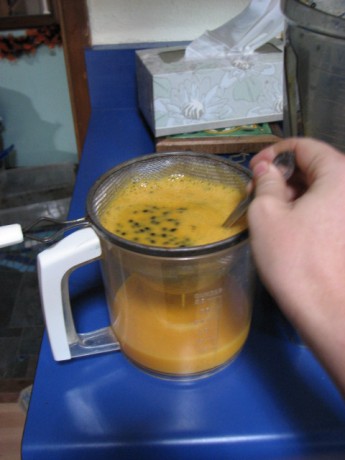
To get the most juice out of it, you swirl a spoon through the pulp as it sits in the sieve. 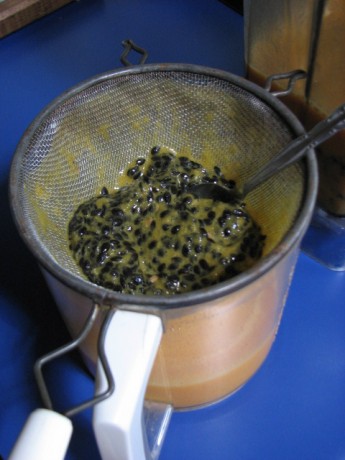
All juiced out. This sounds very labour-intensive – and it is – but it’s worth it to us to use our fruit. We don’t eat passionfruit straight – the seeds are a little too gross. We do, however, use the juice in anything we can make an excuse to, and it keeps frozen into cubes for a long time. And the leftover seeds make a fun treat for our hens.
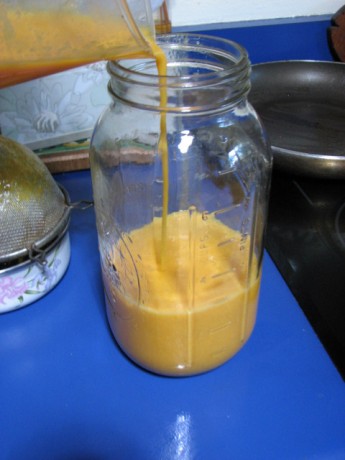
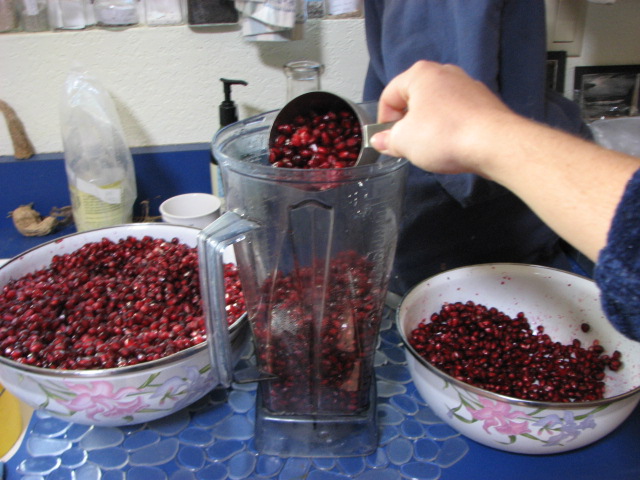
Glowing, beautiful, tangy, fresh passionfruit juice! In the fall, we’re overwhelmed with lovely big pomegranates from our one big pomegranate tree. This year, we’ve had more than ever and we didn’t want to waste any.
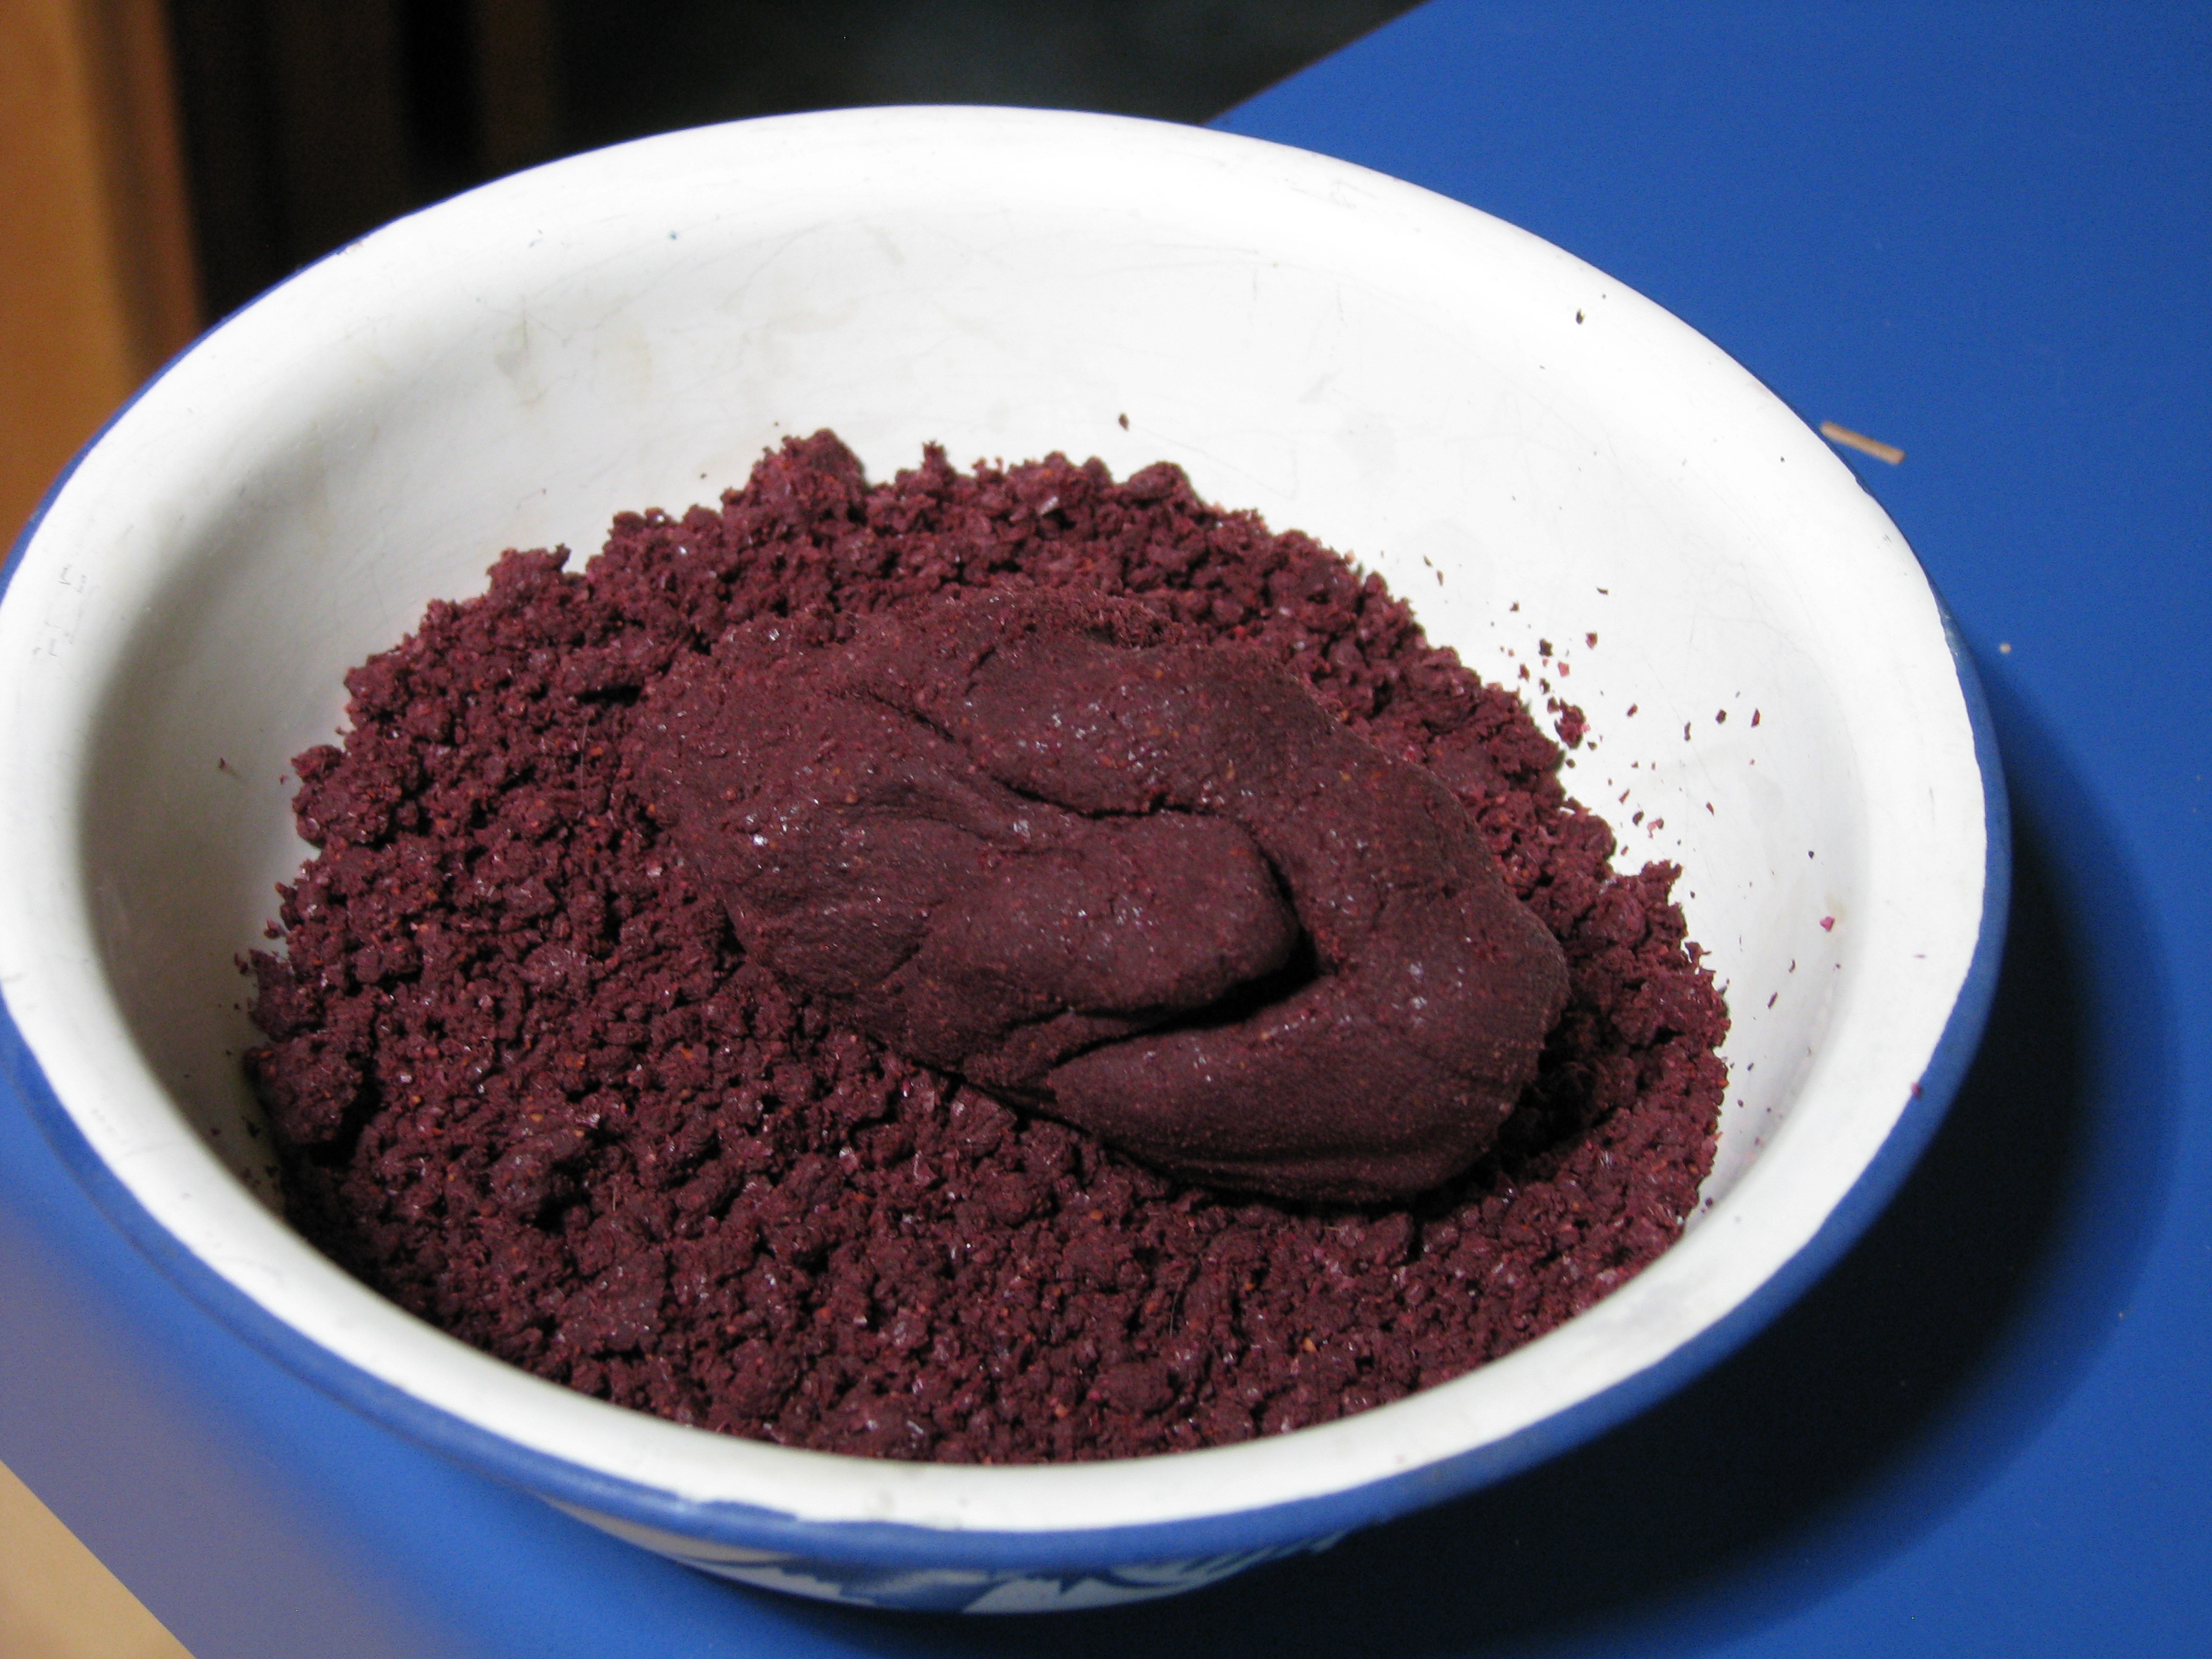
Once harvested, though, the poms need to be processed. Diane and I camped out every evening for a couple weeks cutting poms in half and hand-picking the arils. Recently, after a friend let us try out her juicer, we acquired one for ourselves, eliminating the need for the rest of the process with poms, but it is the same process I still use for grapes, apples and melons, so I’m going to tell you about it anyway.
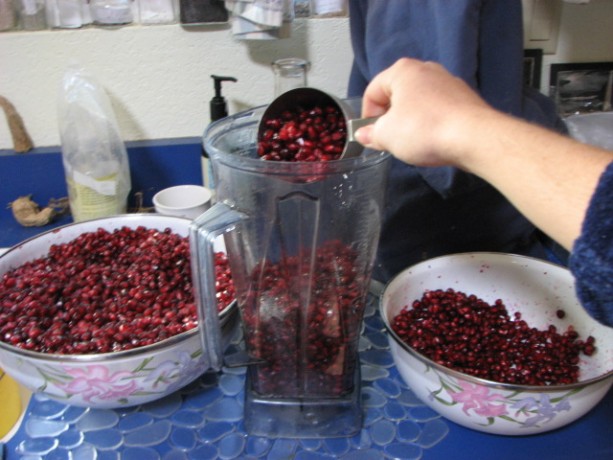
I put the arils in the Vita-Mix and turn all the way up to completely blend the seeds. The blended pom also gets strained, but because the particles are finer than the passionfruit pulp, a mesh sieve isn’t sufficient. No, what you need is a sock.

A nice clean women’s nylon sock is perfect. 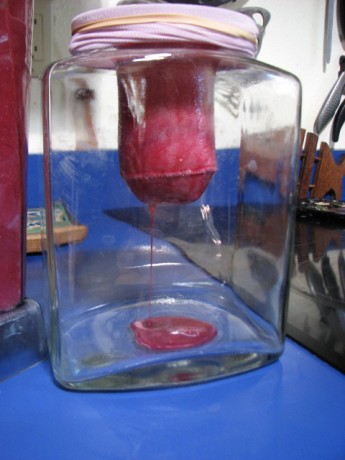
Hanging allows pure juice to come through. To get all the juice out, though, squeezing is necessary, and that puts a little more must in the juice, like fine fruit silt.
It’s also very taxing on the hands, because the sock must be hand squeezed, but it helps get the most juice from the fruit. This second straining produces interesting dry, crumbly must that comes out of the sock like purple Play-Doh.

Also a salutiferous treat for the hens! Like the passionfruit, we use the pom juice as much as we can. For instance, we reduced the juice and I experimented with some pomegranate ice-creams:

Chocolate makes an excellent palate cleanser, if you ask us. I also diluted the concentrate with water to make a lovely breakfast juice. We even poached pears with the juice for Christmas dinner – a lovely rose colour and delicate fruity flavor.
The fun never ends with fruit!
So, that’s a little peek at the juiceinations that go on here at Finch Frolic. Happy juicing to you!
TTFN!
Miranda the Fruit Maven
-
Thai Coconut Soup with Tofu and Mushrooms

A comfort food without the high caloric price tag. This is a soup recipe that has been requested by friends, and is so good that I crave it. So I share it with you. Wonderful even during the summer, it also is fantastic comfort food when sick or on a cold day. You can tweak this dish with lite coconut milk, lime zest instead of lemongrass, or if you have access to Thai ingredients use kaffir lime and Thai basil.

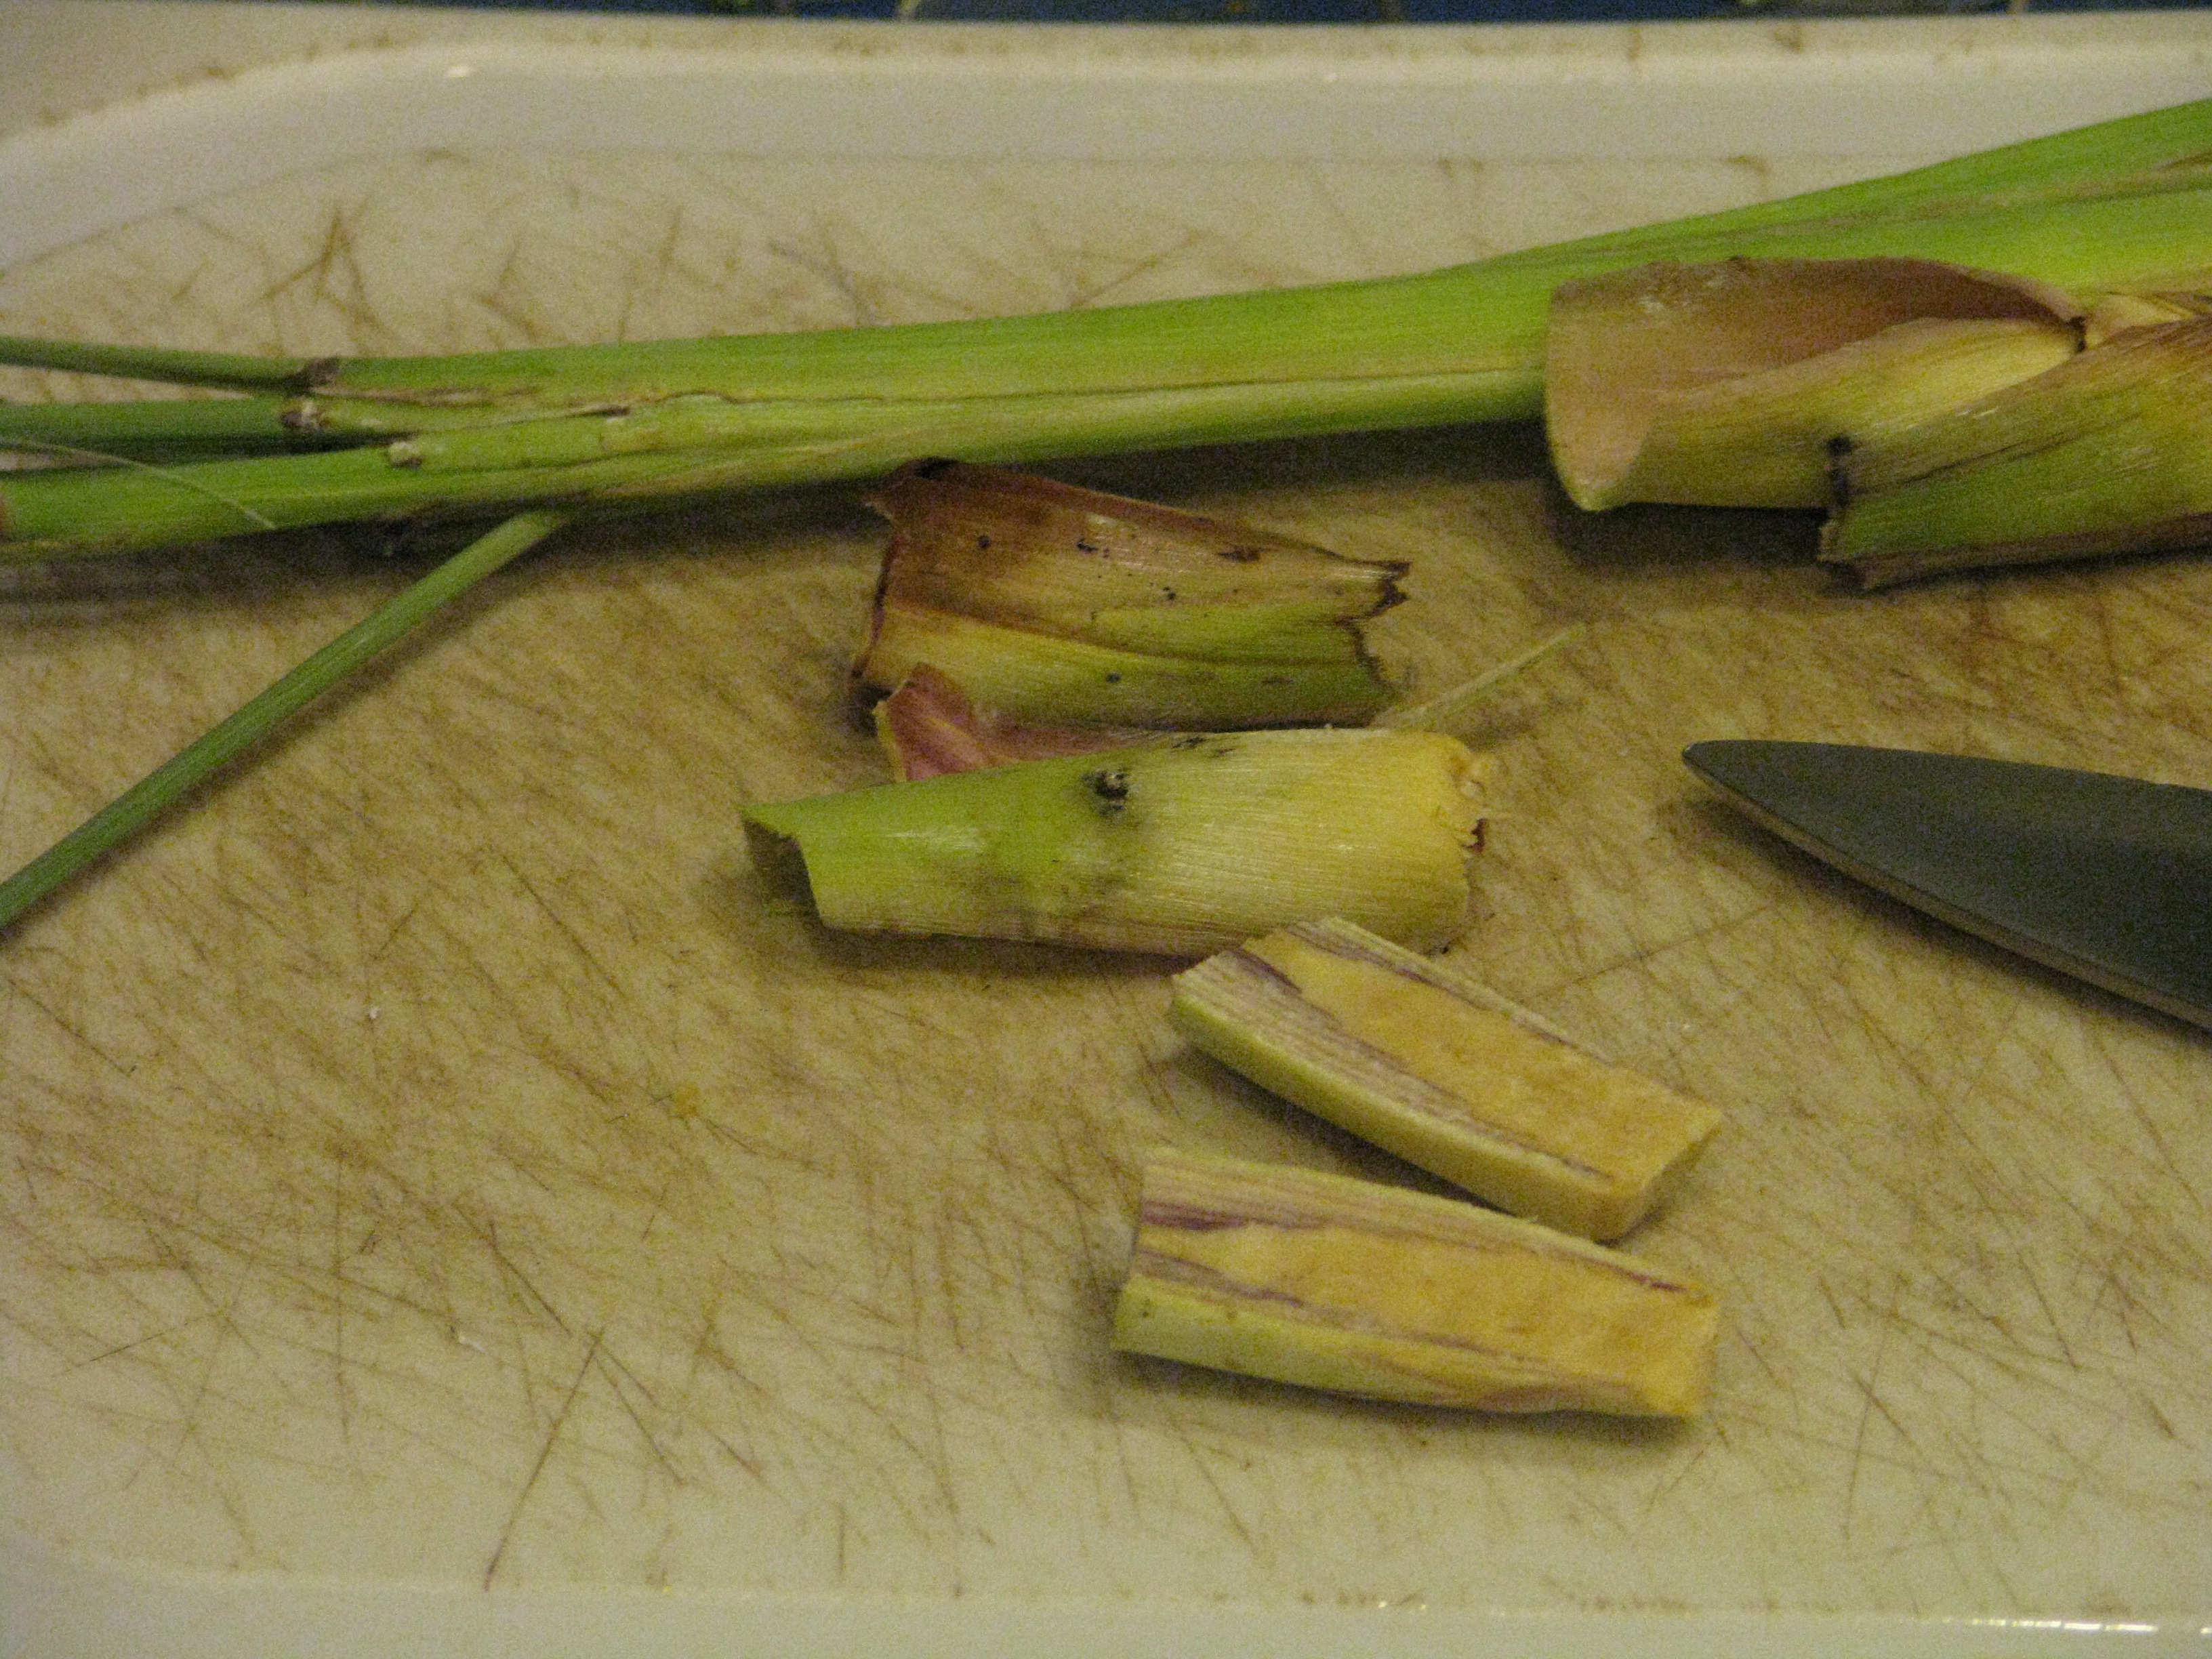
Lemongrass is easy to grow and to use. Just the base of the peeled stalk is used as a flavoring. Cut it only in half so the pieces are easily found in the soup and put aside. I’ve had it without tofu, and without mushrooms, and it is still wonderful. Put the lime in the coconut, and drink it all up! Don’t put too many extra veggies in it; it is a simple soup.
Thai Coconut Soup with Tofu and MushroomsAuthor: Diane C. KennedyRecipe type: SoupCuisine: ThaiPrep time:Cook time:Total time:Serves: 4A simple, delicious vegetarian Tom Kha soup. The lemongrass isn't meant to be eaten because its too tough. The kaffir lime leaf may be eaten only if you use a young one and slice very thinly before adding it.Ingredients- 1 can (1 ½ cups) unsweetened coconut milk
- 2 tsp. grated fresh ginger
- 1 fresh lemongrass stalk, peeled and halved (or 2 tsp. dried, or 1 tsp. lime zest)
- 1 bruised fresh or dried kaffir lime leaf, (if young can be sliced very thinly(or ½ tsp. lime juice)
- Two - three Thai basil leaves (optional)
- 3 cups mild vegetable stock
- ½ to 2 teaspoons Thai red curry paste, or Thai coconut curry paste, or curry powder (depending on hotness desired)
- 1 package (12 – 14 oz) extra firm tofu (not silken)drained and cut into small cubes
- 15 oz canned straw mushrooms, drained and rinsed, or half-cup sliced button mushrooms
- 2 tsp. sugar or other tasteless sweetener
- 2 Tablespoons light soy sauce (I use Bragg’s Amino Acids instead)
- Salt to taste (opt.)
- Fresh lime juice to taste (opt.)
Instructions- Combine lemongrass, ginger, kaffir leaf, Thai basil leaves, and coconut milk with broth in a large saucepan and bring to a boil.
- Reduce heat to medium-low and simmer for 5 – 10 minutes.
- Add the curry paste a half-teaspoon at a time, stirring well and tasting for desired hotness.
- Stir in the tofu, mushrooms, sugar, and soy sauce.
- Simmer for about 10 minutes more.
- Taste before adding additional optional salt.
- Serve as is or over hot rice.
- Offer fresh lime to squeeze on top as desired (it makes the flavors pop).
- Animals, Chickens, Cob, Compost, Composting toilet, Fruit, Gardening adventures, Giving, Grains, Health, Herbs, Houses, Hugelkultur, Humor, Living structures, Natives, Natural cleaners, Permaculture and Edible Forest Gardening Adventures, Ponds, Rain Catching, Recipes, Seeds, Soil, Vegan, Vegetables, Vegetarian, Worms
San Diego Permaculture Convergence, Nov. 9 – 10, 2013
There is a fantastic, information-packed permaculture convergence coming up at the beautiful Sky Mountain Institute in Escondido.
 It will be two days packed with great information for a very reasonable price; in fact, scholarships are available. Check out the website at convergence@sdpermies.com. On that Sunday I’ll be teaching a workshop about why its so important to plant native plants, how to plant them in guilds using fishscale swales and mini-hugelkulturs. Come to the convergence and be inspired!
You May Also Like

Native Insects and IPM
- Gardening adventures, Permaculture and Edible Forest Gardening Adventures, Recipes, Vegan, Vegetables, Vegetarian
Dinner with the Pandas: Harvesting Your Own Bamboo
Hello.
Before you cry, “Imposter!”, let me assure you that I have authorization to be here. Mostly. I happen to be Diane’s daughter Miranda, guestblogging and wordsmithing for you today. You might recognize my powdery feet or recollect me when keeping company with chickens (or from diverse other adventures). As much as I enjoying rolling in dust and home decorating with hens, today I’m here to talk about an unusual topic for Vegetariat – food.
The handy rhyme isn’t the only reason I’m sometimes known as Miranda the Panda – I also have a great partiality for a bit of bamboo, much like the vegetarian carnivore from whom I draw my catchy moniker. Luckily, we happen to have a fair bit of the stuff around Finch Frolic these days (bamboo, not pandas). Bamboo shoots are a common – and delicious! – component of Asian cuisines, and bamboo has been used for many culinary purposes, such as flavoring rice, wherever it grows. During this past summer, I was overcome with the need to find more things to eat on the property and began a foray into harvesting our own bamboo shoots.

Our giant species of bamboo arches over many of our paths — perfect for building material, and any shoots that venture into the soil of the paths are prime targets… 🙂 Before I stepped outdoors and started gnawing on the nearest clump, I had to be sure that our bamboo is an edible variety, and hopefully a tasty edible variety. You need the scientific name of your bamboo for that, but once we ferreted out ours (Bambusa beecheyana), it was easy to find notation of its edibility and delectability online. One helpful and extensive listing is on Guadua Bamboo. Happily, there is a large number of edible and tasty bamboo species.
Proof of mange-ability in hand, the next obstacle was divining the best way to get bamboo shoots from the ground to my mouth. Harvesting can be more or less of a challenge, depending on what variety of bamboo one has and how it’s established (e.g., moisture and soil conditions, obstacles like stones around it). To harvest shoots, it’s best to pick fat green ones poking no more than a foot above the ground. You want to catch them before they get too woody, but old enough to have a bit of meat on them, so to speak. The shoot is mostly leaf (tightly layered sheaths), so bulkier shoots are more rewarding.
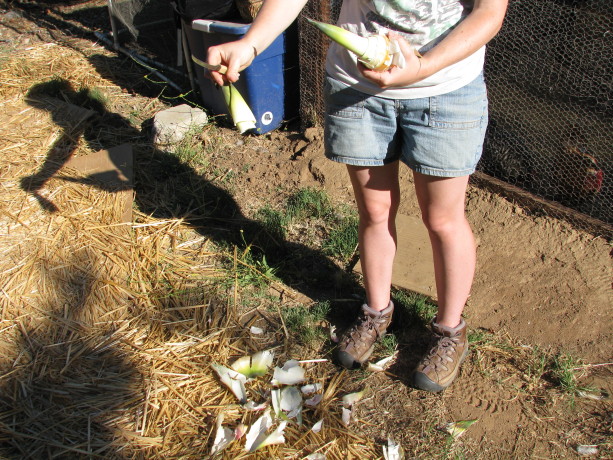
Removing our bamboo from the ground and its parent plant turned out to be on the more side of challenging.
Miranda and Diane bust out the Finch Frolic arsenal on the recalcitrant shoot.
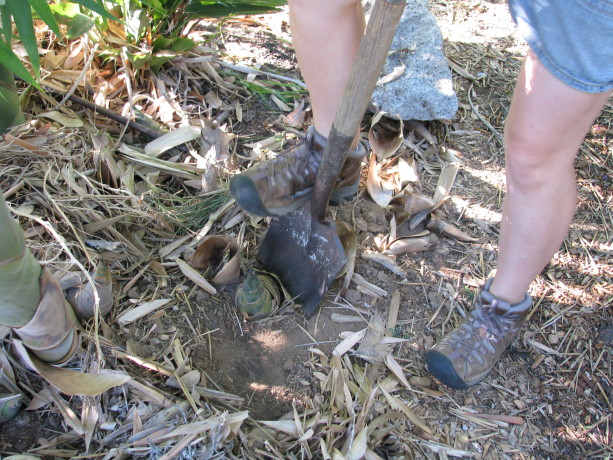
First, the inimitable spade is set to the task. 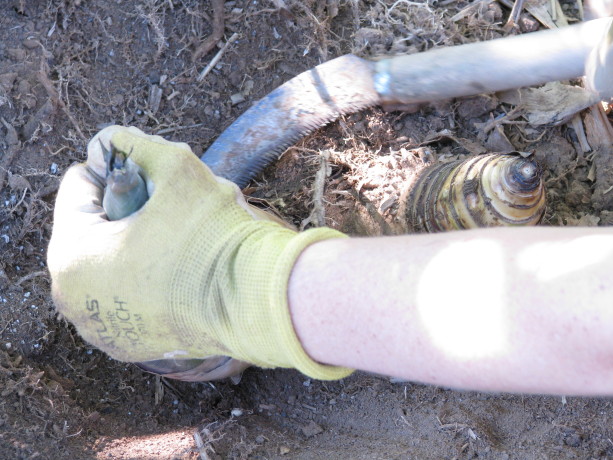
Legs weary and spade abandoned, the small sickle saw is recruited, to little effect. Diane had just returned home and gleefully plunged into the fray, skirt, white sandals and all.
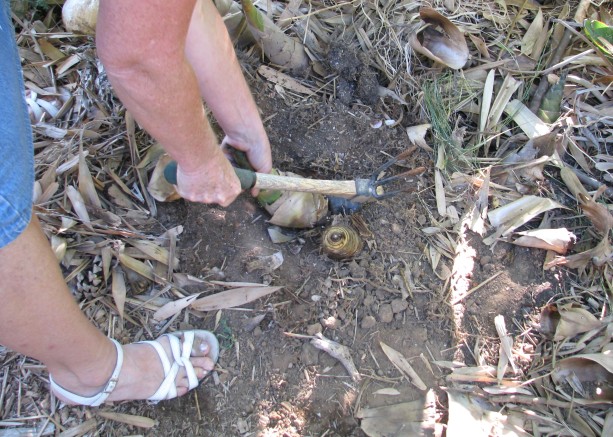
Finally, Diane wades into battle with the winning implement. 
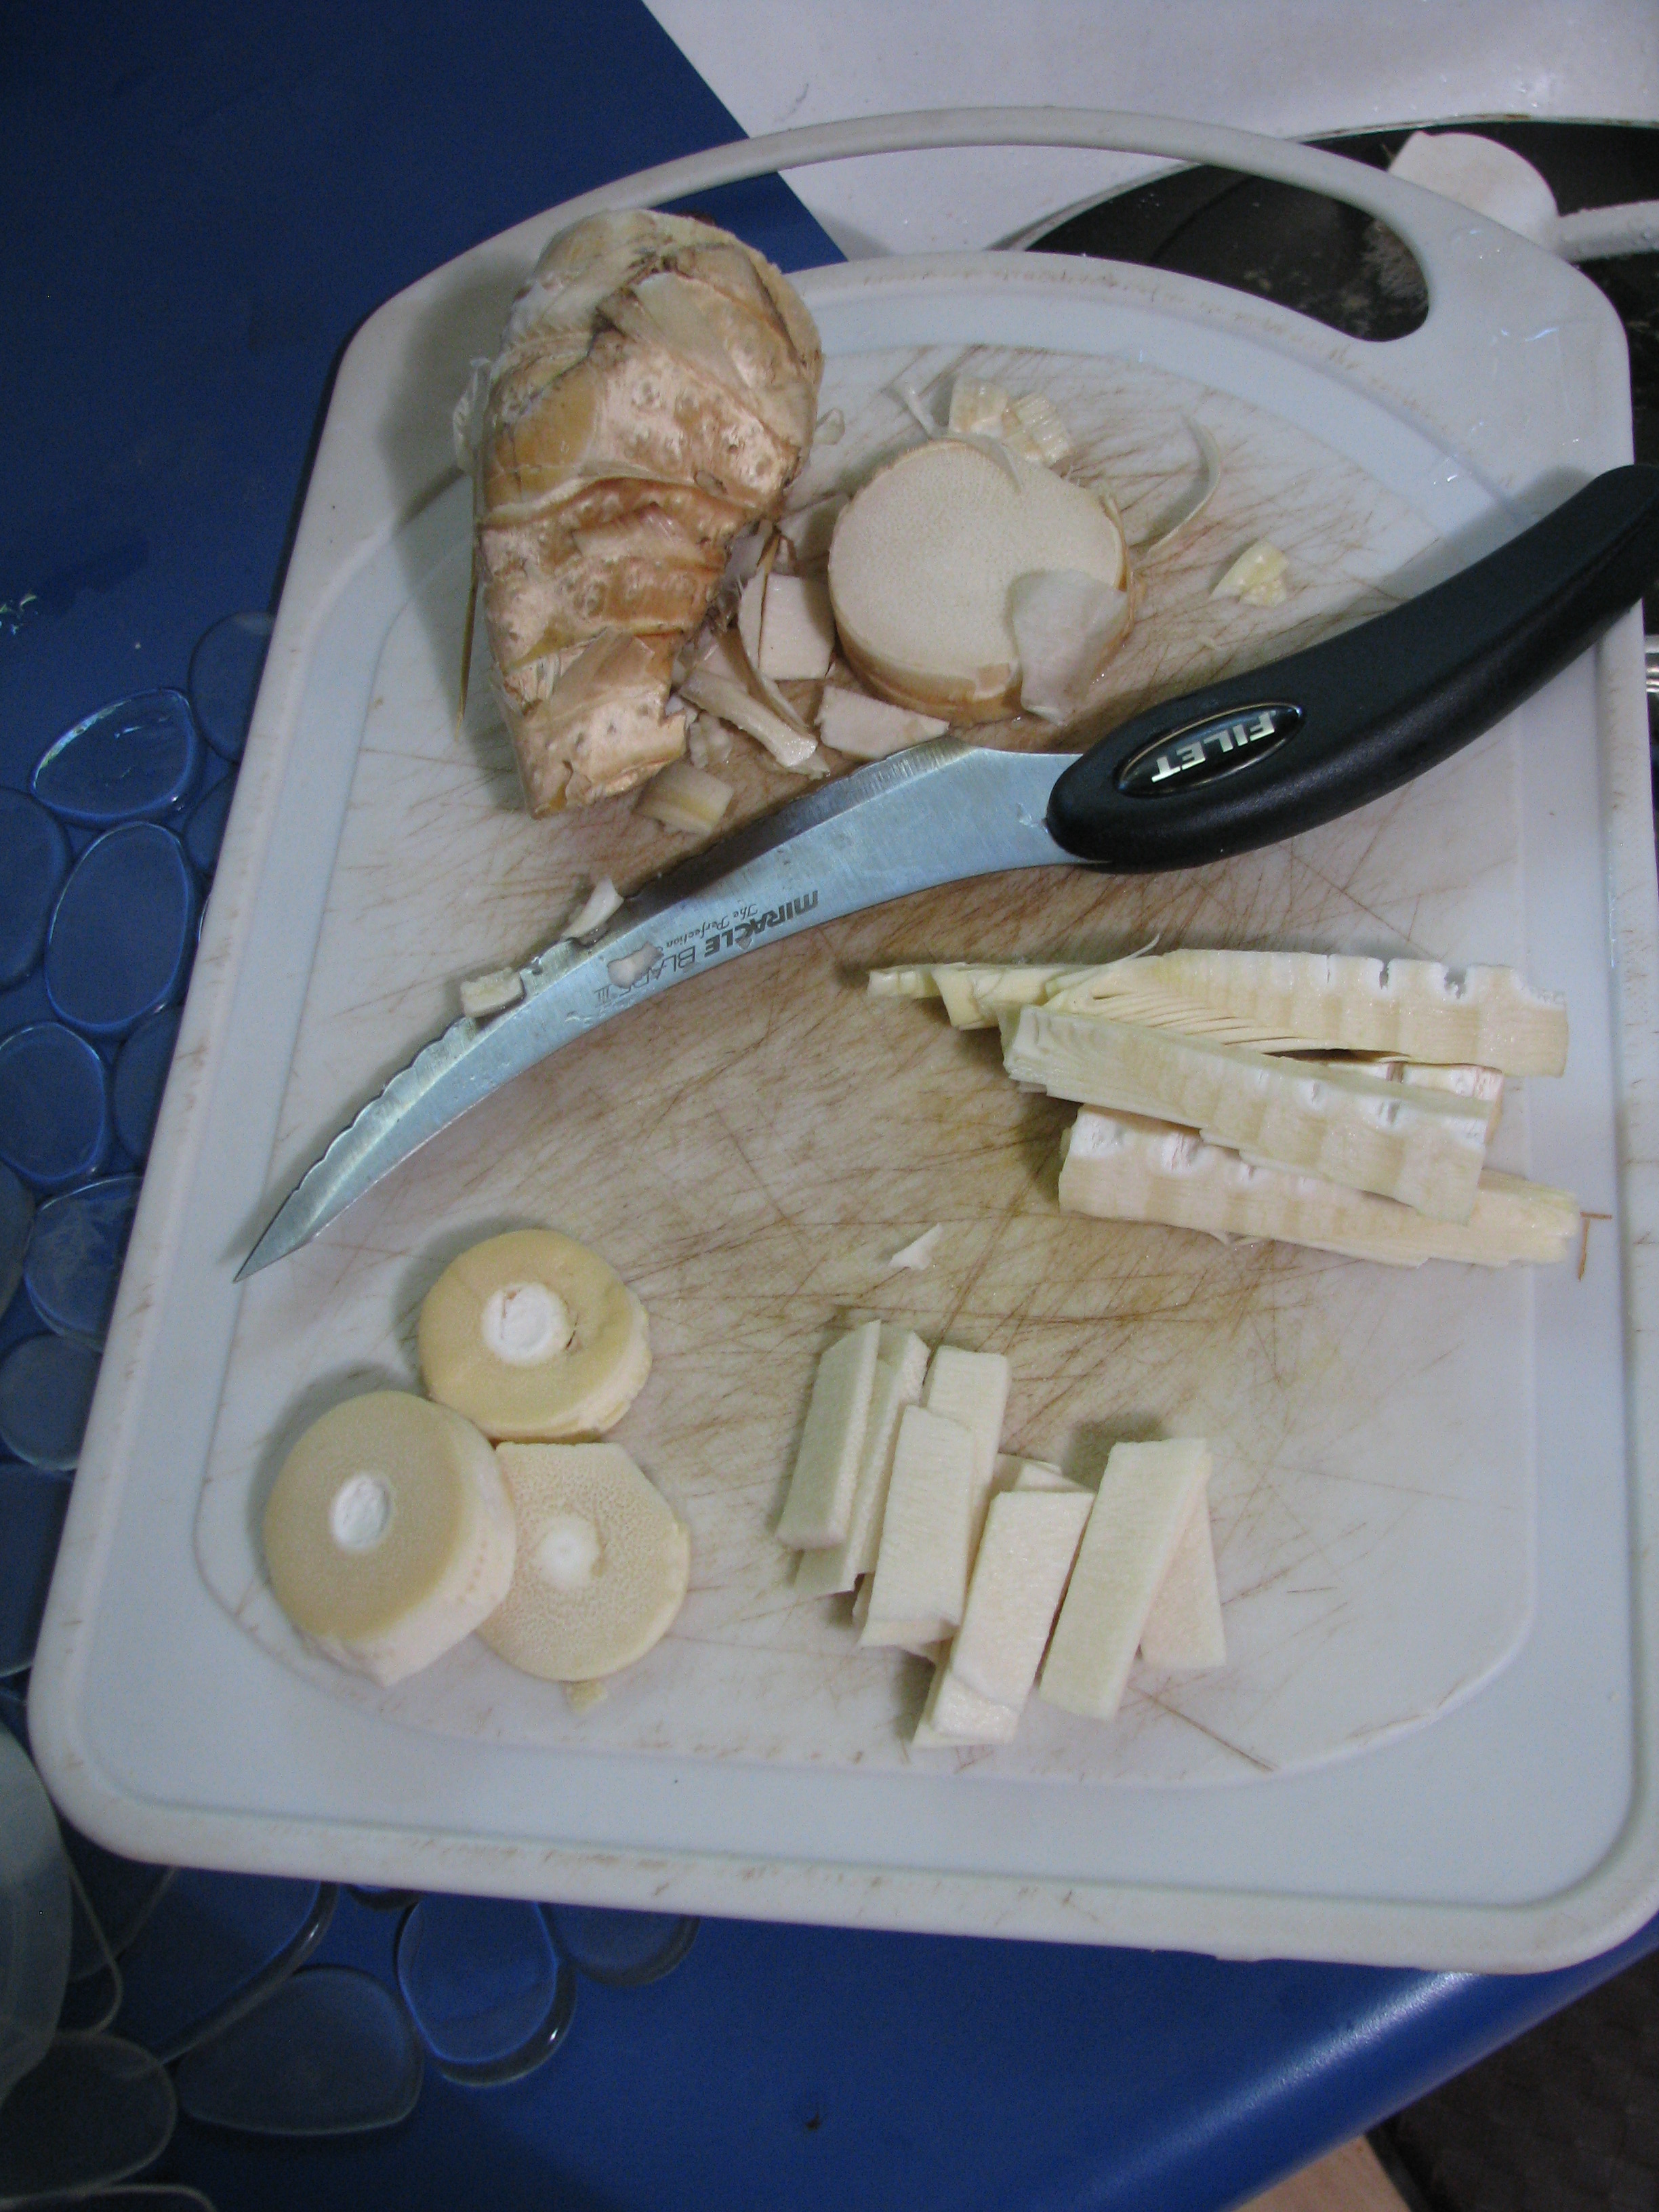
The shoot, freed from the earth and its parent plant. Once we finally achieved success, processing could begin! It is somewhat tiresome to strip a shoot down to the edible white core, because the leaves cling so tightly and are fibrous. It’s like shucking the most stubborn ear of corn in the world. It’s good to slit the tougher outer leaves with a very sharp knife and peel them away.
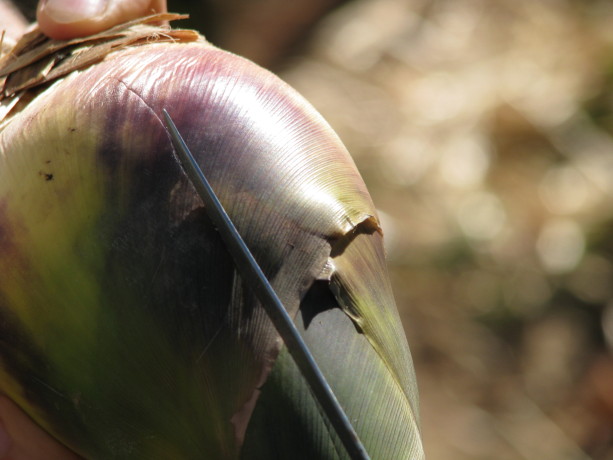
Slitting the fibrous outer leaves with a filet knife. 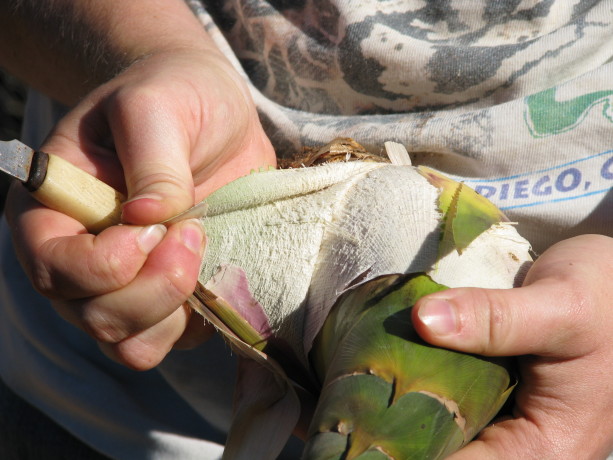
Peeling. The inner leaves come away more easily – rather like the layers of canned hearts-of-palm – as you get closer to the heart of the bamboo shoot. The innermost leaves are basically fetal, and so are edible because they haven’t gotten tough yet. They make the tip of your shoot look hairy.
Many layers of increasingly tender leaves. 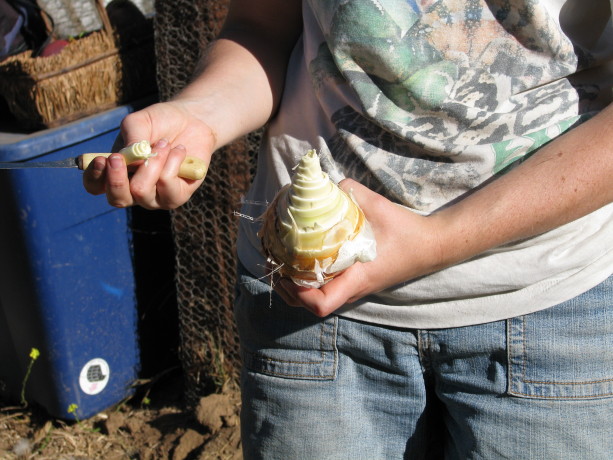
The edible shoot. A peeled bamboo shoot can be cut up in whatever way the chef desires. The shoot grows more fibrous towards the base, where there is probably some inedible hard material. My current rule of thumbs-carefully-tucked-away is if a sharp knife can pretty easily get through it, it’ll be fine to eat.

A shoot cut in three different ways. The material behind the knife (upper left) is too fibrous to eat. You just have to boil your slices before cooking and consumption because they contain a mild toxin that dissipates with boiling. The first time, we tried boiling in lightly salted water for only 30 minutes, and while the shoots were tender and not really bitter, they left a teeny tingling sensation in our mouths, like stir-fried Pop Rocks. The last time I cooked them, I boiled them for a whole 50 min. to much more satisfactory, un-tingly results.

Boiling to remove toxins. Bamboo is delicious and a lot of fun (in a somewhat laborious way) to harvest. The beauty of harvesting your own bamboo shoots is that you are saving yourself a trip to specialty markets and controlling your bamboo’s growth at the same time!
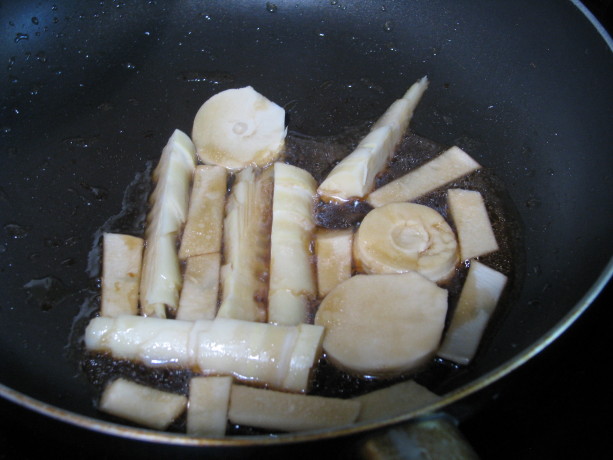
Frying up — yummy! So that’s another thing going on here at FFG. Thanks for wandering the bamboo lane with me.
TTFN!
Miranda (the Panda), B.S.
-
Celery Soup
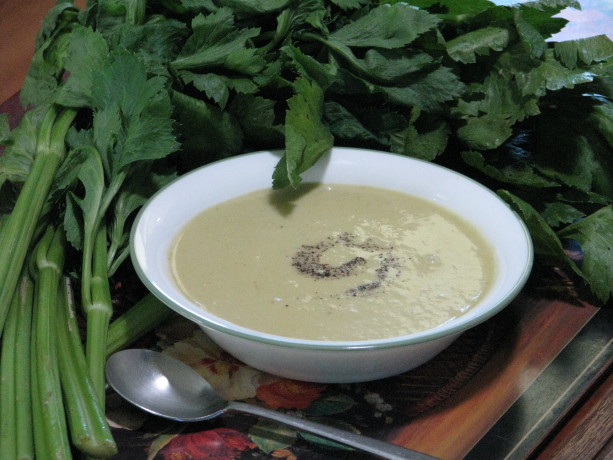
Celery soup, served hot or cold, is delicious and great for you! I thought I had posted this wonderful soup but apparently I hadn’t. Celery is a remarkable food for helping combat mental aging, among other attributes. This year we grew our own celery which is strong, fiberous and slightly bitter. We use it diced in stir-fry and many dishes including Celery Soup. This soup can be served hot or chilled, and you can either use cream at the end to finish it or just rely on the included potato for the thickener. Add a little cayenne to spice it up and increase its medicinal value. This is a blended soup that doesn’t freeze well (the flavor changes), so eat it all up! This is a lovely light green soup… great for Halloween! For another green soup, try my Zucchini and Rosemary Soup, too.
Celery SoupAuthor: Diane C. KennedyRecipe type: Main DishCuisine: AmericanPrep time:Cook time:Total time:Serves: 6 - 8This easy, delicious low-fat soup can be served hot or chilled, or dressed up with cream.Ingredients- ½ cup butter or butter substitute
- 10 ribs of celery (3½ cups) coarsely chopped (no leaves)
- ⅓ cup coarsely chopped shallots, or sliced leeks
- 1 small baking potato (russet-type) (6 oz), peeled and cubed
- Salt
- Pinch celery seed, ground (if using organic, stronger-flavored celery you may omit)
- ⅛th teaspoon cayenne pepper (optional)
- 6 cups vegetable broth
- ¼ teaspoon nutmeg
- ¼ cup heavy cream, or to taste (optional)
Instructions- Melt butter in a large saucepan over medium heat.
- Add celery, shallots or leeks, potato, celery seed and cayenne (if using), and a pinch of salt.
- Partially cover and cook, stirring occasionall,y until vegetables are soft but not browned, about 15 minutes.
- Add stock and bring to a simmer.
- Reduce heat to low, cover and cook 30 minutes.
- Stir in nutmeg.
- Allow to cool enough to be comfortable for you to puree in blender or food processor, in batches until completely smooth.
- If necessary pour through a fine sieve into a large bowl, pressing with a spoon to extract as much liquid as possible. If you have a Vitamix, just blend it on high and don't sieve.
- Return soup to pot, reheat slowly and adjust seasonings. (If serving cold, just adjust seasonings and chill.)
- Stir in cream (if using) and serve, garnished with celery leaves or croutons.