Fruit
-
Black Plum and Basil Granita
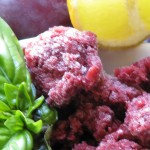 This is an interesting and delicious way to use some of those plums that ripen overnight. Basil is also in season, and combining it with the heavenly, winey flavor of ripe black plums is amazing. If you grow other types of basil such as lime basil or cinnamon basil, use those instead, reducing the lime juice to 1 tablespoon.
Granita is juice that is partially frozen, forked around a little, then refrozen. You don’t need an ice cream maker. Easy, quick and nutritious, too!
Black Plum and Basil GranitaAuthor: Diane C. KennedyRecipe type: DesertCuisine: AmericanPrep time:Cook time:Total time:Serves: 8½ cup servingsBasil and allspice give a wonderful depth of flavor to winey black plums in this frozen treat.Ingredients- 1 cup water
- ⅔ cup granulated sugar
- ¼ teaspoon vanilla extract
- ⅛ teaspoon salt
- 6 whole allspice (if you don't have allspice berries, use a small piece of cinnamon stick)
- 1½ pounds black plums, pitted and quartered
- 2 tablespoons fresh lime juice
- ¾ cup basil leaves (not packed)
Instructions- In a large saucepan combine water, sugar, vanilla, salt, allspice and prepared plums and bring to a boil.
- Reduce heat and simmer for 15 minutes or so, stirring occasionally, until the plums begin to fall apart.
- Pour into a small bowl set in ice water in a larger bowl and cool completely.
- Fish out and discard the six allspice.
- In a blender or VitaMix process plum mixture, basil and lime juice until well blended.
- Press the plum mixture through a fine sieve over a bowl and discard solids. If you have a VitaMix you may not have any residual solids; the granita will be cloudier but will be more nutritious. Don't worry about it.
- Pour the mixture into an 8-inch square glass or ceramic baking dish.
- Cover and freeze until partially frozen, about 2 hours.
- Scrape with a fork, crushing any lumps, and smooth down again.
- Freeze for 3 more hours, scraping with a fork every hour so that it doesn't freeze as a cube, until completely frozen.
- Serve in small scoops; really nice paired with little vanilla cookies.
-
Protecting Fruit

Strange fruit. We have many young fruit trees, including three figs. We have a Black Mission, a white and a Strawberry Jam fig. The trees are a year in the ground and not quite head-height, but all produce small amounts of fruit which ripen sequentially.
The birds know about the figs.
I’m glad to share a percentage of my crops with wildlife; this is a habitat after all, and there is more than enough for me and for sharing. However, there aren’t a lot of figs to go around. My daughter while home from University this summer took on a competitive attitude when harvesting the figs. She was out early testing for perfect ripeness, testing again as the sun set, being foiled by pecked fruit when it was at its peak of perfection.
Netting trees is not a good idea. The netting sits on the trees and the birds sit on it and peck through. Meanwhile it snags and sticks on the trees and is almost impossible to remove without doing damage to the trees. Also that plastic or nylon netting, if left on the ground, will often be deadly to beneficial snakes which become entangled in it (read about how I released one here).

Miranda came up with a wonderful, easy solution that re-purposed something of which we had plenty: plastic berry baskets. These baskets were hard enough to form a space around the fruit so that a bird couldn’t get its beak down through it. They also allowed air to flow around the fruit and sunshine in to ripen. They were also incredibly easy to quickly twist-tie onto the branch around an almost-ripened fig, and reposition to the next fig when it was time to pick the first one. The long twist-ties often used to hold heads of lettuces together worked best. Extra baskets were handy to put the picked figs into as well. This solution could be used for small grape clusters as well.

Obviously this solution is for small trees; but then, when the tree is large it will be producing plenty of fruit to share with the birds. Or, we can get a ladder and a lot of berry baskets and twist-ties.
That, however, may just cause talk in the neighborhood.
-
Jujube: a wonder tree

A handsome fruit. We mostly know the word jujube from having snacks as a kid in the movie theatre. Jujubes were once unchewable resinous candies of many flavors, and then were changed to something akin to gummy bears. Jujubes are a general term for a variety of candies in many countries. Oddly enough, and for reasons I know not, there is a tree called a jujube that bears wonderful fruit.
 ready to pick.")
Jujube tree with fruit (a drupe, actually) ready to pick. Jujube trees (Ziziphus jujuba) have been cultivated in China for over four thousand years, and are gradually catching on in other countries. The first jujube fruit I ate was last year in a dried form. It was good, faintly reminiscent of a date. Now I have a tree that has just begun to bear fruit, and I am in love with it. The fruit is small, like very large olives. They begin green and then quickly turn to a reddish brown color, usually in blotches of color.

The fruit turns brown in patches, but can be eaten before completely dark. You can eat them fresh; in fact, I haven’t had them cooked yet. They are delightful. There is a center stone, such as in a date, but it holds two seeds.

Thin skin, crisp flesh like a green apple with a hint of date. The skin is thin and tender. The flesh is crisp and reminiscent of a green apple with hints of date. I love them. Many wait until the skin begins to wrinkle to eat them. You may pick the jujubes as they start turning color and they ripen quickly in the house without loss of flavor, or let them dry on the tree. Jujubes are high in vitamin C, and have been used medicinally in other countries, especially as a tea for sore throat. Best of all, so far the local birds ignore them, and there don’t seem to be any insect pests that love them.

Jujubes are a lovely reddish brown when ripe, and darken as they wrinkle. What makes the jujube a wonder tree is that it doesn’t seem to mind intense heat; in fact, it loves full sunshine and dry conditions. It also can survive a chill factor down to -28 degrees F! It doesn’t mind clay or alkaline soils, although good drainage and regular watering insures a good crop. They require little or no fertilization. There are many cultivars, the best being from China and more inferior ones from India and Japan. Many are thorny but some are virtually thornless. The trees can grow 30 feet high, have an attractive drooping appearance and are deciduous, the leaves yellowing before dropping. Suckers can appear several feet away from the trunk and can be controlled by mowing or pruning. You can read more about this remarkable tree here.
Why not try a jujube tree? They provide food, windbreak, mulch and have a very hard wood, and take just about any conditions. And the next time you go to a movie theatre you can bring your own jujubes… dried!
-
A Painless Breakfast, and a Bombilla

I'm all over this medicine! Food is the ultimate resource for health. As my body complains ever louder about all the years of abuse I’ve put it through, I’m turning to diet to help with the pain. Certain foods have anti-inflammatory properties, and they aren’t hard to eat at all. Cinnamon, turmeric, and ginger are high on the list. Cooked asparagus is excellent for kidneys and liver, and there is speculation that it cures serious illness as well. Whole eggs are much more healthy to eat than separating out the white and throwing away the yolk. The two parts compliment each other. As well great sources of protein, eggs are excellent for the eyes. The vitamin C found in fruit is an essential boost to your immune system, and helps other vitamins work better.
I also take some supplements. I take a multi-vitamin, a couple of natural menopausal relief pills, a vitamin C, and a couple of glucosamine/chondroitin tablets. G/C is a miracle supplement if you have arthritis. It helps keep the joints juicy.

Hot ginger tea; good for your tummy and good for your joints. So for mornings after a full day of weeding, carrying, hauling, flinging, and planting, I need everything I can get to help get my hands and back moving again. My ideal painless breakfast is: an egg from one of my hens, sprinkled with a turmeric and pepper combination (pepper is supposed to aid turmeric), some Trader Joe’s frozen grilled asparagus, heated, a piece of toast liberally sprinkled with cinnamon and coated with organic (sometimes home-harvested) honey, orange juice and a hot cup of ginger tea. I keep a small white container of cinnamon on the table, as well as a small bowl of the turmeric and pepper combination. That way I don’t forget to sprinkle it on my food. Inflammation is the source of almost all illness. If you can fight inflammation naturally, you’ll be a long way ahead health-wise. You’ll be relieved from pain that you never knew you had!

Bombilla I considered giving the bombilla its own post, but it was in the breakfast photo so I’ll talk about this wonderous gadget here. A bombilla is a metal or bamboo straw with a strainer on the end. Ingenious! Common in South America, it is commonly associated with the drinking of the new old fad tea yerba mate. However, to my delight it works perfectly with loose leaf and herbal teas! Instead of snapping and screwing and pressing tea strainers, I just put loose tea in my cup, brew it and drink it via the bombilla! So easy! Afterwards I scoop the spent tea into the compost, rinse the cup and the bombilla, and its good to go for the next batch. Loose leaf tea is such a better experience than using tea bags. With the bombilla, I now have herbal or loose leaf tea almost every time. Bombillas have transformed my drinking experience! I believe they are available at international marketplaces, but I bought mine online at Amazon.com. I bought two for me and my daughter, who took hers to college, and another as a gift for my son, and then two more as extras at home. Never can have enough bombillas! What a concept! A perfect drinking implement! My life will never be the same. Better still, I can now sip hot tea without losing my place in my book, or steaming up my glasses!
-
What To Do With Grapefruit

Grapefruit, all grown up. Every once in awhile someone gives me a grapefruit. One or two a year are just about all I can eat. Its not that I don’t like grapefruit. I certainly respect it. It is high is vitamin C and is supposed to be a good diet food. I think that is probably because it is so sour and bitter – even the pink kind – that you can’t taste anything else for hours after eating one.

Bare naked grapefruit. My mother would serve us grapefruit halves. She had a set of grapefruit spoons I always coveted that had serrated edges, but they disappeared at some point and I’ve never seen any like them. The sharp edges would allow you to dig out the grapefruit sections without actually arm-wrestling with the fruit. She’d also often ‘section’ the halves, using a paring knife to cut each section free so that all we had to do was scoop them out. She left little reason for us to not eat them. Of course, not eating my mother’s cooking was unheard of anyway.

If you section the grapefruit first, you could probably get more whiskey in there. To make grapefruit much more appealing, she would doctor it up with brown sugar, whiskey and then broil it and serve it warm. Wow did that ever improve the taste! Since grapefruits are making the rounds right now, and no one else I’ve spoken with seems to have heard of this method of serving them (their ears sure perk up when I tell them, though!), I thought I’d do everyone a favor and print the recipe. The Grapefruit Diet suddenly doesn’t look so bleak.
Broiled GrapefruitAuthor: Diane C. KennedyRecipe type: SidePrep time:Cook time:Total time:Serves: 2This method of preparing grapefruit I learned from my mother, Beth Cywar, a fabulous cook and a nutritionist before her time. She also believed that food wouldn't do anyone any good if they wouldn't eat it.Ingredients- One grapefruit, cut in half widthwise.
- 1 - 2 teaspoons brown sugar
- 1 - 2 teaspoons whiskey
- A few fresh or dried berries (optional)
Instructions- You may section the grapefruit or not; your choice. Sectioning would probably allow more whiskey to seep in, and would be a little easier to eat, but it is optional.
- Place halves on foil or an oven-proof dish, or on a broiler pan.
- Start the broiler. A toaster oven works great.
- Sprinkle the grapefruit halves with the brown sugar.
- Slowly drizzle the whiskey over the halves.
- Broil until warm and slightly brown and sizzling, about ten minutes.
- Adorn with fresh or dried fruit, or if you want to be retro, a marashino cherry, and serve.
-
Passionfruit Curd

Passionfruit curd. Yum. Rather than post photos of the rabbits eating my vegetables,

or other Eastery things, I thought I’d put in a recipe that is rather exotic. If you have a passionfruit vine (the ones that produce edible fruit) you may be inundated with the fruit about now. Also the flowers were named passionflowers because of the Christian symbolism read into the shape of the flowers. I always wondered about this, but I figured that faced with ‘heathens’ who ate this aromatic, voluptuous and kind of sexy fruit, some Christian missionaries decided to put the stamp of Christianity onto the plant rather than try to ban its consumption. That’s just my theory, of course, but it makes sense. Therefore a post on passionfruit for the passion of Christ on Easter. Yep, I’m stretching it, but you’ll like the recipe.
Anyway, passionvines have abundant growth (as I mentioned in my post about building a trellis for them http://www.vegetariat.com/2012/03/questionable-carpentry/).

Gorgeous flowers. There are many colors of flowers of both the ornamental and edulis varieties. The flower has a tiny fruit all ready to go and awaiting some friendly bee to come rub herself all over the anthers and stamens (the missionaries are shuddering) and pollinate.

Looks like the fruit is wearing an Easter bonnet! Kind of. Okay, it doesn't. The fruit grows as the flower fades. There is some mother-child allusion somewhere in there but you’ll have to go there yourself.

A developing passionfruit. When the fruit is ready to fall, a good shake of the vines will make them come down. Usually they are still smooth-skinned at this point. You want to wait until the fruit starts to wrinkle before it is sweet, ripe and ready. (I’ll not touch that one at all.)

The fruit falls off still smooth... wait until it wrinkles to use Don’t eat the skin, but cut the fruit in half. Many people like to eat the seeds as well as the pulp. I’m not one of them, and neither is my daughter who very patiently sieved the insides of about 80 passionfruit to obtain the juice. I like to add the juice to tangerine juice for breakfast. We’ve also successfully made a hedonistic passionfruit ice cream that was stupendous. This time we decided to make passionfruit curd.

Wait until they're wrinkly, then scoop out the insides. I’ve posted already on how to make lemon curd (http://www.vegetariat.com/2011/03/when-life-gives-you-lemons-make-lemon-curd/). (You’re wondering, what is UP with this woman and curd, anyway?). The passionfruit curd is slightly different, but yet has that nice bite to it that doesn’t make it too sweet. I thought this curd came out tasting a little eggy, but I believe that is because we used eggs from our own spoiled hens, which have a definate healthy flavor to them. The eggs, not the hens (that we know of, nor will we find out). It was all okay, though.

Scoop and strain. We made two half-pints, and I didn’t ‘can’ them. However you may sterilize the jars and lids, add the hot curd, and give them a 15 minute hot water bath and the curd will last for months. I still refrigerate it, just to be on the safe side.
I found the original recipe in Nigella Lawson’s How To Be A Domestic Goddess. She stirs some passionfruit seeds back into the curd, which looks nice (if you like the fish egg look to your food) and can certainly be done for all of you who enjoy the seeds. I like my curd seedless. On scones. With mascarpone cheese. Mmmm.
Happy Easter!
Passionfruit CurdAuthor: Diane C. KennedyRecipe type: SpreadPrep time:Cook time:Total time:This wonderful spread based on Nigella Lawson's recipe can be used to top baked goods, put in a pie shell, in a jelly roll cake, or used any way you would lemon curd, jam or jelly. It makes an exotic gift, too!Ingredients- 12 passionfruit
- 2 large eggs
- 2 large egg yolks
- ½ cup granulated sugar (superfine if you have it)
- 8 tablespoons unsalted (good quality) butter
- 2 sterilized ½ pint jars
Instructions- Cut the passionfruit in half and scoop out the insides into a sieve.
- With a spoon, strain the juice into a measuring cup. You should have about 10 tablespoons, or a scant ⅔ cup of juice. If you'd like seeds in the curd, reserve the pulp of the 12th one instead of straining it.
- In a bowl beat the eggs, yolks and sugar together.
- In a saucepan, melt the butter over low heat.
- Stirring continuously, add the passionfruit juice and then the sugar mixture, being careful not to cook the egg.
- Keep cooking and stirring until the mixture thickens, about five minutes. It should coat the back of the spoon.
- Take the pan off the heat. If you have reserved the pulp of that one last fruit, here is where you whisk it into the mixture.
- Pour the curd into the jars and seal.
- Store in refrigerator. Try it on scones with mascarpone cheese. Really. I mean it.
- Makes two half-pint jars full, about 1¾ cups.
-
Dragonfruit

Small ripening dragonfruit Dragonfruit have to have the most incredibly sensational color of any fruit. Their blooms are wild, showy and no better than they ought to be, and the fruit has colors so loud they bedazzle the eyes. Also known as pitaya or pitahaya, dragonfruit grow on either columnar or vining cactus plants. Their history is recorded with the Aztecs, and now they are grown in Vietnam and parts of Malaysia. Due to their soft texture, the fruit isn’t conducive to shipping and handling, so finding them at Asian marketplaces or Farmers’ Markets would be your best bet. However, the popularity of this plant is catching on and since they take up little room, can be grown at home.

There, amongst the proper cosmos, a wild flaunting beauty! I have two vining dragonfruit, which I’ve propped up on the trunks of two Washingtonia palm trees for support. They receive sun there, but some protection from the intense late afternoon sun, and it is a frost-free area. One morning in late summer I went out among the small cosmos and other English-style flowers of that yard, and suddenly noticed this enormous tropical flower looking so out of place. It was gorgeous, fragrant, and sultry next to the prim annuals. The flower of the dragonfruit has a nocturnal bloom, relying on bats and moths for pollination; apparently even those that are self-fertile, as this one evidently is, needs some interaction with bats and moths to set fruit. To insure pollination, growers will make an evening event of hand-pollinating, paint brushes and flashlights in hand. The flower slowly faded during the day and was limp in late afternoon; I’m glad I was lucky enough to see it in the morning at its most sensual state.

This gorgeous, fragrant flower was as large as my face. I didn’t think that the flower would set fruit, but the plant surprised me again when I glanced over last week and saw a red dragonfruit. This particular dragonfruit has red skin and crimson flesh. Some have red skin and white flesh, or yellow skin and white flesh. The most dramatic I’ve seen was a bright green skinned fruit with crimson flesh! All have small black seeds inside.

Hey, there's a dragonfruit! Dragonfruit is famed where it grows for its health benefits which are extensive, as well as the fiber and vitamins it contains. Dried dragonfruit is supposed to be more potent than fresh in some ways, and is a better eating alternative for those who don’t care for the texture of the fresh fruit. A good website honoring the nutrition aspect of dragonfruit is http://dragon-fruit.biz/ .

Red on the outside and crimson in the middle Propagation can be done by seed, which is slow, or by one-foot-long cuttings from fruit-bearing plants. Allow the cuttings to harden off before planting, just as you would any cactus or succulent. Plants will need support, especially the vining kind. They are tropical plants, so enjoy warm weather, regular watering without standing in water, and some humidity.
For sheer spectacular showiness, you can’t beat the neon colors of dragonfruit. Eat out-of-hand, in fruit salads, blend in smoothies or for sherbets, or dry to slightly chewy bits that are packed with nutrition. You will certainly impress your neighbors; in fact, invite them over for an evening pollination party! That ought to get the homeowner’s association all worked up!
-
The Little Guys in the Soil
I know, I know, I’ve been very delinquent. However I have been working hard, reading a lot and studying. I’m taking a Permaculture Design Course in San Diego on most weekends, and the information has been dazzling. Even though I know a little or a lot of what is being presented, what amazes me is how related the information is and how it all works together. For instance…
Gardeners know that the best pH for soil is somewhere around 6.5. Higher or lower than that and the soil has too much acid or alkaline. Here in San Diego we have alkaline soil. Rainwater is excellent because it has a neutral pH. What is so important about that neutral pH? Well, I’m going to tell you. There are all kinds of nutrient in the soil in the form of trace minerals, such as iron, magnesium, copper, etc. However these nutrients are bound up in the soil because of the pH… some are bound by a high pH, some by a low pH. For instance, we have adequate iron in our soil, but because of the alkalinity, plants can’t access it and become iron deficient. If you have neutral pH, then plants are able to feed themselves nutritiously. To free up the iron, you should add mature compost and water as much as you can with collected rainwater.
Okay, so you knew all that. So did I. Here comes what I think is the interesting thing.
We know that the soil is teeming with little beings such as bacteria, fungi and nematodes. Some are good, some are bad. Such is life. Picture if you will the soil in a forest, which has a lot of large materials such as logs and sticks being broken down by various fungus. The soil in a vegetable garden, however, is loamy with small particulate matter. Well, in a forest situation, with an acid soil, there is high fungus activity and lower bacteria count in the soil. The soil isn’t usually turned over or bothered in any way. In a vegetable garden, a slightly more alkaline soil is perfect because it has less fungus and more bacteria. The soil is turned over frequently. Weeds such as grasses prefer a pH range that is slightly more alkaline. By changing the pH with the addition of different kinds of mulch, you can moderate the microbes in the soil, tipping the balance between fungi and bacteria, and edging out the grasses. Cool, huh?
Fungus is extremely important where longer-lived trees are planted, because fungus travels underground, linking with the spreading roots of the trees and actually causing communication between them! Fungus, it has been said, is nature’s Internet. Mushrooms are called nature’s teeth, too, but that is an image that perhaps you just don’t want in your head. Bacteria help soil that is often disturbed by helping leguminous plants fix nitrogen (yes, yes, I know, back to the darn legumes again), and help free up nutrients for the roots, usually by dying. That’s not a happy thought but, again, that’s the way it goes. If you till the soil, you kill off the bacteria and nematodes and fungus and all the other little critters. There is a rise in fertility, but only briefly because that rise is the nutrition released by the decomposing bodies of all your soil critters! Then there is just dead soil. Then farmers pour on the salt-based fertilizers (NPK), which is just salting the land and making sure nothing can live in it. The crops grow, but since there aren’t any friendly critters freeing up nutrients, the resulting nutritional value of the produce is poor. Only by mulching, composting, and cover-cropping can the soil come alive again, which nourishes the plants, which nourish us.
There is so much life in just a pinch of soil; so much going on that we still can only guess at. To build up your soil with mulch, compost and organic practices is to give life to gajillions of life forms (yes, that many!) which all work to make your plants healthy, your food more nutritious, and gain back some of the topsoil that has disappeared through man’s blundering.
I hope this was as interesting for you as it is for me!
-
Freezing Apples
 Growing your own food is marvelous. Having it all come ripe at the same time is not. My apple tree is producing well this year, and the apples need to be stored in some way. Since I don’t have a cold cellar, I need to can or freeze them. My plan was to can apple slices in either a light water and sugar mixture, or make Pie-In-A-Jar pie filling. However, two days of 101 degree heat took the wind out of my sails, and used up the time I had allotted for canning. The apples, however, are still there. So I froze them instead, which is probably the better solution because it doesn’t add any sweetener ahead of time.
Another good time saver if you are keeping apples for pies, is to make the apple pie filling, pour it into a pie pan and freeze it. After freezing, slip it out and into a freezer bag. When it comes time to bake, make the crust (which you actually can do ahead of time and freeze separately as well) and slip in the frozen pie filling. Add baking time.

The best apple peeler I’ve ever had was purchased at the Del Mar Fair many years ago and given to me as a gift. It is easy to hold (I have arthritis) and I can zip through peel like nobody’s business. I know that design (in photo) is sold elsewhere, so don’t wait for the Fair.
Freezing ApplesAuthor: Diane KennedyRecipe type: Side dish or dessertPrep time:Total time:Freezing ripe apples allows you to have easy, ready-to-use apple slices whenever you want.Ingredients- Apples
- A bowl full of cold water
- A lime or lemon, or a teaspoon of apple cider vinegar
- cookie sheets that fit into your freezer
- Freezer bags
Instructions- Add the juice of a lime or small lemon, or the vinegar, to the bowl of water.
- Wash the apples.
- Peel several apples and drop them into the water to keep from browning.
- When bowl is full, slice apples into wedges that would be appropriate for pie, and drop the slices into the water.
- Place dipped slices onto a cookie sheet so that they don't overlap.
- Freeze cookie sheet with apples (about 20 - 30 minutes).
- Remove apples from sheet, place in marked freezer bag, flatten and squeeze out extra air, and place flat in freezer so that the bags can be stacked.
- Keeps for about a year.
-
The Surprising Facts about Figs

A young common Black Mission fig People either love or hate figs. Figs were grown long before wheat became a crop. They are members of the Ficus family, which includes such spectacular specimens as the famous Banyan tree that grows enormous roots and support trunks from air roots. The fig tree, and members of the ficus family such as the Bodhi tree, are mentioned in all three major religious texts.
However, figs are not fruit. Nope.
Figs are swollen, fleshy stems called syconiums.

Figs are swollen stems. A fig is actually a swollen, hollow stem that has internal flowers!

The insides of figs show the flowers When the flowers are ready for pollination, the end of the stem opens slightly to allow in the fig wasp, its only pollinator.

The end opens. The syconium will then set seed inside, which is the time when they are usually harvested. Happily for fig eaters, many fig types are self-pollinating. Now you can amaze your friends and family with this interesting trivia over the dinner table!
