Breakfast
- Breads, Breakfast, Cake, Condiments, Dessert, Frosting, Permaculture and Edible Forest Gardening Adventures, Recipes, Sauces, Vegan, Vegetables, Vegetarian
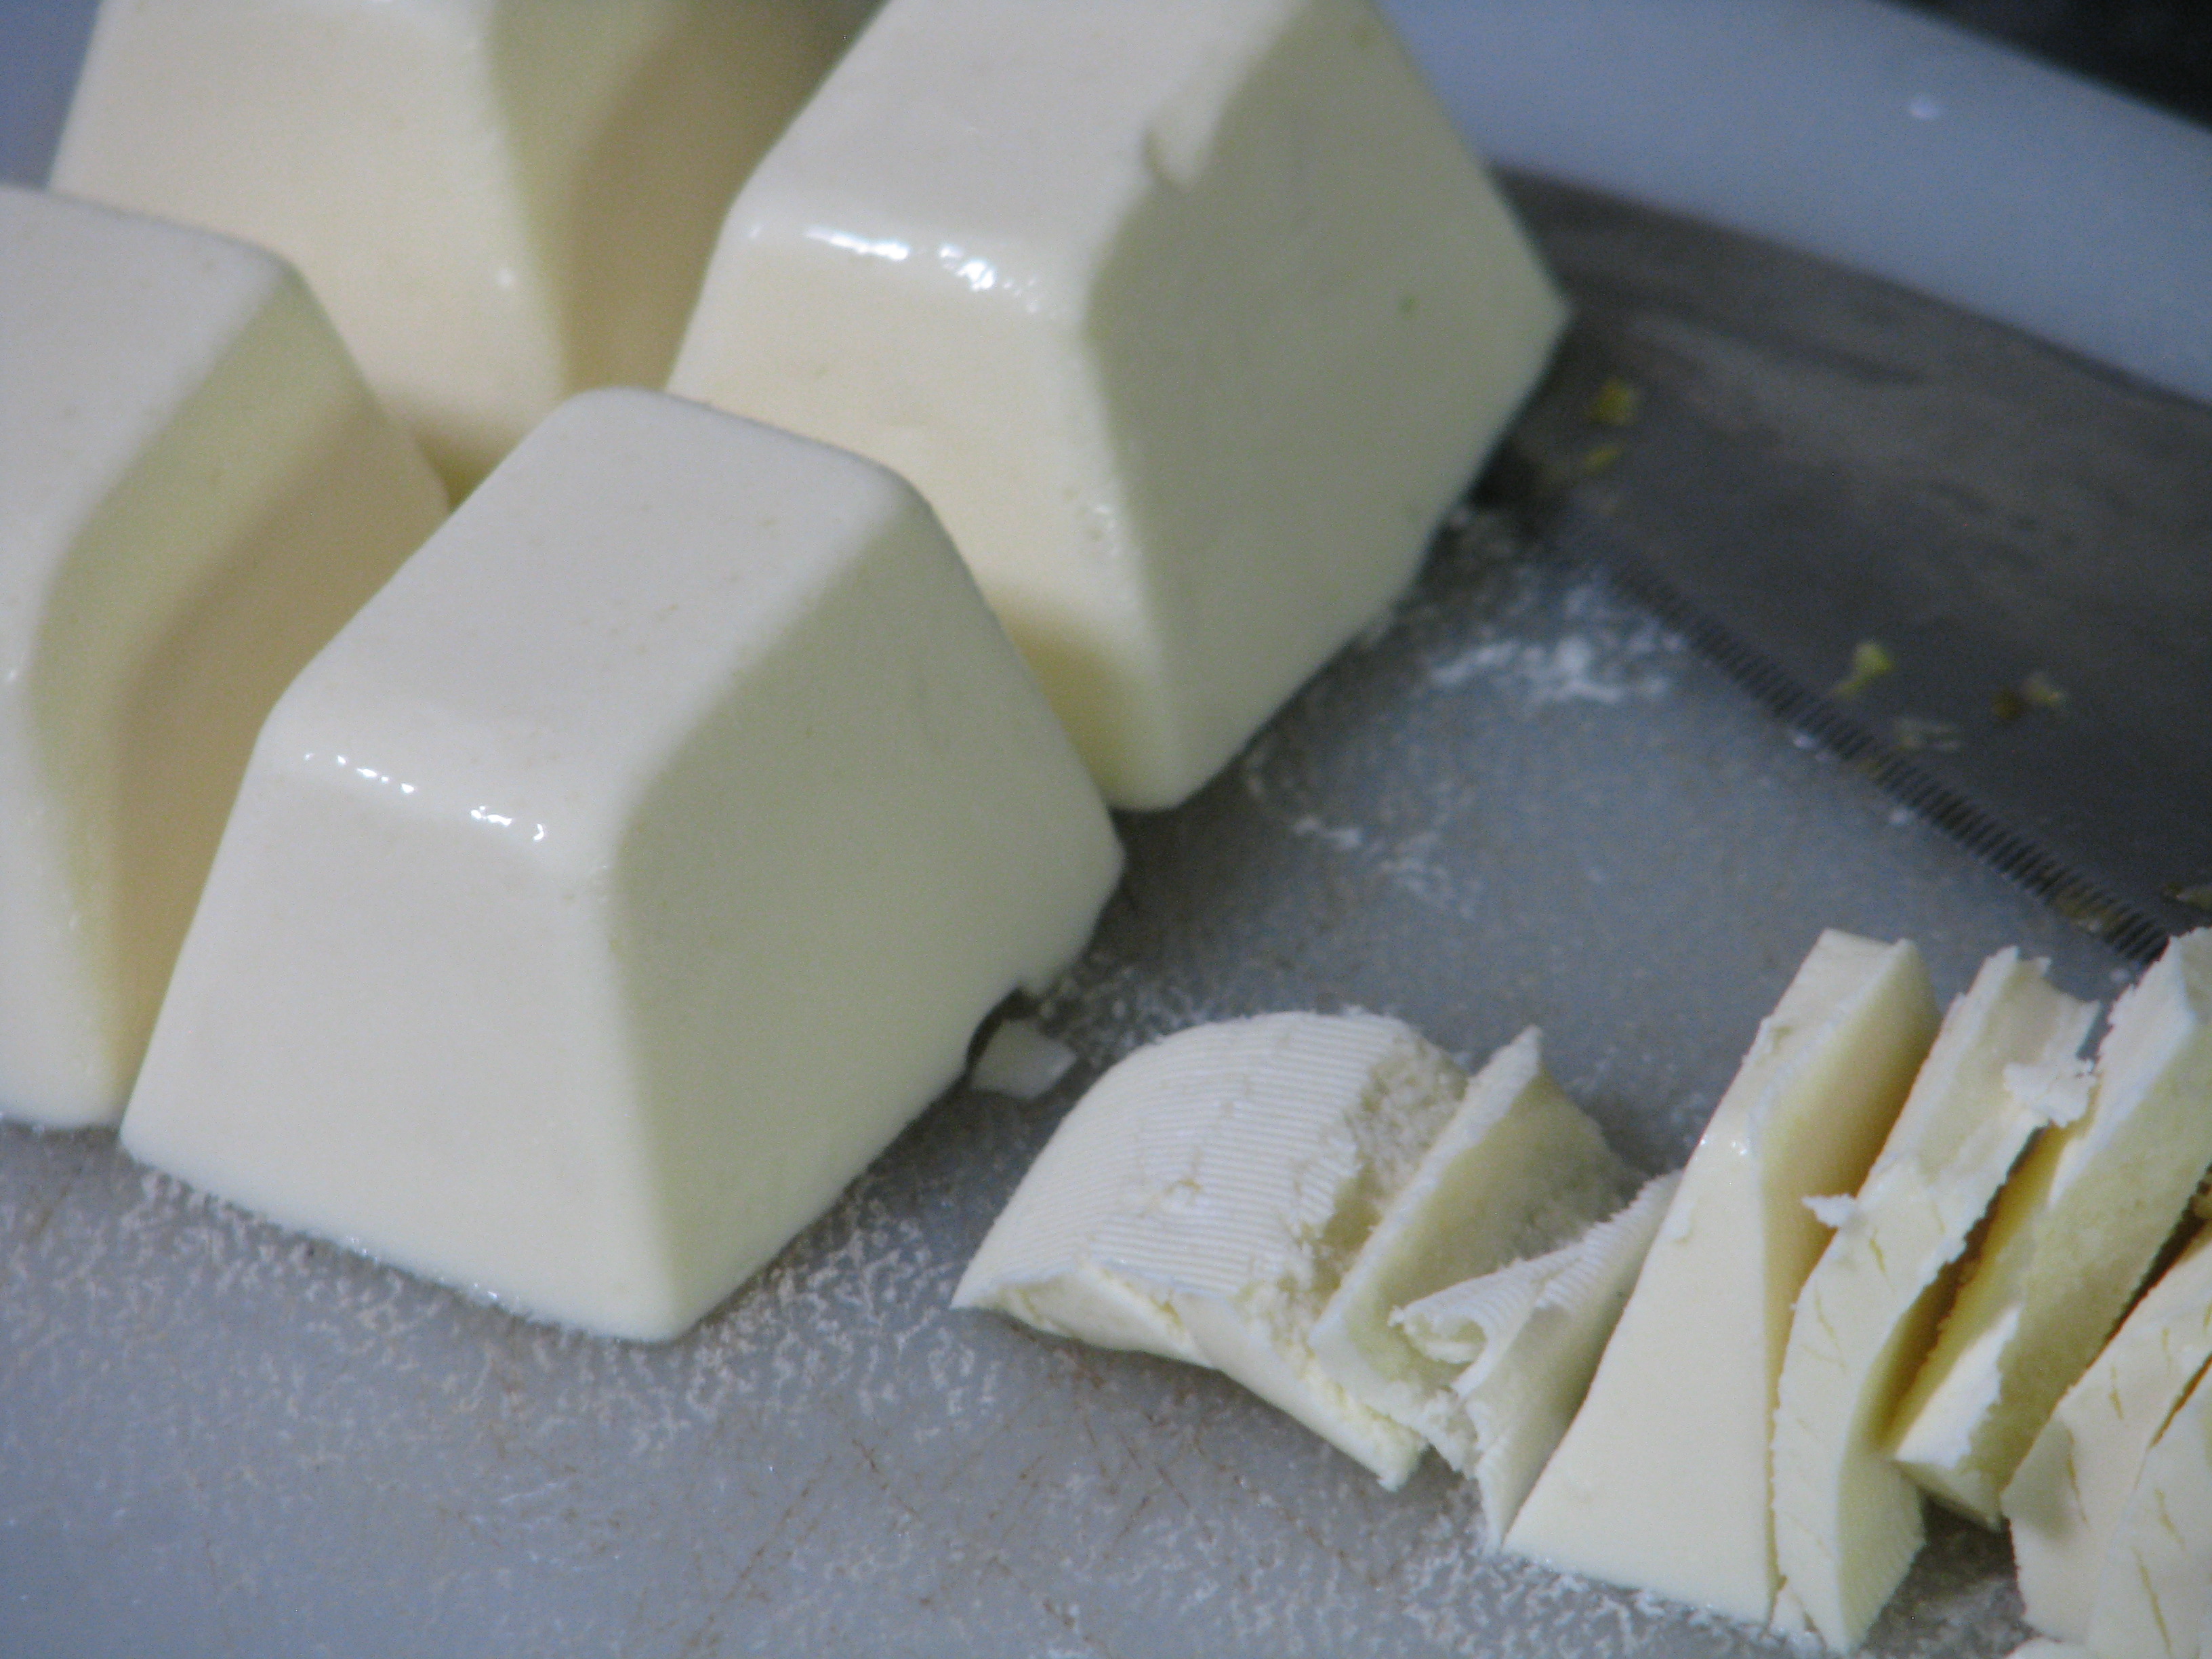
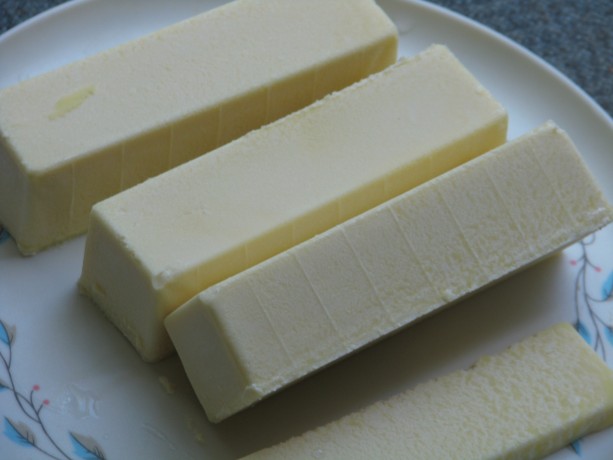
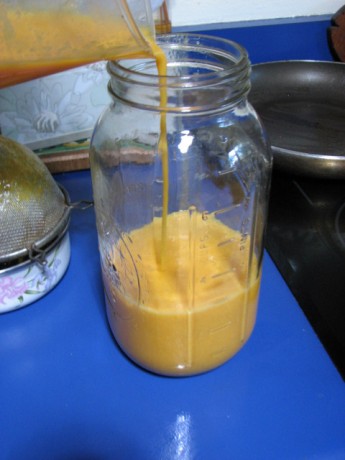
Making Ethical Butter

Vegan butter! I’ve labeled myself an ‘ethical vegetarian’ for nearly two decades. I stopped eating animals when I became horrified at the dichotomy of having glue traps under the house to catch wild rats and mice (and any poor, poor animal that happened upon it, such as lizards. Glue traps are horrendously cruel. I hadn’t put them there.) and a cage with an exercise wheel and specialty food for ‘pet’ mice in the bathroom. Justice is a man-made effort, and by not eating animals I was no longer approving of mass torture by buying into it. Although I no longer ate animals, I have still indulged in animal products, namely dairy products. Slowly it has sunk in how badly animals are treated for those, too. As someone who loves cooking, it has been difficult for me to wean away from dairy products. Butter is especially difficult. Unlike hens who have been bred to continuously lay without needing the services of a rooster, dairy cows must be lactating to produce milk. Cows are usually artificially inseminated, then after giving birth their calves are replaced by milking machines. The calves are most often slaughtered for veal. This process is repeated until the cow is used up from the constant pregnancies and lactating, and then she is slaughtered. This horrible practice is disguised by advertisements showing happy cows grazing in fields. That is a fantasy. ‘Grass fed’ and ‘pasture raised’ are sly terms that give you an image that is nowhere near to the truth. Please read Michael Pollen’s Omnivore’s Dilemma to understand where your food comes from and why.
To find an acceptable butter substitute has been an expensive and frustrating endeavor. For awhile I used a dairy substitute from Trader Joe’s, who I swear keeps tabs on what I buy the most and then discontinues it. All other butter substitutes either taste horrible, can only be used for spreading, or more commonly contain palm oil. The sudden fad for palm oil has created extreme clearance for the growing of palm in the areas which are habitat for the orangutan; indeed, if we don’t curtail our consumption of palm oil quickly the orangutan will go extinct within our lifetimes.
I finally found a recipe for a butter substitute that works pretty well for both spreading and baking. It is made mostly of refined coconut oil. At this point coconut oil is sustainably produced – please make sure that you support companies that do so. Refined organic coconut oil has no flavor or scent; unrefined has a mild coconut flavor and a toasted coconut scent. If you are using a batch of this butter for baking where coconut flavor is desired, then use the unrefined.
This recipe is by no means my own. I found it and a detailed description of the science behind it at VeganBaking.net . There are several options listed and a lot of cooking science behind the butter.
The mouth-feel is amazingly creamy and satisfying. I used the basic recipe, Regular Vegan Butter, Coconut Oil Base. The recipe calls for curdling the soy milk, which will drive the butter flavor. I tried the full teaspoon of cider vinegar, then half cider vinegar and half coconut vinegar, then just half a teaspoon of coconut vinegar, and finally no vinegar, and thus no curdling, at all. I found for my taste that the vinegar flavor carried through and was much too dominant. Even at just half a teaspoon it was so noticeable to me that I didn’t like it on toast. It was good, however, when my daughter used it on sourdough and topped it with fresh avocado. The slight vinegar flavor enhanced the avocado deliciously.
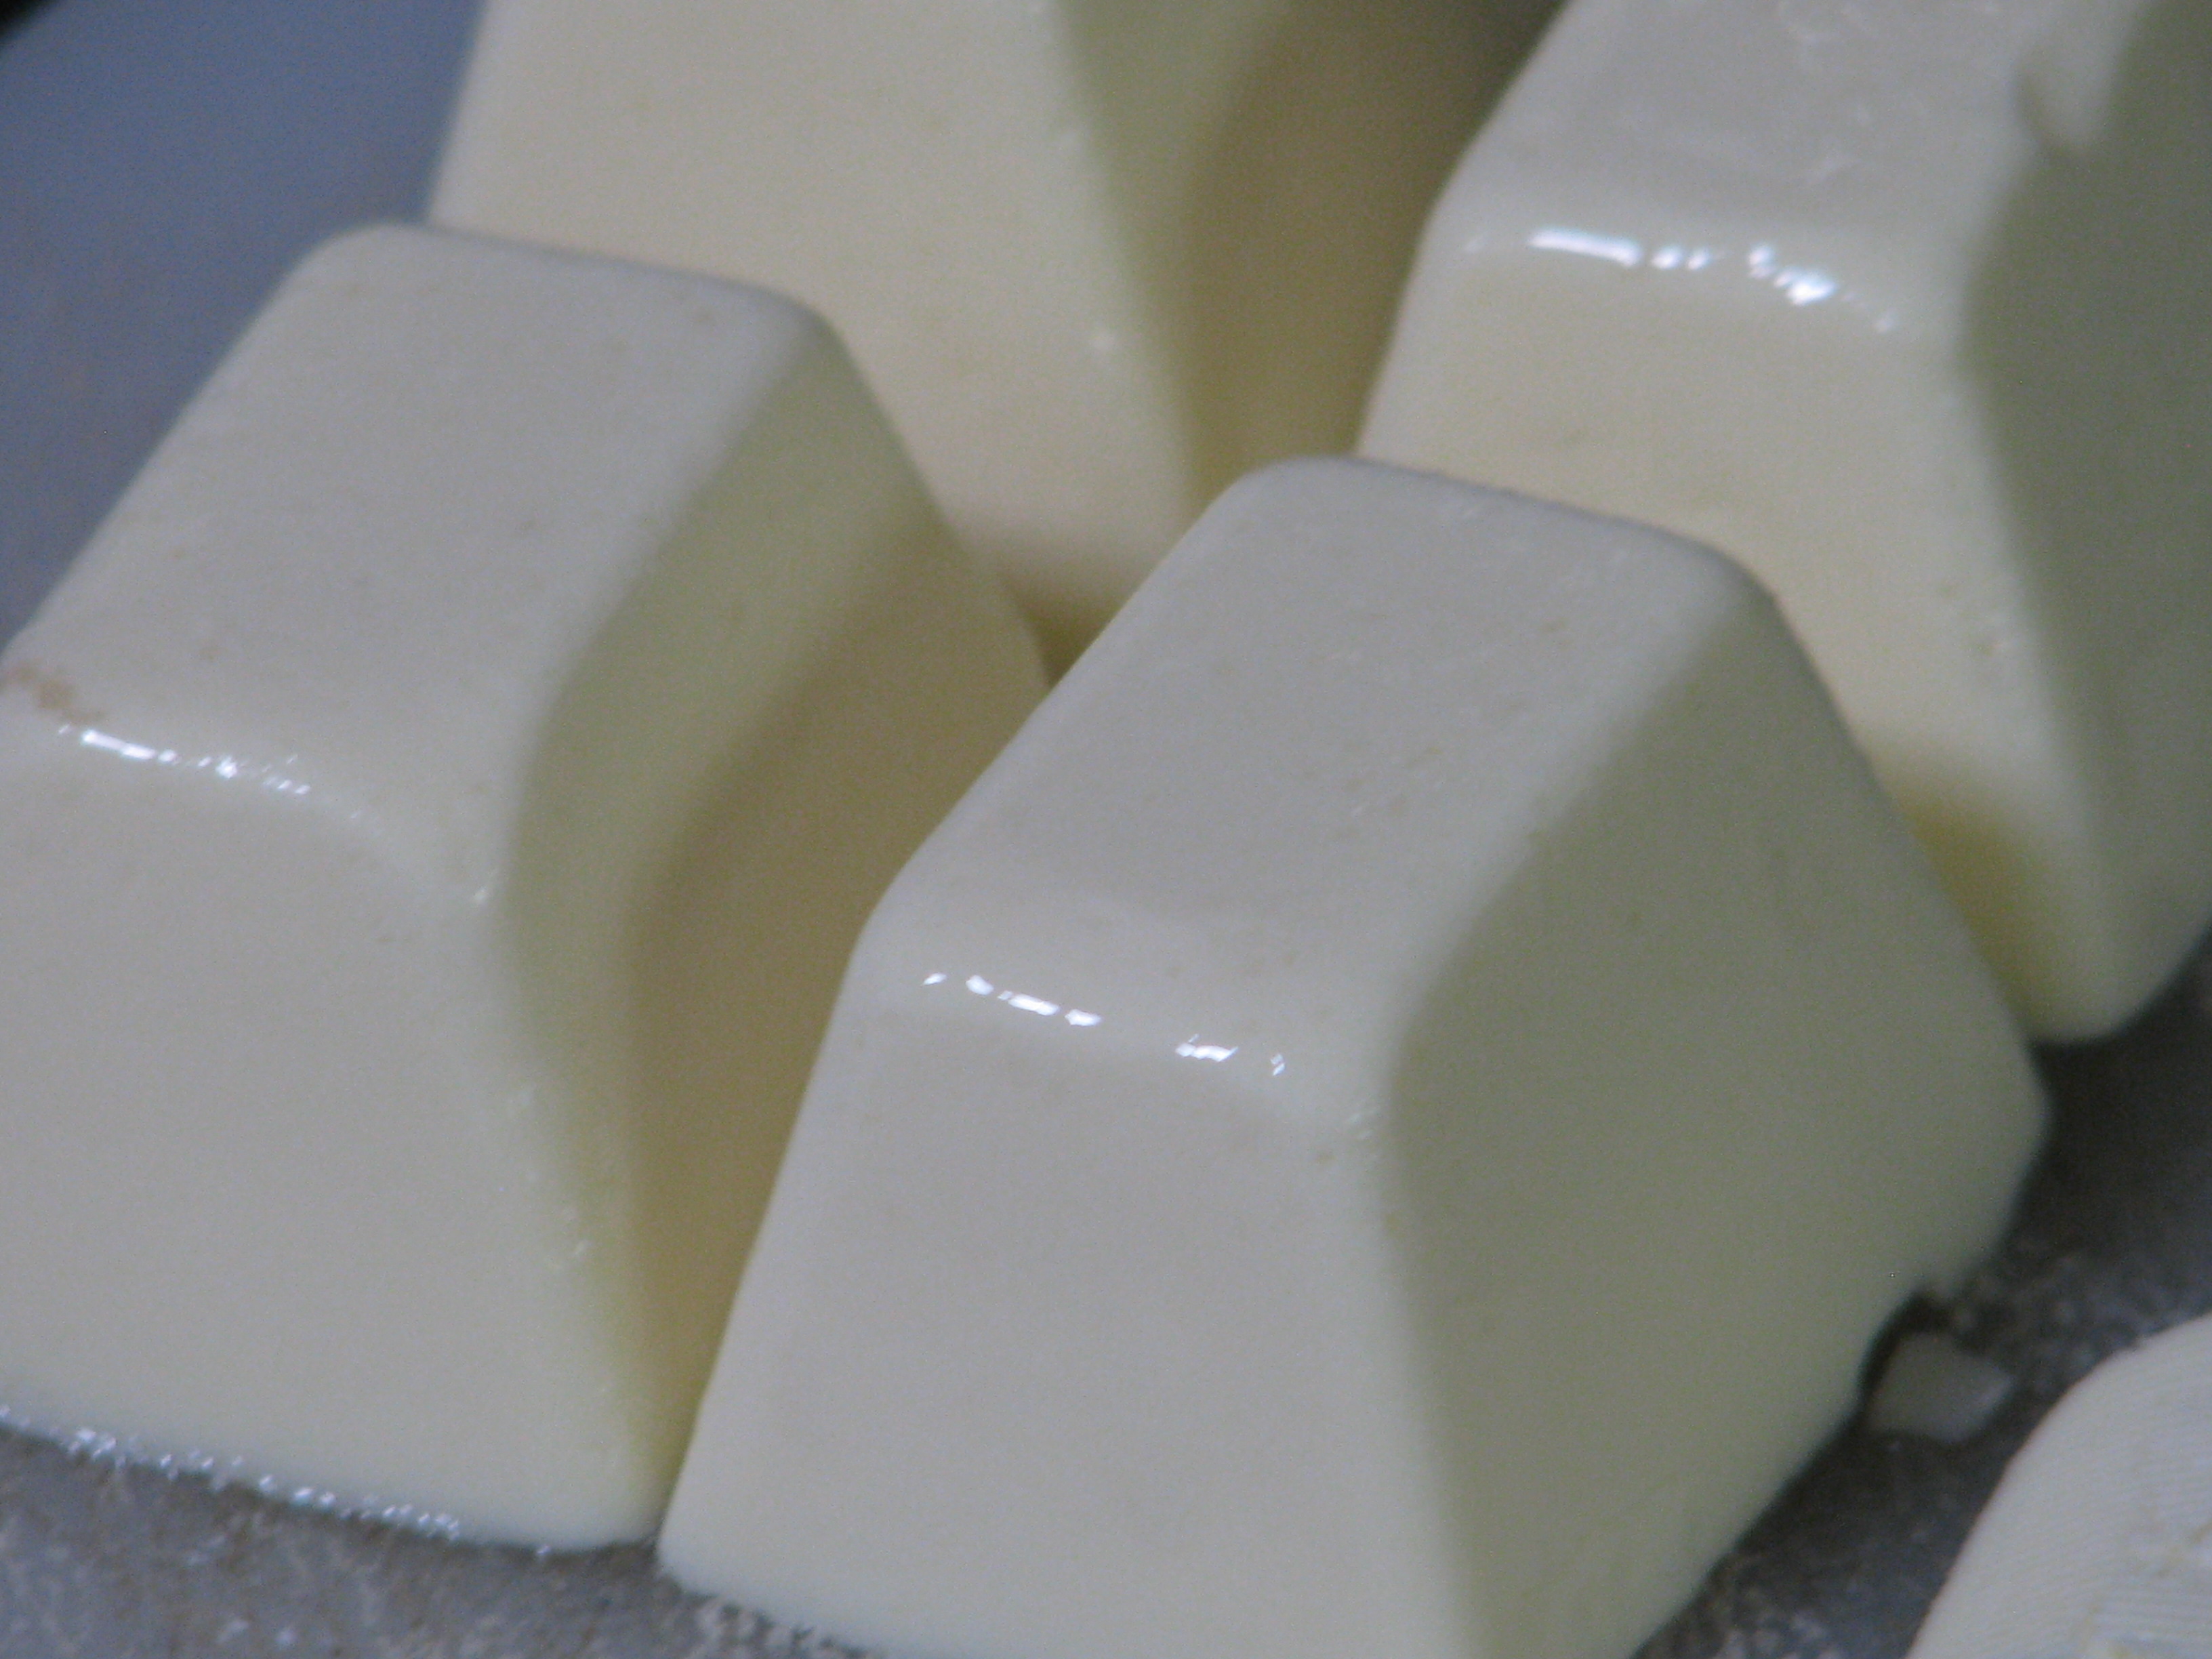
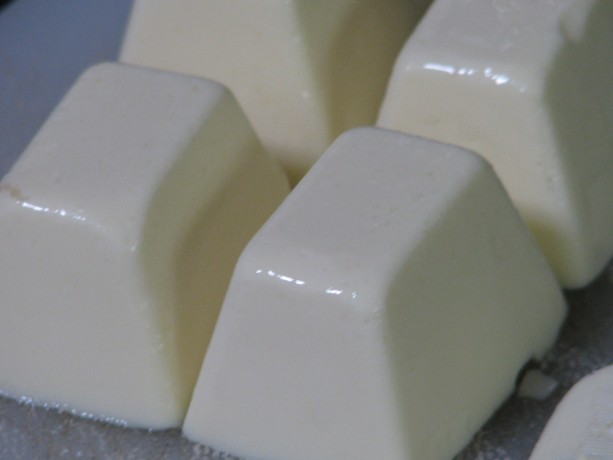
The batch I made without vinegar seemed perfect. The mouth-feel of this butter with or without the vinegar is creamy and all that a high-fat butter should be. It looks, cuts and spreads like butter. The flavor is creamy and very mild, almost like a slightly salted sweet butter. This was a winner for me. For the soy milk I used Trader Joe’s Organic Plain, which does have some sweetener in it. I’ll try with an unsweetened plain organic soy milk another time.
I keep my butter on the counter. I know that organic butter holds its shape better in the heat than processed butter, but both stay stable unless the temperature is in the 80’s. Coconut oil melts at 76F, and in my summertime Southern Californian kitchen, this vegan butter must be kept in the refrigerator. The butter is hard when needed, so the next batch I will take the author’s advice and swap out a tablespoon of coconut oil with regular oil to make it more spreadable.
I wanted to test the butter in cooking and baking. I melted it in a pan and cooked eggs and other breakfast items in it successfully. I used it on toast and on mashed potatoes with great success. The experiment with shortbread cookies went wrong, however, but I don’t think that that was the butter’s fault. These were lemon rosemary shortbread cookies, and contrary to my baking sense I followed the author’s (another blog) directions and didn’t sift the powdered sugar before adding it. There were lumps, therefore, in the batter and I mixed it extra to try and beat them out, which I believe was responsible for making the cookies tough. They were flavorful, but not crumbly. Oh well, I’ll just have to try again! The cookies rolled out, cut, and baked well, retaining their shape and performing as well as with cow’s butter.
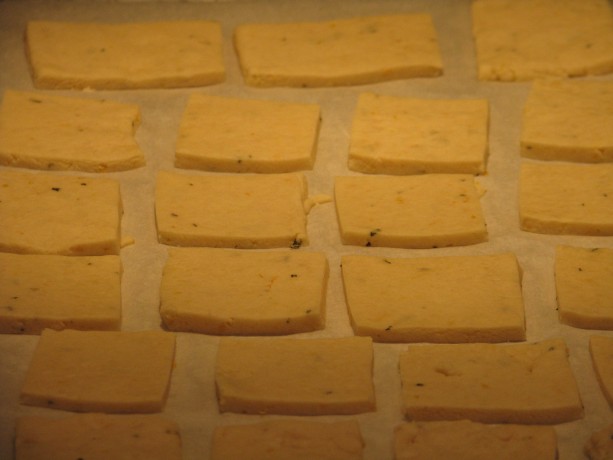
Shortbread didn’t spread using this butter, which was great. I don’t have a finished photo of the lemon-rosemary cookies because, well, they were eaten. As with all substitutions, there is always a difference and vegetarians and vegans have to embrace it. Of course fake bacon and ground ‘meat’ is not quite the same: the great part is that it is far more healthy for your body (lower fat, few preservatives if any, often organic, and not the pesticide-drenched and drugged animals that people eat) and doesn’t perpetuate the extreme cruelty to animals about which humans have become nonchalant. Yes, other animals aren’t kind when feeding off of other animals (those which aren’t vegetarians). Yet we as humans have the option the others don’t, to make eating choices.
Here is the basic revised recipe; please see the original blogpost on VeganBaking.net and give the options a try. I found xanthan gum from Bob’s Red Mill at my local grocery store, and liquid lecithin and coconut vinegar online through Amazon.com.
You can double or triple the recipe with no problem! Enjoy.
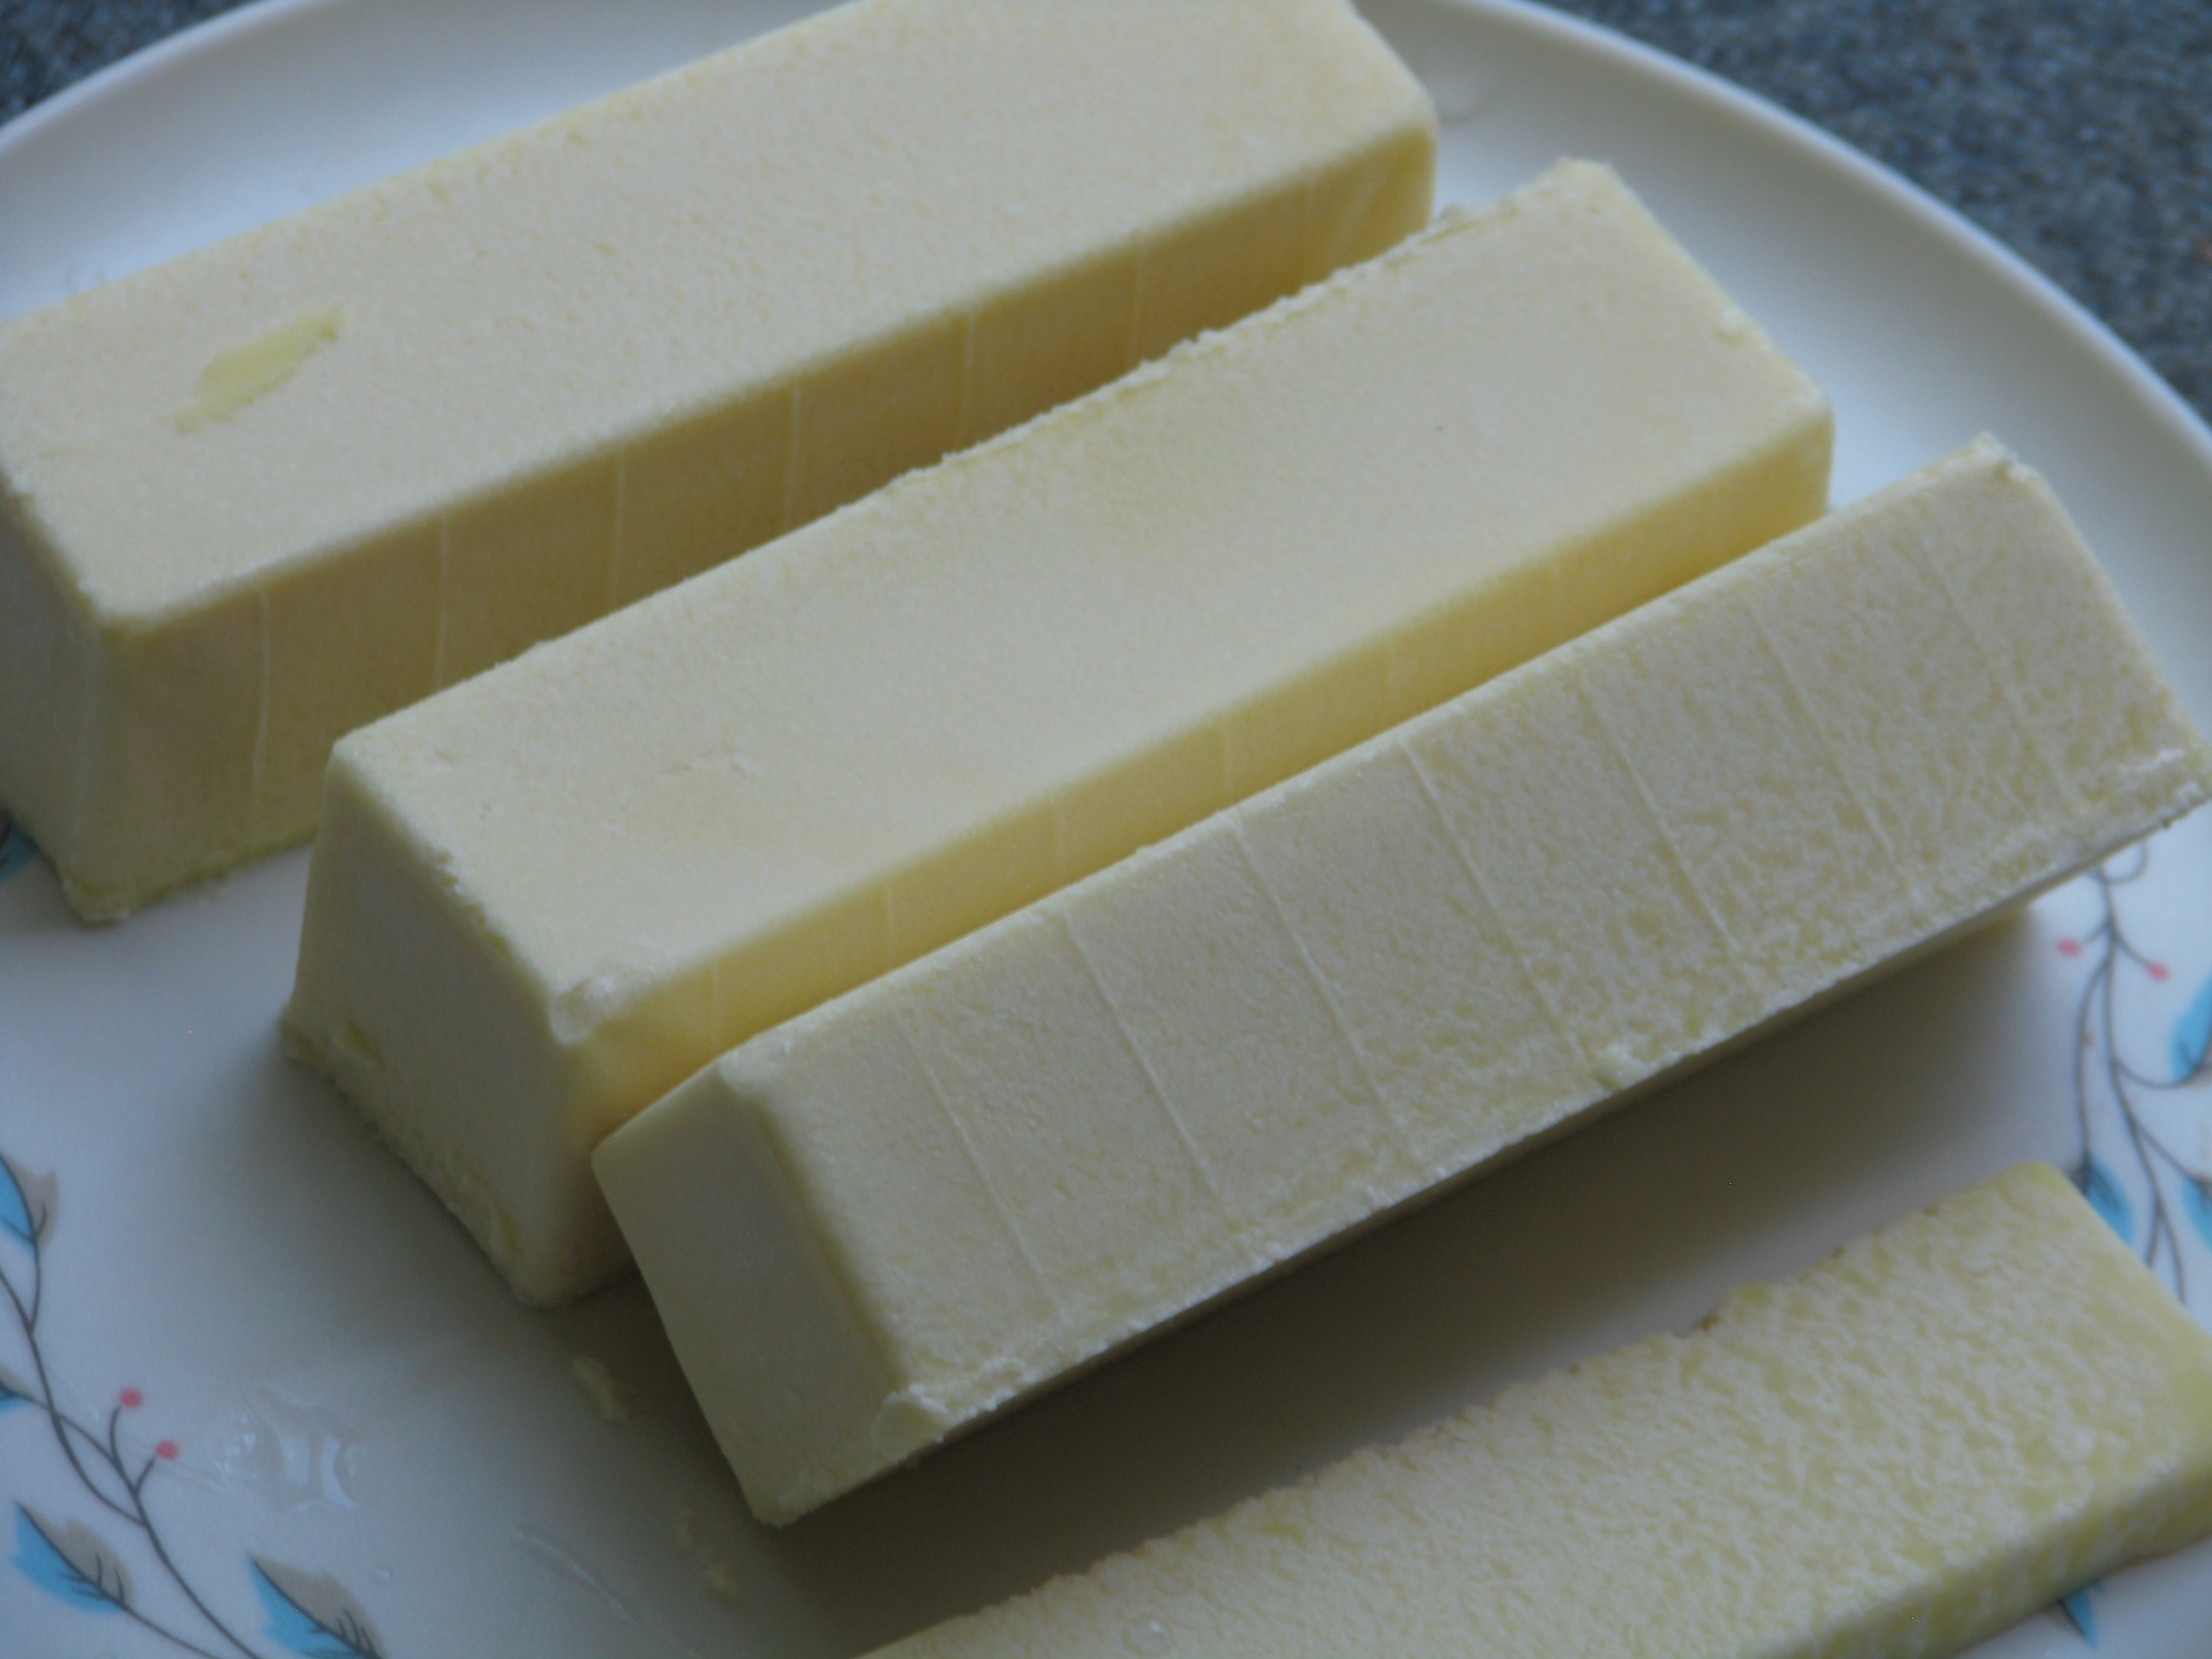
Recipe update: I’ve since made some changes to the recipe, exchanging some vegetable oil for some coconut oil for more spreadability, and adding a little more salt for a more satisfying (to me) taste when spread on toast. I’ve been using this butter for a month now, and have noted that: when melting in a hot pan it will brown faster than regular butter, so keep the temperature down, that it will melt and separate at room temperature (its summer now, so the kitchen is usually in the 70’s – in the winter it will be different) so I keep it in the refrigerator. I found butter stick molds that have the teaspoon markings along the side, so I’ve made 8x the original recipe and poured it into the butter molds, then wrapped each unmolded stick in wax paper and frozen them.
Vegan butter sticks with teaspoon markings along the side for ease in baking. I’ve also poured it back into the cleaned coconut oil jars and frozen them, keeping one in the refrigerator for unmeasured use. I’ve used it along with a non-dairy creamer in the Chocolate Ganache recipe and it is very chocolaty, but not as rich as the original. Part of that is due to the creamer; heavier creamer will produce creamier results, but in no way was it disappointing. It was very tasty, but not as heavy. When refrigerated it didn’t solidify as much as the other, so more chocolate might need to be added depending upon the type of creamer used but it was still spreadable and yummy.
Another Recipe Update:
I’ve been making the butter with unsweetened organic rice milk and it turns out well. At first it tasted too light to be satisfying, but when I had dairy butter at a restaurant it tasted greasy and heavy – my taste buds wanted the vegan butter! I found out that even when the kitchen is colder than the melting point of the coconut oil, it isn’t a good idea to leave the butter refrigerated because unlike dairy butter it will grow mold. The rice milk butter with the increased vegetable oil makes it perfectly usable from the refrigerator. I make sticks and freeze them in a freezer bag for baking and pour the rest into glass jars with screw-on caps for spreading. The jars are kept in the freezer until needed, then switched to the refrigerator. I’ve made biscuits, cookies, cakes, scones and breads with this butter, and with proper handling they all come out just fine. We offered both dairy and vegan butter to our holiday guests and they didn’t detect much of a difference. Since vegan butter is so much lower in calories, and coconut oil is so good for you, I don’t have to hesitate to use it. It is actually part of my weight maintenance program!
Ethical ButterAuthor: Mattie, at VeganBaking.netRecipe type: CondimentCuisine: VeganPrep time:Cook time:Total time:A wonderful vegan butter with no palm oil, but lots of options. My version is without curdling the soy milk. Please see the original excellent post for more explanations and options.Ingredients- ¼ cup + 2 teaspoons organic plain soy milk
- ¼ + ⅛ teaspoon salt (I increased the total salt to ½ t. for spreading butter)
- ½ cup + 2 Tablespoons + 1 teaspoon (130 grams) refined coconut oil, melted to room temp. (For more spreadability, I used ½ cup coconut oil and changed the 2T and 1 t to vegetable oil, along with the following 1 T for a total of 2 Tablespoons and 1 teaspoon vegetable oil.)
- 1 Tablespoon vegetable oil or light olive oil
- 1 teaspoon liquid soy lecithin or liquid sunflower lecithin or 2 ¼ teaspoons soy lecithin granules
- ¼ teaspoon xanthan gum or ½ + ⅛ teaspoon psyllium husk powder (I used xanthan gum)
Instructions- Combine soy milk and salt in a food processor or blender.
- Melt the coconut oil until it is just room temperature and barely melted.
- Add the coconut oil and the rest of the ingredients to the soy milk.
- Blend or process for about 2 minutes on low.
- Pour into ice cube trays, or into butter molds or trays.
- Freeze until firm, about an hour.
- Serve.
- Keep wrapped in refrigerator for a month, or frozen for a year.
- Makes one cup.
- Beverages, Breakfast, Fruit, Permaculture and Edible Forest Gardening Adventures, Recipes, Vegetarian
The Passion of the Fruit: Homemade Juices
Hi there. It’s Miranda the Guestblogger again, and today I want to talk to you about juice. You know, The Big Drip – Drosophilid Milk, Agua Fresca, Drupe’s Tears, Essence of Mesocarp: JUICE.
Here at Finch Frolic Garden, we like a nice fresh juice. As I am officially the FFG Harvester (a.k.a. Fruit Maven), I also take on the mantle of One Who Figures Out What To Do With Some Of The Stuff That’s Been Harvested – and let me tell you, that’s not a title to take lightly.
In the summer, it’s hard to keep up with all the produce and we hate to waste anything, even though spoilt food just goes back into the soil via compost here. We really like to get our produce into our mouths, though. Therefore, a lot of our fruit bounty gets juiced and frozen to keep. I want to walk you through some of our juiceplorations.
Finch Frolic Redoubtable Fruit of Almost Every Month in the Year: the Purple Passionfruit. These exotic and fragrant fruits are dropped by the bushel-load from our vigorous vines almost continuously, but overwhelmingly in midsummer. I pick them off the ground under the vines and wait for their smooth purple shells to wrinkle over in ripeness. Then the process begins.
I sit down for this and usually bring up a show on my laptop, because it takes a while. I have the bag or bowl of fruit on my right and a plastic bag looped over the back of a chair on the other side for the empty shells.
A fruit is picked up, dipped in a bowl of water, then wiped quickly on a paper towel and deposited on a cutting board that has a little rim on it to catch juice.

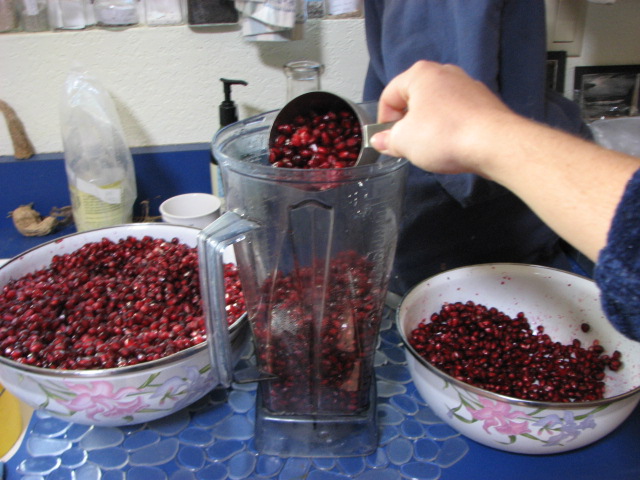
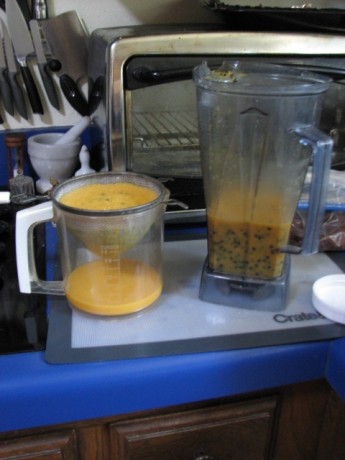
With a sharp knife, I halve the fruits and use a spoon to scoop the many little packets of bright gold-orange juice and hard black seeds into a bowl. Those packets have to be broken to get the juice.
I used to press the pulp into the mesh of a sieve with a spoon, but that’s hard on the hands and on the sieve. Now, I throw it in our Vita-Mix and turn it up to 3, tops – you want to spin all the juice off the seeds, but you don’t want to chop up the seeds. I judge whirl completeness by whether or not the little black seeds are free-floating as they sit in the mixture.
Then I run it through a sieve to separate out the juice.
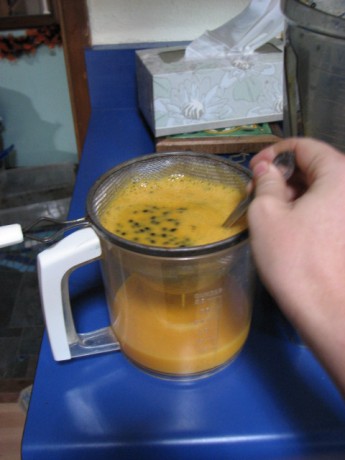
To get the most juice out of it, you swirl a spoon through the pulp as it sits in the sieve. 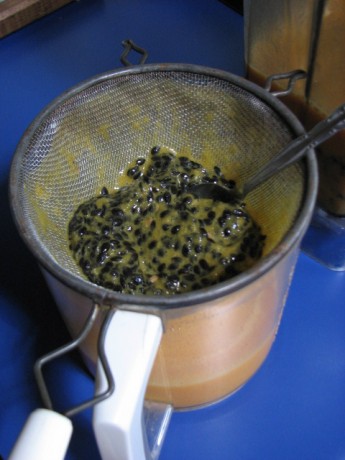
All juiced out. This sounds very labour-intensive – and it is – but it’s worth it to us to use our fruit. We don’t eat passionfruit straight – the seeds are a little too gross. We do, however, use the juice in anything we can make an excuse to, and it keeps frozen into cubes for a long time. And the leftover seeds make a fun treat for our hens.
Glowing, beautiful, tangy, fresh passionfruit juice! In the fall, we’re overwhelmed with lovely big pomegranates from our one big pomegranate tree. This year, we’ve had more than ever and we didn’t want to waste any.
Once harvested, though, the poms need to be processed. Diane and I camped out every evening for a couple weeks cutting poms in half and hand-picking the arils. Recently, after a friend let us try out her juicer, we acquired one for ourselves, eliminating the need for the rest of the process with poms, but it is the same process I still use for grapes, apples and melons, so I’m going to tell you about it anyway.
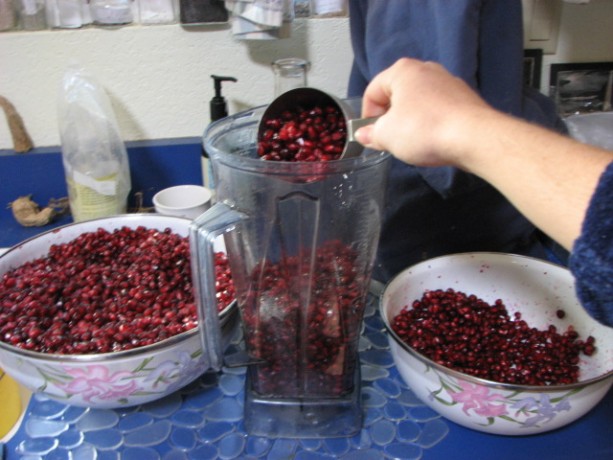
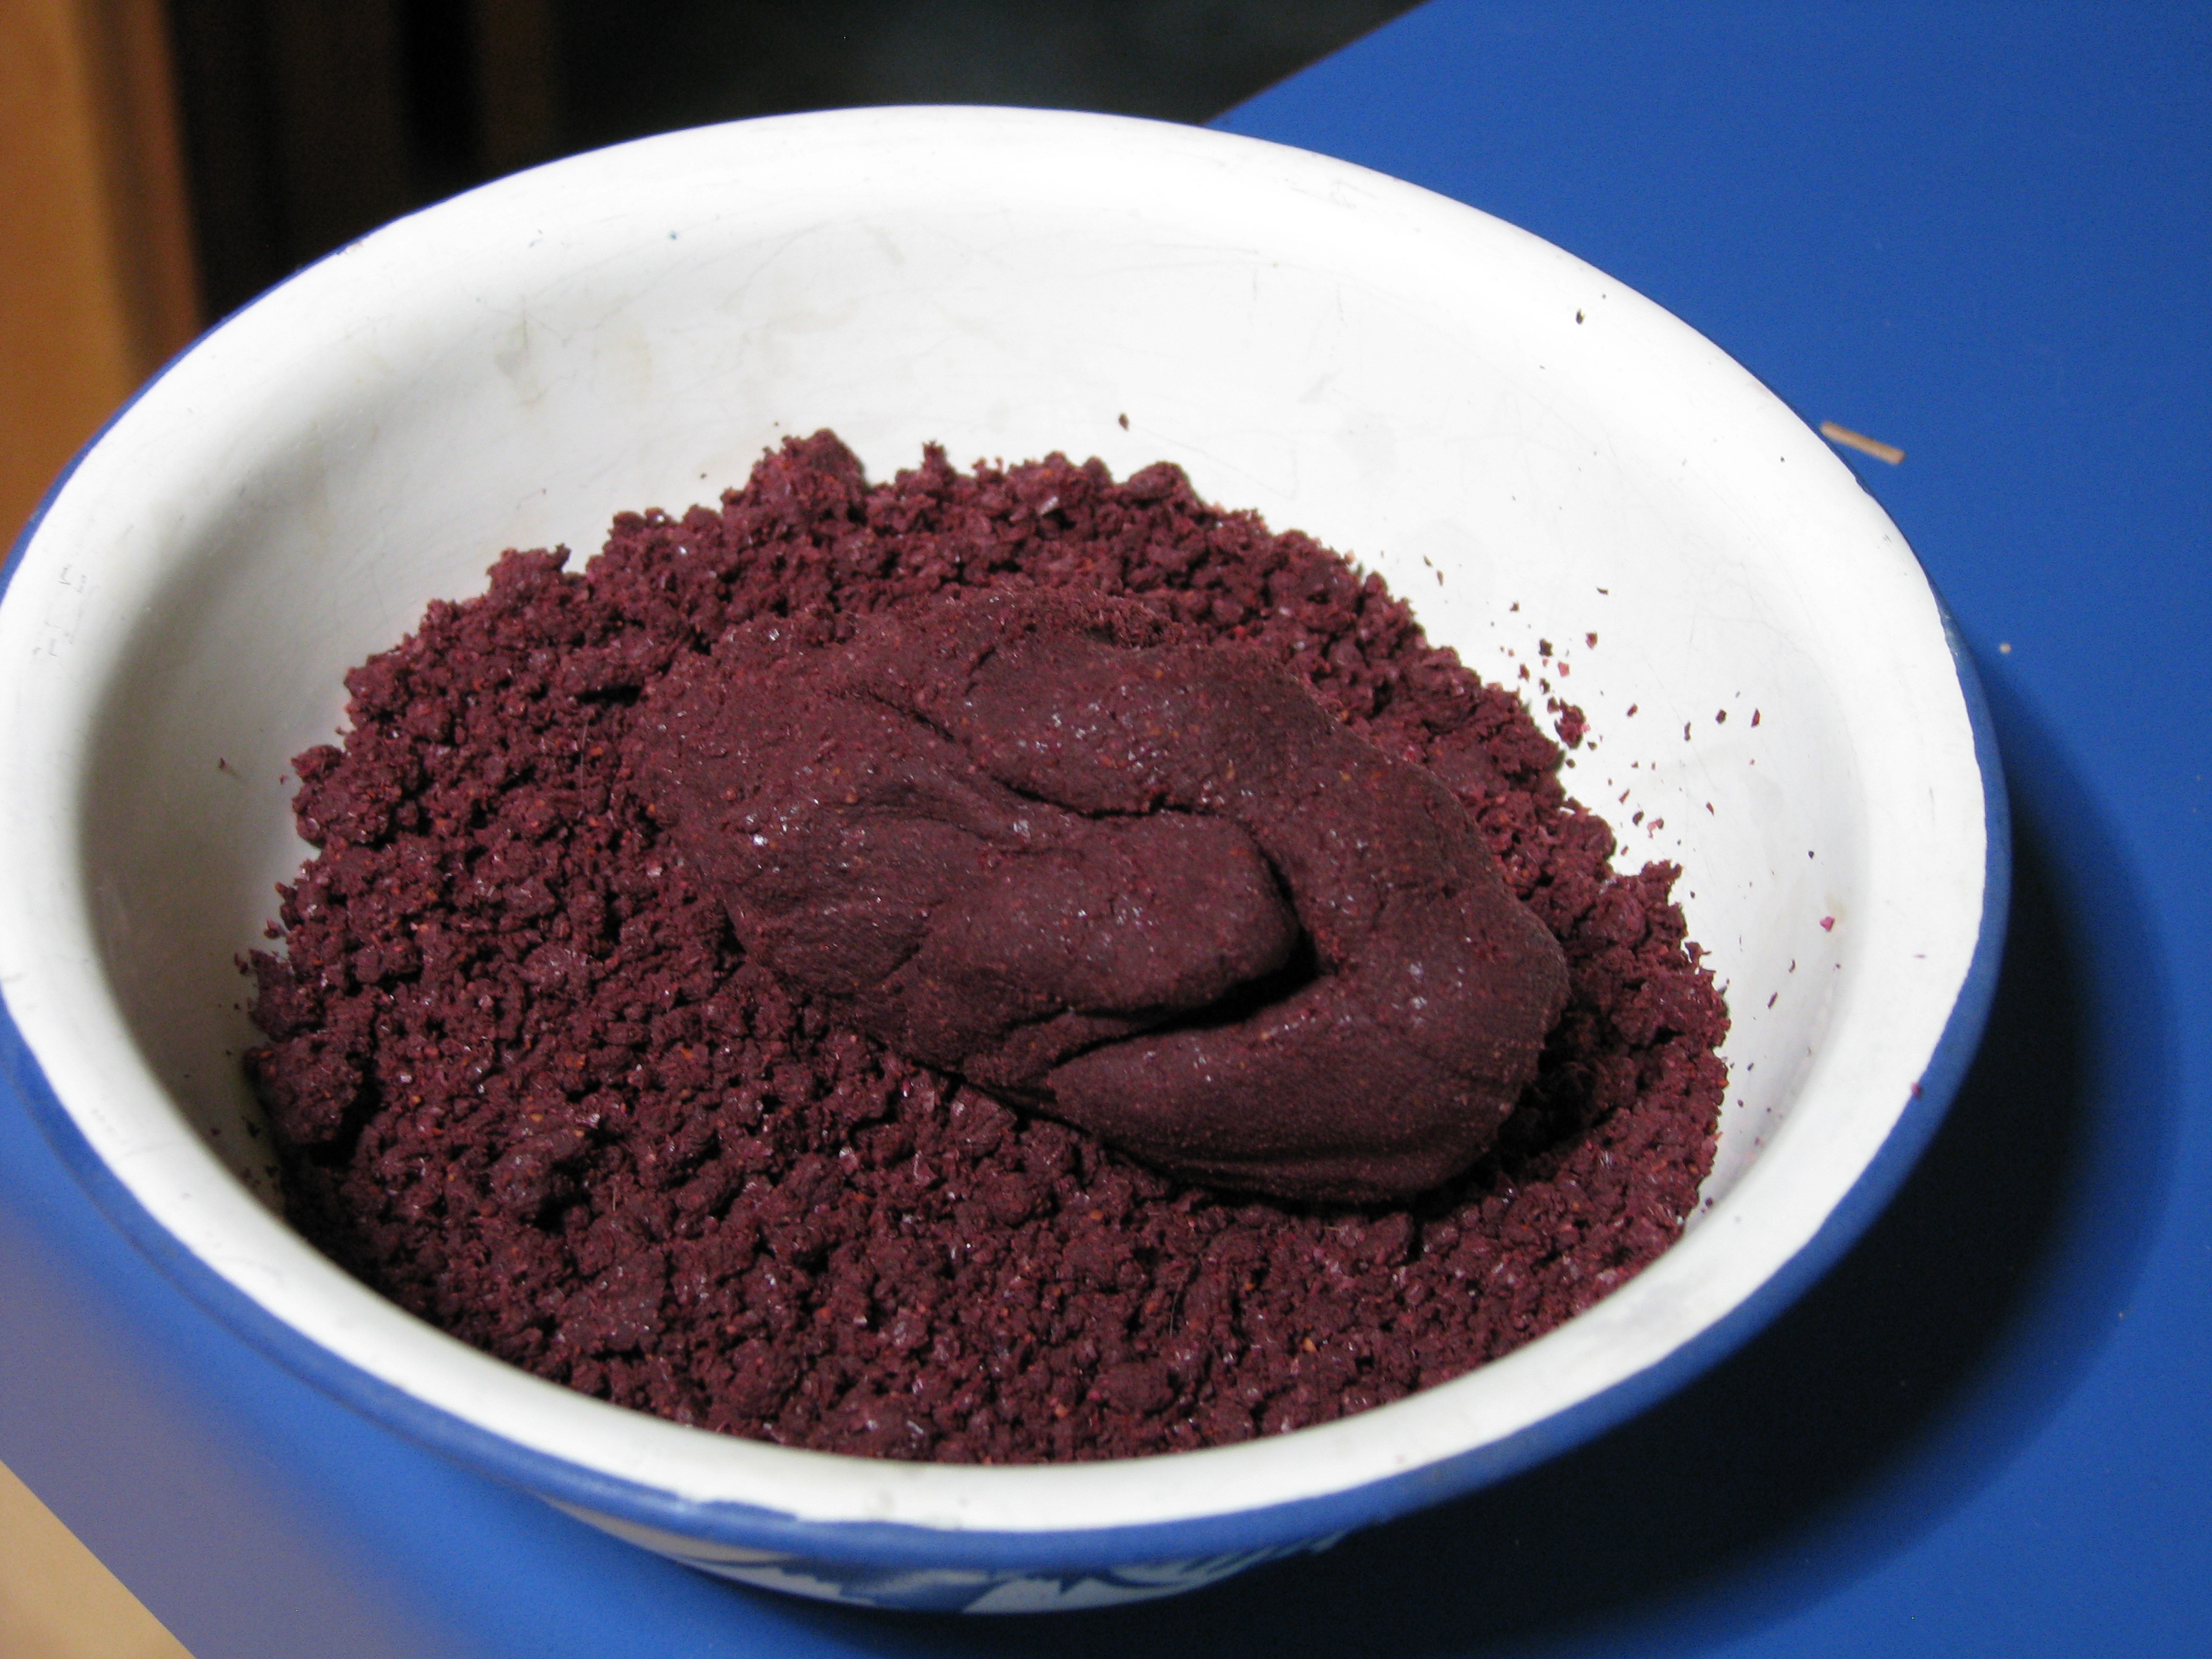
I put the arils in the Vita-Mix and turn all the way up to completely blend the seeds. The blended pom also gets strained, but because the particles are finer than the passionfruit pulp, a mesh sieve isn’t sufficient. No, what you need is a sock.

A nice clean women’s nylon sock is perfect. 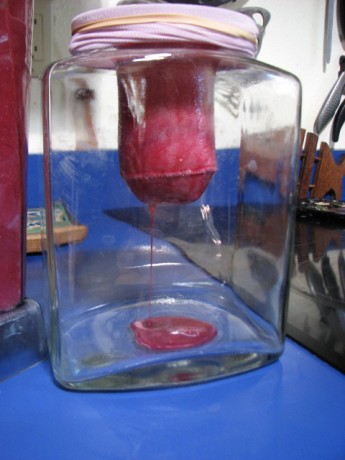
Hanging allows pure juice to come through. To get all the juice out, though, squeezing is necessary, and that puts a little more must in the juice, like fine fruit silt.
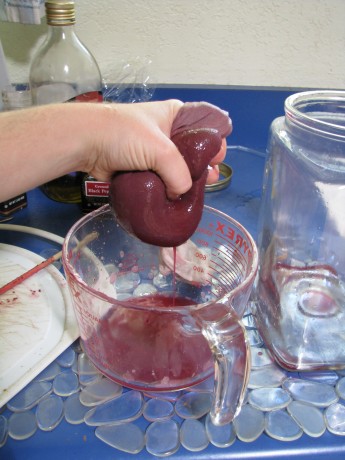
It’s also very taxing on the hands, because the sock must be hand squeezed, but it helps get the most juice from the fruit. This second straining produces interesting dry, crumbly must that comes out of the sock like purple Play-Doh.

Also a salutiferous treat for the hens! Like the passionfruit, we use the pom juice as much as we can. For instance, we reduced the juice and I experimented with some pomegranate ice-creams:

Chocolate makes an excellent palate cleanser, if you ask us. I also diluted the concentrate with water to make a lovely breakfast juice. We even poached pears with the juice for Christmas dinner – a lovely rose colour and delicate fruity flavor.
The fun never ends with fruit!
So, that’s a little peek at the juiceinations that go on here at Finch Frolic. Happy juicing to you!
TTFN!
Miranda the Fruit Maven
-
Plum Clafoutis!

Plum clafouti. Yum. OMG! How could I not have told you about clafoutis yet? If you have ripe plums, peaches, apricots… any stonefruit… and you need something to do with them, this is it! Clafoutis (clow-FOO-tee) is a baked dessert (or breakfast!) that is simple to make and absolutely yummy. Ripe fruit, especially those that are a little too ripe to eat fresh because of the texture, is topped with a flour and custard batter and baked.

Serve plum clafouti warm or at room temperature. So yum. The result is firm enough to not gross out those who don’t like the texture of custard (like my daughter), not too sweet, and makes the flavor of the fruit bloom in your mouth. This is different than Plummy Skillet Cake, which is also wonderful. Of course clafoutis

Because of its simple ingredients and low sugar, clafouti is wonderful for breakfast. Peach clafouti is shown here along with asparagus and soy sausage. is good with ice cream, but just powdered sugar on top for decoration or plain is fine. You can make it with liquid egg substitute and non-dairy milk substitutes; I used our hen’s eggs and organic soy milk. Plums are absolutely delicious in a clafoutis, but we’ve used peaches and apricots as well with great results.
Plum ClafoutisAuthor: Diane KennedyRecipe type: Dessert or BreakfastCuisine: FrenchPrep time:Cook time:Total time:Serves: 6A simple and delicious baked fruit dessert.Ingredients- (You can halve the ingredients and bake in a square pan instead)
- ¼ cup butter (or veg oil or coconut butter)
- Pitted plums cut into thin wedges (think what size you like to bite into) (five cups)(you can use a mixture of stonefruit, too)
- ½ cup granulated sugar, divided (you can eliminate or reduce this amount if you like a tart dessert, if your fruit is very sweet, or use a sugar substitute)
- 4 eggs or equivalent liquid egg substitute
- ½ cup unbleached all-purpose flour (or a mix of other flours)
- ½ teaspoon salt (opt)
- 1 cup milk or milk substitute
- 1 tablespoon vanilla extract
- ½ teaspoon almond extract
- Confectioner's sugar for dusting
Instructions- Move oven rack to the middle and heat to 400F.
- Place butter in a 9 x 13 inch baking dish and put in oven to melt butter.
- In a medium bowl, toss the plums with ¼ cup sugar.
- With oven mitts, remove hot dish from oven and swirl melted butter to coat bottom and partially up the sides.
- Spread plums evenly on bottom of baking dish.
- In a medium bowl, whisk the eggs until blended.
- In a separate bowl, whisk the remaining ¼ cup sugar with the flour and salt.
- Whisk the sugar and flour mixture into the eggs.
- Whisk in the milk, vanilla and almond extracts.
- Pour the batter evenly over the plums.
- Bake 40 - 45 minutes until the clafoutis is lightly browned and the center has puffed up.
- Cool on a wire rack.
- Dust with confectioner's sugar and serve warm, plain or with ice cream. Or hard sauce. Or whatever you like. Use a French accent when announcing dessert.
- Eat within a couple of days or it becomes soggy.
- Store covered at room temperature.
-
Cooking with Nettles
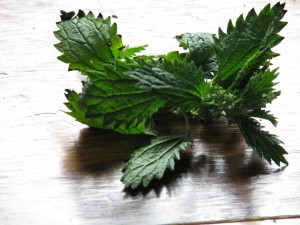
Stinging Nettle Yes, I mean stinging nettles. I’ve already covered in another post about the highly nutritious qualities of this lawn and wetlands weed. One of my friends has taken up the cause and has prepared nettles in soup and as a cooked green for her family. Eat your weeds! (Just be sure what they are, first.)
Stinging nettles (Urtica dioica) are annual plants that come up in nitrogen-rich soil that is well watered, such as in lawns, around farm animals and by streams. The plants are covered with tiny sharp hairs that are tipped with chemicals that cause a stinging sensation when handled. The sting may cause a slight bump on the skin and will go away on its own without spreading. A dab of vinegar will de-acidify the affected parts and should reduce or eliminate the sting. The effect is not like that of poison oak (Toxicodendron diversilobum) which contains an oil that spreads to whatever touches it.
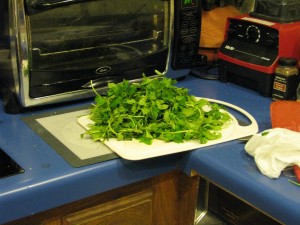
This amount of nettles cooks down to 1/4 – 1/2 cup. You’ll need a lot more for this recipe. Nettles are known throughout Europe as a spring green and there are many recipes available for cooking it. The leaves are delicate and fresh-tasting, and the stems a little tougher but also edible.

Crustless nettle quiche tartlet To harvest nettles, wear gloves or use a plastic bag turned inside-out over your hand for protection. As with most greens the youngest are the most tender. Wash the nettles while wearing rubber gloves. Blanch the nettles 1 – 2 minutes in a pot of boiling water. That eliminates the stinging chemicals completely. Don’t cook longer at this point because the leaves will fall apart. You can now eat the nettles or use them in another dish. I’d advise chopping up the stems before or after blanching because they can be stringy. Use blanched nettles in soups, quiches, or fillings as you would spinach. Hint: don’t tell your family what they’re eating until after they’ve eaten it!
Crustless Nettle QuicheAuthor: Diane KennedyRecipe type: Main dish, side dish or breakfastCuisine: EuropeanPrep time:Cook time:Total time:Serves: 6Substitute blanched nettles for spinach in this simple crustless quiche for more nutrition and fewer weeds!Ingredients- 1 Tablespoon olive oil
- 1 chopped onion
- 10 ounces blanched chopped nettles (measured after cooking)
- 5 eggs, beaten
- 3 cups grated cheese such as Munster, or a mixture of parmesan and mozzerella, or whatever you have that isn't too tangy.
- A pinch of ground nutmeg
- Salt and pepper to taste
- Optional: cooked vegetarian bacon or sausage, crumbled.
Instructions- Preheat oven to 350 degrees F.
- Lightly grease one 9-inch pie pan or 6 - 8 tart tins or Pyrex custard cups.
- Wearing gloves, harvest and wash enough nettles to make 10 ounces cooked, about one stuffed plastic grocery bag full or more.
- Blanch nettles in boiling water for 1 -2 minutes.
- Chop nettles into fine pieces (the stems can be stringy if kept long)
- Heat olive oil in a medium skillet over medium-high heat.
- Cook onion until translucent, 8 - 10 minutes
- Add nettles and stir until the extra water is absorbed.
- Add ground nutmeg to the nettles.
- In a large bowl combine the beaten eggs, cheese, salt and pepper and vegetarian meat if using.
- Add spinach mixture to eggs and stir to combine.
- Pour into prepared pan or pans.
- Bake 30 minutes or until centers have just set. Don't over bake.
- Cool for ten minutes before serving.
-
Two Sure-fire Zucchini Recipes
Zucchini plants are like cats: They both look harmless when small, so you think the more the merrier. One plant is always enough, but it is hard to plant just one seed in case it doesn’t come up. Then the sprouts are hard to thin.. what if something eats it? Then before you know it, there are five enormous plants growing giant green clubs in the dead of night, just after you’ve checked all the plants. Well, that’s my situation anyway. Too many cats; too many zucchinis. When there are enough all at one time, we’re taking them (the zucchinis, not the cats) to the Fallbrook Food Pantry along with pumpkins and tomatoes. Until then, we’re exploring new ways to eat them. And I refuse to sully cheesecake with zucchini! (yes, there is such a recipe!).
My son who is studying Culinary Arts at the University of Hawaii sent me a link to smittenkitchen.com with an exceptional zucchini pancake recipe… not sweet, very light and completely tasty. I’ll include my version. But first I want to explain my ‘discovery’, which everyone but me probably knows about anyway.
SAUTEED ZUCCHINI
I had grated zucchini for bread and had some left over. It was dinnertime and I was alone, so I experimented. I heated a skillet with a little olive oil in it, threw in the grated, undrained zucchini, and stirred it around on medium-high heat for about five minutes. When it was beginning to wilt and brown a little on the bottom, I sprinkled sesame oil on it lightly, and then gave it a touch of Bragg’s Amino Acids, which I use for many things. A light soy sauce may substitute, but Bragg’s is high in nutrition, low in salt and a wonderful flavoring. Buy it online or in health food stores. The zucchini came out tasty and with a mouth-feel of wet wide noodles. It was fantastic. I’ve since made it for my daughter a couple of times, and each time we wanted more! Imagine that! On the plus side, it used up a medium zucchini.
You really must give these pancakes a try.
Fabulous Zucchini PancakesAuthor: Diane C. Kennedy (adapted from smittenkitchen.com)Recipe type: BreakfastPrep time:Cook time:Total time:Serves: 4A light, flavorful, really good pancake that uses up a lot of zucchini and tastes like zucchini bread.Ingredients- 2 large eggs
- 3 tablespoons olive oil
- 2 tablespoons sugar (optional)
- ¼ cup buttermilk or soured milk
- ½ teaspoon vanilla extract
- 2 cups shredded zucchini
- 1 cup all-purpose flour
- ¼ teaspoon table salt
- 1 teaspoon baking soda
- 1 teaspoon ground cinnamon
- ⅛ teaspoon ground or freshly grated nutmeg
- ¼ cup semi-sweet chocolate chips (optional)
- Oil, for coating skillet
Instructions- In a large bowl whisk eggs, olive oil, sugar, buttermilk and vanilla until smooth.
- Stir in zucchini.
- In a smaller bowl, combine flour, salt, baking soda, cinnamon and nutmeg.
- Stir dry ingredients into zucchini batter, mixing until just combined.
- Stir in chocolate chips.
- Heat oil or butter in a large, heavy skillet over medium heat.
- Scoop ¼-cup rounds of batter in pan so they do not touch.
- Cook until bubbles appear on the surface, about 2 to 3 minutes.
- Flip pancakes and cook another minute or two.
- Keep pancakes warm in on a tray in the oven set on low or in a toaster oven.
- Repeat with remaining batter.
- Serve warm with or without traditional pancake toppings.
- Pancakes freeze well.
-
A Painless Breakfast, and a Bombilla

I'm all over this medicine! Food is the ultimate resource for health. As my body complains ever louder about all the years of abuse I’ve put it through, I’m turning to diet to help with the pain. Certain foods have anti-inflammatory properties, and they aren’t hard to eat at all. Cinnamon, turmeric, and ginger are high on the list. Cooked asparagus is excellent for kidneys and liver, and there is speculation that it cures serious illness as well. Whole eggs are much more healthy to eat than separating out the white and throwing away the yolk. The two parts compliment each other. As well great sources of protein, eggs are excellent for the eyes. The vitamin C found in fruit is an essential boost to your immune system, and helps other vitamins work better.
I also take some supplements. I take a multi-vitamin, a couple of natural menopausal relief pills, a vitamin C, and a couple of glucosamine/chondroitin tablets. G/C is a miracle supplement if you have arthritis. It helps keep the joints juicy.

Hot ginger tea; good for your tummy and good for your joints. So for mornings after a full day of weeding, carrying, hauling, flinging, and planting, I need everything I can get to help get my hands and back moving again. My ideal painless breakfast is: an egg from one of my hens, sprinkled with a turmeric and pepper combination (pepper is supposed to aid turmeric), some Trader Joe’s frozen grilled asparagus, heated, a piece of toast liberally sprinkled with cinnamon and coated with organic (sometimes home-harvested) honey, orange juice and a hot cup of ginger tea. I keep a small white container of cinnamon on the table, as well as a small bowl of the turmeric and pepper combination. That way I don’t forget to sprinkle it on my food. Inflammation is the source of almost all illness. If you can fight inflammation naturally, you’ll be a long way ahead health-wise. You’ll be relieved from pain that you never knew you had!

Bombilla I considered giving the bombilla its own post, but it was in the breakfast photo so I’ll talk about this wonderous gadget here. A bombilla is a metal or bamboo straw with a strainer on the end. Ingenious! Common in South America, it is commonly associated with the drinking of the new old fad tea yerba mate. However, to my delight it works perfectly with loose leaf and herbal teas! Instead of snapping and screwing and pressing tea strainers, I just put loose tea in my cup, brew it and drink it via the bombilla! So easy! Afterwards I scoop the spent tea into the compost, rinse the cup and the bombilla, and its good to go for the next batch. Loose leaf tea is such a better experience than using tea bags. With the bombilla, I now have herbal or loose leaf tea almost every time. Bombillas have transformed my drinking experience! I believe they are available at international marketplaces, but I bought mine online at Amazon.com. I bought two for me and my daughter, who took hers to college, and another as a gift for my son, and then two more as extras at home. Never can have enough bombillas! What a concept! A perfect drinking implement! My life will never be the same. Better still, I can now sip hot tea without losing my place in my book, or steaming up my glasses!
-
What To Do With Grapefruit

Grapefruit, all grown up. Every once in awhile someone gives me a grapefruit. One or two a year are just about all I can eat. Its not that I don’t like grapefruit. I certainly respect it. It is high is vitamin C and is supposed to be a good diet food. I think that is probably because it is so sour and bitter – even the pink kind – that you can’t taste anything else for hours after eating one.

Bare naked grapefruit. My mother would serve us grapefruit halves. She had a set of grapefruit spoons I always coveted that had serrated edges, but they disappeared at some point and I’ve never seen any like them. The sharp edges would allow you to dig out the grapefruit sections without actually arm-wrestling with the fruit. She’d also often ‘section’ the halves, using a paring knife to cut each section free so that all we had to do was scoop them out. She left little reason for us to not eat them. Of course, not eating my mother’s cooking was unheard of anyway.

If you section the grapefruit first, you could probably get more whiskey in there. To make grapefruit much more appealing, she would doctor it up with brown sugar, whiskey and then broil it and serve it warm. Wow did that ever improve the taste! Since grapefruits are making the rounds right now, and no one else I’ve spoken with seems to have heard of this method of serving them (their ears sure perk up when I tell them, though!), I thought I’d do everyone a favor and print the recipe. The Grapefruit Diet suddenly doesn’t look so bleak.
Broiled GrapefruitAuthor: Diane C. KennedyRecipe type: SidePrep time:Cook time:Total time:Serves: 2This method of preparing grapefruit I learned from my mother, Beth Cywar, a fabulous cook and a nutritionist before her time. She also believed that food wouldn't do anyone any good if they wouldn't eat it.Ingredients- One grapefruit, cut in half widthwise.
- 1 - 2 teaspoons brown sugar
- 1 - 2 teaspoons whiskey
- A few fresh or dried berries (optional)
Instructions- You may section the grapefruit or not; your choice. Sectioning would probably allow more whiskey to seep in, and would be a little easier to eat, but it is optional.
- Place halves on foil or an oven-proof dish, or on a broiler pan.
- Start the broiler. A toaster oven works great.
- Sprinkle the grapefruit halves with the brown sugar.
- Slowly drizzle the whiskey over the halves.
- Broil until warm and slightly brown and sizzling, about ten minutes.
- Adorn with fresh or dried fruit, or if you want to be retro, a marashino cherry, and serve.
-
Streusel Gingerbread Muffins

Gingerbread Streusel Muffins I love gingerbread. Take gingerbread, put some extra zing to it with freshly grated ginger, deepen the dark flavor with a tablespoon of cocoa, and sprinkle some gingery streusel on the top and wow, what a muffin!
Streusel Gingerbread MuffinsAuthor: Diane C. KennedyRecipe type: Breakfast/DessertPrep time:Cook time:Total time:Serves: 18These gingerbread muffins have an extra kick and a deeper flavor from special ingredients.Ingredients- 2 cups all-purpose flour
- 1½ teaspoons baking soda
- 1½ teaspoons ground ginger
- 1 tablespoon unsweetened baking cocoa
- 1 teaspoon salt
- 1 teaspoon cinnamon
- ⅛ teaspoon ground nutmeg
- ⅛ teaspoon ground cloves
- 1 tablespoon freshly grated ginger root
- ½ cup dark molasses
- ½ cup granulated sugar
- ½ cup vegetable oil
- ½ cup boiling water
- 2 large eggs, whisked
- Streusel topping:
- 1 cup granulated or brown sugar
- 2 tablespoons cinnamon
- ½ teaspoon ground ginger
- 2 tablespoons finely minced candied ginger
- 1 cup all-purpose flour
- ½ cup (one stick) butter, softened
- ½ cup all-purpose flour
- 4 tablespoons butter, softened
Instructions- Preheat oven to 325F.
- Line or grease 18 muffin cups.
- In a large bowl, sift together flour, baking soda, ground ginger, salt, cinnamon, nutmeg, cloves and cocoa powder.
- In a medium bowl, whisk together molasses, sugar, oil, water, eggs and grated fresh ginger.
- Add molasses mixture to flour mixture until well combined.
- Divide batter evenly among prepared muffin cups (an ice cream scoop really works!), each cup half full.
- In a medium bowl, combine the sugar, cinnamon, ground ginger and flour.
- Cut the butter into small bits and using a pastry blender, forks or your fingers, work the butter into the mixture until it is crumbly and there are no large chunks of butter.
- Stir in minced candied ginger.
- Sprinkle streusel on top of muffins, pressing lightly to firm it up.
- Bake 18 - 24 minutes, or until wooden toothpick inserted in the centers of the muffins comes out cleanly.
- Remove muffins from oven and cool.
-
Spiced Pumpkin Scones
Spiced Pumpkin SconesAuthor: Diane C. KennedyRecipe type: BreadPrep time:Cook time:Total time:Serves: 6Tender, healthy, satisfying scones for breakfast, break or dessert.Ingredients- 2 cups all-purpose flour
- ¾ cup granulated sugar
- 1 tablespoon baking powder
- ¼ teaspoon salt
- ½ teaspoon ground cinnamon
- ½ teaspoon ground nutmeg
- ½ teaspoon ground ginger
- ¼ teaspoon ground cloves
- ½ cup pureed pumpkin, canned or fresh (make sure fresh is drained)
- 3 tablespoons milk or milk substitute
- 1 large egg
- 6 tablespoons cold butter, cubed
- For Icing (optional):
- ¾ cup powdered sugar, sifted
- 1-2 tablespoons milk or milk substitute
- ¼ teaspoon ground cinnamon
- ⅛ teaspoon ground nutmeg
- pinch each of ground ginger and ground cloves
Instructions- Preheat oven to 425 degrees F.
- Grease a cookie sheet and dust with flour
- In a large bowl, whisk together the flour, sugar, baking powder, salt and spices.
- In a separate bowl, whisk together the egg, milk and pumpkin.
- Cut butter into dry ingredients using a pastry cutter, forks or your fingers, until there are no butter chunks left, and it is like fine crumbs.
- Fold the wet ingredients into the dry.
- Form dough into a ball. Dough should be sticky, but not stick to baking sheet, so add a little more flour if necessary.
- Pat dough onto prepared baking sheet into 9x3x1" rectangle.
- Using a greased knife (spray with cooking spray), cut rectangle into thirds.
- Cut each third diagonally to form a total of six rectangles. (If you want smaller ones, cut these in half to form twelve).
- Gently pull each section apart so that there is a half an inch between each scone (for even baking).
- (Alternatively, form dough into large circle 1" high, and cut crossways into wedges, and pull slightly apart).
- For six large scones, bake 14 - 16 minutes until slightly browned; for twelve smaller scones, bake 10 - 12 minutes until slightly browned.
- Remove scones to wire cooling tray set over a plate or piece of foil, and cool completely.
- Meanwhile, mix together icing ingredients until smooth, if using.
- Drizzle icing over cooled scones and serve.
- Serve plain, with marscapone cheese, cream cheese or butter.
What to do with leftover pumpkin? Here is the perfect thing, spiced pumpkin scones. Hearty without being heavy, healthy without being icky, these scones are more than just a morning treat. I used fresh pureed sugar-baby pumpkin, but canned pumpkin (unseasoned) works fine, too. The dough is a little damp, so instead of cutting the scones and removing them to a baking sheet, it is easier to form the scone dough right on a floured baking sheet and then cut them. The way I show how to do it makes large scones; you may cut them smaller and reduce the baking time. The scones are great without the icing. Eat them plain, with butter or best of all, with a smear of marscapone cheese or cream cheese. They also keep well for the next day, and freeze beautifully. Wrap them individually in foil and freeze, and when defrosted they are just as good as fresh. -
Jook

Jook with sesame oil and chopped cilantro Jook, Juk, Chinese rice soup, rice porridge, congee… these are many names for basically the same food, rice cooked with a lot of water. There are equally as many ways to fix this wonderful comfort food. Jook can be made with plain water and white or brown rice, then served with toppings such as cilantro, sesame oil, chopped peanuts, bits of cooked tofu, soy sauce, chopped hardboiled egg, preserved or cooked vegetables, chives… as little or as much as you’d like. Jook can be prepared with or without salt; I prepare mine without, then grind a little on the top when serving for that little burst of flavor. Jook can be served with cinnamon and sugar for dessert; this is especially nice for those who love rice pudding but don’t want to eat or can’t eat dairy. Commonly eaten as a savory breakfast dish, Jook is also a perfect food for when you are ill. Not only is it comforting and filling, but it is easy to eat for a sore throat, easy on a troubled stomach, nutritious, and if you are a victim of Montezuma’s Revenge (if you know what I mean), rice is very good for helping you to stop going. Ah-hem. Jook is a very good baby food for those little mouths that are just getting into semi-solids.
You can find hundreds of different versions of Jook on the Internet. Many make it with part broth, part water. Some throw in fresh ginger, some cook bones in it for added calcium. Cooking it plain allows you to top each bowl up the way you want, which is what I do. Leftover Jook can be mixed with water to loosen it up, or eaten in its more solid form. You can’t get a much easier comfort food to make that is so versatile. It is particularly good for celiacs (those who cannot eat gluten). With cooler weather upon us, make one dinner a Jook day!
JookAuthor: Diane C. KennedyRecipe type: MainPrep time:Cook time:Total time:Serves: 6-8Jook, rice porridge, rice soup or congee, is a wonderful versitile comfort food.Ingredients- 1 cup washed white rice (short or long grained depending on your taste)
- 8 cups water (if you like it thick)
- or
- 10 cups water (if you like it medium)
- or
- 12 cups water (if you like it very thin and soupy)
- optional: 1-2 tsp. salt)
- optional: substitute broth for equal parts of the water)
- optional: add a thumb-sized knob of fresh ginger)
- Topping suggestions:
- sesame oil, peanuts, fresh cilantro, chopped hardboiled egg, cooked tofu, seaweed, soy sauce, freshly ground salt and pepper, butter, cooked vegetables, pickled vegetables... leftovers. Also make it sweet with sugar, honey, cinnamon, nutmeg, dried fruit, chocolate chips!
Instructions- Put washed rice and the desired amount of water in a dutch oven
- Heat until boiling
- Turn down heat to a simmer and cook uncovered 2½ - 3 hours, depending on how thick or thin you want it.
- Serve hot in small soup bowls with choices of toppings.