-
Melting Birds
Perhaps you’ve noticed birds doing strange things. I certainly have. Often they glance around afterwards to see if anyone is watching. One very silly-looking thing birds do is sun themselves. They will spread their wings to catch the most warmth, then go into kind of a trance.

Western Bluebird They’ll put their heads to the side and simply melt in the sun. Often I’ve wondered about the safety of their balance.

High wire act But they always seem to come out of it okay. I’ve seen many different kinds of birds melting in the warmth, taking a sun bath. Usually it makes me want to do the same.

Western Bluebird against heat-reflecting fence. You May Also Like

Native Insects and IPM
- Bees, Compost, Gardening adventures, Health, Heirloom Plants, Other Insects, Permaculture and Edible Forest Gardening Adventures, Soil, Vegetables
Integrated Gardening

Wildflowers, tasty borage, milkweed for the Monarch butterflies, and herbs. There are still those who prefer to have all their plants separate, each plant type confined to its own space. Vegetables should definitely not be allowed in the flower garden; herbs may be there only if more ornamental than useful, but don’t ever mix desert, country cottage or rose gardens together. That style of design is a matter of preference, and many gardens following those rules are very beautiful. They are usually also high maintenance, heavily fertilized, watered and sprayed, with poison set out for rodents.

A breadseed poppy is emerging in the sage. The blending of useful and ornamental plants is certainly not a new idea, and yet it isn’t often done. When it is, gardeners should find that the loss rate of plants to pests is quite low, and the yield of the vegetables is high.

Onions, native mallow, tarragon and sweet potatoes under a white fringe tree. Why is this? For one thing, planting mixed seeds which include ornamentals, herbs and vegetables masks the scent of the most yummy plants from its preditors. There aren’t rows of the same type of plant for the insects to find. Since different plants take up different nutrients from the soil, the soil isn’t depleted of one particular nutrient, so mixed plantings usually make for healthier and tastier plants.

My first tomatoes of the season, off of a volunteer along the pathway. Oh so yum! Wildflowers with cilantro, dill and basil not only are more successful and appealing to look at, but if let go to flower are excellent pollen sources for bees.

Young parsley, California poppy, cilantro and dill by rain lilies. Allowing desirable plants to reseed not only saves you money, but makes the new plant hardy and adapted for your particular garden.

Volunteers are welcome, such as this squash. Of course mixing plants is what an edible forest garden is all about, although the mixing isn’t random. Each plant serves a purpose. I use fava beans as a great edible nitrogen-fixer, along with other beans, peas, sweet peas, lupine, and nitrogen-fixing trees and shrubs. Artichokes grow quite large, and their leaves when cut and left on the ground make superb compost, as do the leaves of comfrey. Artichoke leaves keep growing back, and the plant will produce many very yummy artichokes. (Artichoke hint: wipe Vaseline around the stem below the bud to keep ants and earwigs from finding their way between the leaves.)

Artichoke and fava beans beneath an apricot tree. Melons and squash make an incredible ground cover during the hottest months. Their large leaves shade the soil surface and block evaporation. Remember that raccoons aren’t supposed to like going through squash vines, so plant them around your corn.
.")
Green melon and corn by a variegated lemon (Sophie the dog by the car). Integrating your plants, especially when following the edible food forest guidelines, helps increase soil fertility (different plants remove different things from the soil). Mostly this is done by keeping the soil a more moist and inviting habitat for soil microbes and worms, but also by dropping their leaves which become mulch.
 with onions interplanted, wildflowers, artichoke, scented geranium, borage, cowpeas, fava beans and Swiss chard under a small avocado tree.")
A guild: kabocha squash, heirloom squash and gourd (on wire) with onions interplanted to keep seedlings safe, along with something else that I don't remember planting, wildflowers, artichoke (under the milk carton for bunny protection), scented geraniums, lavender, borage, orgeano, sweet potatoes (not up yet), cowpeas, fava beans and Swiss chard by a small avocado tree. You May Also Like
Native Insects and IPM
-
Edible Food Forest
This is a cheat blog, because I’m simply going to give you a link to a newspaper article. This is about land that has been dedicated to an edible food forest, which the public may enjoy. I hope it is the beginning of a new government trend to help feed the hungry. It also has a nice diagram about what a food forest may look like. Here it is: http://www.theepochtimes.com/n2/united-states/food-forest-takes-root-in-seattle-242907.html .
-
A Cob Table, or How To Camouflage Tires

The project: tire table and Harry's hat. When I moved to this property thirteen years ago, I inherited a lot of ‘leftovers’ from the previous owners. Included were three truck tires, one with the wheel. I’ve used them over the years to block a hole under the fence to keep my dogs in and to direct rainwater. When rolling them once again across the property to hide them, I realized that they needed to be re-purposed. If I stacked all three tires together, they’d be just tall enough to be a table. And a table is just what I needed next to Harry Mud, the cob baking oven. Cob, you remember, is an olde English term for building material made of sand, organic material and clay. I wanted to demonstrate cob building material at the AAUW Garden Tour, so earlier that week I cobbed.
I also wanted to add a chimney (or stovepipe hat!) to Harry, since I found a piece left over from my wood burning stove. The chimney would direct smoke up rather than out the front and into one’s face. A chimney isn’t essential for a cob pizza oven, but it can’t hurt.

Harry's fancy new stovetop hat, in progress. I built a sand base to represent the new hollow space in front of Harry. I cobbed around the sand, and around the top hat (stove pipe). Joining wet cob to dry cob can certainly be done; I moistened the dry cob slightly first and had no trouble with separation with this small project.

I sifted some dirt, but then realized for this layer I didn't need to. Cob can be done on a tarp, which helps mix the ingredients when you pull the ends towards you. Making cob is simple and everyone can enjoy it!
")
Marge does a great job mixing cob! (She adds some organic material, too!) The tires were stacked with the wheeled one on top; a post just taller than the middle of the wheel was inserted down the center for stability and then filled with leftover sand, rubble left over from urbanite, and broken bottles that had been dug up on the property. All candidates for landfill, all of which became useful. Across the top I put a board to firm the counter

Broken bottles joined bits of rubble and sand as filler. I began to cob around the bottom of the tires, making a thick base.

A wide cob base. I kept mixing and cobbing, making sure to push the new layers of cob well into the one below so they wouldn’t crack and fall off.

The work area; about 85 degrees that afternoon, too. I was trying very hard to make a mushroom-shaped table, but I failed completely and settled for a cylinder. This layer is shaggy with straw because I needed very firm cob to hold together, since it wouldn’t adhere to the tires. Another time I’ll put a smooth, decorative slip coat on both the table and Harry.

Nearing completion. The cob was done for the tour and there were many interested people looking it over. I especially saw many husbands shrink into themselves as their wives grew more excited about an outdoor cob pizza oven!

Cob table and Harry's hat, with information sign for Garden Tour. - Gardening adventures, Heirloom Plants, Permaculture and Edible Forest Gardening Adventures, Recipes, Vegan, Vegetables, Vegetarian
Kohlrabi: A New (Old) Vegetable

Cute hot air balloon veggie Once, my mother came home from the grocery store and was laughing about a woman who stood hands on hips in front of the produce section and announced, “I wish they’d come up with a new vegetable!”
I entirely sympathize.

The whole plant is edible! This year I planted a vegetable that I hadn’t grown, and perhaps had never eaten before. Kohlrabi. It certainly isn’t new; its been mentioned since Roman times and used on many continents. But it was new to me. The name is German, and it can be found in (East) Indian, Italian, French as well as Asian cuisine. It is very low in calories, yet very high in fiber, potassium and other vitamins and minerals.
It also is very cool looking. You can either imagine an alien, or a hot air balloon. The entire plant is edible, and can be eaten raw.

Peel the outer layer of older bulbs. When young, the leaves, stems and bulbous base can just be munched on, chopped up in salads, grated for slaw, used like jicama for dips, stir-fried, and even barbecued. When older the leafy parts should be separated from the tougher stems, like older chard leaves. The base should then be peeled before use.
The flavor is very mild, and is kind of turnip-radish-broccoli tasting. There are two types, a purple and a light green. I grew the light green, but have read that the purple variety is sweeter. I don’t know if that’s a good thing or not, but I may try that next year.
I braised and steamed the leaves, ate some of the bulb raw and stir-fried the rest. It was tasty. It was cute. It was fun to say. It was NEW.

Stir-fried kohlrabi with sesame oil and seeds, served with brown rice noodles and fresh orange. And, if you want to send a grocery store checker into confusion and hold up the line, buy some kohlrabi. They’ll have no idea.
- Compost, Composting toilet, Gardening adventures, Houses, Natural cleaners, Permaculture and Edible Forest Gardening Adventures, Photos, Soil
I Went to a Garden Potty (adventures with a composting toilet)

A very pretty outhouse! I asked Roger Boddaert to have his men build a simple composting toilet out of the scraps of wood left over from my sheds. This is what he came up with! It is a gorgeous little building painted to match the sheds. Wood features stand out decoratively, and two cloud-shaped windows covered with trellis adorn the sides. Good for ventilation and for watching birds on the pond!

Inside there is a $5 toilet seat on a bench that conceals a bucket. Inside is a raised seat that conceals a bucket underneath. The least expensive toilet seat I could find is attached to smoothed wood. Above the seat Roger attached a shelf with flower pots. I stashed the organic cleaner bottle and extra toilet paper behind some cut status flowers.

In the back you can see the bucket placed high enough to prevent accidents. Underneath is a Home Depot bucket, with the lid close at hand. I had to make it stand taller by shoving boards underneath so that there weren’t any room for mistakes.
The way a composting toilet works, is that you do your business, including the toilet paper, and then add a scoop of organic material to the bucket equal to what you had put in there. That’s it. The organic material can be sawdust, wood shavings for pet bedding, compost, etc. As long as it is easily scoopable.

When the bucket is full, you put the lid on and store it for a year. Or you can dig a deep hole, dump the bucket in, cover it up and mark it, and in a year plant on it or use it otherwise. I don’t have the exact science for this, but within a year all those microbes will consume the humanure and neutralize all the stuff that is in there that could be harmful, such as medicines. Very simple, very clean, very useful.
Composting toilets – the ones that look like real toilets – are tremendously expensive and not that efficient. What a waste of money! The bucket system is amazingly efficient. I have visited several, one a private one and the others at Audubon preserves. There are no flies, no smells. My outhouse was used a lot during the Garden Tour last Saturday, and I peeked in there today to check. Smells great! No flies.
The outhouses at the Audubon centers have the same system, but on a larger scale for more visitors. Instead of a bucket there is a wheeled compost bin underneath. One in rainy Oregon was a solar composting toilet, where part of the bin was under the toilet seat, and the rest under clear corrugated plastic roofing that amplified the ambient light and helped ‘cook’ the compost. The waste in the bin was stirred around frequently with the compost so that it could cook better. Still no smell, no mess.
Simple solutions are there for everything, and through studying permaculture and seeing what works for other people is very enlightening. The answer rarely has to be expensive. And, as is my new outhouse, it can be fun, too.
- Animals, Bees, Birding, Chickens, Compost, Gardening adventures, Health, Other Insects, Permaculture and Edible Forest Gardening Adventures, Photos, Ponds, Quail, Rain Catching, Reptiles and Amphibians, Soil
I Went to a Garden Party….

AAUW Garden Tour Saturday was the AAUW Garden Tour. What a glorious day. I expected about a hundred visitors, and made 120 handouts. Sometime in the early afternoon I guess they ran out, and I didn’t know about it for awhile. I made 25 more for the last two hours, and have five left. One of the docents said that some had been turned back in during the morning. Every couple probably took just one… wow, that’s a lot of people.
I’d been talking to the garden all week, asking the blooming plants to hold that thought for a few more days, and encouraging the nonblooming ones to get a move on. The plants did what I asked! There were so many flowers out Saturday, it was amazing. Heirloom roses, Gideon’s Trumpet, ranunculus, herbs, wildflowers, and waterlilies. The garden, apparently, also was also all for proof in advertising, as in standing behind the NWF Habitat sign on the front gate. So many kinds of butterflies and dragonflies were out for the first time this year that people remarked on it. In the afternoon, there were sightings of a king snake all over the property; I think it had to have been three kingsnakes. One was moved from the refreshment area, but he came back, and then as I was standing by the pond talking to some ladies one came past us. Another was sighted up in the driveway. Roger sighted a gopher snake. No one shrieked or complained; either these were hardy people, or the idea that this was a habitat yard made them keep calm. It also backed up my claims of letting snakes deal with gophers and rodents! One man spotted a baby bunny under the Withy Hide bench. By one o’clock, it was funny. It was as if a button had been pressed to turn the garden on, and all the features were working! What a glorious day.
Jacob (Aquascape Associates) and Roger (landscape architect) and I answered questions for most of the day; the last four visitors left at four. So many people asked questions about permaculture, soil, beekeeping, cob ovens and rain catchment that I know that I couldn’t answer everyone’s questions. Of course there were some who like a tidy, orderly garden, and that is fine. If everyone came away with some idea how to work with nature rather against it, to use chemicals less, to grow organic food, to repurpose, to compost their kitchen waste and weeds, then what a lot of small ripples of good will come of it.
Thank you to my dear friends who helped prepare the garden so that it looked stunning. And thank you to the snakes, butterflies, bees, dragonflies, birds, bunnies and who-knows-what-else that came out to perform for the visitors! And thank you to everyone who visited! No casualities; all good.
Here are some photos, although my camera doesn’t do the colors justice:

AAUW Garden Tour 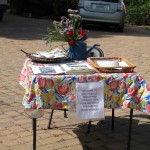
Welcome! Look at photos of how it was. 
Main entrance walkway 
Walkway into the Nest 
One of the many trails 
A palm sitting stump between guilds by the driveway 
A green melon under variegated lemon, with native grasses. 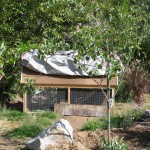
Quail hut, with privacy boards up. 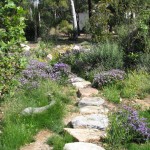
Status and wildflowers across the stone walkway 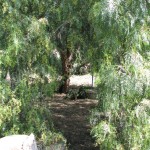
Cool spot under the upper pepper tree 
Roger and visitors by the Withy Hide 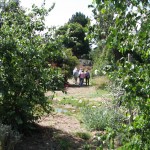
Some of the first visitors of many 
Pickerel blooming in the little pond 
Gideon’s Trumpet keeping blooms and aroma until the tour 
Jacob teaching about natural ponds 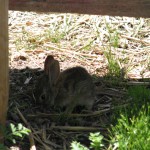
Baby bunny under the Withy Hide bench 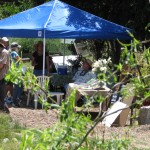
Roger answering questions 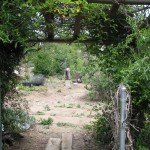
View from the Bee Garden gate 
Cool spot under the pepper tree You May Also Like
Native Insects and IPM
-
What I Punch Now

Sundial on the stump Its a Thyme Clock. So clever of me, I can hardly stand it. There is a sundial that I picked up at a thrift store, which sits on a stump. Around it are planted fourteen kinds of thyme! A Thyme Clock! I don’t have to punch a time clock at work… I can ‘punch’ (theoretically speaking that is) a Thyme Clock in my yard! (Or is the concept of a time clock too lost in history?). Ha!!!!
Sorry. Too much time in the sun (or should I say Thyme in the sun!) preparing for the Garden Tour tomorrow. I’m thinking its bedtime. Or bedthyme!!! No, it won’t stop anythyme soon. But it must, somethyme.
Sorry again.

The Thyme Clock -
Kingsnake in the Pond

Coming down to the watering hole. With the AAUW Garden Tour coming up in three days (yikes!) and so much still to do, and of course working in the 80+ degree heat this week, I haven’t been doing much else. However the heat did bring out our annual visitor to the upper pond.

More than a drink... he's going in! He (or she) visits a couple of times a year, and seems to enjoy the new shape of the pond with its long shallow end.

Swimming the channel. I wish he’d go after the bullfrog!

Beautiful bands. Siblings can be striped or banded. Kingsnakes are mild snakes that will eat other snakes, including rattlers. I’m glad to see him!
You May Also Like
Native Insects and IPM
-
Lavender Cookies with Rose Water Drizzle

This is not the everyday, lunchbox type of cookie. This is the cookie you put a sign next to with the name on it, and listen to the oohs and ahhs and hmmms when it is sampled. These coconut keto cookies are buttery and with no added extract have a very light lavender flavor. The rose water icing and coconut oil should be added sparingly; it is better even to make the icing the day before to let the rose fragrance mellow some. You don’t want cookies that taste like hand lotion.
That said, these are fun to make, smell great, taste good, and are perfect for teatime or to bring to a ladie’s function. Don’t forget the sign.
Most lavender recipes require dried blossom. This recipe calls for dried leaves. If you don’t have dried leaves, you can set a few sprigs in the sunshine on a hot day, or dry them at lowest temperature in the oven or toaster oven. My toaster oven has a ‘dehydrate’ setting, and it did an admirable job drying some fresh sprigs. You don’t want nasty bits of leaf in your cookie. Use a mortar and pestle to grind up the dried leaves. The result should be like fluff. Yep. It doesn’t powder, it fluffs.
Rose water can be found at International markets, some grocery stores, many liquer stores, or online. If you can’t find it, or just don’t like the smell or taste of rose, then leave the icing unflavored, or add a drop of vanilla.
 Lavender Cookies with Rose Water DrizzleAuthor: Diane C. KennedyRecipe type: DessertPrep time:Cook time:Total time:Serves: 4 dozenAn English teatime-type cookie.Ingredients
- ½ cup butter, softened
- 1 cup sugar
- 2 eggs
- 2 teaspoons lavender, crushed until fluffy
- 1½ cups flour
- 2 teaspoons baking powder
- ¼ teaspoon salt
- For icing:
- 2 cups powdered sugar, sifted
- 5 - 6 teaspoons water
- 6 teaspoons (or less... try it!) rose water
Instructions- Preheat oven to 375 degrees F.
- In a medium bowl, cream together the butter and sugar.
- Add the eggs.
- Add lavender, flour, baking powder and salt.
- Drop by small teaspoonfuls onto an ungreased cookie sheet. Leave space between for spreading.
- Bake 10 -12 minutes, until edges begin to turn brown.
- Cool on racks.
- To prepare icing, mix the powdered sugar with water and rose water until it has a nice, non-globby drizzly consistency.
- Drizzle over cooled cookies.